
Popular categories
Looking for a yarn?


Comments / Questions (47)
![]() Alberta Hapuku wrote:
Alberta Hapuku wrote:
Cast on 128 stitches ( including 5 band stitches in each side towards mid front). Is this band included in the 128 stitches. because I seem to have problems with the stitch count at the end of the ribbing. This is for Arendal cardigan Drops 181-25. Cheers
10.02.2021 - 01:50DROPS Design answered:
Hi Alberta, Yes, both bands are included in the 128 stitches. Happy knitting!
10.02.2021 - 11:13
![]() Alberta Hapuku wrote:
Alberta Hapuku wrote:
In your pattern Drops 181-25. Arendal cardigan, it read cast on 128 stitches (including 5 band stitches in each side towards mid front). Are the band stitches included in the 128 stitches. Help.
10.02.2021 - 01:46DROPS Design answered:
Dear Mrs Hapuku, yes the 5 front band stitches each side are included in the 128 stitches, this means you don't have to cast on them extra. Happy knitting!
10.02.2021 - 07:06
![]() Gerry wrote:
Gerry wrote:
Your answer doesn't help! It says in the section headed READ THE WHOLE OF THE NEXT SECTION BEFORE CONTINUING! ..... Continue the pattern as before (without increases) until the piece measures 22-24-26-29-30-33 cm from the cast-on edge. But this should either have an extra 4cm added for the rib, or it should say measures 22-24-26-29-30-33 cm from the end of the rib, not from the cast on edge. It is incorrect in the jumper pattern as well.
27.01.2021 - 14:51DROPS Design answered:
Dear Gerry, but I thought you already worked body, sorry if I didn't understand properly your first question. The 22-24-26-29-30-33 cm are measured from cast on row, ie with the neck edge - the 4 cm in the chart are for the shoulder. But you are welcome to make yoke longer if you wish to. Happy knitting!
27.01.2021 - 15:33
![]() Gerry wrote:
Gerry wrote:
I am about to unravel all of the body section back to the division for the sleeves. The pattern give the measurement to the cast on edge. However, the schematic shows this to exclude the 4cm rib. Does this need correcting??
27.01.2021 - 12:59DROPS Design answered:
Dear Gerry, pattern is right, measurements under body are given from the beginning of body see THE PIECE IS NOW MEASURED FROM HERE - this means body is 32-32-32-31-32-31 cm + 2 cm rib = 34-34-34-33-34-33 cm + 22-24-26-29-30-33 cm yoke + 4 cm shoulder = 60-62-64-66-68-70 cm in total from shoulder to cast off edge. Hope this will help. Happy knitting!
27.01.2021 - 13:22
![]() Mrs C Harknett wrote:
Mrs C Harknett wrote:
Why when we ask for English (UK) we get Us Norwegin. Very confusing when reading patterns which should be in English all the way down etc
29.11.2020 - 13:33DROPS Design answered:
Dear Mrs Harknett, the original pattern is in Norwegian, that's the reason why it's shown as the main language. When you choose the language under the pattern, you can select the English UK version to follow that one. Happy knitting!
29.11.2020 - 18:26
![]() Kelly wrote:
Kelly wrote:
Hallo, ik heb jullie patroon een beetje aangepast (ipv ribbelsteek en knopen heb ik een vlecht rand aan beide kanten gebreid) maar nu komen mijn aantallen natuurlijk iet meer uit :( ik vraag me nu af : als je na 27cm breien het breiwerk op hulpdraden moet zetten, WAAR dit juist gebeurd. VOOR A1, ih midden van A1, na A1...
02.11.2020 - 20:08DROPS Design answered:
Dag Kelly,
Het werk wordt dan gesplitst en het lijf wordt apart verder gebreid en daarna worden de mouwen gebreid. Aan de hand van het aantal steken dat je op het achterpand hebt, kun je naar beide zijkanten uittellen welke steken je precies van de mouwen op hulpdraden moet zetten.
03.11.2020 - 13:07
![]() Suma wrote:
Suma wrote:
I am very confused between the size shown and pattern stitches. As per the measurements shown, the neck width is (size S) 17x2=34 cm. As per the gauge (2.1 stitches US 6 needles)the CO should be 31x2.1 = 71 stitches + 10 Band = 81 stitches. But the pattern says CO=120 stitches - WHY? Also, after the neck rib, the stitches are increased to 132 (142-10). WHY? Also, as per the size chart, bust is 86 cm (round) = 181 stitches -- where is this number in the pattern.
06.06.2020 - 18:37DROPS Design answered:
Dear Suma, tension is measured in stocking stitch but neck is worked in rib - rib tighten work, ie you need much more stitches with rib than with stocking stitch for same width. You then have to increase to keep correct width when starting cables. Make sure your tension is right and keep it all the way, to get the same measurements as in the measurement chart. Happy knitting!
08.06.2020 - 08:34
![]() Anja wrote:
Anja wrote:
Hallo Liebes Drops-Team! Rumpfteil: Mache ich grade einen Fehler? Wie komme ich von 242 M auf 218 M, wenn doch gleichzeitig zu- und abgenommen wird? Die gleichmäßig verteilten Abnahmen hab ich gemacht...dann bin ich bei 230M. Aber dann hab ich immer noch 12 M zu viel! Ich hoffe, ihr könnt mir helfen! Liebe Grüße Anja
02.12.2019 - 10:26DROPS Design answered:
Liebe Anja, haben Sie auch die Abnahmen in Zöpfen gestrickt? Wenn nicht mehr genug Maschen in A.1 vorhanden sind, um 6 Maschen zu verzopfen, diese Maschen glatt rechts stricken, GLEICHZEITIG je 3 Maschen gleichmäßig verteilt über diesen Zöpfen abnehmen, es wird nicht bei den Zöpfen aus 2 Maschen abgenommen (nicht vergessen, an der Außenseite von A.1 zuzunehmen und beidseitig jedes Markierungsfadens abzunehmen). . Viel Spaß beim stricken!
02.12.2019 - 10:50
![]() Ragnhildur wrote:
Ragnhildur wrote:
Góðan dag. Ég skil ekki alveg hvort kaðlarnir me 2 lykkjum eigi að halda áfram niður bolinn eða hvað?
17.08.2019 - 11:59DROPS Design answered:
Blessuð. Litlu kaðlarnir halda áfram niður bolinn. Gangi þér vel.
10.09.2019 - 23:35
![]() Annie JANICKI wrote:
Annie JANICKI wrote:
Bonjour, pour passer de 134 m à 158 m on a "1 jeté, 1m endroit" 3 fois puis 1 m endroit donc 10 m et 9 jetés mais vous indiquez "ces 7 m sont augmentées à 13 m" et là c'est que je suis perdue!!! Merci pour votre réponse
26.05.2019 - 01:15DROPS Design answered:
Bonjour Mme Janicki, les 7 mailles (après les 15 m end) vont se tricoter ainsi: *1 jeté, 1 m end* x 3 (= on a maintenant 6 m au lieu de 3), 1 m end, *1 jeté, 1 m end* x 3 (= on a maintenant 6 m au lieu de 3), vous avez maintenant: 6 + 1 + 6 m = 13 m au-desssus des 3 + 1 + 3 m du rang précédent. Bon tricot!
27.05.2019 - 10:21
|
|||||||||||||||||||
Arendal Cardigan#arendalcardigan |
|||||||||||||||||||
 |
 |
||||||||||||||||||
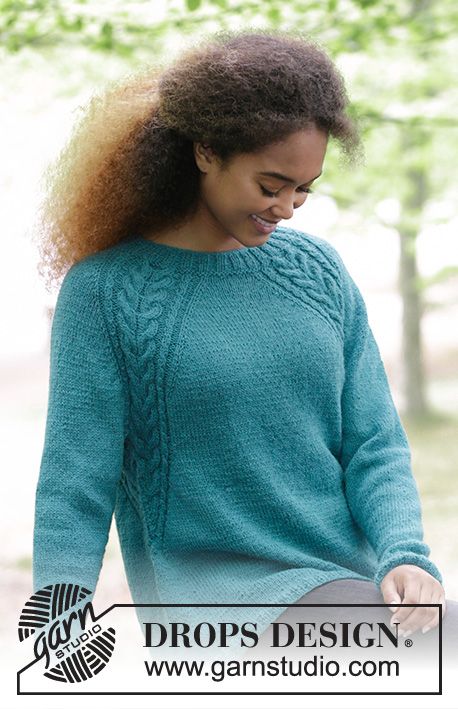
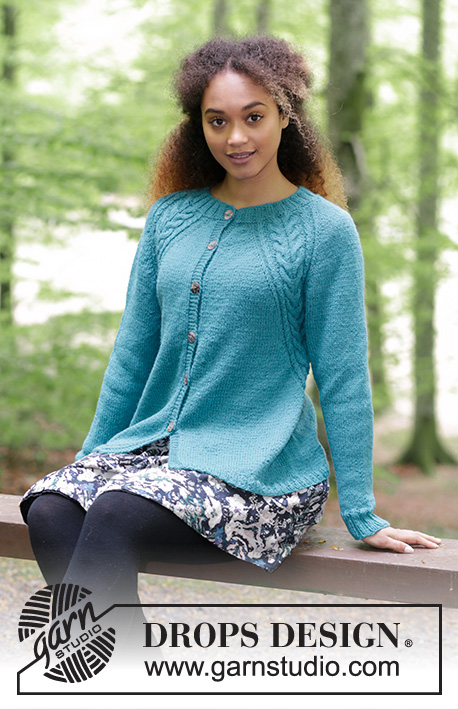
Knitted jacket with cables and raglan, worked top down. Sizes S - XXXL. The piece is worked in DROPS Puna.
DROPS 181-25 |
|||||||||||||||||||
|
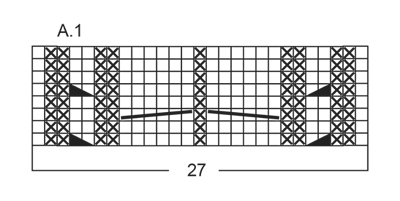
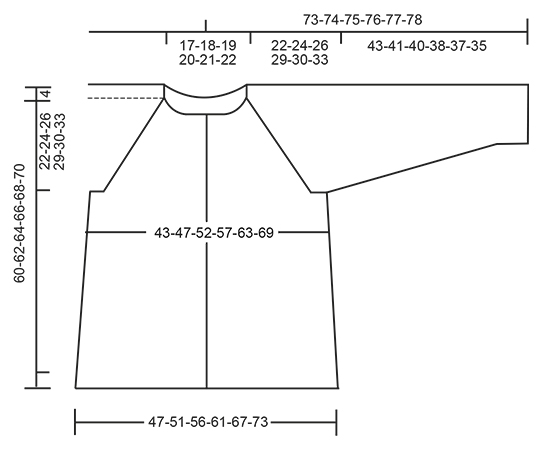
INFORMATION FOR THE PATTERN: RIDGE/GARTER STITCH (worked back and forth): 1 ridge = Knit 2 rows. PATTERN: See diagram A.1. The diagram shows all the rows in the pattern seen from the right side. RAGLAN: Increase to raglan on each side of A.1. Increase 1 stitch on each side of A.1 as follows (= 8 new stitches each time you increase). Work to A.1, 1 yarn over, work A.1, 1 yarn over. On the next round, purl the yarn overs twisted to prevent holes. INCREASE TIP (for the sides): Work until there are 2 stitches left before the marker thread in the side. Make 1 yarn over, knit 2 stitches (the marker thread sits between these) and make 1 yarn over. On the next round, purl the yarn overs twisted to prevent holes. DECREASE TIP (for sleeves): Decrease 1 stitch on each side of the marker thread as follows: Work until there are 3 stitches left before the marker thread, slip 1 stitch as if to knit, knit 1, pass the slipped stitch over, knit 2 stitches (the marker thread sits between these stitches), knit the next 2 stitches together. BUTTONHOLE: The first buttonhole is worked when the rib in the neck measures 3 cm, then work the 5-5-5-6-6-6 next buttonholes with approx. 8 cm between them. Decrease for buttonhole on the right band as follows: Work until there are 3 stitches left on the needle (seen from the right side), make 1 yarn over, knit 2 together and knit 1. On the next row, knit the yarn over, so that there is a hole. ---------------------------------------------------------- The jacket is worked back and forth with circular needle, from mid front and top down. JACKET: Cast on 120-128-132-136-144-144 stitches (including 5 band stitches in each side towards mid front) with circular needle size 4 mm and Puna. Purl 1 row from the wrong side, then work as follows – from the right side: 5 stitches garter stitch, * knit 2/ purl 2 *, repeat from *-* until there are 7 stitches left, knit 2 stitches and 5 stitches garter stitch. REMEMBER BUTTONHOLE! Continue with rib in this way for 4 cm. The last row is from the wrong side. Change to circular needle size 4.5 mm. Work 1 RIDGE – see description above, on the first row, decrease 2 stitches evenly on row = 118-126-130-134-142-142 stitches. Continue as follows – from the right side: Work 5 stitches garter stitch, knit 11-12-13-15-16-18, *1 yarn over, knit 1 *, repeat from *-* a total of 3 times, knit 1, * 1 yarn over, knit 1 *, repeat from *-* a total of 3 times (= these 7 stitches become 13 stitches), knit 18-20-20-18-20-16, *1 yarn over, knit 1 *, repeat from *-* a total of 3 times, knit 1, * 1 yarn over, knit 1 *, repeat from *-* a total of 3 times, knit 22-24-26-30-32-36, * 1 yarn over, knit 1 *, repeat from *-* a total of 3 times, knit 1, * 1 yarn over, knit 1 *, repeat from *-* a total of 3 times, knit 18-20-20-18-20-16, *1 yarn over, knit 1 *, repeat from *-* a total of 3 times, knit 1, * 1 yarn over, knit 1 *, repeat from *-* a total of 3 times, knit 11-12-13-15-16-18 and 5 stitches garter stitch = 142-150-154-158-166-166 stitches. Purl 1 row from the wrong side; the yarn overs are purled twisted to prevent holes and the bands are knitted. Continue as follows from the right side: Work 5 stitches garter stitch (= band stitches), 4-5-6-8-9-11 stitches stocking stitch (= left front piece), A.1 (= 27 stitches), 4-6-6-4-6-2 stitches stocking stitch (= sleeve), A.1, 8-10-12-16-18-22 stitches stocking stitch (= back piece), A1, 4-6-6-4-6-2 stitches stocking stitch (= sleeve), A.1, 4-5-6-8-9-11 stitches stocking stitch (= right front piece and finish with 5 stitches garter stitch (= band stitches). READ THE WHOLE OF THE NEXT SECTION BEFORE CONTINUING! Continue this pattern, at the same time increase on each side of A.1 to RAGLAN – see description above. Increase every 2nd row (= each row from the right side) 21-24-27-30-32-35 times. REMEMBER THE KNITTING TENSION! After all the increases, there are 310-342-370-398-422-446 stitches on the needle. Continue the pattern as before (without increases) until the piece measures 22-24-26-29-30-33 cm from the cast-on edge mid front. The next row is worked as follows from the wrong side: Work 50-54-58-63-68-73 stitches (= right front piece), place the next 60-68-74-78-80-82 stitches on 1 thread (= sleeve), cast on 8-8-10-10-12-14 new stitches on the needle (= under the sleeve), work 90-98-106-116-126-136 stitches (= back piece), place the next 60-68-74-78-80-82 stitches on 1 thread (= sleeve), cast on 8-8-10-10-12-14 new stitches on the needle (= under the sleeve) and work the remaining 50-54-58-63-68-73 stitches (= left front piece). BODY: = 206-222-242-262-286-310 stitches. THE PIECE IS NOW MEASURED FROM HERE! Insert a marker thread in each side, in the middle of the new stitches cast on. Continue back and forth with stocking stitch and 5 stitches garter stitch in each side of the piece. REMEMBER BUTTONHOLE. Continue A.1 over the 20-20-20-20-22-22 stitches in the pattern which remain on the front and back pieces, but on every 2nd row (= each row from the right side) make 1 yarn over on the outside of each A.1 (= towards mid front and mid back) and knit 2 stitches together on each side of the marker thread in the sides. The yarn overs are purled twisted on the next row to prevent holes. The number of stitches remains the same, but the stitches in A.1 will gradually decrease towards the sides of the jacket and there will be more and more stitches in stocking stitch. When there are not enough stitches in A.1 to work 6-stitch cable, work these stitches in stocking stitch, AT THE SAME TIME as you decrease 3 stitches evenly over the cable, do not decrease over the cable with 2 stitches (remember to make the increase on the outside of A.1 and decrease on each side of the marker threads). When all of A.1 has been decreased there are 182-198-218-238-262-286 stitches on the row. Continue with stocking stitch and garter stitch over the band stitches. There is 48-52-57-62-68-74 stitches on each front piece and 86-94-104-114-126-138 stitches on back piece. When the piece measures 15-15-15-15-15-15 cm increase 1 stitch on each side of the marker threads (= 4 stitches increased) – READ INCREASE TIP! Increase every 5 cm a total of 4 times = 198-214-234-254-278-302 stitches. When the piece measures 32-32-32-31-32-31 cm, purl 1 row from the wrong side where you increase 42-46-50-54-58-62 stitches evenly on row (the bands are continued in garter stitch, do not increase over these stitches) = 240-260-284-308-336-364 stitches. Change to circular needle size 4 mm. On the next row from the right side, work as follows: 5 stitches garter stitch, * knit 2, purl 2 *, repeat from *-* until there are 7 stitches left, knit 2 stitches and 5 stitches garter stitch. Work rib for 2 cm, cast off loosely, with knit over knit and purl over purl. The jacket measures approx. 60-62-64-66-68-70 cm from the shoulder. SLEEVE: The piece is worked in the round with circular needle/double pointed needles. Place the 60-68-74-78-80-82 stitches from the thread in the one side of the piece on a short circular needle size 4.5 mm. In addition, cast on 8-8-10-10-12-14 new stitches mid under the sleeve = 68-76-84-88-92-96 stitches on the needle. Insert a marker thread in the middle of these new stitches – The piece is now measured from here! Work stocking stitch in the round. When the piece measures 2-2-2-2-2-4 cm decrease 2 stitches mid under the sleeve – READ DECREASE TIP. Decrease every 3-2-1½-1½-1½-1 cm a total of 12-15-18-19-20-21 times = 44-46-48-50-52-54 stitches. When the sleeve measures 38-36-35-33-32-30 cm increase 4-6-8-6-8-10 stitches evenly on round = 48-52-56-56-60-64 stitches. Change to double pointed needles size 4 mm and work rib, knit 2/ purl 2 over all stitches. Cast off with knit over knit and purl over purl when the sleeve measures 43-41-40-38-37-35 cm. Work the other sleeve in the same way. ASSEMBLY: Sew the openings under the sleeves. Sew the buttons onto the left band. |
|||||||||||||||||||
Diagram explanations |
|||||||||||||||||||
|
|||||||||||||||||||
 |
|||||||||||||||||||
 |
|||||||||||||||||||
Have you finished this pattern?Tag your pictures with #dropspattern #arendalcardigan or submit them to the #dropsfan gallery. Do you need help with this pattern?You'll find 28 tutorial videos, a Comments/Questions area and more by visiting the pattern on garnstudio.com. © 1982-2026 DROPS Design A/S. We reserve all rights. This document, including all its sub-sections, has copyrights. Read more about what you can do with our patterns at the bottom of each pattern on our site. |
|||||||||||||||||||


With over 40 years in knitting and crochet design, DROPS Design offers one of the most extensive collections of free patterns on the internet - translated to 17 languages. As of today we count 324 catalogues and 12290 patterns translated into English (UK/cm).
We work hard to bring you the best knitting and crochet have to offer, inspiration and advice as well as great quality yarns at incredible prices! Would you like to use our patterns for other than personal use? You can read what you are allowed to do in the Copyright text at the bottom of all our patterns. Happy crafting!
Post a comment to pattern DROPS 181-25
We would love to hear what you have to say about this pattern!
If you want to leave a question, please make sure you select the correct category in the form below, to speed up the answering process. Required fields are marked *.