
Popular categories
Looking for a yarn?


Comments / Questions (104)
![]() Katha wrote:
Katha wrote:
Kann mir jemand etwas eindeutiger erklären - vielleicht sogar mit einem Foto- wie die Ärmel angesetzt werden? In den Tutorials werden die immer beim Zusammenführen gestrickt. In der Anleitung steht aber: "Die Ärmel-M an den beiden Stellen, an denen beim Rumpfteil für die Armausschnitte abgekettet wurde, auf dieselbe Rundnadel Nr. 3 wie die Rumpfteil-M legen (ohne die M dabei zu str)". Ich versteh es leider nicht... Danke schon mal!
25.11.2021 - 20:41DROPS Design answered:
Liebe Katha, die ersten Minuter in diesem Video zeigen, wie die Maschen von der Ärmel bei der Passe an der 1. Reihe gestrickt werden (im Video werden die Maschen glatt rechts gestrickt, hier sollen Sie im Muster wie zuvor stricken). Viel Spaß beim stricken!
26.11.2021 - 07:35
![]() Lone Hansen wrote:
Lone Hansen wrote:
Hej. Jeg har netop modtaget det garn jeg har købt hos Jer. Jeg kan ikke se hvor jeg finder måleskemaet for at få den korrekte str. Hvor finder jeg den? Hilsen Lone
16.07.2021 - 11:02DROPS Design answered:
Hej Lone. Du hittar den längt ner på opskriften, under diagrammen. Mvh DROPS Design
16.07.2021 - 11:03
![]() Françoise wrote:
Françoise wrote:
Bonjour, j'arrive au niveau de l'encolure. Y a-t-il une encolure au niveau du dos ? Dans l'attente,
28.04.2021 - 11:26DROPS Design answered:
Bonjour Françoise, dans ce modèle, on ne rabat pas de mailles pour l'encolure dos, seulement pour l'encolure devant. Bon tricot!
28.04.2021 - 11:27
![]() Kristina Rouffignac wrote:
Kristina Rouffignac wrote:
I was just wondering if you do this pattern with smaller sleeves with a rounder neck and v shape neck at the back. Thank you look forward to your response.
19.03.2021 - 20:54DROPS Design answered:
Dear Krustina, please understand, that we cannot modify our patterns for each individual request. Happy Knitting!
20.03.2021 - 07:02
![]() Bürger wrote:
Bürger wrote:
Hallo, mein Pullover ist fertig und richtig gut geworden. Nun habe ich noch Wolle übrig und würde gerne den gleichen für meine Enkelin stricken. Ist es möglich,die Strickanleitung in Grösse 128 umzurechnen?
09.03.2021 - 20:58DROPS Design answered:
Liebe Frau Bürger, leider können wir nicht jede Anleitung nach jedem Wunsch umrechnen - sicher können Sie sich von einem ähnlichen Pullover mit derselben Maschenprobe und in die richtige Größe inspirieren - gerne kan sicher Ihren DROPS Händler (auch telefonisch oder per E-Mail) damit helfen. Viel Spaß beim stricken!
10.03.2021 - 07:20
![]() Elisabeth Bürger wrote:
Elisabeth Bürger wrote:
Hallo. Meine Maschenprobe stimmt mit Ihrer überein, allerdings ergibt sich beim Rundgestrickten ( Rumpf und Ärmel ) eine Maschenprobe von 27Maschen mal 39Reihen. Beide Teile passen aber. Nun habe ich Rumpf und Ärmel auf eine Nadel genommen und bin mir unsicher, wie ich die Raglanabnahmen machen soll ( wie in der Anleitung oder Neuberechnung? )
26.02.2021 - 12:41DROPS Design answered:
Liebe Frau Bürger, die Anleitung stimmt einer Maschenprobe von 24 M x 32 Reihe glatt rechts = 10 x 10 cm. Wenn Sie mehr Maschen/Reihen brauchen, dann werden die Angaben nicht Ihrer Maschenprobe stimmen und die fertige Maßen werden unterschiedlich sein - am besten sollten Sie alles neu umrechnen. Hier lesen Sie mehr darüber. Hoffentlich kann es Ihnen weiterhelfen. Viel Spaß beim stricken!
26.02.2021 - 13:15
![]() Sibel Dastan wrote:
Sibel Dastan wrote:
Ik zou dit patroon graag in een boekje willen bestellen 169-10 ik word kippig van een beeldscherm op den duur
23.12.2020 - 06:57DROPS Design answered:
Dag Sibel,
Al onze patronen zijn gratis af te drukken via de knop 'Afdrukken' onder de materialenlijst. Klik op de knop 'Afdrukken' en dan op 'Patroon'.
17.01.2021 - 14:20
![]() Hanne Mokvist wrote:
Hanne Mokvist wrote:
Hejsa Hvor startes mønsterdiagrammet? Fra højre eller Venstre? Mvh Hanne
04.12.2020 - 11:23DROPS Design answered:
Hej Hanne, Når du strikker fra retsiden, starter du nederst i diagrammets højre hjørne og så du læser maskerne mod venstre, nøjagtig som du strikker dem. God fornøjelse!
07.12.2020 - 10:47
![]() ESCANDE HELENE wrote:
ESCANDE HELENE wrote:
Bonjour, Ce modèle est très attirant !!! Que donnerait-il tricoté en Cotton Safran ?? Quelqu'un ou quelqu'une a t'il essayé de réaliser ce pull en Safran !! Merci pour vos réponses !! Hélène
26.09.2020 - 09:42DROPS Design answered:
Bonjour Mme Escande, ce modèle est réalisable en DROPS Safran car il appartient au groupe A, tout comme DROPS BabyMerino et DROPS ♥ You 7 - vous pouvez demander sur notre groupe à d'autres tricoteuses du monde entier DROPS Workshop. Bon tricot!
28.09.2020 - 09:23
![]() Tove Juhl wrote:
Tove Juhl wrote:
Jeg strikker normal og har gjort det i mange år men med pinde 3 og antal masker giver det ikke 10x10 med baby merino jeg skal op på pinde 4 og så bliver det jo ikke den nette bluse Jeg er ærgerlig over at have købt garn når det ikke passer Håber athøre fra jer Mvh Tove Juhl
27.03.2020 - 17:44DROPS Design answered:
Hei Tove. Det var jo kjedelig å høre, men de aller fleste oppskrifter vi har i Baby Merino er strikket med pinne 3 og har en oppgitt strikkefasthet på 24 masker x 32 pinner. Vil ikke bruker begrepet normal strikkefasthet, da det kan varierer fra person til person og pinne størrelsen er veiledende. mvh DROPS design
30.03.2020 - 15:49
|
||||||||||||||||||||||||||||
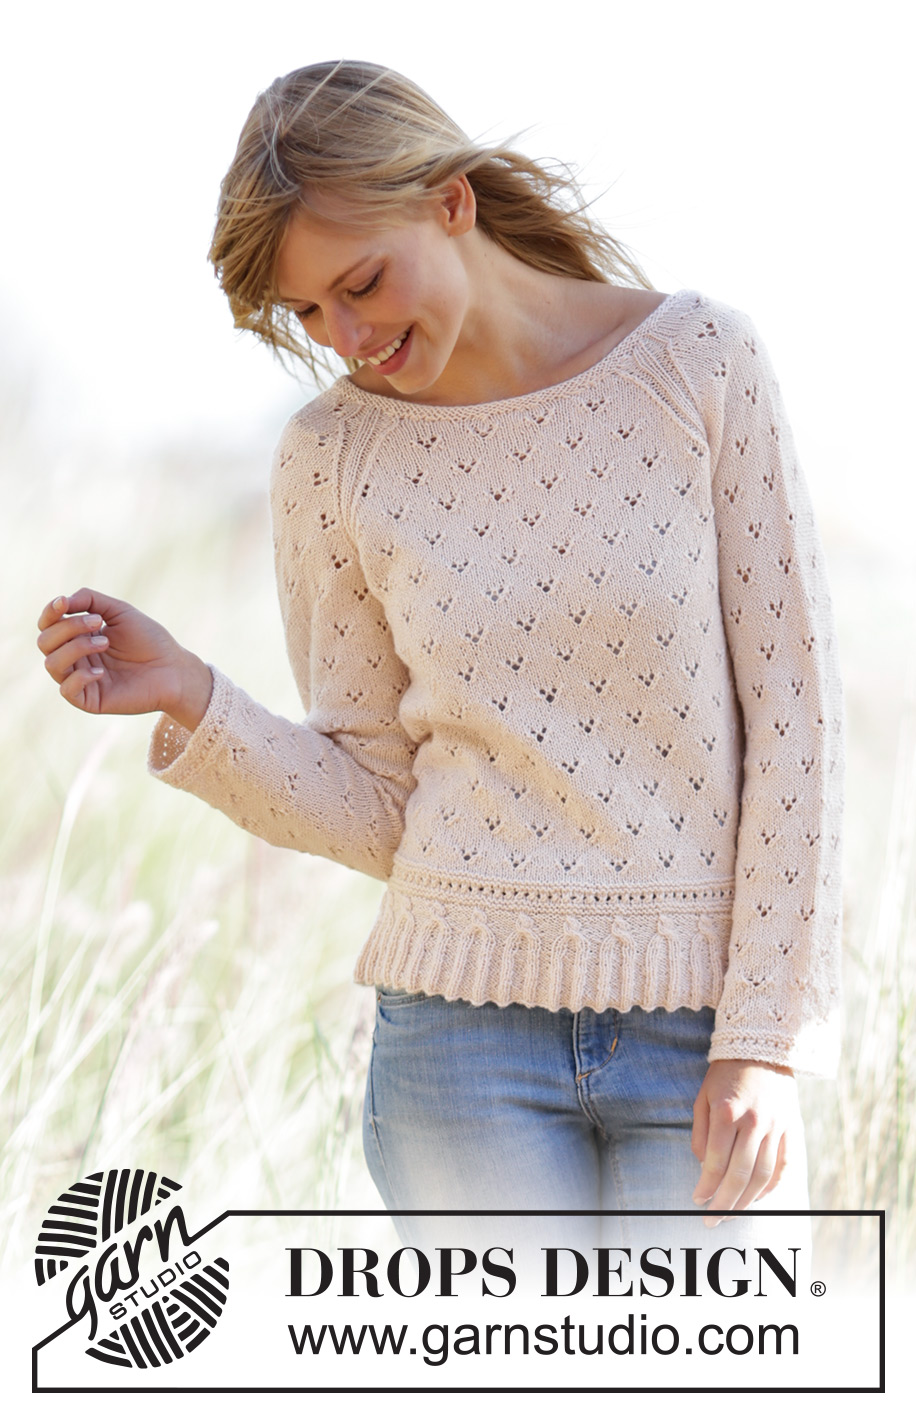
Vintage Charmer#vintagecharmersweater |
||||||||||||||||||||||||||||
|
|
||||||||||||||||||||||||||||
Knitted DROPS jumper with a small cable edge, lace pattern and raglan in ”BabyMerino” or "DROPS ♥ You #7". Size: XS - XXXL.
DROPS 169-10 |
||||||||||||||||||||||||||||
|
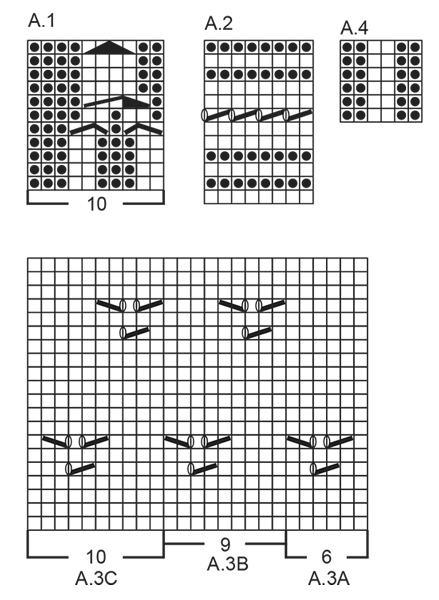
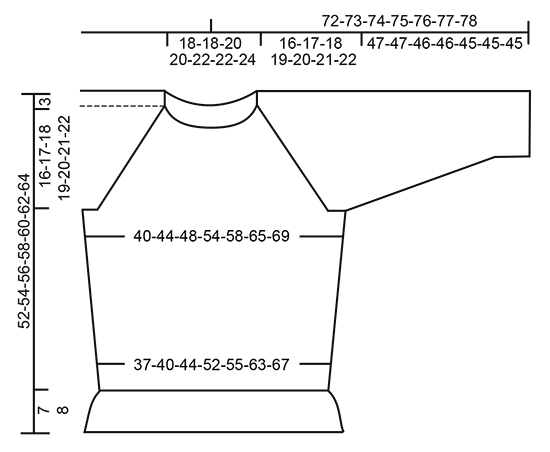
GARTER ST (worked in the round): 1 ridge = 2 rounds. * K 1 round and P 1 round *, repeat from *-*. PATTERN: See diagrams A.1 to A.4. INCREASE TIP: Inc 1 st on each side of marker as follows: Work until 1 sts remain before marker: Make 1 YO, work 2 sts in stocking st (marker is in the middle of these 2 sts), make 1 YO. On next round K YOs twisted to avoid holes - NOTE: Work inc sts in stocking st until they fit the pattern. RAGLAN: Dec for raglan on each side of A.4 in every transition between sleeves and body. DEC AS FOLLOWS FROM RS: Beg 2 sts before A.4, K 2 tog, A.4 (= 6 sts), slip 1 st as if to K, K 1, psso (= 2 sts dec). DEC AS FOLLOWS FROM WS: Beg 2 sts before A.4, P 2 twisted tog, A.4 (= 6 sts), P 2 tog (= 2 sts dec). DECREASE TIP (applies to neck edge): To calculate how often dec should be done, use the total no of sts on row (e.g. 114 sts) and divide by no of dec to be done (e.g. 10) = 11.4. I.e. in this example work alternately approx. every 10th and 11th st and every 11th and 12th st tog. ---------------------------------------------------------- BODY: Worked in the round on circular needle. Cast on 322-350-378-448-476-546-574 sts on circular needle size 2.5 mm with Baby Merino or DROPS ♥ You #7. K 1 round. Then work rib = K 2/P 5. When piece measures 3-3-3-3-4-4-4 cm, dec 1 st in every P-section by working the first 2 sts in every P-section P tog. Repeat dec when piece measures 4-4-4-4-5-5-5 cm, but now work the last 2 sts in every P-section P tog = 230-250-270-320-340-390-410 sts on needle. Now work pattern in the round according to diagram A.1 (= 23-25-27-32-34-39-41 repetitions of 10 sts). When A.1 has been worked vertically, 184-200-216-256-272-312-328 sts remain on needle and piece measures approx. 7-7-7-7-8-8-8 cm. K 1 round while at the same time dec 8-6-4-8-6-10-8 sts evenly = 176-194-212-248-266-302-320 sts. Switch to circular needle size 3 mm and work pattern in the round according to diagram A.2. After A.2 insert 1 marker at beg of round and 1 marker after 88-97-106-124-133-151-160 sts. Then work as follows: * Work A.3A (= 6 sts), repeat A.3B over the next 72-81-90-108-117-135-144 sts (= 8-9-10-12-13-15-16 repetitions of 9 sts), work A.3C (= 10 sts), marker *, repeat from *-* one more time. Continue pattern like this. REMEMBER THE KNITTING TENSION When piece measures 12 cm, inc 1 st on each side of marker in each side - READ INCREASE TIP (= 4 sts inc). Repeat inc every 5-5-6-8-10-10-10 cm a total of 4-4-4-3-3-3-3 times = 192-210-228-260-278-314-332 sts - NOTE: Work inc sts in stocking st until they fit the pattern. When piece measures 33-34-35-36-37-38-39 cm, work next round as follows: Cast off 3-3-4-4-5-5-5 sts for armhole, work 90-99-106-122-129-147-156 sts (= back piece), cast off 6-6-8-8-10-10-10 sts for armhole, work 90-99-106-122-129-147-156 sts (= front piece) and cast off the last 3-3-4-4-5-5-5 sts for armhole. Put piece aside and knit the sleeves. SLEEVE: Worked in the round on double pointed needles. Cast on 52-52-61-61-61-70-70 sts on double pointed needles size 2.5 mm with Baby Merino or DROPS ♥ You #7. K 1 round. Then work pattern in the round according to diagram A.2 - NOTE: On 7th round in A.2 K last st on round (applies to size M + L + XL). When A.2 has been worked, switch to double pointed needles size 3 mm. Insert 1 marker at the beg of the round. Work next round as follows: Work A.3A (= 6 sts), work A.3B over the next 36-36-45-45-45-54-54 sts (= 4-4-5-5-5-6-6 repetitions of 9 sts) and finish with A.3C (= 10 sts). Continue pattern like this. When piece measures 5-6-6-7-5-9-9 cm, inc 2 sts mid under sleeve - READ INCREASE TIP. Repeat inc every 3-2½-3-2½-2½-2½-2½ cm 14-16-13-15-16-14-17 times in total = 80-84-87-91-93-98-104 sts – NOTE: Work inc sts in stocking st until they fit the pattern again. Work until piece measures approx. 47-47-46-46-45-45-45 cm (NOTE: Shorter measurements in the larger sizes because of longer yoke) – adjust to work the same length in repetition of A.3 as on back body before dec for armholes. Work next round as follows: Cast off 3-3-4-4-5-5-5 sts, work 74-78-79-83-83-88-94 sts and cast off the remaining 3-3-4-4-5-5-5 sts. Put piece aside and knit another sleeve. YOKE: Slip sleeves on to same circular needle size 3 mm as body where armholes were cast off (without working them first) = 328-354-370-410-424-470-500 sts. Insert 1 marker in every transition between sleeves and body = 4 markers. Continue pattern as before and work in addition A.4 in every transition between body and sleeves (markers are in the middle of A.4). AT THE SAME TIME on first round beg dec for RAGLAN – see explanation above (= 8 sts dec). Repeat dec for raglan every other round a total of 24-25-28-29-32-34-34 times and then every round a total of 4-5-2-3-0-0-3 times - NOTE: Work sts that do not fit A.3 in stocking st when dec. NECK: AT THE SAME TIME when piece measures 46-48-50-51-53-54-56 cm, slip the middle 12-17-24-28-35-43-46 sts on 1 stitch holder for neck and finish piece back and forth on needle (in some sizes dec for raglan from both RS and WS). Continue with pattern and raglan as before and cast off for neck at beg of every row from the neck as follows: Cast off 3 sts 0-0-0-1-1-2-2 times, 2 sts 2 times and 1 st 3-3-3-4-4-4-4 times. After all dec and cast offs for raglan and neck, 78-83-92-104-111-127-130 sts remain on needle. NECK EDGE: Pick up from RS approx. 104-114-130-154-168-198-204 sts (incl sts on stitch holder at the front) on a short circular needle size 2.5 mm. P 1 round. K 1 round while dec evenly to 102-104-120-122-132-136-140 sts (i.e. dec approx. 2-10-10-32-36-62-64 sts) – READ DECREASE TIP. Work 2 ridges in GARTER ST - see explanation above, then loosely cast off. ASSEMBLY: Sew the openings under the sleeves. |
||||||||||||||||||||||||||||
Diagram explanations |
||||||||||||||||||||||||||||
|
||||||||||||||||||||||||||||
 |
||||||||||||||||||||||||||||
 |
||||||||||||||||||||||||||||
Have you finished this pattern?Tag your pictures with #dropspattern #vintagecharmersweater or submit them to the #dropsfan gallery. Do you need help with this pattern?You'll find 31 tutorial videos, a Comments/Questions area and more by visiting the pattern on garnstudio.com. © 1982-2026 DROPS Design A/S. We reserve all rights. This document, including all its sub-sections, has copyrights. Read more about what you can do with our patterns at the bottom of each pattern on our site. |
||||||||||||||||||||||||||||


With over 40 years in knitting and crochet design, DROPS Design offers one of the most extensive collections of free patterns on the internet - translated to 17 languages. As of today we count 324 catalogues and 12290 patterns translated into English (UK/cm).
We work hard to bring you the best knitting and crochet have to offer, inspiration and advice as well as great quality yarns at incredible prices! Would you like to use our patterns for other than personal use? You can read what you are allowed to do in the Copyright text at the bottom of all our patterns. Happy crafting!
Post a comment to pattern DROPS 169-10
We would love to hear what you have to say about this pattern!
If you want to leave a question, please make sure you select the correct category in the form below, to speed up the answering process. Required fields are marked *.