DROPS Baby Merino
DROPS Baby Merino
100% Wool
from 3.50 £ /50g
Get the yarn to make this pattern from 24.50£.

The yarn cost is calculated from the pattern’s smallest size and the yarn’s cheapest product type. Looking for an even better price? You might find it on the DROPS Deals!

DROPS SS24

Jolly May

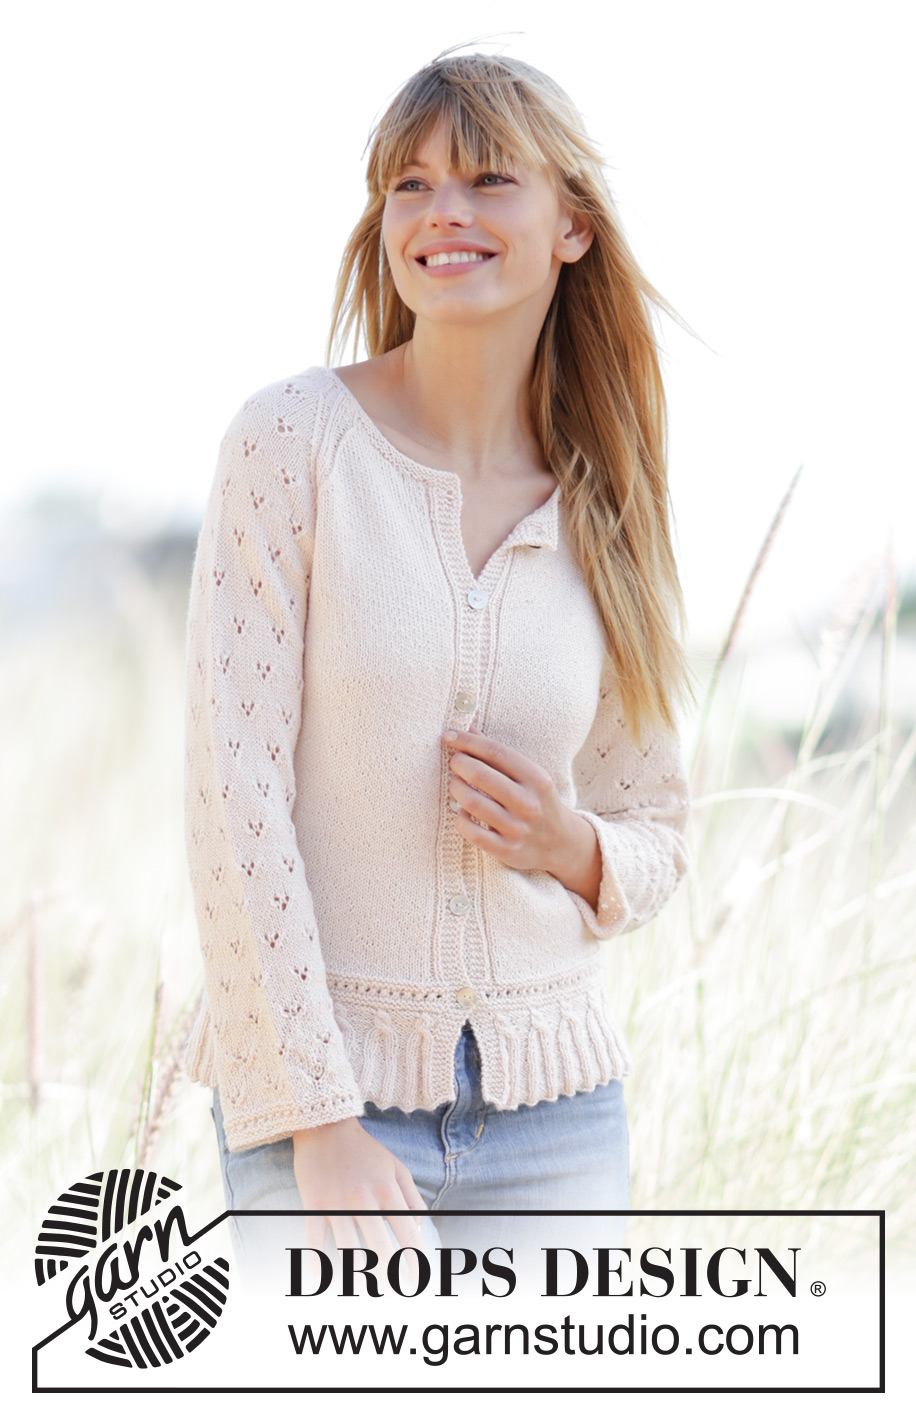
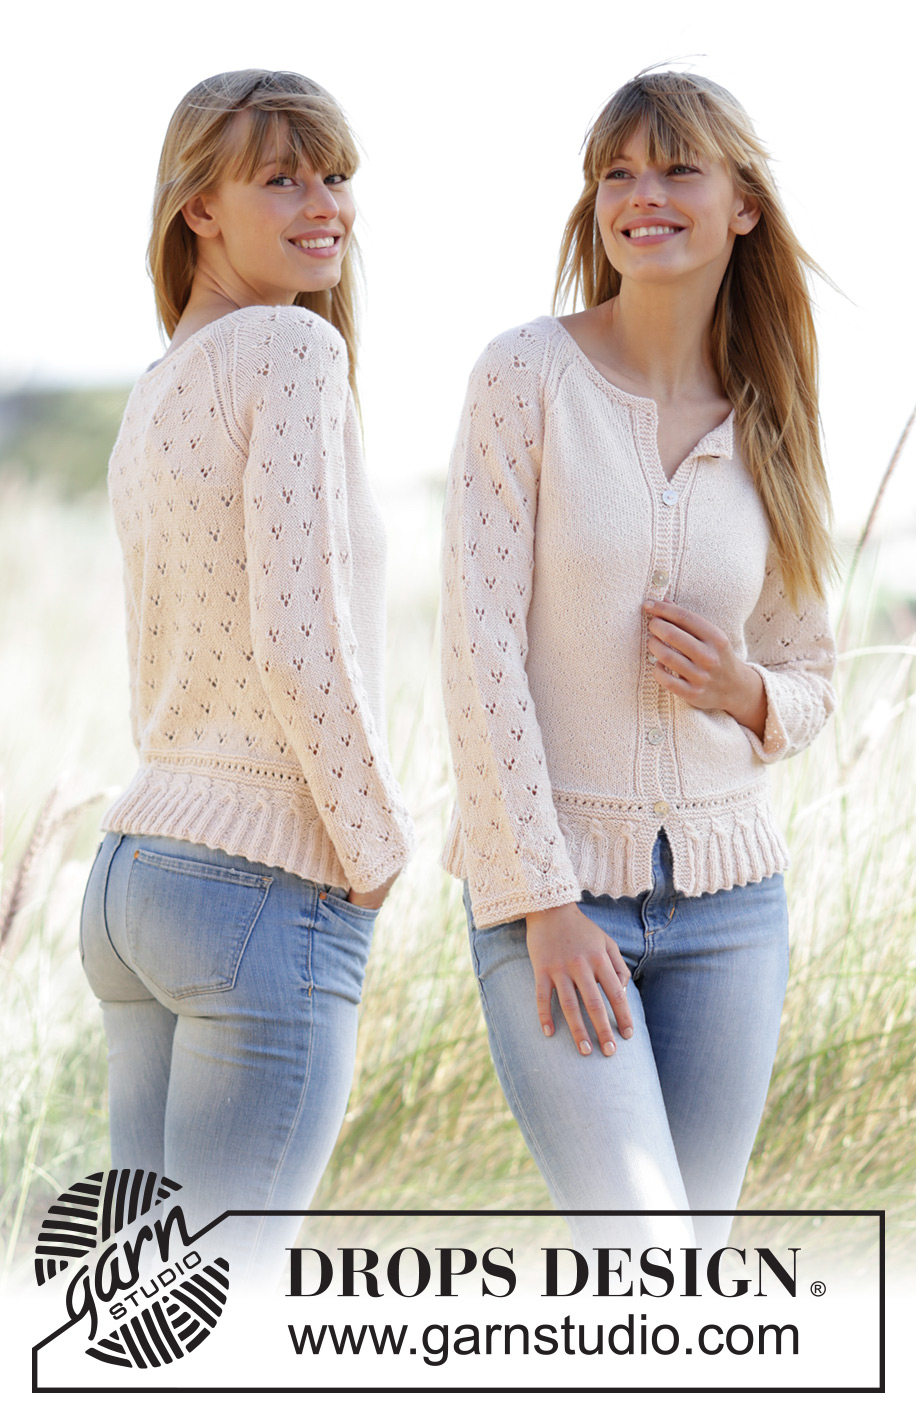
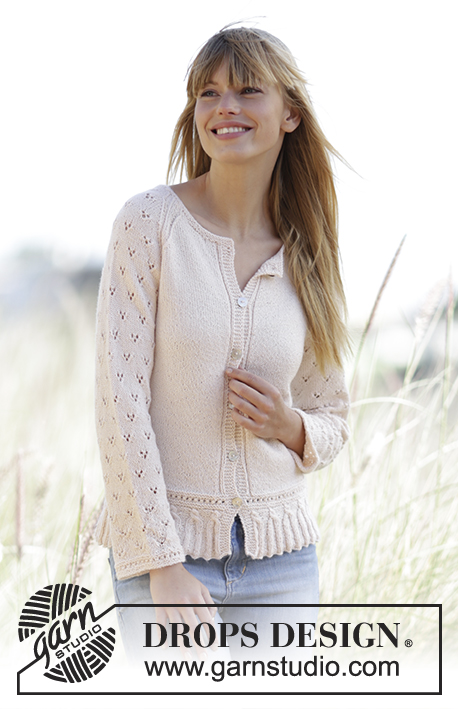
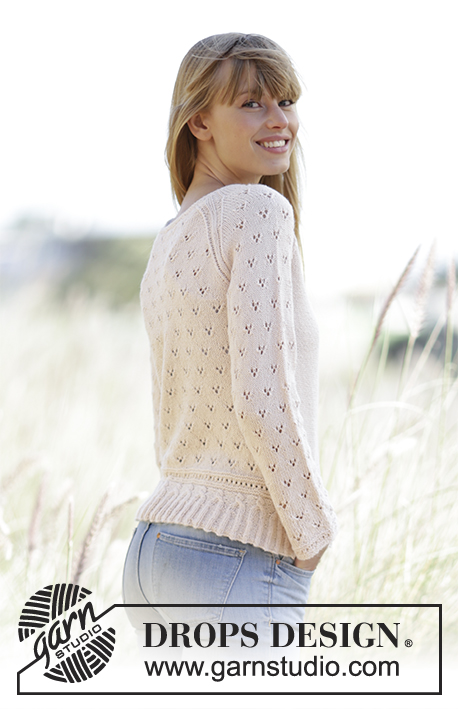
Knitted DROPS jacket with a small cable edge, lace pattern and raglan in ”BabyMerino”. Size: XS - XXXL.

DROPS 169-27
DROPS design: Pattern no bm-026
Yarn group A
----------------------------------------------------------
Size: XS - S - M - L - XL - XXL - XXXL
Materials:
DROPS BABY MERINO from Garnstudio
350-350-400-450-450-500-550 g colour no 44, powder

DROPS DOUBLE POINTED NEEDLES AND CIRCULAR NEEDLE (60 or 80 cm) SIZE 3 mm - or size needed to get 24 sts x 32 rows in stocking st = 10 x 10 cm.
DROPS DOUBLE POINTED NEEDLES and CIRCULAR NEEDLE (60 cm) SIZE 2.5 mm - for rib and edges.
DROPS CABLE NEEDLE - for cable edge.
DROPS MOTHER-OF-PEARL BUTTON ARCHED (white), NO 521: 6-6-6-7-7-7-7 pieces

-------------------------------------------------------

Alternative Yarn – See how to change yarns here
Yarn Groups A to F – Use the same pattern and change the yarn here
Yarn usage using an alternative yarn – Use our yarn converter here

-------------------------------------------------------

DROPS Baby Merino
DROPS Baby Merino
100% Wool
from 3.50 £ /50g
Get the yarn to make this pattern from 24.50£.

The yarn cost is calculated from the pattern’s smallest size and the yarn’s cheapest product type. Looking for an even better price? You might find it on the DROPS Deals!

Pattern instructions

NOTE: This pattern is written in British English. All measurements in charts are in cm. For conversion from cm to inches - click here. There are different terms for crocheting in British and American English. If this pattern includes crochet, click for "crochet terms" here. For this pattern in American English, please click here.
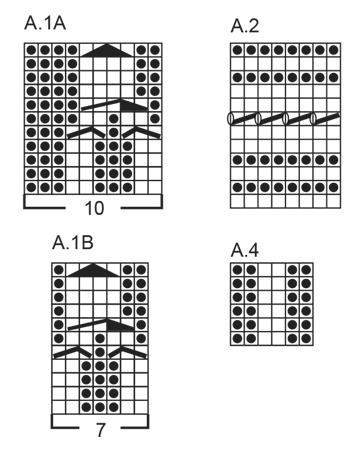
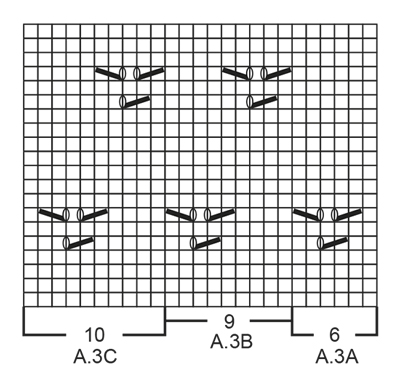
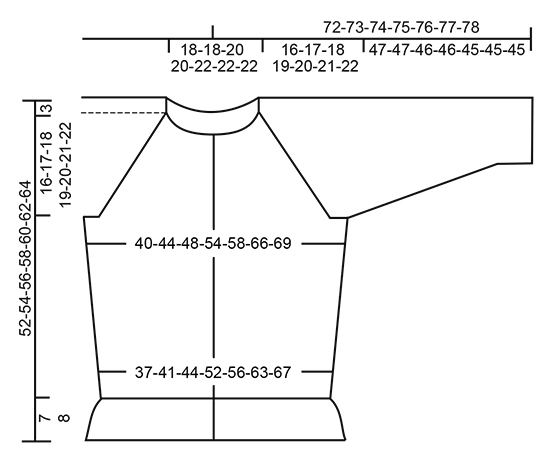
GARTER ST (back and forth):
K all rows. 1 ridge = 2 rows K.

GARTER ST (worked in the round):
1 ridge = 2 rounds. * K 1 round and P 1 round *, repeat from *-*.

PATTERN:
See diagrams A.1 to A.4. The diagrams show all rows in pattern seen from RS.

INCREASE TIP:
Inc 1 st on each side of marker as follows: Work until 1 sts remain before marker: Make 1 YO, work 2 sts in stocking st (marker is in the middle of these 2 sts), make 1 YO. On next row work YOs twisted to avoid holes - NOTE: Work inc sts in stocking st on front piece and in stocking st until they fit pattern on back piece and on sleeves.

RAGLAN:
Dec for raglan on each side of A.4 in every transition between sleeves and body.
DEC AS FOLLOWS FROM RS:
Beg 2 sts before A.4, K 2 tog, A.4 (= 6 sts), slip 1 st as if to K, K 1, psso (= 2 sts dec).
DEC AS FOLLOWS FROM WS:
Beg 2 sts before A.4, P 2 twisted tog, A.4 (= 6 sts), P 2 tog (= 2 sts dec).

BUTTONHOLES:
Dec for buttonholes on right band. 1 buttonhole = cast off third and fourth st from edge and cast on 2 new sts on next row over these sts.
Dec for buttonholes when piece measures (first buttonhole should be in the middle of A.2):
SIZE XS: 9, 17, 24, 31, 38 and 45 cm.
SIZE S: 9, 17, 25, 33, 40 and 47 cm.
SIZE M: 9, 17, 25, 33, 41 and 49 cm.
SIZE L: 9, 16, 23, 29, 36, 43 and 50 cm
SIZE XL: 10, 17, 24, 31, 38, 45 and 52 cm
SIZE XXL: 10, 18, 25, 32, 39, 46 and 53 cm
SIZE XXXL: 10, 18, 25, 33, 40, 48 and 55 cm

DECREASE TIP (applies to neck edge):
To calculate how often dec should be done, use the total no of sts on row (e.g. 126 sts), minus bands (e.g. 10 sts) and divide the remaining sts by no of dec to be done (e.g. 14) = 8.3. I.e. in this example work approx. every 7th and 8th st tog (and do not dec of bands).
----------------------------------------------------------

BODY:
Worked back and forth on circular needle from mid front. Cast on 327-355-383-453-481-551-579 sts (incl 5 band sts in each side towards mid front) on circular needle size 2.5 mm with Baby Merino. P 1 row from WS. Work next row as follows from RS: 5 band sts in GARTER ST - see explanation above - * K 2, P 5 *, repeat from *-* until 7 sts remain on needle, finish with K 2 and 5 bands sts in garter st. Continue rib like this. When piece measures 3-3-3-3-4-4-4 cm, dec 1 st in every P-section by working the first 2 sts in every P-section P tog (from RS). Repeat dec when piece measures 4-4-4-4-5-5-5 cm, but now work the last 2 sts in every P-section P tog = 237-257-277-327-347-397-417 sts on needle. Work next row as follows from RS: 5 band sts as before, work pattern according to diagram A.1A until 12 sts remain on row (= 22-24-26-31-33-38-40 repetitions of 10 sts), work A.1B (= 7 sts) and finish with 5 band sts as before. When A.1 has been worked vertically, 191-207-223-263-279-319-335 sts remain on needle and piece measures approx. 7-7-7-7-8-8-8 cm. P 1 row from WS (continue bands as before) while dec 5-2-1-5-2-6-5 sts evenly - READ DECREASE TIP! (do not dec over bands) = 186-205-222-258-277-313-330 sts. Switch to circular needle size 3 mm and work next row from RS as follows - remember BUTTONHOLES on band - see explanation above: 5 band sts as before, work pattern according to diagram A.2 until 5 sts remain on row, and finish with 5 band sts in garter st as before. Continue the pattern like this - NOTE: On 7th row in diagram K last st before band. After A.2 insert 1 marker 49-54-58-67-72-81-85 sts in from each side (= 88-97-106-124-133-151-160 sts between markers on back piece). Then work as follows (1st row = RS): 5 band sts as before, K 1, P 2, work in stocking st until marker in the side, work A.3A (= 6 sts), repeat A.3B over the next 72-81-90-108-117-135-144 sts (= 8-9-10-12-13-15-16 repetitions of 9 sts), work A.3C (= 10 sts), marker, work in stocking st until 8 sts remain on row, finish with P 2, K 1 and 5 band sts as before. Continue pattern like this. REMEMBER THE KNITTING TENSION
When piece measures 12 cm, inc 1 st on each side of marker in each side - READ INCREASE TIP (= 4 sts inc). Repeat inc every 5-5-6-8-10-10-10 cm a total of 4-4-4-3-3-3-3 times = 202-221-238-270-289-325-342 sts - NOTE: Work inc sts in stocking st on front piece and in stocking st until they fit pattern on back piece.
When piece measures 33-34-35-36-37-38-39 cm, work next row from WS as follows: Work 50-55-58-66-70-79-83 sts (= left front piece), cast off 6-6-8-8-10-10-10 sts for armhole, work 90-99-106-122-129-147-156 sts (= back piece), cast off 6-6-8-8-10-10-10 sts for armhole and work the remaining 50-55-58-66-70-79-83 sts (= right front piece). Put piece aside and knit the sleeves.

Worked in the round on double pointed needles. Cast on 52-52-61-61-61-70-70 sts on double pointed needles size 2.5 mm with Baby Merino. K 1 round. Then work pattern in the round according to diagram A.2 - NOTE: On 7th round in A.2 K last st on round (applies to size L + XL + XXL). When A.2 has been worked, switch to double pointed needles size 3 mm. Insert 1 marker at the beg of the round. Work next round as follows: Work A.3A (= 6 sts), work A.3B over the next 36-36-45-45-45-54-54 sts (= 4-4-5-5-5-6-6 repetitions of 9 sts) and finish with A.3C (= 10 sts). Continue pattern like this. When piece measures 5-6-6-7-5-9-9 cm, inc 2 sts mid under sleeve - READ INCREASE TIP. Repeat inc every 3.-2½.-3.-2½.-2½.-2½.-2. cm 14-16-13-15-16-14-17 times in total = 80-84-87-91-93-98-104 sts – NOTE: Work inc sts in stocking st until they fit the pattern again. Work until piece measures approx. 47-47-46-46-45-45-45 cm (NOTE: Shorter measurements in the larger sizes because of longer yoke) – adjust to work the same length in repetition of A.3 as on back piece before cast off for armholes. Work next round as follows: Cast off 3-3-4-4-5-5-5 sts, work 74-78-79-83-83-88-94 sts and cast off the remaining 3-3-4-4-5-5-5 sts. Put piece aside and knit another sleeve.

YOKE:
Slip sleeves on to same circular needle size 3 mm as body where armholes were cast off (without working them first) = 338-365-380-420-435-481-510 sts. Insert 1 marker in every transition between sleeves and body = 4 markers. Continue with pattern on sleeves and back piece as before and work in stocking st with bands on front piece. Work in addition A.4 now in every transition between body and sleeves (markers are in the middle of A.4). On first row from RS beg dec for RAGLAN – see explanation above (= 8 sts dec). Repeat dec for raglan on every other row (i.e. every row from RS) 24-25-28-29-32-34-34 times in total and then every row (i.e. both from RS and WS) 4-5-2-3-0-0-3 times in total - NOTE: Work sts that do not fit A.3 on back and sleeves in stocking st when dec.
NECK: AT THE SAME TIME when piece measures approx. 46-48-50-51-53-54-56 cm (1-2 rows should be worked after last buttonhole on band), slip the first 10-13-16-18-22-26-27 sts at beg of the next 2 rows on 1 stitch holder for neck (work them before slipping them on stitch holder to avoid cutting the yarn). Continue with pattern and raglan as before and cast off for neck at beg of every row in each side as follows: Cast off 3 sts 0-0-0-1-1-2-2 times, 2 sts 2 times and 1 st 3-3-3-4-4-4-4 times.
After all dec and cast offs for raglan and neck, 80-85-94-106-113-129-132 sts remain on needle.

NECK EDGE:
Pick up from RS approx. 114-126-140-164-179-209-214 sts (incl sts on stitch holders at the front) on circular needle size 2.5 mm. K 1 row from WS while dec evenly to 110-112-128-130-140-144-146 sts (i.e. dec approx. 4-14-12-34-39-65-68 sts) – READ DECREASE TIP. K 4 rows and loosely cast off with K from RS.

ASSEMBLY:
Sew the openings under the sleeves. Sew on buttons.

This pattern has been corrected.

Updated online: 30.05.2016
SLEEVE:...When piece measures 5-6-6-7-5-9-9 cm, inc 2 sts mid under sleeve - READ INCREASE TIP. Repeat inc every 3.-2½.-3.-2½.-2½.-2½.-2. cm 14-16-13-15-16-14-17 times in total = 80-84-87-91-93-98-104 sts – NOTE: Work inc sts in stocking st until they fit the pattern again. Work until piece measures approx. 47-47-46-46-45-45-45 cm (NOTE: Shorter measurements in the larger sizes because of longer yoke) – adjust to work the same length in repetition of A.3 as on back piece before cast off for armholes...

Diagram

symbols = K from RS, P from WS


symbols = P from RS, K from WS
symbols = 1 YO between 2 sts
symbols = K 2 tog
symbols = slip 1 st as if to K, K 1, psso
symbols = slip 2 sts on cable needle in front of piece, P 1, K 2 from cable needle
symbols = slip 1 st on cable needle behind piece, K 2, P 1 from cable needle
symbols = slip 2 sts on cable needle in front of piece, P 1, K 2, K 2 from cable needle
symbols = slip 2 sts on cable needle in front of piece, K 2 tog, K 2 twisted tog from cable needle
diagram
diagram
diagram

Each of our patterns has specific tutorial videos to help you.

Do you have a question? See a list of frequently asked questions (FAQ)

Knitting tension is what determines the final measurements of your work, and is usually measured per 10 x 10 cm. It is provided like so: number of stitches in width x number of rows in height - eg: 19 stitches x 26 rows = 10 x 10 cm.

The knitting tension is very individual; some people knit/crochet loosely while others work tightly. You adjust the knitting tension with the needle size, which is why the suggested needle size is only meant as a guide! You need to adjust this (up or down) to ensure that YOUR knitting tension matches the knitting tension provided in the pattern. If you work with a different knitting tension than provided you will have a different yarn consumption, and your work will have different measurements than what the pattern suggests.

The knitting tension also determines which yarns can replace each other. As long as you achieve the same knitting tension you can replace one yarn with another.

See DROPS lesson: How to measure your tension/gauge

See DROPS video: How to make a gauge tension swatch

The required amount of yarn is provided in grams, eg: 450 g. To calculate how many balls you’ll need you first need to know how many grams are in 1 ball (25g, 50g or 100g). This information is available if you click on the individual yarn quality on our pages. Divide the amount required with the amount of each ball. For example, if each ball is 50g (the most common amount), the calculation will be as follows: 450 / 50 = 9 balls.

The important thing when changing from one yarn to another is that the knitting/crochet tension remains the same. This is so that the measurements of the finished piece will be the same as on the sketch provided. It is easier to achieve the same knitting tension using yarns from the same yarn group. It is also possible to work with multiple strands of a thinner yarn to achieve the knitting tension of a thicker one. Please try our yarn converter. We recommend you to always work a test swatch.

Please NOTE: when changing yarn the garment might have a different look and feel to the garment in the photo, due to individual properties and qualities of each yarn.

See DROPS lesson: Can I use a different yarn than the one mentioned in the pattern?

All our yarns are categorised into yarn groups (from A to F) according to thickness and knitting tension – group A contains the thinnest yarns and group F the thickest. This makes it easier for you to find alternative yarns to our patterns, should you wish to switch yarn. All yarns within the same group have a similar knitting tension and can easily replace each other. However, different yarn qualities have different structures and properties which will give the finished work a unique look and feel.

Click here for an overview of the yarns in each yarn group

At the top of all our patterns you’ll find a link to our yarn calculator, which is a helpful tool should you wish to use a different yarn than suggested. By filling in the yarn quality you wish to replace, the amount (in your size) and number of strands, the calculator will present good alternative yarns with the same knitting tension. Additionally it will tell you how much you’ll require in the new qualities and whether you’ll need to work with multiple strands. Most skeins are 50g (some are 25g or 100g).

If the pattern is worked with multiple colours, every colour will have to be calculated separately. Similarly, if the pattern is worked with several strands of different yarns (for example 1 strand Alpaca and 1 strand Kid-Silk) you will have to find alternatives for each, individually.

Click here to see our yarn calculator

Since different yarns have different qualities and textures we have chosen to keep the original yarn in our patterns. However, you can easily find options among our available qualities by using our yarn calculator, or simply pick a yarn from the same yarn group.

It is possible that some retailers still have discontinued yarns in stock, or that someone has a few skeins at home that they would like to find patterns for.

The yarn calculator will provide both alternative yarn as well as required amount in the new quality.

If you think it's hard to decide what size to make, it can be a good idea to measure a garment you own already and like the size of. Then you can pick the size by comparing those measures with the ones available in the pattern's size chart.

You'll find the size chart at the bottom of the pattern.

See DROPS lesson: How to read size chart

The needle size provided in the pattern serves only as a guide, the important thing is to follow the knitting tension. And since knitting tension is very individual, you will have to adjust the needle size to ensure that YOUR tension is the same as in the pattern – maybe you’ll have to adjust 1, or even 2 needle sizes, up or down to achieve the correct tension. For this, we recommend that you work test swatches.

Should you work with a different knitting tension than the one provided, the measurements of the finished garment might deviate from the measurement sketch.

See DROPS lesson: How to measure your tension/gauge

See DROPS video: How to make a tension/gauge swatch

Working a garment top-down provides more flexibility and room for personal adjustment. For example it is easier to try the garment on while working, as well as making adjustments to length of yoke and shoulder caps.

The instructions are carefully explaining every step, in the correct order. Diagrams are adjusted to the knitting direction and are worked as usual.

The diagram depicts all rows/rounds, and every stitch seen from the right side. It is read from bottom to top, from right to left. 1 square = 1 stitch.

When working back and forth, every other row is worked from the right side and every other row is worked from the wrong side. When working from the wrong side, the diagram will have to be worked reversed: from left to right, knit stitches are purled, purl stitches are knit etc.

When working in the round every round is worked from the right side and the diagram are worked from right to left on all rounds.

See DROPS lesson: How to read knitting diagrams

The diagram depicts all rows/rounds, and every stitch seen from the right side. It is worked from bottom to top, from right to left.

When working back and forth every other row is worked from the right side: from right to left and every other row is worked from the wrong side: from left to right.

When working in the round, every row in the diagram are worked from the right side, from right to left.

When working a circular diagram you start in the middle and work your way outwards, counter clockwise, row by row.

The rows usually start with a given number of chain stitches (equivalent to the height of the following stitch), this will either be depicted in the diagram or explained in the pattern.

See DROPS lesson: How to read crochet diagrams

Instructions for working several diagrams after each other on the same row/round, will often be written like so: “work A.1, A.2, A.3 a total of 0-0-2-3-4 times". This means you work A.1 once, then A.2 is worked once, and A.3 is repeated (in width) the number of times provided for your size – in this case like so: S = 0 times, M = 0 times, L=2 times, XL= 3 times and XXL = 4 times.

The diagrams are worked as usual: begin with the first row in A.1, then work the first row in A.2 etc.

See DROPS lesson: How to read knitting diagrams

See DROPS lesson: How to read crochet diagrams

The total width of the garment (from wrist-to-wrist) will be larger in the larger sizes, despite the actual sleeves being shorter. The larger sizes have longer sleeve caps and wider shoulders, so there will be a good fit in all sizes.

The measurement sketch/schematic drawing provides information regarding the full length of the garment. If it’s a jumper or a jacket the length is measured from the highest point on the shoulder closest to the neckline, and straight down to the bottom of the garment. It is NOT measured from the tip of shoulder. Similarly, the length of yoke is measured from the highest point on the shoulder and down to where yoke is split into body and sleeves.

On a jacket measures are never taken along bands, unless specifically stated. Always measure inside band stitches when measuring the length.

See DROPS lesson: How to read a schematic drawing

Diagrams are often repeated on the round or in height. 1 repeat is the diagram the way it appears in the pattern. If it says to work 5 repeats of A.1 in the round, then you work A.1 a total of 5 times after/next to each other in the round. If it says to work 2 repeats of A.1 vertically/in height you work the entire diagram once, then begin again at the start and work the entire diagram one more time.

Chain stitches are slightly narrower than other stitches and to avoid working the cast-on edge too tight, we simply chain more stitches to begin with. The stitch count will be adjusted on the following row to fit the pattern and measurement sketch.

The rib edge is more elastic and will contract slightly compared to, for example, stocking stitch. By increasing before the rib edge, you avoid a visible difference in width between the rib edge and the rest of the body.

It’s very easy to cast off too tightly, and by making yarn overs while casting off (and simultaneously casting these off) you avoid a too tight cast off edge.

See DROPS video: How to bind off with yarn overs (yo)

To achieve an even increase (or decrease) you can increase on, for example: every 3rd and 4th row alternately, like so: work 2 rows and increase on the 3rd row, work 3 rows and increase on the 4th. Repeat this until the increase is complete.

See DROPS lesson: Increase or decrease 1 st on every 3rd and 4th row alternately

Should you prefer to work in the round instead of back and forth, you may of course adjust the pattern. You’ll need to add steeks mid-front (usually 5 stitches), and follow the instructions. When you would normally turn and work from the wrong side, simply work across the steek and continue in the round. At the end you’ll cut the piece open, pick up stitches to work bands, and cover the cut edges.

See DROPS video: How to knit steeks and cut open

Should you prefer to work back and forth instead of in the round, you may of course adjust the pattern so you work the pieces separately and then assemble them at the end. Divide the stitches for the body in 2, add 1 edge stitch in each side (for sewing) and work the front and back pieces separately.

See DROPS lesson: Can I adapt a pattern for circular needles into straight needles?

Pattern repeats can vary slightly in the different sizes, in order to get the correct proportions. If you’re not working the exact same size as the garment in the photo, yours might deviate slightly. This has been carefully developed and adjusted so that the complete impression of the garment is the same in all sizes.

Make sure to follow instructions and diagrams for your size!

If you have found a pattern you like which is available in women’s size it’s not very difficult to convert it to men’s size. The biggest difference will be the length of sleeves and body. Start working on the women size that you think would fit across the chest. The additional length will be worked right before you cast off for the armhole/sleeve cap. If the pattern is worked top-down you can add the length right after the armhole or before the first decrease on sleeve.

Regarding additional yarn amount, this will depend on how much length you add, but it is better with a skein too many than too few.

All yarns will have excess fibres (from production) that might come off as lint or shedding. Brushed yarns (ie hairier yarns) have more of these loose, excess fibres, causing more shedding.

Shedding also depends on what is worn under or over the garment, and whether this pulls at the yarn fibres. It’s therefore not possible to guarantee that there will be no shedding

Below are some tips on how to get the best result when working with hairier yarns:

1. When the garment is finished (before you wash it) shake it vigorously so the looser hairs come off. NOTE: do NOT use a lint roller, brush or any method that pulls at the yarn.

2. Place the garment in a plastic bag and put it in your freezer - the temperature will cause the fibres to become less attached to each other, and excess fibres will come off easier.

3. Leave in the freezer for a few hours before taking it out and shaking it again.

4. Wash the garment according to the instructions on the yarn label.

Pilling is a natural process that happens to even the most exclusive of fibers. It's a natural sign of wear and tear that is hard to avoid, and that is most visible in high friction areas of your garment like a sweater's arms and cuffs.

You can make your garment look as new by removing the pilling, using a fabric comb or a pill/lint remover.

Still can't find the answer you need? Then scroll down and leave your question so one of our experts can try to help you. This will be done normally within 5 to 10 working days.
In the meantime, you can read the questions and answers that others have left to this pattern or join the DROPS Workshop on Facebook to get help from fellow knitters/crocheters!

You might also like...

Post a comment to pattern DROPS 169-27

We would love to hear what you have to say about this pattern!

If you want to leave a question, please make sure you select the correct category in the form below, to speed up the answering process. Required fields are marked *.

Comments / Questions (41)

country flag Robin Ryan wrote:

Hi! On the yoke decrease after joining sleeves, there is a K2tog before A4 , then A4, then a sl1k1psso after A4 and this is a reduction of 2 for each shoulder. The pattern says decrease of 8 per row, but I only see total decrease of 4 per row. What am I missing?

05.12.2022 - 03:44

DROPS Design answered:

Hi Robin, You have 4 markers in the middle of each A.4, in each transition between the front/back pieces and sleeves. As you say, you decrease before and after each A.4: 2 x 4 = 8 stitches decreased on each decrease-row. Happy knitting!

05.12.2022 - 06:47

country flag Morard wrote:

Merci pour vos informations.

01.02.2021 - 12:27

country flag Morard wrote:

Bonjour, comment tricoter A4 au moment de la transition dos/devant ?

30.01.2021 - 10:52

DROPS Design answered:

Bonjour Mme Morard, A.4 se compose de 6 mailles et doit être tricoté à cheval sur le devant/le dos et les manches pour former les lignes des raglans ainsi: tricotez les 3 dernières mailes du devant droit + les 3 premières mailles de la manche = 1er A.4. Tricotez les 3 dernières mailles de la manche + les 3 premières mailles du dos = 2ème A.4. Tricotez les 3 dernières mailles du dos + les 3 premières mailles de la manche = 3ème A.4. Tricotez les 3 dernières mailles de la manche + les 3 premières mailles du devant = 4ème A.4. Bon tricot!

01.02.2021 - 08:33

country flag Amanda Westbye wrote:

Hva er forskjellen på Baby merino uni color og Baby merino mix?

13.10.2020 - 22:03

DROPS Design answered:

Hej Amanda. Det är bara lite skillnad i färgen. Uni color är helt enfärgade och Mix är lite mixade i färgen (du ser skillnaden på färgkartan). Mvh DROPS design

15.10.2020 - 08:52

country flag Siri Granum wrote:

Det står ikke forklaring på hvordan å strikker mønsteret på boken. Tegn er en runding med skrå strek

09.01.2020 - 17:25

DROPS Design answered:

Hej Siri, cirklen betyder kast og den skrå strek er 2 rett sammen. God fornøjelse!

15.01.2020 - 15:43

country flag Élodie wrote:

Bonjour, J'ai choisi une laine en taille 3,5 au lieu de 3. Pouvez vous me donner des indications sur l'échantillon à réaliser pour vérifier la taille ? Merci.

05.11.2019 - 12:43

DROPS Design answered:

Bonjour Élodie, l'échantillon est primordial pour réussir l'ouvrage conformément aux explications - plus d'infos ici. Bon tricot!

05.11.2019 - 14:50

country flag Noora Voutilainen wrote:

Hei! Minulla on ongelmia kaarrokkeen kanssa. Ohjeessa käsketään siirtää kaarrokkeen alussa samalle pyöröpuikolle kaikki silmukat, myös hihojen silmukat. Näin tehdessä kainaloiden päätellyt silmukat kiristävät työtä (kaikki hihan silmukat kerralla puikolla)siten, että hihan neulominen on lähes mahdotonta. Mikä neuvoksi??

09.05.2019 - 14:39

DROPS Design answered:

Neulominen on aluksi hankalaa, kun kaarrokkeen osat on yhdistetty, se kuitenkin helpottuu joka kerroksen jälkeen. Voit neuloa kaarrokkeen ensimmäiset kerrokset kahdella pyöröpuikolla, mikä voi tehdä neulomisesta hieman helpompaa.

08.01.2020 - 16:54

country flag Sylvie wrote:

A l’empiècement, j’ai mes 365m, je fais les dim raglan ce qui ôte 200m (25x8), reste donc 165m. Je diminue de 40m (5x8)= 125m. Encolure = -7m = 118m. Commt peut-il rester 85m SVP ? Moi j’ai +33m ! Merci de bien vouloir m’éclairer SVP.

15.04.2019 - 23:16

DROPS Design answered:

Bonjour Sylvie, n'oubliez pas L'ENCOLOURE: "EN MÊME TEMPS, quand l'ouvrage mesure environ 48 (1-2 rangs après la dernière boutonnière), glisser les 13 premières m au début des 2 rangs suivants sur un arrêt de mailles pour l'encolure" - vous avez lors 26 m sur les aiguilles auxiliaires (365-200-40-26=99 m). Et au total 7 m diminuees pour l'encolure de chaque cote: 7x2=14. 99-14=85 m. Bon tricot!

16.04.2019 - 16:24

country flag Marina wrote:

Ja, hier nochmals ich, das bis dahin habe ich ja verstanden nur in der Anleitung steht das ich wenn das Muster A1 fertig ist ich nur noch 223 Maschen auf der Nadel sind. Wo sind die Maschen geblieben??? Das ist vor dem Mustersatz A2 wenn ich zur Nadel 3 wechsle. Ich weiß nicht weiter😢

25.01.2019 - 14:56

DROPS Design answered:

Liebe Marina, bei der letzte Reihe in A.1A und A.1B werden Sie 2 Masche abnehmen -siehe letzte Diagram symbol = es sind nur noch 8 M in jedem A.1A (2 M in jedem Zopf) und 5 in A.1B (= 2 M im Zopf), dann haben Sie: 5 Blendemaschen, 26 x 8 M (A.1A), 5 M (A.1B), 5 Blendemaschen = 223 M. Viel Spaß beim stricken!

25.01.2019 - 16:31

country flag Marina wrote:

Hallo, ich habe da ein Problem ich stricke diese Strickjacke in Größe M, habe 277 Maschen auf der Nadel bevor ich mit dem Muster A1A/A1B Anfange. Wenn die Mustersätze fertig sind sollen nur noch 223 Maschen auf der Nadel sein. Wo bleiben die Maschen, in dem Muster werden keine Maschen abgenommen bzw. nix zusammen gestrickt. Der Mustersatz A1A besteht durchgängig aus 10 Maschen. Hilfe.... ich stehe auf dem Schlauch. 😩

25.01.2019 - 11:15

DROPS Design answered:

Liebe Marina, so stricken Sie die 277 M: 5 Blendemaschen, A.1A (= 10 M = 2 M re, 3 M li, 2 M re, 3 M li bei der 1. Reihe) x 26 (= über die nächsten 260 M), dann stricken Sie A.1B (= 7 M = 2 M re, 3 M li, 2 M re) und 5 Blendemaschen = 5 + 260 + 7 + 5 = 277 M. Viel Spaß beim stricken!

25.01.2019 - 14:05