
Popular categories
Looking for a yarn?


Comments / Questions (53)
![]() Gabi Märsch wrote:
Gabi Märsch wrote:
Ich muss doch mit 354 Maschen beginnen und nicht mit 275 Maschen? So steht es in der Anleitung. Da ich die Wolle direkt bei Ihnen bestellt habe bin ich eigentlich davon ausgegangen, dass die Maschenprobe stimmt. Dies ist leider nicht der Fall. Lt. Strickanleitung ergeben 21Maschen 10 cm bei mir nur 17 Maschen. Was soll ich nun tun? Sorry, dass ich meine Frage 2x geschickt habe. Ich dachte ich hätte sie gestern Abend nicht weggeschickt 😏
05.11.2019 - 12:26DROPS Design answered:
Liebe Frau Märsch, die Maschenprobe ist sehr individuell, am besten stricken Sie noch eine mit anderen Nadeln - mehr lesen Sie hier. Viel Spaß beim stricken!
05.11.2019 - 14:49
![]() Gabi Märsch wrote:
Gabi Märsch wrote:
Ich habe die passende Wolle bei Ihnen bestellt. Wenn ich die Jacke mit der Maschenzahl für XL stricke, dann ist sie unten eine Weite von 170cm anstelle laut Skizze 126cm. Nadelstärke wird wie in der Anleitung verwendet. Was mache ich falsch? Bin ich die Einzige bei der es nicht stimmt? Ich stricke sehr viel und kann es mir aber nicht vorstellen. Können Sie mir bitte eine Antwort per Mail schicken? Danke.
05.11.2019 - 12:13DROPS Design answered:
Liebe Frau Märsch, Stimmt Ihre Maschenprobe? Am Anfang schlagen Sie mehr Maschen als Sie dann später für die gesamte Breite haben, dh es wird von 354 M zu 275 M abgenommen - siehe auch vorrige Antwort. Viel Spaß beim stricken!
05.11.2019 - 14:47
![]() Gabi Märsch wrote:
Gabi Märsch wrote:
Ich habe mir auch gleich die Wolle bei Garnstudio über das Internet bestellt und bereits die ersten 25 cm in der Größe XL mit einem Maschenanschlag von den angegebenen 354 Maschen gestrickt. Was mich allerdings ziemlich durcheinander bringt ist, dass die Maße überhaupt nicht mit den Maßen in der Strickanleitung übereinstimmen. Meine Jacke bekäme mit der Strickanleitung unten eine Weite gesamt von 170 cm. (Lt. Anleitung 126 cm ) was habe ich falsch gemacht? Ich brauche Hilfe
04.11.2019 - 22:30DROPS Design answered:
Liebe Frau Märsch, stimmt Ihre Maschenprobe? Nach den Diagrammen sollen Sie 275 M haben, dh ca 131 cm in der Breite = ca 63 cm wenn die Jacke flach liegt. Viel Spaß beim stricken!
05.11.2019 - 09:20
![]() Andrea wrote:
Andrea wrote:
Gibt es irgendwo eine Liste aller Abkürzungen und deren Bedeutung? Die meisten verstehe ich ja, aber bei dieser ist mir die Abkürzung "einschl." ein Rätsel. Vielen Dank für Ihre Antwort.
03.09.2019 - 19:25DROPS Design answered:
Liebe Andrea, es bedeutet "einschließlich". Viel Spaß beim stricken!
04.09.2019 - 09:23
![]() Marimar wrote:
Marimar wrote:
Bonjour, Je ne comprends pas bien vos explications pour les diminutions (côtes dos et devant): Voulez vous dire : 2 m ens à l'end, 4 m end, le marqueur, 4 m end, glisser 1m à l'end,1 m end et passer la m glissée par dessus la m tricotée Doit il toujours avoir 8m entre le marqueur ? Merci pour votre aide
02.09.2019 - 21:48DROPS Design answered:
Bonjour Marimar, c'est tout à fait ainsi que l'on va diminuer, on aura donc 8 mailles entre les diminutions, on va diminuer avant les 4 m avant le marqueur et après les 4 m après le marqueur. Bon tricot!
03.09.2019 - 08:52
![]() Barbara wrote:
Barbara wrote:
Ich habe die Jacke gleich 2 mal gestrickt, weil sie so schön ist. Die Anleitung ist sehr gut verständlich und das einfache Muster sieht viel anspruchsvoller aus, als es ist. Vielen Dank für diese tolle Jacke 😊
21.05.2019 - 20:05
![]() Jennifer Douglas wrote:
Jennifer Douglas wrote:
I would like to make this pattern as a sweater instead of a cardigan. Is there a pattern already published for this or something similar with the patterned top section?
20.05.2019 - 17:47DROPS Design answered:
Dear Mrs Douglas, there is no matching sweater to this cardigan, you can find all our knitted cardigans here - use the filters to sort them. Happy knitting!
21.05.2019 - 09:36
![]() Monica Forss wrote:
Monica Forss wrote:
Jag skulle vilja veta storlekarna i cm. Kan inte hitta info om detta!
03.02.2019 - 19:12DROPS Design answered:
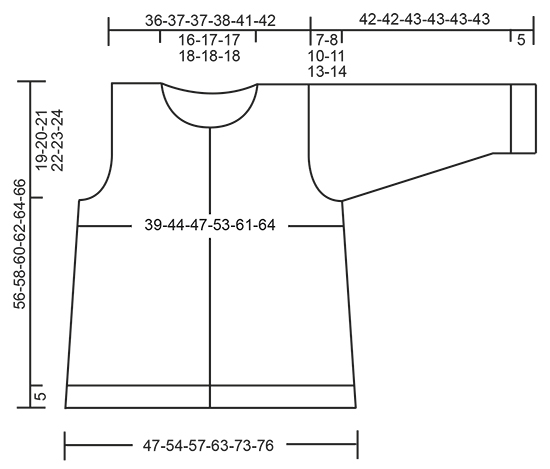
Hei Monica. Nederst på siden finner du en målskisse med alle plaggets mål i alle størrelser. Alle mål er oppgitt i cm (viddemål gjelder fra side til side, ikke rundt). God fornøyelse
08.02.2019 - 13:05Jennifer Douglas wrote:
Please can you tell me the number of stitches remaining once all the decreases have been done for the sleeve cap. The instructions say "loosely cast off the remaining stitches" but does not give a number. I have tried to work this out and based on XL size and gauge of 28 rows to 10cm, I have 32 stitches left. Can you confirm this please. It is rather annoying as throughout the rest of the pattern you give a stitch count, which is really helpful.
24.08.2018 - 15:45DROPS Design answered:
Dear Jennifer, We will take into consideration your feedback in giving the number of remaining stitches for future patterns. For this particular pattern, if your gauge is correct, then, most likely, you have the correct number of remaining stitches. Happy Knitting,
30.08.2018 - 12:49Jennifer Douglas wrote:
Pleae can you explain the inceases in sizes. At the bust the total difference From M to L is 6cm, but from L to XL it is 12 cm. from XL to XXL it is 16cm. As I am a 48 cm bust, the L is a bit small but the XL is much too big. There is a similar jump at the hem. Which size will be best?
26.07.2018 - 19:52DROPS Design answered:
Dear Mrs Douglas, compare these measurements to a similar garment you have and like the shape to find out the matching size - if you like the bust part to be somewhat fitter, use the smaller size (L) and if you rather get a somewhate looser bust part, use the larger size (XL). Happy knitting!
27.07.2018 - 09:47
|
|||||||||||||||||||
Golden Blossom#goldenblossomcardigan |
|||||||||||||||||||
|
|
|||||||||||||||||||
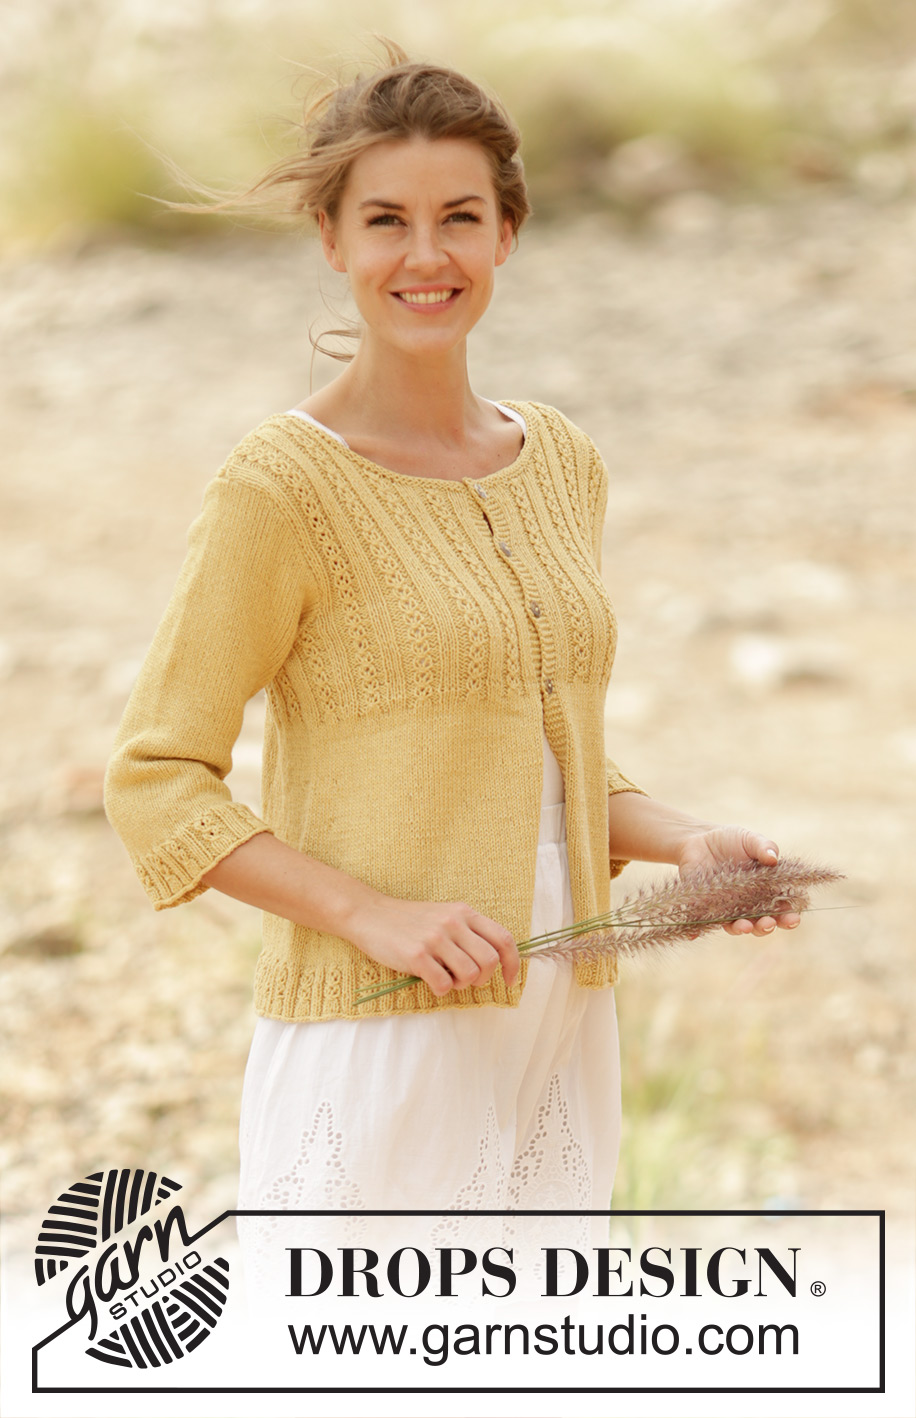
Knitted DROPS jacket with lace edge on yoke and ¾ sleeves in "Belle". Size: S - XXXL.
DROPS 170-29 |
|||||||||||||||||||
|
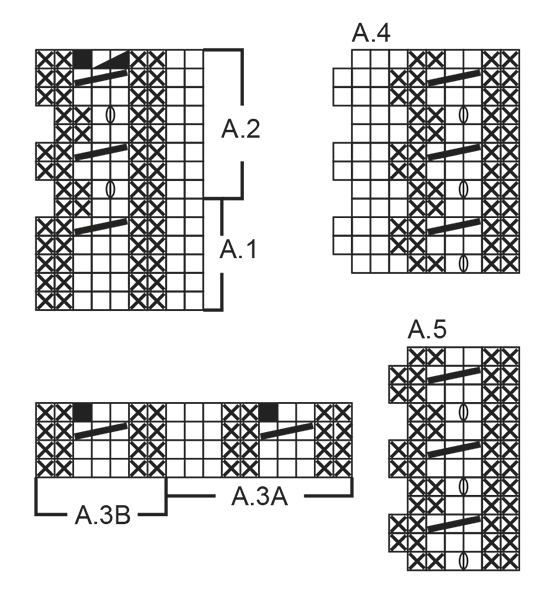
GARTER ST (back and forth): K all rows. 1 ridge = 2 rows K. PATTERN: See diagrams A.1 to A.5. The diagrams show all rows in pattern seen from RS. DECREASE TIP (applies to sides of body): All dec are done from RS! Dec on each side of marker in each side on body as follows: Beg 6 sts before marker and K 2 tog, K 8 (marker is between these 8 K sts), slip 1 st as if to K, K 1, psso (= 2 sts dec). INCREASE TIP (applies to mid under sleeve): Inc 1 st on each side of the middle 4 sts under sleeve as follows: Beg 2 sts before marker mid under sleeve, make 1 YO, work 4 sts in stocking st and make 1 YO (= 2 sts inc). On next round K YOs twisted to avoid holes (= 2 sts inc). BUTTONHOLES: Dec for buttonholes on right band. 1 buttonhole = cast off third and fourth st from edge and cast on 2 new sts on next row over these sts. Dec for buttonholes when piece measures: SIZE S: 28, 35, 41 and 48 cm SIZE M: 28, 35, 43 and 50 cm SIZE L: 29, 37, 44 and 52 cm SIZE XL: 30, 37, 45 and 52 cm SIZE XXL: 31, 39, 46 and 54 cm SIZE XXXL: 32, 40, 48 and 56 cm ---------------------------------------------------------- BODY: The piece is worked back and forth from mid front on circular needle because of no of sts. Cast on 282-309-327-354-408-426 sts (incl 5 band sts in each side towards mid front) on circular needle size 3.5 mm with Belle. P 1 row from WS. Work next row as follows from RS: 5 band sts in GARTER ST- see explanation above, work pattern according to diagram A.1 until 7 sts remain on row (= 30-33-35-38-44-46 repetitions of 9 sts), work 2 sts in stocking st and finish with 5 band sts in garter st. Continue pattern like this until A.1 has been worked 1 time vertically = 252-276-292-316-364-380 sts remain on needle. Then work pattern according to diagram A.2 the same way - NOTE: On last row in A.2 dec in addition 13-8-8-3-5-5 sts evenly (dec in P-sections and do not dec over bands) = 209-235-249-275-315-329 sts on needle. After A.2 switch to circular needle size 4 mm. Insert 2 markers in the piece; 54-62-64-72-82-84 sts in from each side = 101-111-121-131-151-161 sts between markers on back piece. Then work in stocking st with 5 band sts in garter st in each side towards mid front. REMEMBER THE KNITTING TENSION. When piece measures 8 cm, dec 1 st on each side of both markers - READ DECREASE TIP(= 4 sts dec). Repeat dec every 4-4-4-4½-5-5 cm a total of 5 times in each side = 189-215-229-255-295-309 sts. When piece measures 28-28-29-30-31-32 cm, dec for BUTTONHOLES on right band - see explanation above! AT THE SAME TIME work next row as follows from RS: SIZE S + L + XXXL: 5 band sts as before, P 2, K 3, work pattern according to diagram A.3A over the next 30-40-60 sts (= 3-4-6 repetitions of 10 sts), work A.3B (= 7 sts), 4 sts in stocking st (marker in the side is in the middle of these 4 sts), work A.3A over the next 80-100-140 sts (= 8-10-14 repetitions of 10 sts), work A.3B (= 7 sts), 4 sts in stocking st (marker is in the middle of these 4 sts), work A.3A over the next 30-40-60 sts, work A.3B (= 7 sts), K 3, P 2 and 5 band sts as before. When A.3A/A.3B have been worked 1 time vertically, 172-208-280 sts remain on needle. SIZE M + XL + XXL: 5 band sts as before, K 3, work pattern according to diagram A.3A over the next 40-50-60 sts (= 4-5-6 repetitions of 10 sts), work A.3B (= 7 sts), 4 sts in stocking st (marker in the side is in the middle of these 4 sts), work A.3A over the next 90-110-130 sts (= 9-11-13 repetitions of 10 sts), work A.3B (= 7 sts), 4 sts in stocking st (marker is in the middle of these 4 sts), work A.3A over the next 40-50-60 sts, work A.3B (= 7 sts), K 3 and 5 band sts as before. When A.3A/A.3B have been worked 1 time vertically, 195-231-267 sts remain on needle. Continue to work pattern as follows (1st row = RS): SIZE S + L + XXXL: 5 band sts as before, P 2, K 3, work pattern according to diagram A.4 over the next 27-36-54 sts (= 3-4-6 repetitions of 9 sts), work A.5 (= 6 sts), 4 sts in stocking st (marker in the side is in the middle of these 4 sts), work A.4 over the next 72-90-126 sts (= 8-10-14 repetitions of 9 sts), work A.5 (= 6 sts), 4 sts in stocking st (marker is in the middle of these 4 sts), work A.4 over the next 27-36-54 sts, work A.5 (= 6 sts), K 3, P 2 and 5 band sts as before. Continue pattern like this. SIZE M + XL + XXL: 5 band sts as before, K 3, work pattern according to diagram A.4 over the next 36-45-54 sts (= 4-5-6 repetitions of 9 sts), work A.5 (= 6 sts), 4 sts in stocking st (marker in the side is in the middle of these 4 sts), work A.4 over the next 81-99-117 sts (= 9-11-13 repetitions of 9 sts), work A.5 (= 6 sts), 4 sts in stocking st (marker is in the middle of these 4 sts), work A.4 over the next 36-45-54 sts, work A.5 (= 6 sts), K 3 and 5 band sts as before. Continue pattern like this. When piece measures 37-38-39-40-41-42 cm, cast off the middle 4-6-6-8-10-12 sts in each side for armholes (i.e. cast off 2-3-3-4-5-6 sts on each side of both markers). Finish front and back piece separately. BACK PIECE: = 78-85-94-101-117-124 sts. Continue with the pattern as before while AT THE SAME TIME cast off for armhole at beg of every row in each side as follows: Cast off 2 sts 0-1-2-3-4-5 times and then 1 st 1-2-4-5-7-8 times = 76-77-78-79-87-88 sts remain on needle. When piece measures 54-56-58-60-62-64 cm, cast off the middle 32-33-34-35-35-36 sts for neck and finish each shoulder separately. Continue pattern as before and cast off 1 st on beg on next row from neck = 21-21-21-21-25-25 sts remain on the shoulder. Continue pattern as before with 1 edge st in garter st towards the neck until piece measures 56-58-60-62-64-66 cm and loosely cast off. Repeat on the other shoulder. RIGHT FRONT PIECE: = 43-49-51-57-65-66 sts. Continue pattern as before and cast off for armhole in the side as on back piece = 42-45-43-46-50-48 sts. Work until piece measures approx. 48-50-52-52-54-56 cm (1-2 rows should be worked after last buttonhole on band). Now slip the outermost 12-15-13-16-16-14 sts towards mid front on 1 stitch holder for neck (work them before slipping them on stitch holder to avoid cutting the yarn). Continue to cast off for neck at beg of every row from neck as follows: Cast off 2 sts 3 times and 1 st 3 times = 21-21-21-21-25-25 sts remain on shoulder. Continue pattern as before with 1 edge st in garter st towards the neck until piece measures 56-58-60-62-64-66 cm and loosely cast off. LEFT FRONT PIECE: = 43-49-51-57-65-66 sts. Work as right but reversed - NOTE: Do not dec for buttonholes on left band. SLEEVE: Worked in the round on double pointed needles. Cast on 72-72-81-81-90-90 sts on double pointed needle size 3.5 mm with Belle. K 1 round. Then work pattern in the round according to diagram A.1 (= 8-8-9-9-10-10 repetitions of 9 sts). When A.1 has been worked 1 time vertically, there are 64-64-72-72-80-80 sts on needle. Then work pattern in the round according to diagram A.2 the same way - NOTE: On last round in A.2 dec in addition 0-0-3-1-6-4 sts evenly (dec in P-sections) = 56-56-60-62-64-66 sts. After A.2 switch to double pointed needles size 4 mm. Insert 1 marker at beg of round (= mid under sleeve) and work in stocking st in the round. When piece measures 8 cm, inc 2 sts mid under sleeve - READ INCREASE TIP (= 2 sts inc). Repeat inc a total of 6-9-9-11-13-15 times. In size S: On every 14th round, in size M: On every 8th round, in size L: Alternately on every 7th and 8th round, in size XL: On every 6th round, in size XXL: Alternately on every 4th and 5th round and size XXXL: Alternately on every 3rd and 4th round = 68-74-78-84-90-96 sts. When piece measures 35-34-33-32-30-29 cm (NOTE: Shorter measurements in the larger sizes because of wider shoulders and longer sleeve cap), cast off the middle 4-6-6-8-10-12 sts under sleeve and finish sleeve back and forth on needle. Continue with stocking st and cast off for sleeve cap at beg of every row in each side as follows: Cast off 2 sts 3-3-4-4-4-4 times and 1 st 2-2-4-5-8-10 times, then cast off 2 sts in each side until piece measures 41-41-42-42-42-42 cm. Cast off 3 sts at beg of the next 2 rows and loosely cast off the remaining sts. Sleeve measures approx. 42-42-43-43-43-43 cm. Knit another sleeve. ASSEMBLY: Sew the shoulder seams. Sew in sleeves. NECK EDGE: Pick up around the neck from RS inside 1 edge st approx. 98 to 112 sts (incl sts on stitch holders at the front) on circular needle size 3.5 mm. K 3 rows and then loosely cast off with K from RS. Sew the buttons on to the left band. |
|||||||||||||||||||
Diagram explanations |
|||||||||||||||||||
|
|||||||||||||||||||
 |
|||||||||||||||||||
 |
|||||||||||||||||||
Have you finished this pattern?Tag your pictures with #dropspattern #goldenblossomcardigan or submit them to the #dropsfan gallery. Do you need help with this pattern?You'll find 29 tutorial videos, a Comments/Questions area and more by visiting the pattern on garnstudio.com. © 1982-2026 DROPS Design A/S. We reserve all rights. This document, including all its sub-sections, has copyrights. Read more about what you can do with our patterns at the bottom of each pattern on our site. |
|||||||||||||||||||


With over 40 years in knitting and crochet design, DROPS Design offers one of the most extensive collections of free patterns on the internet - translated to 17 languages. As of today we count 324 catalogues and 12290 patterns translated into English (UK/cm).
We work hard to bring you the best knitting and crochet have to offer, inspiration and advice as well as great quality yarns at incredible prices! Would you like to use our patterns for other than personal use? You can read what you are allowed to do in the Copyright text at the bottom of all our patterns. Happy crafting!
Post a comment to pattern DROPS 170-29
We would love to hear what you have to say about this pattern!
If you want to leave a question, please make sure you select the correct category in the form below, to speed up the answering process. Required fields are marked *.