Comments / Questions (293)
![]() Susan O Flint wrote:
Susan O Flint wrote:
Help I'm working the sleeve and have no idea how to do the yarn over at the beginning of the round. I'm ready to give up
28.05.2023 - 01:55DROPS Design answered:
Dear Susan, to start with a yarn over, move the yarn in front of the needle and then knit the first stitch. Happy knitting!
28.05.2023 - 19:09
![]() Renée Beerens wrote:
Renée Beerens wrote:
Bijzonder dat ik nu net het advies krijg om na het afkanten van de hals het advies krijg om gewoon door te breien. Terwijl er bij meerdere andere vragen wordt gezegd dat bij middenachter de draad moet worden afgeknipt. Dat advies vind ik logischer. Want als je door breit heb je op de rechtermouw een rij te veel aan steken. Daar heb je al een ronde geminderd. Of is dat de bedoeling?
13.05.2023 - 09:30DROPS Design answered:
Dag Renée,
Je kan ervoor kiezen om de draad af te knippen, maar het hoeft niet. Het staat ook niet in het patroon. Als je de draad afknipt, dan doe je dat gelijk midden achter na de naald dat je hebt afgekant aan de voorkant. Als de daarop volgende naald een naald is waarin je minderingen moet maken voor de raglan, dan begin je op de goede kant. Als het een naald is zonder minderingen, dan begin je op de verkeerde kant.
13.05.2023 - 15:23
![]() Renée Beerens wrote:
Renée Beerens wrote:
Goedendag, ik heb de mouwen op de rondbreinaald gezet. De eerste raglan mindering is gemaakt. En de 18 stk (maat XXL) voor de hals zijn geminderd. Ik heb de naald uitgebreid tot middenachter. Uit de overige vragen heb ik begrepen dat de draad nu afgeknipt moet worden en opnieuw aangehecht vanaf de hals. Is de eerste naald dan op de verkeerde kant of de goede kant? Ivm om de naald kunnen minderen voor raglan/hals. Bvd. Renee
12.05.2023 - 11:30DROPS Design answered:
Dag Renée,
Na het afkanten voor de hals kun je gewoon doorbreien, maar je breit nu heen en weer in plaats van in de rondte. let erop dat je steeds om de naald mindert in iedere raglanlijn.
13.05.2023 - 09:10
![]() Kassie wrote:
Kassie wrote:
This is my first knitted sweater. I have had success with other drops patterns, but I'm having a hard time reconciling the amount of pieces. The jumper doesn't seem to leave room for the raglan, and I am not exactly sure what to do with the yoke. I am sorry this seems basic, but I need to understand the construction before I get started. My preference is to work in the round to avoid sewing sides together.
09.03.2023 - 18:16DROPS Design answered:
Dear Kassie, this video shows how to work a raglan worked from bottom up, ie how to join pieces together and then how to decrease for the raglan (but remember to follow the raglan decreases for this jumper to get the same and not exactly as in the video). Happy knitting!
10.03.2023 - 09:22
![]() Paule De Margerie wrote:
Paule De Margerie wrote:
J'ai terminé la réhausse pour l'encolure dos. J'en suis à «Rabattre» et je ne sais pas comment faire car j'ai 16 mailles sur une aiguille gauche et toutes les autres sont sur l'aiguille droite. Comment dois-je précéder ? Merci
23.02.2023 - 16:35DROPS Design answered:
Bonjour Mme De Margerie, vous pouvez couper le fil, le joindre au début du rang et rabattre toutes les mailles. Bon tricot!
24.02.2023 - 09:46
![]() Nancy Scholl wrote:
Nancy Scholl wrote:
I’m finishing the first sleeve increases. I’ve reached the end of the increases on each 5th round but have only 65 stitches not 67. Any idea of where I went wrong ? Should I knit another 5 rounds to make another increase or do it sooner?
23.02.2023 - 02:57DROPS Design answered:
Dear Mrs Scholl, in size M you should increase a total of 8 times on every 6th round then a total of 7 times on every 5th round = 37 + (2x8) + (2x7) = 67 stitches. Happy knitting!
23.02.2023 - 13:52
![]() Johanna Elmer wrote:
Johanna Elmer wrote:
Hello, Could you kindly explain this? I am now at 204 sts and the body is 70 cm in length per the chart. I do not understand what this means or where to measure from: On next round switch to circular needle size 6 mm / US 10 and dec 32-32-36-40-44-48 sts evenly = 144-156-168-184-200-220 sts. REMEMBER THE GAUGE! When piece measures 42-43-44-45-46-47 cm / Please advice! Joha na
05.02.2023 - 00:36DROPS Design answered:
Dear Johanna, The instructions you have indicated are worked on the round just after the rib. So, you cast on 204sts, work the rib 6 cm and then work the round with decreases (the rest of the round is worked in stocking stitch). Continue working in stocking stitch, without decreasing, until the body measures 44cm, where you will start casting off for the armholes. Happy knitting!
05.02.2023 - 23:23
![]() Nancy Scholl wrote:
Nancy Scholl wrote:
I checked the gauge for a size small. It measures 96 cm at the hip and the directions say to cast on 176 sts. My calculations of 15sts/10cm result in 145 sts needing to be casted on. Please help me out.
15.01.2023 - 01:06DROPS Design answered:
Dear Nancy, since we are going to work the rib, we cast on more stitches, so that the cast on edge is not too tight. Take into account that the 15sts/10 cm gauge is for the pattern in stocking stitch and not the rib and that you will decrease to 144 sts (more or less the amount stated by the gauge) the moment you change from rib to stocking stitch. Happy knitting!
15.01.2023 - 09:59
![]() Janelle Davey wrote:
Janelle Davey wrote:
I am struggling with where to change to working back and forth. I have just finished the round where I cast off for the neck and am ment to change to working back and forth where should this start, do I start it right after I cast off the 18sts for neck or at the start of next round
07.01.2023 - 19:22DROPS Design answered:
Dear Mrs Davey, after you have cast off the middle stitches for neck on front piece, finish the row/round as before,then cut the yarn and join again just after the 18 sts cast off so that rows will now start from after these 18 sts and end before these 18 sts cast off. Happy knitting!
09.01.2023 - 09:28
![]() Betsy wrote:
Betsy wrote:
Hi I have just finished row 11 of yoke /sleeve/neck dec,22 rows total after joining sleeves to body. The bound off bottom neck edge is centered perfectly, sleeves and raglans are equal stitch counts and symmetrical, back also. Yet I have only 2 stitches left between neck edge and raglan on the right side, 10 are left on the left side. Help! Ps I'm trying to get this done for Xmas, thank you
13.12.2022 - 02:07DROPS Design answered:
Dear Betsy, check that you decreased the same number of times/stitches on both front piece, you might have skip some on the left side. Do not hesitate to show you work to your store (even with a picture per mai), it will be easier for them to help you looking at your knitting piece. Happy knitting!
13.12.2022 - 08:20
Aberdeen |
|||||||
 |
 |
||||||
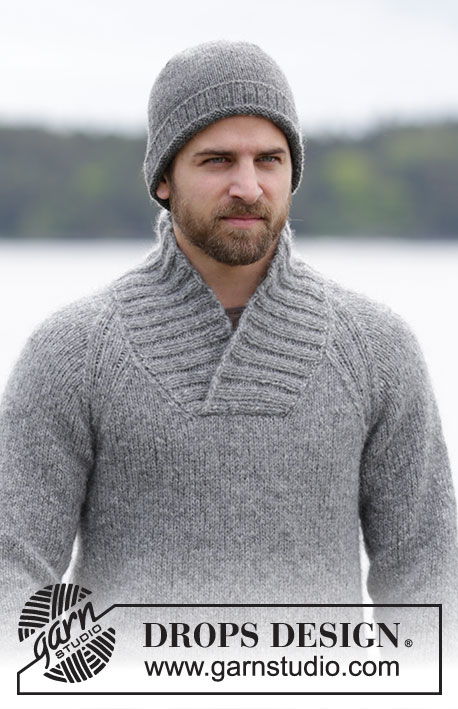
Men's knitted jumper in DROPS Air, with raglan and shawl collar. Size: S - XXXL.
DROPS Extra 0-1159 |
|||||||
|
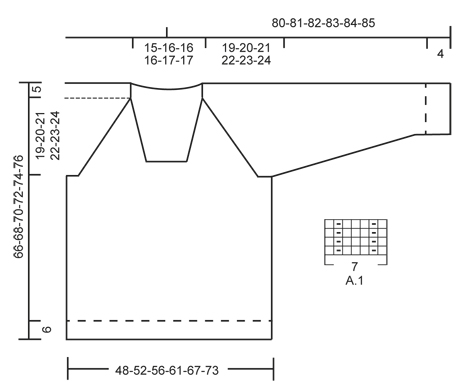
GARTER ST (back and forth): K all rows. 1 ridge = 2 rows K. PATTERN: See diagram A.1. The diagram shows all rows/rounds in pattern seen from RS. RAGLAN: All dec are done from RS! Dec 1 st on each side of every A.1 (= 8 sts dec on row/round): Dec as follows before A.1: Work until 2 sts before A.1, K 2 tog = 1 st dec. Dec as follows after A.1: Slip 1 st as if to K, K 1, psso = 1 st dec. Dec 2 sts on each side of every A.1 as follows (= 16 sts dec on row): Dec as follows before A.1: Work until 3 sts remain before A.1, slip 1 st as if to K, K 2 tog, psso = 2 sts dec. Dec as follows after A.1: Slip 1 st as if to K, K 2 tog, psso = 2 sts dec. INCREASE TIP: Inc 1 st by making 1 YO, on next round K YO twisted (i.e. work in back loop of st instead front) to avoid holes. DECREASE TIP: Dec inside 1 edge st in garter st. All dec are done from RS! Dec as follows before 1 edge st: K 2 tog. Dec after 1 edge st as follows: Slip 1 st as if to K, K 1, psso. ---------------------------------------------------------- JUMPER: Jumper is worked in the round on circular needle up to neck. When casting off for neck, continue back and forth. Rounds start mid back. BODY: Cast on 176-188-204-224-244-268 sts on circular needle size 5 mm with Air. Work rib = K 2/P 2 in the round for 6 cm. Then continue in stocking st until finished measurements. On next round switch to circular needle size 6 mm and dec 32-32-36-40-44-48 sts evenly = 144-156-168-184-200-220 sts. REMEMBER THE KNITTING TENSION! When piece measures 42-43-44-45-46-47 cm, cast off for armholes in each side as follows: Work 31-34-37-41-45-50 sts in stocking st (= half back piece), cast off 10 sts under sleeve, work 62-68-74-82-90-100 sts in stocking st (= front piece), cast off 10 sts and work the remaining 31-34-37-41-45-50 sts in stocking st (= half back piece). Put piece aside and knit the sleeves. SLEEVES: Worked in the round on double pointed needles/circular needle. Cast on 40-40-44-44-44-48 sts on double pointed needles size 5 mm. Work rib = K 2/P 2 for 4 cm. Then continue in stocking st until finished measurements. On next round switch to double pointed/circular needle size 6 mm and dec 5-3-5-3-3-7 sts evenly = 35-37-39-41-41-41 sts. When sleeve measures 8 cm in all sizes, insert a marker at beg of round (= mid under sleeve). On next round inc 1 st in each side of marker - Read INCREASE TIP! Repeat inc every 6-6-6-6-5-5 round 8-7-3-3-14-7 more times, then every 5-5-5-5-4-4 round a total of 6-7-12-12-2-11 times = 65-67-71-73-75-79 sts. Work the new stitches in stocking stitch. When piece measures 54-53-53-53-53-53, cast off 10 sts mid under sleeve (= 5 sts on each side of marker) = 55-57-61-63-65-69 sts remain on sleeve. YOKE: Slip sleeves on to same circular needle as body where armholes were cast off = 234-250-270-290-310-338 sts. Now continue with stocking st and pattern in every transition between front and back piece and sleeves from beg of round: Continue in stocking st over the first 28-31-34-38-42-47 sts, A.1 (= 7 sts), stocking st over the next 47-49-53-55-57-61 sts, A.1, 56-62-68-76-84-94 sts in stocking sts, A.1, 47-49-53-55-57-61 sts in stocking sts, A.1, 28-31-34-38-42-47 sts in stocking sts. Continue like this, AT THE SAME TIME dec for RAGLAN - see explanation above, and dec for neck as follows: READ ALL OF THE FOLLOWING SECTION BEFORE CONTINUING! RAGLAN: NOTE: Continue in the round until cast off for neck. Then work the rest of yoke back and forth. Repeat dec for raglan every other round/every row from RS 15-16-16-17-18-18 more times (= 8 sts per dec), then dec 2 sts on each side of every raglan(= 16 sts per dec). Repeat dec 1-1-2-2-2-3 more times. NECK DEC: When piece measures 44-45-46-47-48-49 cm, cast off the middle 14-16-16-16-18-20 sts on front piece for neck. Then work piece back and forth and work edge st towards the neck in GARTER ST - see explanation above. Then dec 1 st inside 1 edge st in garter st on each side of neck - Read DECREASE TIP! Repeat dec every other row until finished measurements. NOTE: Neck dec overlaps dec for raglan on front piece. I.e. when there is not enough sts to dec for raglan on front piece, continue dec for neck over A.1. When raglan and neck dec are done, there are approx. 44-48-50-56-62-68 sts on needle. Piece measures approx. 66-68-70-72-74-76 cm from bottom edge to shoulder. Now work an elevation in the neck: Beg from RS and work as before until 7 sts, turn, tighten yarn, work back until 7 sts remain, turn, tighten yarn, work until 10 sts remain, turn, tighten yarn, work until 10 sts remain, turn, tighten yarn, work until 13 sts remain, turn, tighten yarn, work until 13 sts remain, turn, tighten yarn, work until 16 sts remain, turn, tighten yarn, work until 16 sts remain. Cast off. SHAWL COLLAR: Start mid front on the right side of sts dec for neck. Pick up on circular needle size 5 mm with Air: 43-45-46-48-50-52 sts up to shoulder, then pick up 26-27-27-27-29-29 sts in the back of neck, and finally 43-45-46-48-50-52 sts down along left side of neck dec = 112-117-119-123-129-133 sts. (Do not pick up sts at the front of neck where sts were cast off.) K 1 row from WS while AT THE SAME TIME inc 4-7-5-5-7-7 sts evenly = 116-124-124-128-136-140 sts. Then work rib as follows (from RS): 1 edge st in garter st, * K 2, P 2 *, repeat from *-* until 3 sts remain, finish with K 2 and 1 edge st in garter st. Continue rib like this until collar measures approx. 6 cm. Now inc 1 st in each of the middle 14 P-sections, seen from RS (= back of neck) = 130-138-138-142-150-154 sts. Continue to work until collar measures 10-11-11-11-12-13 cm, cast off with K over K and P over P. ASSEMBLY: Place the collar double (left side over right side) at the bottom of neck opening and sew it to the neck line at the front through both layers. Sew the openings under the sleeves. |
|||||||
Diagram explanations |
|||||||
|
|||||||
 |
|||||||
Have you finished this pattern?Tag your pictures with #dropspattern or submit them to the #dropsfan gallery. Do you need help with this pattern?You'll find 26 tutorial videos, a Comments/Questions area and more by visiting the pattern on garnstudio.com. © 1982-2026 DROPS Design A/S. We reserve all rights. This document, including all its sub-sections, has copyrights. Read more about what you can do with our patterns at the bottom of each pattern on our site. |
|||||||


Post a comment to pattern DROPS Extra 0-1159
We would love to hear what you have to say about this pattern!
If you want to leave a question, please make sure you select the correct category in the form below, to speed up the answering process. Required fields are marked *.