DROPS Air
DROPS Air
65% Alpaca, 28% Polyamide, 7% Wool
from 5.30 € /50g
Get the yarn to make this pattern from 31.80€.

The yarn cost is calculated from the pattern’s smallest size and the yarn’s cheapest product type. Looking for an even better price? You might find it on the DROPS Deals!

DROPS SS24

Aberdeen

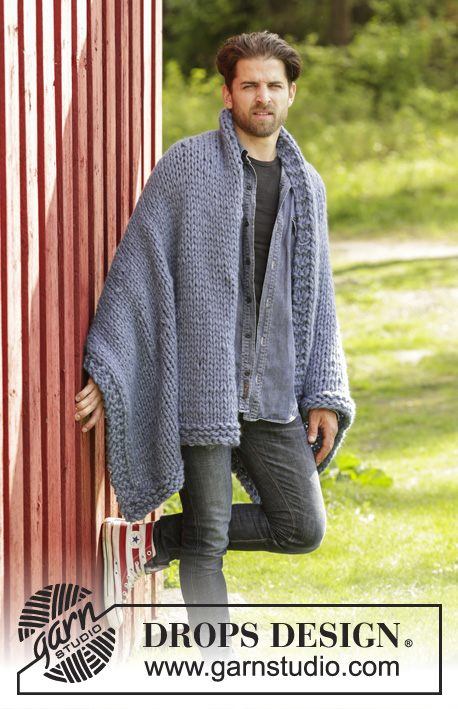
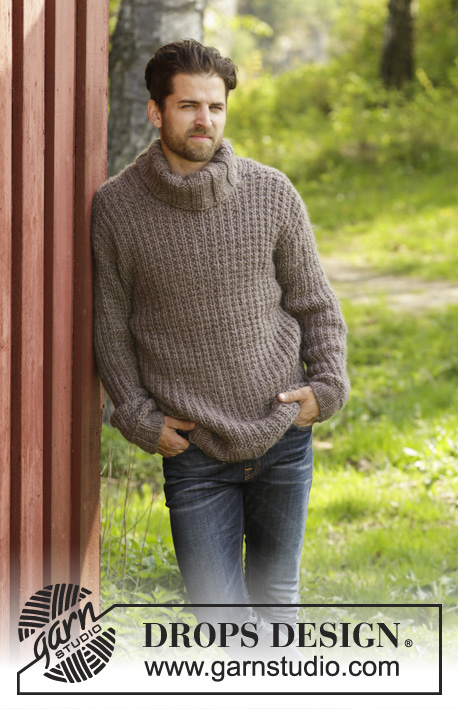
Men's knitted jumper in DROPS Air, with raglan and shawl collar. Size: S - XXXL.

DROPS Extra 0-1159
DROPS design: Pattern no ai-008
Yarn group C or A + A
----------------------------------------------------------
Size: S - M - L - XL - XXL - XXXL
Materials:
DROPS AIR from Garnstudio
300-350-350-400-450-500 g colour no 04, medium grey

DROPS DOUBLE POINTED NEEDLES AND CIRCULAR NEEDLE (40 and 80 cm) SIZE 6 mm - or size needed to get 15 sts x 19 rows in stocking st = 10 x 10 cm.
DROPS DOUBLE POINTED NEEDLES and CIRCULAR NEEDLE (80 cm) SIZE 5 mm - for rib.

-------------------------------------------------------

Alternative Yarn – See how to change yarns here
Yarn Groups A to F – Use the same pattern and change the yarn here
Yarn usage using an alternative yarn – Use our yarn converter here

-------------------------------------------------------

DROPS Air
DROPS Air
65% Alpaca, 28% Polyamide, 7% Wool
from 5.30 € /50g
Get the yarn to make this pattern from 31.80€.

The yarn cost is calculated from the pattern’s smallest size and the yarn’s cheapest product type. Looking for an even better price? You might find it on the DROPS Deals!

Pattern instructions

NOTE: This pattern is written in British English. All measurements in charts are in cm. For conversion from cm to inches - click here. There are different terms for crocheting in British and American English. If this pattern includes crochet, click for "crochet terms" here. For this pattern in American English, please click here.
GARTER ST (back and forth):
K all rows. 1 ridge = 2 rows K.

PATTERN:
See diagram A.1. The diagram shows all rows/rounds in pattern seen from RS.

RAGLAN:
All dec are done from RS!
Dec 1 st on each side of every A.1 (= 8 sts dec on row/round):
Dec as follows before A.1: Work until 2 sts before A.1, K 2 tog = 1 st dec.
Dec as follows after A.1: Slip 1 st as if to K, K 1, psso = 1 st dec.

Dec 2 sts on each side of every A.1 as follows (= 16 sts dec on row):
Dec as follows before A.1: Work until 3 sts remain before A.1, slip 1 st as if to K, K 2 tog, psso = 2 sts dec.
Dec as follows after A.1: Slip 1 st as if to K, K 2 tog, psso = 2 sts dec.

INCREASE TIP:
Inc 1 st by making 1 YO, on next round K YO twisted (i.e. work in back loop of st instead front) to avoid holes.

DECREASE TIP:
Dec inside 1 edge st in garter st. All dec are done from RS!
Dec as follows before 1 edge st: K 2 tog.
Dec after 1 edge st as follows: Slip 1 st as if to K, K 1, psso.
----------------------------------------------------------

JUMPER:
Jumper is worked in the round on circular needle up to neck. When casting off for neck, continue back and forth. Rounds start mid back.

BODY:
Cast on 176-188-204-224-244-268 sts on circular needle size 5 mm with Air. Work rib = K 2/P 2 in the round for 6 cm. Then continue in stocking st until finished measurements. On next round switch to circular needle size 6 mm and dec 32-32-36-40-44-48 sts evenly = 144-156-168-184-200-220 sts. REMEMBER THE KNITTING TENSION! When piece measures 42-43-44-45-46-47 cm, cast off for armholes in each side as follows: Work 31-34-37-41-45-50 sts in stocking st (= half back piece), cast off 10 sts under sleeve, work 62-68-74-82-90-100 sts in stocking st (= front piece), cast off 10 sts and work the remaining 31-34-37-41-45-50 sts in stocking st (= half back piece). Put piece aside and knit the sleeves.

SLEEVES:
Worked in the round on double pointed needles/circular needle.
Cast on 40-40-44-44-44-48 sts on double pointed needles size 5 mm. Work rib = K 2/P 2 for 4 cm. Then continue in stocking st until finished measurements. On next round switch to double pointed/circular needle size 6 mm and dec 5-3-5-3-3-7 sts evenly = 35-37-39-41-41-41 sts. When sleeve measures 8 cm in all sizes, insert a marker at beg of round (= mid under sleeve). On next round inc 1 st in each side of marker - Read INCREASE TIP! Repeat inc every 6-6-6-6-5-5 round 8-7-3-3-14-7 more times, then every 5-5-5-5-4-4 round a total of 6-7-12-12-2-11 times = 65-67-71-73-75-79 sts. Work the new stitches in stocking stitch. When piece measures 54-53-53-53-53-53, cast off 10 sts mid under sleeve (= 5 sts on each side of marker) = 55-57-61-63-65-69 sts remain on sleeve.

YOKE:
Slip sleeves on to same circular needle as body where armholes were cast off = 234-250-270-290-310-338 sts. Now continue with stocking st and pattern in every transition between front and back piece and sleeves from beg of round: Continue in stocking st over the first 28-31-34-38-42-47 sts, A.1 (= 7 sts), stocking st over the next 47-49-53-55-57-61 sts, A.1, 56-62-68-76-84-94 sts in stocking sts, A.1, 47-49-53-55-57-61 sts in stocking sts, A.1, 28-31-34-38-42-47 sts in stocking sts. Continue like this, AT THE SAME TIME dec for RAGLAN - see explanation above, and dec for neck as follows: READ ALL OF THE FOLLOWING SECTION BEFORE CONTINUING!

RAGLAN:
NOTE: Continue in the round until cast off for neck. Then work the rest of yoke back and forth.
Repeat dec for raglan every other round/every row from RS 15-16-16-17-18-18 more times (= 8 sts per dec), then dec 2 sts on each side of every raglan(= 16 sts per dec). Repeat dec 1-1-2-2-2-3 more times.
NECK DEC:
When piece measures 44-45-46-47-48-49 cm, cast off the middle 14-16-16-16-18-20 sts on front piece for neck. Then work piece back and forth and work edge st towards the neck in GARTER ST - see explanation above. Then dec 1 st inside 1 edge st in garter st on each side of neck - Read DECREASE TIP! Repeat dec every other row until finished measurements. NOTE: Neck dec overlaps dec for raglan on front piece. I.e. when there is not enough sts to dec for raglan on front piece, continue dec for neck over A.1.

When raglan and neck dec are done, there are approx. 44-48-50-56-62-68 sts on needle. Piece measures approx. 66-68-70-72-74-76 cm from bottom edge to shoulder.
Now work an elevation in the neck: Beg from RS and work as before until 7 sts, turn, tighten yarn, work back until 7 sts remain, turn, tighten yarn, work until 10 sts remain, turn, tighten yarn, work until 10 sts remain, turn, tighten yarn, work until 13 sts remain, turn, tighten yarn, work until 13 sts remain, turn, tighten yarn, work until 16 sts remain, turn, tighten yarn, work until 16 sts remain. Cast off.

SHAWL COLLAR:
Start mid front on the right side of sts dec for neck. Pick up on circular needle size 5 mm with Air: 43-45-46-48-50-52 sts up to shoulder, then pick up 26-27-27-27-29-29 sts in the back of neck, and finally 43-45-46-48-50-52 sts down along left side of neck dec = 112-117-119-123-129-133 sts. (Do not pick up sts at the front of neck where sts were cast off.) K 1 row from WS while AT THE SAME TIME inc 4-7-5-5-7-7 sts evenly = 116-124-124-128-136-140 sts. Then work rib as follows (from RS): 1 edge st in garter st, * K 2, P 2 *, repeat from *-* until 3 sts remain, finish with K 2 and 1 edge st in garter st. Continue rib like this until collar measures approx. 6 cm. Now inc 1 st in each of the middle 14 P-sections, seen from RS (= back of neck) = 130-138-138-142-150-154 sts. Continue to work until collar measures 10-11-11-11-12-13 cm, cast off with K over K and P over P.

ASSEMBLY:
Place the collar double (left side over right side) at the bottom of neck opening and sew it to the neck line at the front through both layers. Sew the openings under the sleeves.

This pattern has been corrected.

Updated online: 08.07.2020
Sleeves: .... Work the new sts in stocking st. When piece measures 54-53-53-53-53-53 cm, cast off 10 sts mid under sleeve (= 5 sts on each side of marker) = 55-57-61-63-65-69 sts remain on sleeve.
Updated online: 09.08.2021
New yarn amount:
DROPS AIR from Garnstudio
300-350-350-400-450-500 g colour no 04, medium grey
Updated online: 23.02.2023
SLEEVES: ... When sleeve measures 8 cm in all sizes, insert a marker at beg of round (= mid under sleeve). On next round inc 1 st in each side of marker - Read INCREASE TIP! Repeat inc every 6-6-6-6-5-5 round 8-7-3-3-14-7 more times, then every 5-5-5-5-4-4 round a total of 6-7-12-12-2-11 times = 65-67-71-73-75-79 sts. Work the new stitches in stocking stitch. When piece measures 54-53-53-53-53-53, cast off ...

Diagram

symbols = K from RS, P from WS
symbols = P from RS, K from WS
diagram

Each of our patterns has specific tutorial videos to help you.

Do you have a question? See a list of frequently asked questions (FAQ)

Knitting tension is what determines the final measurements of your work, and is usually measured per 10 x 10 cm. It is provided like so: number of stitches in width x number of rows in height - eg: 19 stitches x 26 rows = 10 x 10 cm.

The knitting tension is very individual; some people knit/crochet loosely while others work tightly. You adjust the knitting tension with the needle size, which is why the suggested needle size is only meant as a guide! You need to adjust this (up or down) to ensure that YOUR knitting tension matches the knitting tension provided in the pattern. If you work with a different knitting tension than provided you will have a different yarn consumption, and your work will have different measurements than what the pattern suggests.

The knitting tension also determines which yarns can replace each other. As long as you achieve the same knitting tension you can replace one yarn with another.

See DROPS lesson: How to measure your tension/gauge

See DROPS video: How to make a gauge tension swatch

The required amount of yarn is provided in grams, eg: 450 g. To calculate how many balls you’ll need you first need to know how many grams are in 1 ball (25g, 50g or 100g). This information is available if you click on the individual yarn quality on our pages. Divide the amount required with the amount of each ball. For example, if each ball is 50g (the most common amount), the calculation will be as follows: 450 / 50 = 9 balls.

The important thing when changing from one yarn to another is that the knitting/crochet tension remains the same. This is so that the measurements of the finished piece will be the same as on the sketch provided. It is easier to achieve the same knitting tension using yarns from the same yarn group. It is also possible to work with multiple strands of a thinner yarn to achieve the knitting tension of a thicker one. Please try our yarn converter. We recommend you to always work a test swatch.

Please NOTE: when changing yarn the garment might have a different look and feel to the garment in the photo, due to individual properties and qualities of each yarn.

See DROPS lesson: Can I use a different yarn than the one mentioned in the pattern?

All our yarns are categorised into yarn groups (from A to F) according to thickness and knitting tension – group A contains the thinnest yarns and group F the thickest. This makes it easier for you to find alternative yarns to our patterns, should you wish to switch yarn. All yarns within the same group have a similar knitting tension and can easily replace each other. However, different yarn qualities have different structures and properties which will give the finished work a unique look and feel.

Click here for an overview of the yarns in each yarn group

At the top of all our patterns you’ll find a link to our yarn calculator, which is a helpful tool should you wish to use a different yarn than suggested. By filling in the yarn quality you wish to replace, the amount (in your size) and number of strands, the calculator will present good alternative yarns with the same knitting tension. Additionally it will tell you how much you’ll require in the new qualities and whether you’ll need to work with multiple strands. Most skeins are 50g (some are 25g or 100g).

If the pattern is worked with multiple colours, every colour will have to be calculated separately. Similarly, if the pattern is worked with several strands of different yarns (for example 1 strand Alpaca and 1 strand Kid-Silk) you will have to find alternatives for each, individually.

Click here to see our yarn calculator

Since different yarns have different qualities and textures we have chosen to keep the original yarn in our patterns. However, you can easily find options among our available qualities by using our yarn calculator, or simply pick a yarn from the same yarn group.

It is possible that some retailers still have discontinued yarns in stock, or that someone has a few skeins at home that they would like to find patterns for.

The yarn calculator will provide both alternative yarn as well as required amount in the new quality.

If you think it's hard to decide what size to make, it can be a good idea to measure a garment you own already and like the size of. Then you can pick the size by comparing those measures with the ones available in the pattern's size chart.

You'll find the size chart at the bottom of the pattern.

See DROPS lesson: How to read size chart

The needle size provided in the pattern serves only as a guide, the important thing is to follow the knitting tension. And since knitting tension is very individual, you will have to adjust the needle size to ensure that YOUR tension is the same as in the pattern – maybe you’ll have to adjust 1, or even 2 needle sizes, up or down to achieve the correct tension. For this, we recommend that you work test swatches.

Should you work with a different knitting tension than the one provided, the measurements of the finished garment might deviate from the measurement sketch.

See DROPS lesson: How to measure your tension/gauge

See DROPS video: How to make a tension/gauge swatch

Working a garment top-down provides more flexibility and room for personal adjustment. For example it is easier to try the garment on while working, as well as making adjustments to length of yoke and shoulder caps.

The instructions are carefully explaining every step, in the correct order. Diagrams are adjusted to the knitting direction and are worked as usual.

The diagram depicts all rows/rounds, and every stitch seen from the right side. It is read from bottom to top, from right to left. 1 square = 1 stitch.

When working back and forth, every other row is worked from the right side and every other row is worked from the wrong side. When working from the wrong side, the diagram will have to be worked reversed: from left to right, knit stitches are purled, purl stitches are knit etc.

When working in the round every round is worked from the right side and the diagram are worked from right to left on all rounds.

See DROPS lesson: How to read knitting diagrams

The diagram depicts all rows/rounds, and every stitch seen from the right side. It is worked from bottom to top, from right to left.

When working back and forth every other row is worked from the right side: from right to left and every other row is worked from the wrong side: from left to right.

When working in the round, every row in the diagram are worked from the right side, from right to left.

When working a circular diagram you start in the middle and work your way outwards, counter clockwise, row by row.

The rows usually start with a given number of chain stitches (equivalent to the height of the following stitch), this will either be depicted in the diagram or explained in the pattern.

See DROPS lesson: How to read crochet diagrams

Instructions for working several diagrams after each other on the same row/round, will often be written like so: “work A.1, A.2, A.3 a total of 0-0-2-3-4 times". This means you work A.1 once, then A.2 is worked once, and A.3 is repeated (in width) the number of times provided for your size – in this case like so: S = 0 times, M = 0 times, L=2 times, XL= 3 times and XXL = 4 times.

The diagrams are worked as usual: begin with the first row in A.1, then work the first row in A.2 etc.

See DROPS lesson: How to read knitting diagrams

See DROPS lesson: How to read crochet diagrams

The total width of the garment (from wrist-to-wrist) will be larger in the larger sizes, despite the actual sleeves being shorter. The larger sizes have longer sleeve caps and wider shoulders, so there will be a good fit in all sizes.

The measurement sketch/schematic drawing provides information regarding the full length of the garment. If it’s a jumper or a jacket the length is measured from the highest point on the shoulder closest to the neckline, and straight down to the bottom of the garment. It is NOT measured from the tip of shoulder. Similarly, the length of yoke is measured from the highest point on the shoulder and down to where yoke is split into body and sleeves.

On a jacket measures are never taken along bands, unless specifically stated. Always measure inside band stitches when measuring the length.

See DROPS lesson: How to read a schematic drawing

Diagrams are often repeated on the round or in height. 1 repeat is the diagram the way it appears in the pattern. If it says to work 5 repeats of A.1 in the round, then you work A.1 a total of 5 times after/next to each other in the round. If it says to work 2 repeats of A.1 vertically/in height you work the entire diagram once, then begin again at the start and work the entire diagram one more time.

Chain stitches are slightly narrower than other stitches and to avoid working the cast-on edge too tight, we simply chain more stitches to begin with. The stitch count will be adjusted on the following row to fit the pattern and measurement sketch.

The rib edge is more elastic and will contract slightly compared to, for example, stocking stitch. By increasing before the rib edge, you avoid a visible difference in width between the rib edge and the rest of the body.

It’s very easy to cast off too tightly, and by making yarn overs while casting off (and simultaneously casting these off) you avoid a too tight cast off edge.

See DROPS video: How to bind off with yarn overs (yo)

To achieve an even increase (or decrease) you can increase on, for example: every 3rd and 4th row alternately, like so: work 2 rows and increase on the 3rd row, work 3 rows and increase on the 4th. Repeat this until the increase is complete.

See DROPS lesson: Increase or decrease 1 st on every 3rd and 4th row alternately

Should you prefer to work in the round instead of back and forth, you may of course adjust the pattern. You’ll need to add steeks mid-front (usually 5 stitches), and follow the instructions. When you would normally turn and work from the wrong side, simply work across the steek and continue in the round. At the end you’ll cut the piece open, pick up stitches to work bands, and cover the cut edges.

See DROPS video: How to knit steeks and cut open

Should you prefer to work back and forth instead of in the round, you may of course adjust the pattern so you work the pieces separately and then assemble them at the end. Divide the stitches for the body in 2, add 1 edge stitch in each side (for sewing) and work the front and back pieces separately.

See DROPS lesson: Can I adapt a pattern for circular needles into straight needles?

Pattern repeats can vary slightly in the different sizes, in order to get the correct proportions. If you’re not working the exact same size as the garment in the photo, yours might deviate slightly. This has been carefully developed and adjusted so that the complete impression of the garment is the same in all sizes.

Make sure to follow instructions and diagrams for your size!

If you have found a pattern you like which is available in women’s size it’s not very difficult to convert it to men’s size. The biggest difference will be the length of sleeves and body. Start working on the women size that you think would fit across the chest. The additional length will be worked right before you cast off for the armhole/sleeve cap. If the pattern is worked top-down you can add the length right after the armhole or before the first decrease on sleeve.

Regarding additional yarn amount, this will depend on how much length you add, but it is better with a skein too many than too few.

All yarns will have excess fibres (from production) that might come off as lint or shedding. Brushed yarns (ie hairier yarns) have more of these loose, excess fibres, causing more shedding.

Shedding also depends on what is worn under or over the garment, and whether this pulls at the yarn fibres. It’s therefore not possible to guarantee that there will be no shedding

Below are some tips on how to get the best result when working with hairier yarns:

1. When the garment is finished (before you wash it) shake it vigorously so the looser hairs come off. NOTE: do NOT use a lint roller, brush or any method that pulls at the yarn.

2. Place the garment in a plastic bag and put it in your freezer - the temperature will cause the fibres to become less attached to each other, and excess fibres will come off easier.

3. Leave in the freezer for a few hours before taking it out and shaking it again.

4. Wash the garment according to the instructions on the yarn label.

Pilling is a natural process that happens to even the most exclusive of fibers. It's a natural sign of wear and tear that is hard to avoid, and that is most visible in high friction areas of your garment like a sweater's arms and cuffs.

You can make your garment look as new by removing the pilling, using a fabric comb or a pill/lint remover.

Still can't find the answer you need? Then scroll down and leave your question so one of our experts can try to help you. This will be done normally within 5 to 10 working days.
In the meantime, you can read the questions and answers that others have left to this pattern or join the DROPS Workshop on Facebook to get help from fellow knitters/crocheters!

You might also like...

Aberdeen

Lelia Scott, United States

Aberdeen

Kammya, India

712. Aberdeen

Olajda, Norway

Post a comment to pattern DROPS Extra 0-1159

We would love to hear what you have to say about this pattern!

If you want to leave a question, please make sure you select the correct category in the form below, to speed up the answering process. Required fields are marked *.

Comments / Questions (259)

country flag Paola wrote:

Volevo ringraziarvi per la semplicità di spiegazione. Ho realizzato il maglione ed è stato molto apprezzato. Vorrei inviarvi la fotografia del risultato ma non so come farvela avere. Grazie mille

11.04.2024 - 20:32

country flag Maggie wrote:

In the pattern for the Body, second line, what is meant by " until finished measurements"?

02.04.2024 - 02:30

DROPS Design answered:

Hi Maggie, This means that you continue with stocking stitch for the rest of the piece. Happy knitting!

02.04.2024 - 06:36

country flag Paola wrote:

Quando nella lavorazione dell alzata per il collo a scialle indicate di continuare a lavorare fino a che rimangono 7 m si intende che si continuano le diminuzioni? Dopodiché raggiunte le 7 m, cosa significa girare (per il ferro di ritorno ) stringere il filo e continuare finché restano 10 maglie e poi ancora finché restano 13 maglie ? Le maglie totali crescono quindi bisogna fare degli aumenti sul ferro a dritto ? Grazie mille

30.03.2024 - 16:30

DROPS Design answered:

Buonasera Paola, l'alzata sul collo si lavora a ferri accorciati, significa che deve lavorare su una parte delle maglie e non su tutte le maglie sul ferro. Buon lavoro!

01.04.2024 - 20:17

country flag Anja wrote:

Liebes Drops-Team, ich habe am 23.3.24 eine Frage zum Pullover Aberdeen gestellt, aber leider noch keine Antwort erhalten. Da ich gerne weiter stricken möchte, würde ich mich über Unterstützung sehr freuen. Liebe Grüße Anja

26.03.2024 - 19:03

country flag Anja wrote:

Liebes Drops-Team, ich habe am 23.3.24 eine Frage zum Pullover Aberdeen gestellt, aber leider bis heute noch keine Antwort bekommen. Da ich gerne weiterstricken möchte, würde ich mich über eine baldige Antwort sehr freuen. Viele Grüße Anja

26.03.2024 - 18:31

DROPS Design answered:

Siehe unten. Danke für Ihren Geduld.

02.04.2024 - 10:30

country flag Anja wrote:

Ich stricke den Pullover Aberdeen in XXL. Bei der Passe stimmt meiner Meinung nach die Maschenanzahl nicht. Ich habe gesamt 310 Maschen auf der Nadel. Dann soll ich 42 M stricken , 2M abnehmen, 57M stricken, 2 M abnehmen, 84M stricken, 2M abnehmen, 57M stricken, 2 M abnehmen und 42M stricken. Gesamt sind das dann 286 Maschen. Was geschieht dann mit den restlichen 24 Maschen? oder liege ich da falsch. Über eine schnelle Antwort würde ich mich sehr freuen. Liebe Grüße Anja

23.03.2024 - 16:32

DROPS Design answered:

Liebe Anja, die Beschreibung gilt für die 310 Maschen dh bei der 1. Runde aber dann soll mann für den Raglan abnehmen, es wird dann weniger Maschen glatt rechts gestrickt, damit die Abnahmen beidseitig von A.1 gestrickt werden - siehe unter RAGLANABNAHMEN wie man für den Raglan abnehmen wird. Viel Spaß beim Stricken!

02.04.2024 - 08:52

country flag Nikki wrote:

I am guessing "Now inc 1 St in each of the middle 14P- sections, seen from RS (=back of neck) means that I need to k2 m1 p2 m1 k2 etc at the centre back neck - but how do you do that and keep the rib2 pattern? What is 14 p-sections?

18.03.2024 - 21:48

DROPS Design answered:

Dear Nikkik, you are working in rib K2, P2, along neck, count the 14 sections with P2 of the rib on the middle of neck, then increase 1 stitch, you will then have K2, P2 at the beg, then K2, P3 a total of 14 times then finish with K2, P2. See here how to increase in purl stitches. Happy knitting!

19.03.2024 - 11:08

country flag Sylvie wrote:

Bonjour, je n’arrive pas à interpréter cette phrase. « en rond pendant 6 cm. Continuer ensuite avec l'aiguille circulaire 6 en jersey jusqu'à la fin, et, au tour suivant, répartir 32-32-36-40-44-48 diminutions = 144-156-168-184-200-220 m. » On continue en aiguille circulaire jusqu’à quelle fin? Et quel est le tour suivant ? Merci.

10.01.2024 - 14:02

DROPS Design answered:

Bonjour Sylvie, on tricote les côtes 2/2 pendant 6 cm avec les aiguilles 5, puis au tour suivant, on tricote avec l'aiguille circulaire 6 (qui servira jusqu'à ce qu'on rabatte les mailles des épaules = fin du dos/devant), et en même temps sur ce 1er tour, on va diminuer à intervalles réguliers, puis on continue en jersey. Bon tricot!

10.01.2024 - 16:20

country flag Monica wrote:

Hej! Under avsnittet Raglan, 3:e meningen står det: Upprepa minskn till raglan på vartannat v/varje v från rätsidan 15-16-16-17-18-18 ggr till. Ska minskn ske vartannat v eller varje v?

21.12.2023 - 09:49

DROPS Design answered:

Hej Monica. Det ska vara minskning vartannat varv (alla minskningar görs från rätsidan). Mvh DROPS Design

21.12.2023 - 12:13

country flag Blandine wrote:

Bonjour, Je ne sais pas comment interpréter les explications pour la fin de l'encolure : "augmenter maintenant 1m dans chacune des 14m sections en mailles envers vu sur l'endroit, du milieu du col (=encolure dos)". Je fais le modèle en XL, j'ai 7 sections envers au milieu du dos, si je prends dans les sections sur les côtés, ce ne sera pas centré. À moins qu'il faille passer en côtes 2/4 sur l'encolure dos et je rajoute 2m par section ?

17.12.2023 - 22:39

DROPS Design answered:

Bonjour Blandine, vous pouvez alors augmenter dans les 15 sections centrales pour que ces augmentations soient symétriques, l'important est de bien les centrer pour que le col tombe joliment. Bon tricot!

18.12.2023 - 09:32