
Popular categories
Looking for a yarn?


Comments / Questions (297)
![]() Bice wrote:
Bice wrote:
Non è ben chiaro se le diminuizioni per il raglan si devono fare ad ogni giro o ad ogni due giri, perché quando poi si lavora in piano dice ad ogni ferro sul diritto del lavoro. Greazie
14.10.2025 - 18:18DROPS Design answered:
Buonasera Bice, in quel punto si lavora in piano, per cui gli aumenti sono ogni 2 ferri, sul diritto del lavoro. Buon lavoro!
14.10.2025 - 22:25
![]() Christian wrote:
Christian wrote:
Vielen lieben Dank für die schnelle Antwort!
05.09.2025 - 10:26
![]() Christian wrote:
Christian wrote:
Ich habe eine Frage zum Abschluss der Ärmel. Bei der erreichten Gesamtlänge sollen10 M abgekettet werden, jeweils 5 M beidseitig des Markierers. Was mache ich mit der Masche, auf der der Markierer liegt? Wenn ich diese M auch abkette, werden insgesamt 11 M abgekettet. Kette ich also etwa 4 M links des Markierers, den Markierer und dann 5 M rechts des Markierers ab? Ich würde mich sehr über eine Antwort freuen!
04.09.2025 - 19:00DROPS Design answered:
Liebe Christian, wenn der Markierer in die 1. Masche der Runde eingesetzt wird, dann ketten Sie die letzten 5 Maschen + die ersten 5 Maschen (= die Masche mit dem Markierer + die nächsten 4 Maschen) der Runde ab. Viel Spaß beim Stricken!
05.09.2025 - 07:36
![]() Eugenia wrote:
Eugenia wrote:
Pésimo padrón no se entiende
02.06.2025 - 03:16
![]() Donna HUTCHINSON wrote:
Donna HUTCHINSON wrote:
Regarding the decrease after the band. 32sts seems too many. Is it correct or an error? The size will alter significantly.
01.06.2025 - 13:55DROPS Design answered:
Dear Donna, the decreases are correct for starting in stocking stitch in the correct gauge and get the correct sizing. We decrease to compensate for the difference in gauge between the stocking stitch (gauge indicated in the swatch at the top) and the rib (which is much tighter). Happy knitting!
01.06.2025 - 23:27
![]() Christiane Lass wrote:
Christiane Lass wrote:
Zu meiner Anleitung Drops Extra 0-1159 habe ich eine Frage: Wie kann ich bei der Raglanabnahme zum Ende hin pro Hinrunde 16 Maschen abnehmen, wenn durch die Halsausschnittabnahmen vorne nicht genug Maschen übrig sind?
08.03.2025 - 22:14DROPS Design answered:
Liebe Frau Lass, dann wird man in A.1 abnehmen, siehe BITTE BEACHTEN. Viel Spaß beim Stricken!
10.03.2025 - 08:44
![]() Patricia Macpherson wrote:
Patricia Macpherson wrote:
After ribbing do you switch to 6mm for the body then knit to required length? Pattern reads you switch needles after you get to length. And why and when do you do the decrease of 40 stitches for xl?
02.03.2025 - 22:02DROPS Design answered:
Hi Patricia, You change to needle size 6 mm after the ribbing, so the stocking stitch is worked with 6 mm needles. The decrease of 40 stitches (evenly spaced) is on the first stocking stitch round. Happy knitting!
03.03.2025 - 06:35
![]() Angel wrote:
Angel wrote:
This is a horribly written pattern. Clearly based on comments here the way you've formatted it isn't clear to people, but you can't be bothered to edit it. The only reason I pulled it off is because I've made so many sweaters before. Otherwise I would have been lost.
19.02.2025 - 02:46
![]() Leentje Van Dorst wrote:
Leentje Van Dorst wrote:
Hoi, Ik heb de mouwen aan de rondbreinaald toegevoegd. Ik heb een vraag met betrekking tot de raglan. Er zijn een vast aantal steken te volgen voor achter,mouw,voor,mouw, achter. Hiertussen komt de raglan. Blijf je steeds de 34-53-68-53-34 aanhouden of veranderd dit doordat je mindert voor en na de raglan? Alvast bedankt
09.02.2025 - 19:00DROPS Design answered:
Dag Leentje,
Je mindert voor de raglan, dus er komen inderdaad steeds minder steken op zowel de mouwen als op de panden.
11.02.2025 - 21:15
![]() Karine wrote:
Karine wrote:
Tere. Kui palju silmuseid peab jääma pärast raglaani ja kaeluse kahandamist? Koon M suurust. Kuidas edasi kahandada ma ei saanud aru kui pole enam silmuseid raglaani kahanduse jaoks esiosal, jätka kaelakaare kahandustega üle skeemi A.1.Kas kaelakaare kahandamist tuleb hakata tegema kohe kui olen 16 silma kahandanud?
13.01.2025 - 10:21
|
|||||||
Aberdeen |
|||||||
 |
 |
||||||
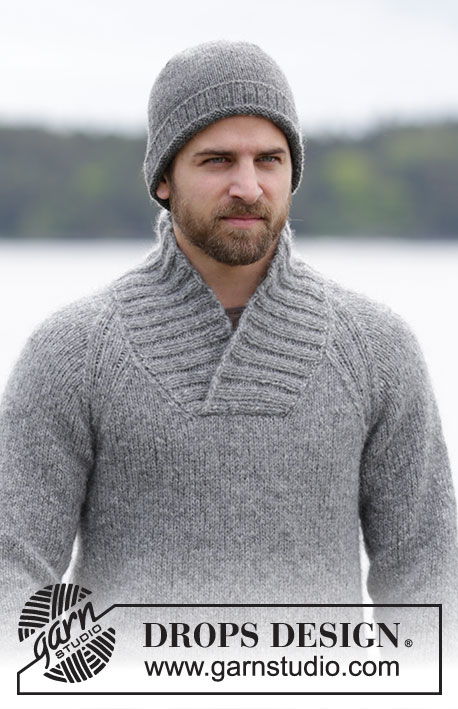
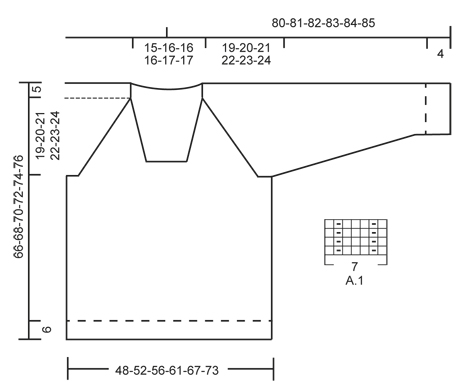
Men's knitted jumper in DROPS Air, with raglan and shawl collar. Size: S - XXXL.
DROPS Extra 0-1159 |
|||||||
|
GARTER ST (back and forth): K all rows. 1 ridge = 2 rows K. PATTERN: See diagram A.1. The diagram shows all rows/rounds in pattern seen from RS. RAGLAN: All dec are done from RS! Dec 1 st on each side of every A.1 (= 8 sts dec on row/round): Dec as follows before A.1: Work until 2 sts before A.1, K 2 tog = 1 st dec. Dec as follows after A.1: Slip 1 st as if to K, K 1, psso = 1 st dec. Dec 2 sts on each side of every A.1 as follows (= 16 sts dec on row): Dec as follows before A.1: Work until 3 sts remain before A.1, slip 1 st as if to K, K 2 tog, psso = 2 sts dec. Dec as follows after A.1: Slip 1 st as if to K, K 2 tog, psso = 2 sts dec. INCREASE TIP: Inc 1 st by making 1 YO, on next round K YO twisted (i.e. work in back loop of st instead front) to avoid holes. DECREASE TIP: Dec inside 1 edge st in garter st. All dec are done from RS! Dec as follows before 1 edge st: K 2 tog. Dec after 1 edge st as follows: Slip 1 st as if to K, K 1, psso. ---------------------------------------------------------- JUMPER: Jumper is worked in the round on circular needle up to neck. When casting off for neck, continue back and forth. Rounds start mid back. BODY: Cast on 176-188-204-224-244-268 sts on circular needle size 5 mm with Air. Work rib = K 2/P 2 in the round for 6 cm. Then continue in stocking st until finished measurements. On next round switch to circular needle size 6 mm and dec 32-32-36-40-44-48 sts evenly = 144-156-168-184-200-220 sts. REMEMBER THE KNITTING TENSION! When piece measures 42-43-44-45-46-47 cm, cast off for armholes in each side as follows: Work 31-34-37-41-45-50 sts in stocking st (= half back piece), cast off 10 sts under sleeve, work 62-68-74-82-90-100 sts in stocking st (= front piece), cast off 10 sts and work the remaining 31-34-37-41-45-50 sts in stocking st (= half back piece). Put piece aside and knit the sleeves. SLEEVES: Worked in the round on double pointed needles/circular needle. Cast on 40-40-44-44-44-48 sts on double pointed needles size 5 mm. Work rib = K 2/P 2 for 4 cm. Then continue in stocking st until finished measurements. On next round switch to double pointed/circular needle size 6 mm and dec 5-3-5-3-3-7 sts evenly = 35-37-39-41-41-41 sts. When sleeve measures 8 cm in all sizes, insert a marker at beg of round (= mid under sleeve). On next round inc 1 st in each side of marker - Read INCREASE TIP! Repeat inc every 6-6-6-6-5-5 round 8-7-3-3-14-7 more times, then every 5-5-5-5-4-4 round a total of 6-7-12-12-2-11 times = 65-67-71-73-75-79 sts. Work the new stitches in stocking stitch. When piece measures 54-53-53-53-53-53, cast off 10 sts mid under sleeve (= 5 sts on each side of marker) = 55-57-61-63-65-69 sts remain on sleeve. YOKE: Slip sleeves on to same circular needle as body where armholes were cast off = 234-250-270-290-310-338 sts. Now continue with stocking st and pattern in every transition between front and back piece and sleeves from beg of round: Continue in stocking st over the first 28-31-34-38-42-47 sts, A.1 (= 7 sts), stocking st over the next 47-49-53-55-57-61 sts, A.1, 56-62-68-76-84-94 sts in stocking sts, A.1, 47-49-53-55-57-61 sts in stocking sts, A.1, 28-31-34-38-42-47 sts in stocking sts. Continue like this, AT THE SAME TIME dec for RAGLAN - see explanation above, and dec for neck as follows: READ ALL OF THE FOLLOWING SECTION BEFORE CONTINUING! RAGLAN: NOTE: Continue in the round until cast off for neck. Then work the rest of yoke back and forth. Repeat dec for raglan every other round/every row from RS 15-16-16-17-18-18 more times (= 8 sts per dec), then dec 2 sts on each side of every raglan(= 16 sts per dec). Repeat dec 1-1-2-2-2-3 more times. NECK DEC: When piece measures 44-45-46-47-48-49 cm, cast off the middle 14-16-16-16-18-20 sts on front piece for neck. Then work piece back and forth and work edge st towards the neck in GARTER ST - see explanation above. Then dec 1 st inside 1 edge st in garter st on each side of neck - Read DECREASE TIP! Repeat dec every other row until finished measurements. NOTE: Neck dec overlaps dec for raglan on front piece. I.e. when there is not enough sts to dec for raglan on front piece, continue dec for neck over A.1. When raglan and neck dec are done, there are approx. 44-48-50-56-62-68 sts on needle. Piece measures approx. 66-68-70-72-74-76 cm from bottom edge to shoulder. Now work an elevation in the neck: Beg from RS and work as before until 7 sts, turn, tighten yarn, work back until 7 sts remain, turn, tighten yarn, work until 10 sts remain, turn, tighten yarn, work until 10 sts remain, turn, tighten yarn, work until 13 sts remain, turn, tighten yarn, work until 13 sts remain, turn, tighten yarn, work until 16 sts remain, turn, tighten yarn, work until 16 sts remain. Cast off. SHAWL COLLAR: Start mid front on the right side of sts dec for neck. Pick up on circular needle size 5 mm with Air: 43-45-46-48-50-52 sts up to shoulder, then pick up 26-27-27-27-29-29 sts in the back of neck, and finally 43-45-46-48-50-52 sts down along left side of neck dec = 112-117-119-123-129-133 sts. (Do not pick up sts at the front of neck where sts were cast off.) K 1 row from WS while AT THE SAME TIME inc 4-7-5-5-7-7 sts evenly = 116-124-124-128-136-140 sts. Then work rib as follows (from RS): 1 edge st in garter st, * K 2, P 2 *, repeat from *-* until 3 sts remain, finish with K 2 and 1 edge st in garter st. Continue rib like this until collar measures approx. 6 cm. Now inc 1 st in each of the middle 14 P-sections, seen from RS (= back of neck) = 130-138-138-142-150-154 sts. Continue to work until collar measures 10-11-11-11-12-13 cm, cast off with K over K and P over P. ASSEMBLY: Place the collar double (left side over right side) at the bottom of neck opening and sew it to the neck line at the front through both layers. Sew the openings under the sleeves. |
|||||||
Diagram explanations |
|||||||
|
|||||||
 |
|||||||
Have you finished this pattern?Tag your pictures with #dropspattern or submit them to the #dropsfan gallery. Do you need help with this pattern?You'll find 26 tutorial videos, a Comments/Questions area and more by visiting the pattern on garnstudio.com. © 1982-2026 DROPS Design A/S. We reserve all rights. This document, including all its sub-sections, has copyrights. Read more about what you can do with our patterns at the bottom of each pattern on our site. |
|||||||


With over 40 years in knitting and crochet design, DROPS Design offers one of the most extensive collections of free patterns on the internet - translated to 17 languages. As of today we count 324 catalogues and 12290 patterns translated into English (UK/cm).
We work hard to bring you the best knitting and crochet have to offer, inspiration and advice as well as great quality yarns at incredible prices! Would you like to use our patterns for other than personal use? You can read what you are allowed to do in the Copyright text at the bottom of all our patterns. Happy crafting!
Post a comment to pattern DROPS Extra 0-1159
We would love to hear what you have to say about this pattern!
If you want to leave a question, please make sure you select the correct category in the form below, to speed up the answering process. Required fields are marked *.