
Popular categories
Looking for a yarn?


Comments / Questions (24)
![]() Tina wrote:
Tina wrote:
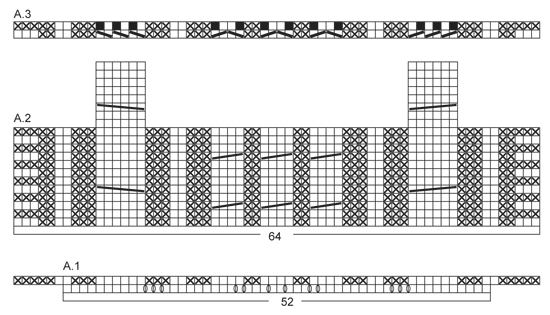
Takk for svar 😊 Så det vil si at når jeg repeterer diagram A.2 første gang så vil fletteomgangen for både de store og de små flettene komme samtidig? Det hadde vært lettere å forstå om det stod en «repiteringspil» på siden av diagrammet som gjalt høyden.
31.10.2024 - 09:30DROPS Design answered:
Hej Tina, de små fletter kommer på pind 3, 9, 15, 21 og de store kommer på pind 5, 15, 25 osv :)
31.10.2024 - 14:59
![]() Tina wrote:
Tina wrote:
Diagram A.2: Skal det strikkes 9 eller 11 pinner mellom hver store flette i høyden? Eller 9 og 11 annenhver gang? Får det ikke til å stemme. Det som forvirrer meg er disse omgangene som vises i høyden som oppstikkere, hvis det gir mening.
30.10.2024 - 18:13DROPS Design answered:
Hej Tina, i diagram A.2 strikker du 9 pinde mellem hver stor snoning :)
31.10.2024 - 08:53
![]() Evelyne SENNELIER wrote:
Evelyne SENNELIER wrote:
Bonjour, Je souhaite commencer le modèle DROPS 163-2 mais je ne comprends pas bien le début : dois-je monter 52 mailles et en même temps inclure 12 jetés ou dois-je monter 52 mailles et lors du premier rang inclure les 12 jetés ? Pourquoi ne pas monter directement 64 mailles ? Merci beaucoup pour votre réponse !
26.08.2024 - 13:24DROPS Design answered:
Bonjour Mme Sennelier, pour la couverture, vous montez 52 mailles et tricotez 3 côtes mousse (= 6 rangs endroit), puis vous tricotez le diagramme A.1 et vous augmentez 12 mailles au 1er rang - il faut davantage de mailles pour les torsades que pour la bordure point mousse, raison pour laquelle on augmente au 1er rang de A.1; on a ainsi suffisamment de mailles pour tricoter A.2 tout en conservant la largeur souhaitée. Bon tricot!
27.08.2024 - 08:55
![]() Yvette wrote:
Yvette wrote:
Goedemiddag, Ik heb nog niet zo veel ervaring in het lezen van telpatronen en mijn vraag gaat dan ook over telpatroon A.2. Van de grote kabels staan 20 rijen afgebeeld, terwijl van de rest van het patroon 12 rijen zijn afgebeeld. Hoe moet ik dat interpreteren? Hoe brei ik de resterende 8 rijen naast de grote kabels die niet zijn afgebeeld? Alvast hartelijk dank voor uw antwoord.
18.08.2019 - 18:12DROPS Design answered:
Dag Yvette,
De telpatronen herhalen zich in de hoogte, maar over de kabels heb je een andere herhaalfrequentie, dus je begint gewoon weer op de eerste rij over de rest van de steken, terwijl de kabel nog een stukje in de hoogte doorloopt.
01.09.2019 - 13:54
![]() Bente wrote:
Bente wrote:
Hei, jeg skulle gjerne hatt tips på hvordan jeg kan gjøre det for å lage dette større, ca 120x180?
29.04.2019 - 09:49DROPS Design answered:
Hei Bente. Du kan feks gjenta deler av diagrammene i bredden. Hele diagram A.2 måler 80 cm i bredden, og du må legge til 40 cm, for å få 120 cm. Dvs du kan legge til tilsvarende en halv rapport til av A.2. Det blir opp til deg hvilke flettekombinasjoner du vil legge til, men feks kan du strikke dobbelt så mange av de små flettene på midten. Når det gjelder lengden er det bare å fortsette flettemønsteret til ferdige mål. Garnforbuket kan du regne ut ved å finne ut hvor mange gram som går med til hver kvadratcm, og gange opp med det nye arealet. God fornøyelse
29.04.2019 - 13:48
![]() Sharon wrote:
Sharon wrote:
If I use my 15mm needles would it present any problems that I cant Foresee? I dont want my stitches any looser than they look on my 15mm needle test. I have 30 balls, so Its fine if it uses more yarn and Ill need to add more stitches to make it the same size. Thanks in advance for your advice.
14.04.2019 - 21:16DROPS Design answered:
Dear Sharon, with needes that are smaler than the suggested, your fabric will be denser, less fleaxible, it will have less drape. The piece will need more yarn, and more stitches as well. However it probably will hold up to time somewhat better. Please do a swatch and determine the necessary changes in the stitch count. Happy Knitting!
15.04.2019 - 21:33
![]() Corinne wrote:
Corinne wrote:
Bonjour, j'ai une question concernant la quantité de laine à prévoir pour le coussin. Je pense que la quantité prévue de 600 g est une erreur ? Merci pour votre réponse
10.02.2019 - 03:33DROPS Design answered:
Bonjour Corinne! C'est correct. Ce fil appartient au group de fils F, il est donc tres epais. Bon tricot!
11.02.2019 - 07:30
![]() Corinne wrote:
Corinne wrote:
Bonjour, j'ai une question concernant la quantité de laine à prévoir pour le coussin. Je pense que la quantité prévue de 600 g est une erreur ? Merci pour votre réponse
10.02.2019 - 03:26DROPS Design answered:
Bonjour Corine, il faut bien 600 g DROPS Polaris, soit 6 pelotes de 100 g sur la base de l'échantillon pour réaliser le coussin. Bon tricot!
11.02.2019 - 12:21
![]() Karolina wrote:
Karolina wrote:
Hi :) I just want to make sure, needles nr 20 means needles size 20mm?
05.02.2018 - 12:51DROPS Design answered:
Dear Karolina, that's correct, you need here needle size 20 mm. Happy knitting!
05.02.2018 - 13:21
![]() Melinda Fülöp wrote:
Melinda Fülöp wrote:
Hej Nu har jag stickat de 12 första varven. Men hur fortsätter jag sen?? Jag förstår att jag ska börja om igen, men varven till flätmönstret stämmer inte. Det är 3 varv till man ska göra flätan medan det i början av mönstret är 5 varv till flätan
01.08.2017 - 16:02DROPS Design answered:
Hej! Du ska upprepa de 12 varven i diagrammet, det blir då alltid 5 varv mellan flätvridningarna.
02.08.2017 - 13:38
|
||||||||||||||||||||||||||||
Frosty Cables#frostycablesset |
||||||||||||||||||||||||||||
 |
 |
|||||||||||||||||||||||||||
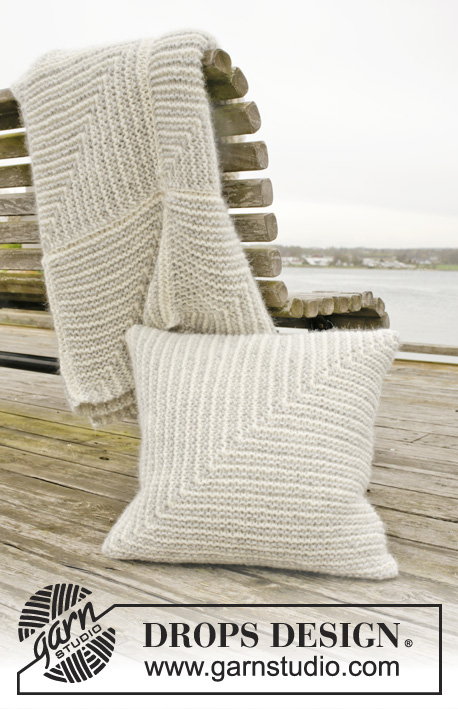
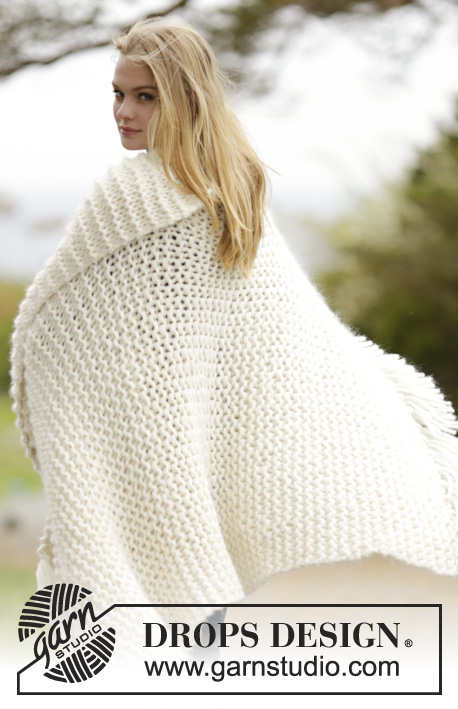
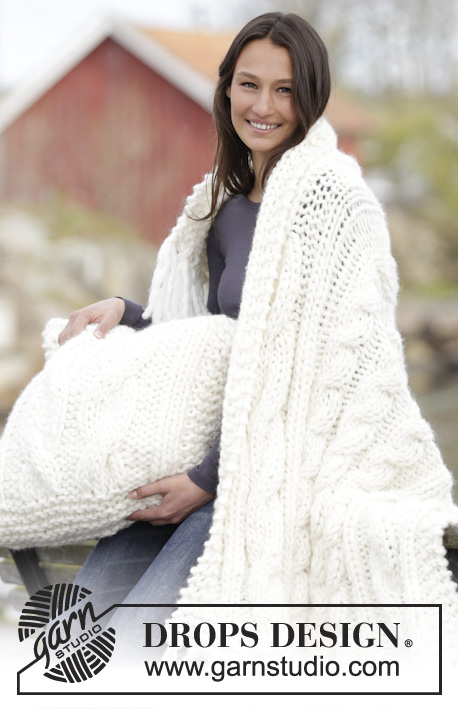
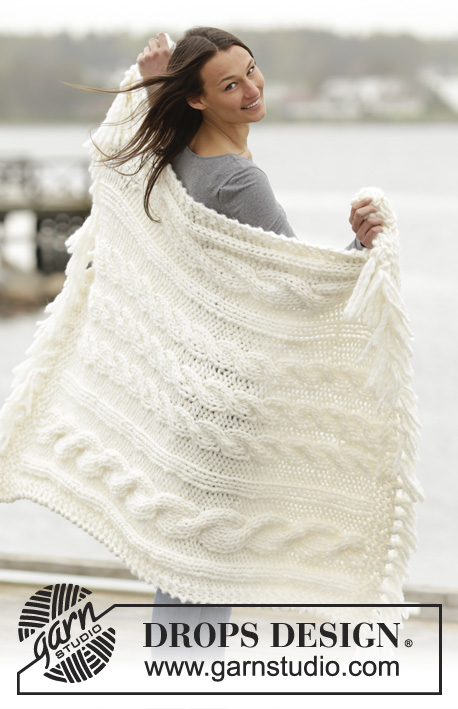
Set consists of: Knitted DROPS blanket and pillow with cables in ”Polaris”.
DROPS 163-2 |
||||||||||||||||||||||||||||
|
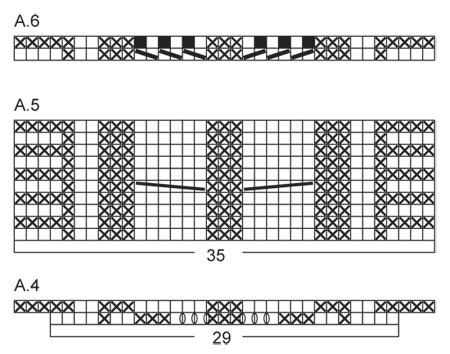
GARTER ST (back and forth): K all rows. 1 ridge = 2 rows K. PATTERN: See diagrams A.1 to A.3 (= blanket) and diagrams A.4 to A.6 (= pillow). The diagrams show all rows in pattern seen from RS. TIP FOR CHANGING YARN: When switching ball with Polaris, split the old strand in two on the last 15 cm – cut off one part, do the same on the new strand. Place the first and last 15 cm on top of each other so that the yarn is the normal thickness and continue to work – this is done to make the strand switch invisible in the yarn. ---------------------------------------------------------- BLANKET: The piece is worked back and forth on circular needle because of no of sts. Cast on 52 sts on circular needle size 20 mm with Polaris. Work 3 ridges in GARTER ST - see explanation above. Then work pattern according to diagram A.1. When A.1 has been worked 1 time vertically, there are 64 sts on needle. Then continue pattern according to diagram A.2. REMEMBER KNITTING TENSION AND READ TIP FOR CHANGNING YARN. When piece measures approx. 122 cm – adjust so that 3 or 5 rows have been worked after a cable row in a large cable, work pattern according to diagram A.3. When A.3 has been worked 1 time vertically, there are 52 sts on needle. Work 3 ridges in garter st and LOOSELY cast off with K from RS. FRINGES: Fasten fringes in every other st along cast-on and cast-off edge on blanket as follows: Cut 2 strands Polaris of 40 cm, fold them double and pull the loop through a st and then pull yarn ends through the loop. ---------------------------------------------------------- PILLOW: A pillow casing consist of 1 long part that is folded in the middle and sewn tog along three sides. The piece is worked back and forth on circular needle because of no of sts. Cast on 29 sts on circular needle size 20 mm with Polaris. Work 4 ridges in GARTER ST - see explanation above. * Work pattern according to diagram A.4. When A.4 has been worked 1 time vertically, there are 35 sts on needle. Then continue pattern according to diagram A.5. REMEMBER THE KNITTING TENSION When pillow measures approx. 36 cm – adjust so that 3 or 5 rows have been worked after a cable row, work pattern according to diagram A.6 = 29 sts on needle *. Work 4 ridges, insert 1 marker (= middle – fold pillow here) and work 4 ridges. Then repeat from *-* 1 more time - NOTE: Adjust so that A.5 is worked the same length as on first part. Work 4 ridges in garter st and LOOSELY cast off with K from RS. ASSEMBLY: Fold piece in the middle at marker, WS against WS. Sew 2 of the sides tog edge to edge in outer loops of edge sts. Fill the pillow casing with a pillow and then sew along the last side. |
||||||||||||||||||||||||||||
Diagram explanations |
||||||||||||||||||||||||||||
|
||||||||||||||||||||||||||||
 |
||||||||||||||||||||||||||||
 |
||||||||||||||||||||||||||||
Have you finished this pattern?Tag your pictures with #dropspattern #frostycablesset or submit them to the #dropsfan gallery. Do you need help with this pattern?You'll find 17 tutorial videos, a Comments/Questions area and more by visiting the pattern on garnstudio.com. © 1982-2026 DROPS Design A/S. We reserve all rights. This document, including all its sub-sections, has copyrights. Read more about what you can do with our patterns at the bottom of each pattern on our site. |
||||||||||||||||||||||||||||


With over 40 years in knitting and crochet design, DROPS Design offers one of the most extensive collections of free patterns on the internet - translated to 17 languages. As of today we count 324 catalogues and 12290 patterns translated into English (UK/cm).
We work hard to bring you the best knitting and crochet have to offer, inspiration and advice as well as great quality yarns at incredible prices! Would you like to use our patterns for other than personal use? You can read what you are allowed to do in the Copyright text at the bottom of all our patterns. Happy crafting!
Post a comment to pattern DROPS 163-2
We would love to hear what you have to say about this pattern!
If you want to leave a question, please make sure you select the correct category in the form below, to speed up the answering process. Required fields are marked *.