DROPS Snow
DROPS Snow
100% Wool
from 2.00 £ /50g
Get the yarn to make this pattern from 58.00£.

The yarn cost is calculated from the pattern’s smallest size and the yarn’s cheapest product type. Looking for an even better price? You might find it on the DROPS Deals!

DROPS Super Sale

Let's Relax

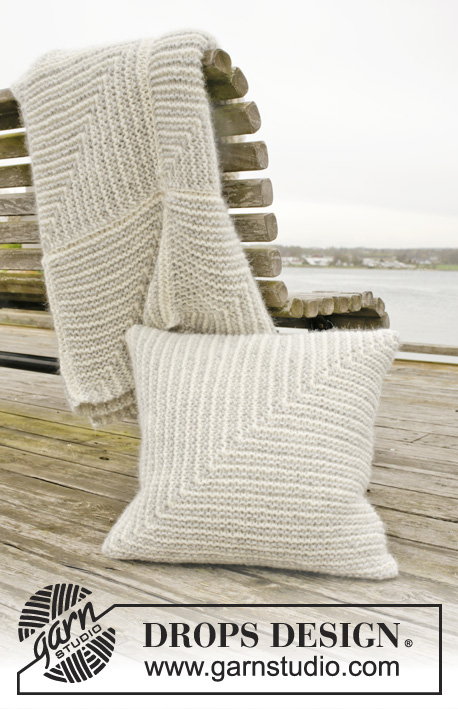
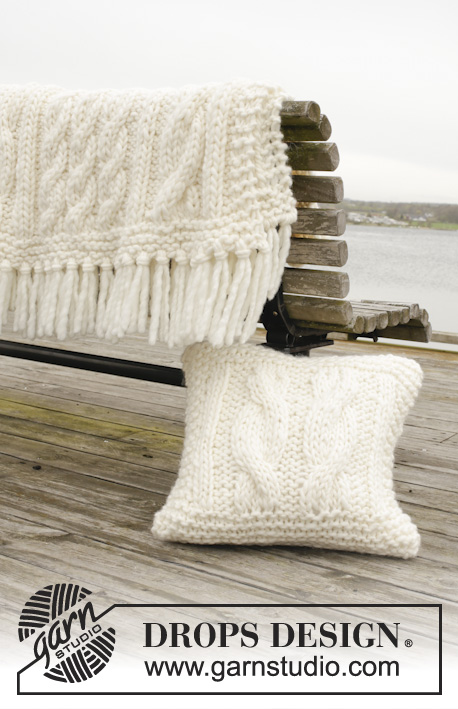
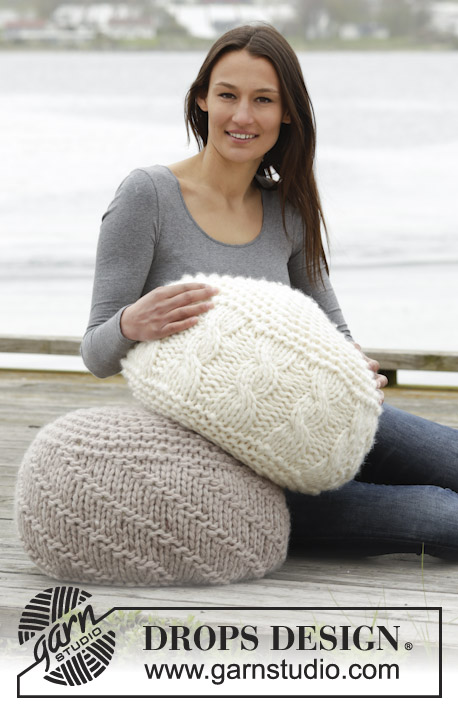
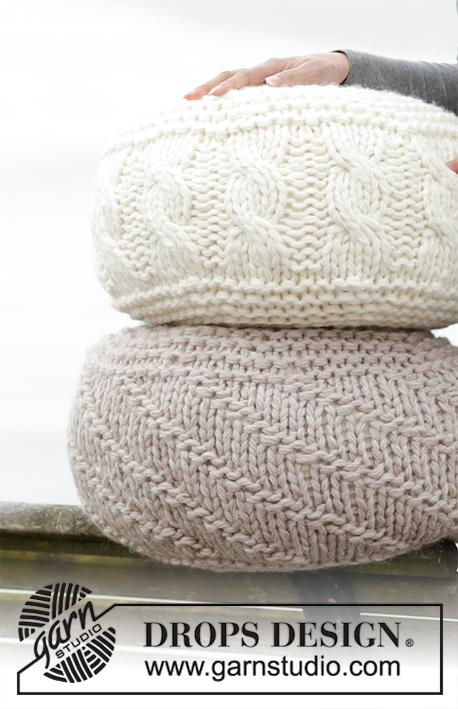
Knitted DROPS pouffe in garter st with cables or purl stitches in 4 strands ”Snow”. Can also be worked in 2 strand Polaris.

DROPS 163-6
DROPS design: Pattern no ee-542
Yarn group E + E + E + E or F + F
----------------------------------------------------------
POUFFE WITH CABLES:
Measurements: Circumference: Approx. 144 cm (incl filling) Diameter: Approx. 48 cm Height: 25 cm
Materials:
DROPS SNOW from Garnstudio
750 g colour no 01, off white
Or use:
DROPS POLARIS from Garnstudio
1000 g colour no 01, off white

POUFFE WITH PURL STITCHES THAT ARE DISPLACED:
Measurements: Circumference: Approx. 150 cm (incl filling) Diameter: Approx. 48 cm Height: 25 cm
Materials:
DROPS SNOW from Garnstudio
700 g colour no 47, light beige
Or use:
DROPS POLARIS from Garnstudio
1000 g colour no 06, light beige

DROPS CIRCULAR NEEDLE (80 cm) SIZE 15 mm - or size needed to get 7 sts x 8 rows in stocking st or 7 sts x 12 rows in garter st with 4 strands Snow (or 2 strands Polaris) = 10 x 10 cm.
1 down duvet (1400 g) or 2 down duvets (700 g) for filling (it is important to use down as this is best for shaping). The cheap kind is ok - we used summer down duvets that weighs approx. 1400 g).
1 stretch sheet in the same colour as pouffe (so the duvet is protected and does not shown through the sts).

-------------------------------------------------------

Alternative Yarn – See how to change yarns here
Yarn Groups A to F – Use the same pattern and change the yarn here
Yarn usage using an alternative yarn – Use our yarn converter here

-------------------------------------------------------

DROPS Snow
DROPS Snow
100% Wool
from 2.00 £ /50g
Get the yarn to make this pattern from 58.00£.

The yarn cost is calculated from the pattern’s smallest size and the yarn’s cheapest product type. Looking for an even better price? You might find it on the DROPS Deals!

DROPS Super Sale

SAVE 30% on 6 cotton favourites!
Valid until 12.04.2024

Pattern instructions

NOTE: This pattern is written in British English. All measurements in charts are in cm. For conversion from cm to inches - click here. There are different terms for crocheting in British and American English. If this pattern includes crochet, click for "crochet terms" here. For this pattern in American English, please click here.
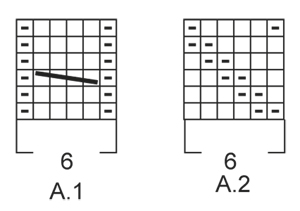
DOUBLE YARN TIP:
Use yarn from both inside and outside of the ball. When switching to a new ball, try to avoid switching both strands at the same time - to avoid a thick yarn when fastening.

GARTER ST (back and forth):
K all rows. 1 ridge = 2 rows K.

PATTERN:
See diagrams A.1 and A.2. The diagrams show all rows in pattern seen from RS.

INCREASE TIP:
Inc 1 st by making 1 YO, on next round K YO twisted (i.e. work in the back loop of st instead front) to avoid holes.
----------------------------------------------------------

POUFFE WITH CABLES:
Worked back and forth on circular needle - READ DOUBLE YARN TIP.

Cast on 6 sts on circular needle size 15 mm with 4 strands Snow or 2 strands Polaris.
Row 1 (= RS): * K 1, 1 YO *, repeat from *-* 4 more times, K 2 in last st = 12 sts.
Row 2: K all sts. NOTE: Always K YOs twisted on next row (i.e. work in back loop of st) to avoid holes. Insert a marker in 2nd, 4th, 6th, 8th, 10th and 12th st.
Then continue in GARTER ST - see explanation above, AT THE SAME TIME inc 1 st before every st with marker (= 6 sts inc) - READ INCREASE TIP. Repeat inc on every row from RS 7 more times = 60 sts. REMEMBER THE KNITTING TENSION
On next row from RS, inc 12 sts evenly = 72 sts. P 1 row from WS. Now work pattern as follows: Work A.1 (= 6 sts) 12 times in width (NOTE: No edge sts are worked due to thickness). When entire A.1 has been worked vertically, work the first 5 rows in A.1 (last row from RS). Then P 1 row from WS. Now continue in garter st until finished measurements. On next row from RS, dec 12 sts evenly by K 2 tog = 60 sts.
Now insert 6 markers in the piece without working: Insert a marker in 1st st, then insert 5 markers in the piece 9 sts apart. 9 sts remain after last marker. On next row from RS dec 1 st after every marker. Repeat dec on every row from RS 7 more times = 12 sts. Now K all sts tog 2 by 2 = 6 sts. Cut the yarn but leave enough yarn for assembly.

ASSEMBLY:
Pull strands through remaining sts and tighten tog, tie and fasten strand without cutting (= bottom of pouffe). Sew the opening, sew in the outer loops of outermost sts with 2 strand Snow og 1 strand Polaris. Fill the pouffe as follows (it might be wise to have someone to help you to make it look nice). Place 1 duvet (of 1400 g) or 2 duvets (of 700 g on top of each other) and pull a stretch sheet over. Push the duvet into the pouffe (make sure that the sheet is facing out). Tighten tog top of pouffe. Fasten yarn tightly.
----------------------------------------------------------

POUFFE WITH DISPLACEMENT OF PURL STITCH:
Worked back and forth on circular needle - READ DOUBLE YARN TIP.

Cast on 6 sts on circular needle size 15 mm with 4 strands Snow or 2 strands Polaris.
Row 1 (= RS): * K 1, 1 YO *, repeat from *-* 4 more times, K 2 in last st = 12 sts.
Row 2: K all sts. NOTE: Always K YOs twisted on next row (i.e. work in back loop of st) to avoid holes. Insert a marker in 2nd, 4th, 6th, 8th, 10th and 12th st.
Then continue in GARTER ST - see explanation above, AT THE SAME TIME inc 1 st before every st with marker (= 6 sts inc) - READ INCREASE TIP. Repeat inc on every row from RS 7 more times = 60 sts. REMEMBER THE KNITTING TENSION
On next row from RS, inc 10 sts evenly = 70 sts. K 1 row from WS. Insert a marker here and measure from here.
Now work pattern as follows: Work 2 sts in garter st, then work A.2 (= 6 sts) 11 times in width, 2 sts in garter st. When A.2 has been worked 1 time vertically, P sts in pattern continue to displace 1 st towards the left (seen from RS) on every row. When piece measures 16 cm from marker, work as follows: Work in garter st until finished measurements, AT THE SAME TIME on first row from RS dec 10 sts evenly = 60 sts. Now insert 6 markers in the piece without working: Insert a marker in 1st st, then insert 5 markers in the piece 9 sts apart. 9 sts remain after last marker. On next row from RS dec 1 st after every marker. Repeat dec on every row from RS 7 more times = 12 sts. Now K all sts tog 2 by 2 = 6 sts. Cut the yarn but leave enough yarn for assembly.

ASSEMBLY:
Pull strands through remaining sts and tighten tog, tie and fasten strand without cutting (= bottom of pouffe). Sew the opening, sew in the outer loops of outermost sts with 2 strand Snow og 1 strand Polaris. Fill the pouffe as follows (it might be wise to have someone to help you to make it look nice). Place 1 duvet (of 1400 g) or 2 duvets (of 700 g on top of each other) and pull a stretch sheet over. Push the duvet into the pouffe (make sure that the sheet is facing out). Tighten tog top of pouffe. Fasten yarn tightly.

Diagram

symbols = K from RS, P from WS
symbols = P from RS, K from WS
symbols = slip 2 sts on cable needle in front of piece, K 2, K 2 from cable needle
diagram
Do you have a question? See a list of frequently asked questions (FAQ)

Knitting tension is what determines the final measurements of your work, and is usually measured per 10 x 10 cm. It is provided like so: number of stitches in width x number of rows in height - eg: 19 stitches x 26 rows = 10 x 10 cm.

The knitting tension is very individual; some people knit/crochet loosely while others work tightly. You adjust the knitting tension with the needle size, which is why the suggested needle size is only meant as a guide! You need to adjust this (up or down) to ensure that YOUR knitting tension matches the knitting tension provided in the pattern. If you work with a different knitting tension than provided you will have a different yarn consumption, and your work will have different measurements than what the pattern suggests.

The knitting tension also determines which yarns can replace each other. As long as you achieve the same knitting tension you can replace one yarn with another.

See DROPS lesson: How to measure your tension/gauge

See DROPS video: How to make a gauge tension swatch

The required amount of yarn is provided in grams, eg: 450 g. To calculate how many balls you’ll need you first need to know how many grams are in 1 ball (25g, 50g or 100g). This information is available if you click on the individual yarn quality on our pages. Divide the amount required with the amount of each ball. For example, if each ball is 50g (the most common amount), the calculation will be as follows: 450 / 50 = 9 balls.

The important thing when changing from one yarn to another is that the knitting/crochet tension remains the same. This is so that the measurements of the finished piece will be the same as on the sketch provided. It is easier to achieve the same knitting tension using yarns from the same yarn group. It is also possible to work with multiple strands of a thinner yarn to achieve the knitting tension of a thicker one. Please try our yarn converter. We recommend you to always work a test swatch.

Please NOTE: when changing yarn the garment might have a different look and feel to the garment in the photo, due to individual properties and qualities of each yarn.

See DROPS lesson: Can I use a different yarn than the one mentioned in the pattern?

All our yarns are categorised into yarn groups (from A to F) according to thickness and knitting tension – group A contains the thinnest yarns and group F the thickest. This makes it easier for you to find alternative yarns to our patterns, should you wish to switch yarn. All yarns within the same group have a similar knitting tension and can easily replace each other. However, different yarn qualities have different structures and properties which will give the finished work a unique look and feel.

Click here for an overview of the yarns in each yarn group

At the top of all our patterns you’ll find a link to our yarn calculator, which is a helpful tool should you wish to use a different yarn than suggested. By filling in the yarn quality you wish to replace, the amount (in your size) and number of strands, the calculator will present good alternative yarns with the same knitting tension. Additionally it will tell you how much you’ll require in the new qualities and whether you’ll need to work with multiple strands. Most skeins are 50g (some are 25g or 100g).

If the pattern is worked with multiple colours, every colour will have to be calculated separately. Similarly, if the pattern is worked with several strands of different yarns (for example 1 strand Alpaca and 1 strand Kid-Silk) you will have to find alternatives for each, individually.

Click here to see our yarn calculator

Since different yarns have different qualities and textures we have chosen to keep the original yarn in our patterns. However, you can easily find options among our available qualities by using our yarn calculator, or simply pick a yarn from the same yarn group.

It is possible that some retailers still have discontinued yarns in stock, or that someone has a few skeins at home that they would like to find patterns for.

The yarn calculator will provide both alternative yarn as well as required amount in the new quality.

If you think it's hard to decide what size to make, it can be a good idea to measure a garment you own already and like the size of. Then you can pick the size by comparing those measures with the ones available in the pattern's size chart.

You'll find the size chart at the bottom of the pattern.

See DROPS lesson: How to read size chart

The needle size provided in the pattern serves only as a guide, the important thing is to follow the knitting tension. And since knitting tension is very individual, you will have to adjust the needle size to ensure that YOUR tension is the same as in the pattern – maybe you’ll have to adjust 1, or even 2 needle sizes, up or down to achieve the correct tension. For this, we recommend that you work test swatches.

Should you work with a different knitting tension than the one provided, the measurements of the finished garment might deviate from the measurement sketch.

See DROPS lesson: How to measure your tension/gauge

See DROPS video: How to make a tension/gauge swatch

Working a garment top-down provides more flexibility and room for personal adjustment. For example it is easier to try the garment on while working, as well as making adjustments to length of yoke and shoulder caps.

The instructions are carefully explaining every step, in the correct order. Diagrams are adjusted to the knitting direction and are worked as usual.

The diagram depicts all rows/rounds, and every stitch seen from the right side. It is read from bottom to top, from right to left. 1 square = 1 stitch.

When working back and forth, every other row is worked from the right side and every other row is worked from the wrong side. When working from the wrong side, the diagram will have to be worked reversed: from left to right, knit stitches are purled, purl stitches are knit etc.

When working in the round every round is worked from the right side and the diagram are worked from right to left on all rounds.

See DROPS lesson: How to read knitting diagrams

The diagram depicts all rows/rounds, and every stitch seen from the right side. It is worked from bottom to top, from right to left.

When working back and forth every other row is worked from the right side: from right to left and every other row is worked from the wrong side: from left to right.

When working in the round, every row in the diagram are worked from the right side, from right to left.

When working a circular diagram you start in the middle and work your way outwards, counter clockwise, row by row.

The rows usually start with a given number of chain stitches (equivalent to the height of the following stitch), this will either be depicted in the diagram or explained in the pattern.

See DROPS lesson: How to read crochet diagrams

Instructions for working several diagrams after each other on the same row/round, will often be written like so: “work A.1, A.2, A.3 a total of 0-0-2-3-4 times". This means you work A.1 once, then A.2 is worked once, and A.3 is repeated (in width) the number of times provided for your size – in this case like so: S = 0 times, M = 0 times, L=2 times, XL= 3 times and XXL = 4 times.

The diagrams are worked as usual: begin with the first row in A.1, then work the first row in A.2 etc.

See DROPS lesson: How to read knitting diagrams

See DROPS lesson: How to read crochet diagrams

The total width of the garment (from wrist-to-wrist) will be larger in the larger sizes, despite the actual sleeves being shorter. The larger sizes have longer sleeve caps and wider shoulders, so there will be a good fit in all sizes.

The measurement sketch/schematic drawing provides information regarding the full length of the garment. If it’s a jumper or a jacket the length is measured from the highest point on the shoulder closest to the neckline, and straight down to the bottom of the garment. It is NOT measured from the tip of shoulder. Similarly, the length of yoke is measured from the highest point on the shoulder and down to where yoke is split into body and sleeves.

On a jacket measures are never taken along bands, unless specifically stated. Always measure inside band stitches when measuring the length.

See DROPS lesson: How to read a schematic drawing

Diagrams are often repeated on the round or in height. 1 repeat is the diagram the way it appears in the pattern. If it says to work 5 repeats of A.1 in the round, then you work A.1 a total of 5 times after/next to each other in the round. If it says to work 2 repeats of A.1 vertically/in height you work the entire diagram once, then begin again at the start and work the entire diagram one more time.

Chain stitches are slightly narrower than other stitches and to avoid working the cast-on edge too tight, we simply chain more stitches to begin with. The stitch count will be adjusted on the following row to fit the pattern and measurement sketch.

The rib edge is more elastic and will contract slightly compared to, for example, stocking stitch. By increasing before the rib edge, you avoid a visible difference in width between the rib edge and the rest of the body.

It’s very easy to cast off too tightly, and by making yarn overs while casting off (and simultaneously casting these off) you avoid a too tight cast off edge.

See DROPS video: How to bind off with yarn overs (yo)

To achieve an even increase (or decrease) you can increase on, for example: every 3rd and 4th row alternately, like so: work 2 rows and increase on the 3rd row, work 3 rows and increase on the 4th. Repeat this until the increase is complete.

See DROPS lesson: Increase or decrease 1 st on every 3rd and 4th row alternately

Should you prefer to work in the round instead of back and forth, you may of course adjust the pattern. You’ll need to add steeks mid-front (usually 5 stitches), and follow the instructions. When you would normally turn and work from the wrong side, simply work across the steek and continue in the round. At the end you’ll cut the piece open, pick up stitches to work bands, and cover the cut edges.

See DROPS video: How to knit steeks and cut open

Should you prefer to work back and forth instead of in the round, you may of course adjust the pattern so you work the pieces separately and then assemble them at the end. Divide the stitches for the body in 2, add 1 edge stitch in each side (for sewing) and work the front and back pieces separately.

See DROPS lesson: Can I adapt a pattern for circular needles into straight needles?

Pattern repeats can vary slightly in the different sizes, in order to get the correct proportions. If you’re not working the exact same size as the garment in the photo, yours might deviate slightly. This has been carefully developed and adjusted so that the complete impression of the garment is the same in all sizes.

Make sure to follow instructions and diagrams for your size!

If you have found a pattern you like which is available in women’s size it’s not very difficult to convert it to men’s size. The biggest difference will be the length of sleeves and body. Start working on the women size that you think would fit across the chest. The additional length will be worked right before you cast off for the armhole/sleeve cap. If the pattern is worked top-down you can add the length right after the armhole or before the first decrease on sleeve.

Regarding additional yarn amount, this will depend on how much length you add, but it is better with a skein too many than too few.

All yarns will have excess fibres (from production) that might come off as lint or shedding. Brushed yarns (ie hairier yarns) have more of these loose, excess fibres, causing more shedding.

Shedding also depends on what is worn under or over the garment, and whether this pulls at the yarn fibres. It’s therefore not possible to guarantee that there will be no shedding

Below are some tips on how to get the best result when working with hairier yarns:

1. When the garment is finished (before you wash it) shake it vigorously so the looser hairs come off. NOTE: do NOT use a lint roller, brush or any method that pulls at the yarn.

2. Place the garment in a plastic bag and put it in your freezer - the temperature will cause the fibres to become less attached to each other, and excess fibres will come off easier.

3. Leave in the freezer for a few hours before taking it out and shaking it again.

4. Wash the garment according to the instructions on the yarn label.

Pilling is a natural process that happens to even the most exclusive of fibers. It's a natural sign of wear and tear that is hard to avoid, and that is most visible in high friction areas of your garment like a sweater's arms and cuffs.

You can make your garment look as new by removing the pilling, using a fabric comb or a pill/lint remover.

Still can't find the answer you need? Then scroll down and leave your question so one of our experts can try to help you. This will be done normally within 5 to 10 working days.
In the meantime, you can read the questions and answers that others have left to this pattern or join the DROPS Workshop on Facebook to get help from fellow knitters/crocheters!

You might also like...

Post a comment to pattern DROPS 163-6

We would love to hear what you have to say about this pattern!

If you want to leave a question, please make sure you select the correct category in the form below, to speed up the answering process. Required fields are marked *.

Comments / Questions (23)

country flag CLERT Annick wrote:

Le pouf à mailles envers décalées m'intéresse, mais j'ai peur du feutrage; de la laine polaris ; pouvez vous me conseiller une autre laine ne présentant pas ce risque, et à tricoter avec le moins de fils possibles ( d'où ma préférence entre polaris et snow). D'avance merci.

15.02.2021 - 14:06

DROPS Design answered:

Bonjour Mme Clert, utilisez notre convertisseur pour découvrir les alternatives possibles - et retrouvez ici plus d'infos sur les alternatives, votre magasin DROPS saura vous conseiller si besoin, même par mail ou téléphone. Bon tricot!

16.02.2021 - 08:37

country flag Murielle Pham wrote:

Bonjour, j'ai envie de me faire ce modèle mais en laine feutrée...qu'en pensez vous ? Quelle sera sa taille ?

08.01.2020 - 21:21

DROPS Design answered:

Bonjour Mme Pham, Si vous souhaitez feutrer ce pouf à la fin, il sera beaucoup plus petit, ou bien il vous faudra recalculer toutes les explications pour qu'il ait la forme/taille souhaité. Ces quelques informations sur le feutrage pourront peut-être vous aider. Bon tricot!

09.01.2020 - 09:38

country flag Ricci wrote:

Bonjour, je voulais savoir s' il était possible de tricoter ces poufs en aiguille circulaire 60 cm. Parce que soit je ne trouve pas soit les boutiques sont en rupture de sock Je vous remercie

13.11.2019 - 14:07

DROPS Design answered:

Bonjour Mme Ricci, tout à fait, on tricote ici en allers et retours, vos mailles seront juste légèrement plus serrées, mais toujours plus confortable que sur des aiguilles droites. Bon tricot!

13.11.2019 - 14:43

country flag Marie wrote:

Bonjour, Est il possible de tricoter le pouf à torsade avec des aiguilles droites. Je vous remercie de votre réponse

08.11.2019 - 13:41

DROPS Design answered:

Bonjour Marie, ces 2 poufs se tricotent en allers et retours sur aiguilles circulaires, vous pouvez donc utiliser des aiguilles droites mais vos mailles seront plus serrées (attention à votre tension). Vous trouverez plus d'infos sur le tricot sur aiguilles circulaires ici. Bon tricot!

08.11.2019 - 14:21

country flag Cristina Borghetti wrote:

Buonasera, vorrei eseguire uno dei due pouff, voorei però usare un filato in cotone, è possibile? quale mi consigliate? dove osso trovare il down duvet necessario per l'imbottitura? grazie cristina

17.02.2017 - 16:25

DROPS Design answered:

Buongiorno Cristina, questi pouff sono lavorati con dei filati troppo spessi che non hanno alternative in cotone, sono belli così proprio perché sono molto soffici. Per l'imbottitura può provare su internet o in negozi di tessuti per casa della sua zona. Buon lavoro!

17.02.2017 - 16:48

country flag Joanne wrote:

I am unable to read the comments for this pattern. Is there some way I can view them translated into English? Also in Row 2 of the cable pouffe are all knit stitches worked into the back or just the KYOs?

24.06.2016 - 03:18

DROPS Design answered:

Dear Joanne, on row 2, work only YOs twisted to avoid holes, all other sts will be worked as usual K sts. You are welcome to use any online translator to read comments in all other languages. Happy knitting!

24.06.2016 - 08:49

country flag Rebecca Prinz wrote:

Guten Tag, Würden Sie eher die Eskimo oder die Polaris für ein gleichmäßiges Maschenbild empfehlen? Danke :)

09.05.2016 - 16:44

DROPS Design answered:

Liebe Rebecca, Sie erhalten sowohl mit Eskimo als auch mit Polaris ein sehr gleichmässiges Maschenbild.

09.05.2016 - 20:42

country flag Bente Møller wrote:

Tak, havde nok lidt travl, og fik ikke læst rigtig😅

05.02.2016 - 12:52

country flag Mette wrote:

Hej Bente. Der står: Strik *1 ret, slå om*, gentag *-* 4 gange til, altså i alt 5 gange, og strik 2 masker ret i sidste maske = 12 masker. Håber det lykkes nu. Strikkehilsen fra Mette

05.02.2016 - 00:11

country flag Bente Møller wrote:

Hej. Jeg kan ikke få det til at passe. Slå 6 m op. 1 ret, slå om, g.4 strik 2 ret = 10 m. Men i opskriften står der = 12 m. Og sæt et mærke i 2,4,6,8,10,12 m. Jeg er total på herrens mark😟 Mvh. Bente

04.02.2016 - 18:21