
Popular categories
Looking for a yarn?


Comments / Questions (53)
![]() Susanne wrote:
Susanne wrote:
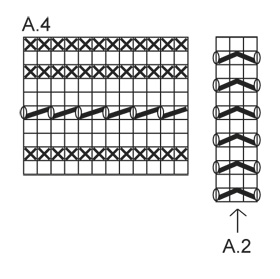
Wenn ich Muster A2 und gleichzeitig die Raglanabnahmen stricke, habe ich sehr viel schneller viel weniger Maschen als die erforderlichen 286 Ma auf der Nadel, nämlich nur noch 226 Ma. Wo ist mein Fehler?
12.01.2026 - 12:12DROPS Design answered:
Lire Susanne, in A.2 sind es keine Abnahme: man hat 2 Umschläge und 2 Abnahmen, nun wird man bei jeder 2. Runde 8. Maschen für den Raglan abnehmen, so 326 - (8 Maschen x 5 Mal) =286 Maschen. Viel Spaß beim Stricken!
14.01.2026 - 07:46
![]() Britt-Inger Johansson wrote:
Britt-Inger Johansson wrote:
Jag förstår heller inte hur jag skall sticka första varvet med raglan och A2. Jag gör raglanintagningen på stycket innan första ärmen, stickar ihop 2 m rätt. Sedan visar A2 tre maskor där m med markering är i mitten .Hur löser jag detta, markeringsmaskan är ju ytterst på min ärm? Hoppas att ni förstår min fråga och kan hjälpa.
06.01.2022 - 17:06DROPS Design answered:
Hej Britt-Inger, du minskar på varje sida om A.2, se RAGLAN: Det minskas till raglan på varje sida av A.2 i varje övergång mellan fram- och bakst och ärmar. Minska så här efter A.2: Lyft 1 m som om den skulle stickas rät, 1 rm, drag den lyfta m över. Minska så här före A.2: Börja 2 m före A.2 och sticka 2 m räta tills.
17.01.2022 - 10:17
![]() Anne Munkebyaune wrote:
Anne Munkebyaune wrote:
Ups! Nå ser jeg at det står jo 3 cm med perlestrikk. Beklager at jeg overså dette først. :)
30.10.2021 - 22:24
![]() Anne Munkebyaune wrote:
Anne Munkebyaune wrote:
Ermene startet med perlestrikk, men det står ikke hvor langt man skal strikke dette. I forklaringen til perlestrikk står det at man skal "gjenta 2. omg." Menes det at man skal gjenta de to omgangene, altså 4 omganger til sammen? Jeg synes det ser ut som at feltet med perlestrikk er lenger på bildet.
30.10.2021 - 20:29DROPS Design answered:
Hei Anne. I oppskriften under ERME står det: "Deretter strikkes det PERLESTRIKK – se forkl over i 3-3-3-4-4-4 cm." Avhengig av hvilken str du strikker, men 3 eller 4 cm. For å strikke perlestrikk, gjentas forklaringen til perlestrikk (som består av 2 omganger) til arbeidet måler enten 3 cm eller 4 cm. mvh DROPS Design
01.11.2021 - 11:40
![]() Anne-Mari Birkeland wrote:
Anne-Mari Birkeland wrote:
Vanskelig å forstå A2 (mønster 3 masker + 1 kast på hver side). Blir det f.eks 1 kast og 1 maske på ermen og videre 2 maske +1 kast på bolen??. Har lest mange oppskrifter men denne ble for vanskelig for meg å tolke.
13.10.2021 - 16:05DROPS Design answered:
Hej Anne-Mari. A.2 är raglanlinje mellan styckena. Så när du ska felle till raglan gör du det på hver side av A.2. Mvh DROPS Design
15.10.2021 - 12:19
![]() Anne Cooley wrote:
Anne Cooley wrote:
Thank you for your very prompt response. However it did not answer my question re Vintage Rose pullover. I know where to place the markers but need to know what to do when starting to do the A2 and raglan decreases as the psso happens around the marker and I can’t work out where it should be replaced. I have tried twice and had to rip many rows out as it doesn’t look right at all. Sorry I didn’t give more information last time. Many thanks.
06.09.2021 - 18:54DROPS Design answered:
Dear Mrs Cooley, you will decrease for the raglan on each side of A.2, work until 2 sts remain before A.2, K2 tog, work A.2 as before, slip 1 as if to K, K1, psso = you have decreased 1 stitch on each side of A.2 - repeat at each A.2 /each transiton between body and sleeve. Can this help?
07.09.2021 - 08:17
![]() Anne Cooley wrote:
Anne Cooley wrote:
Hi I am struggling with the rows after joining the sleeves to the body. I follow the instructions but I think placing the marker is confusing me. Do you have a tutorial on this.
05.09.2021 - 15:01DROPS Design answered:
Dear Anne, you need to place a stitch marker in the first and last stitch of each sleeve, where you will work the decreases for the yoke later on. Happy knitting!
05.09.2021 - 16:49
![]() Martine Fournière wrote:
Martine Fournière wrote:
Bonjour, Je suis en train de réaliser ce modèle et je prend grand plaisir à le réaliser. Une fois terminé cela va être superbe et je pense qu'il aura un beau rendu. Merci pour tout vos magnifiques modèles. Cordialement Martine
03.01.2021 - 23:26
![]() Karin wrote:
Karin wrote:
Habe gerade Pulli angefangen. Wenn ich Muster A1 stricke, dann ist das doch zweifarbig. Warum ist der Anfang des Rumpfes auf dem Foto einfarbig gestrickt. Danke für Antwort
20.11.2020 - 22:47DROPS Design answered:
Liebe Karin, wenn Sie A.1 stricken, lesen Sie die 2 ersten Symbol wie erklärt = leeres Kästchen = 1 M re mit hell perlgrau / kreuz = 1 M li mit hell perlgrau. - Kreuz wird dunkel indigo/indigo nur wenn Sie A.4 stricken. Viel Spaß beim stricken!
23.11.2020 - 08:23
![]() Véronique Kuyle wrote:
Véronique Kuyle wrote:
RE Bonjour , Je vous pose la même question pour le diagramme A3 ! En fait , je ne souhaite pas avoir de "jours , trous " dans mon pull !!!! Merci encore ;
12.08.2020 - 12:49DROPS Design answered:
Bonjour Mme Kuyle, pour éviter les jours de A.3 tricotez en jersey les 3 m des jours (= 1 jeté, glissez 1 m, 2 m ens à l'end, passez la m glissée par-dessus la m tricotée, 1 jeté) - autrement dit, tricotez toutes les mailles à l'endroit au 15ème tour de A.3 et au 35ème rang de A.3, commencez chaque A.3 par 2 m ens à l'end (= diminution pour l'empiècement), mais ne tricotez pas les jours comme au 15ème tour. Bon tricot!
12.08.2020 - 13:50
|
||||||||||||||||||||||||||||
Vintage Rose#vintagerosesweater |
||||||||||||||||||||||||||||
|
|
||||||||||||||||||||||||||||
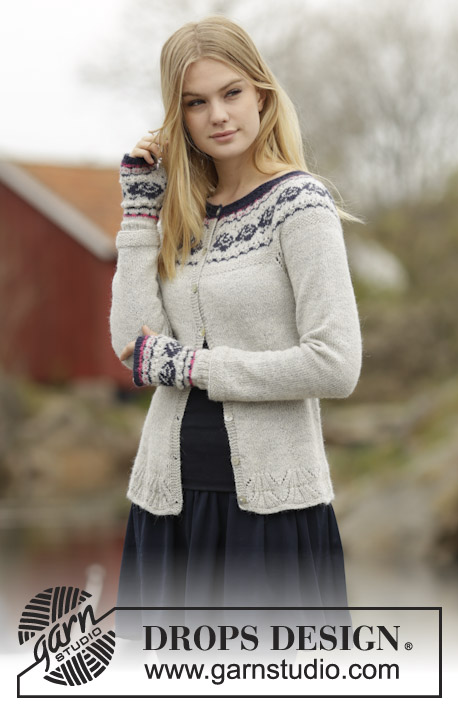
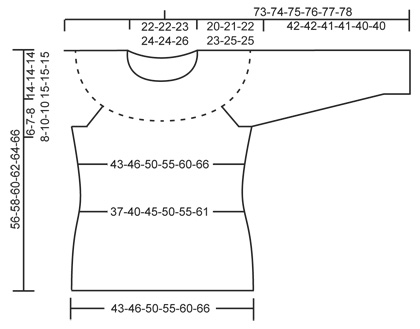
Knitted DROPS jumper with round yoke and rose pattern in Alpaca or Flora. Size: S - XXXL.
DROPS 165-9 |
||||||||||||||||||||||||||||
|
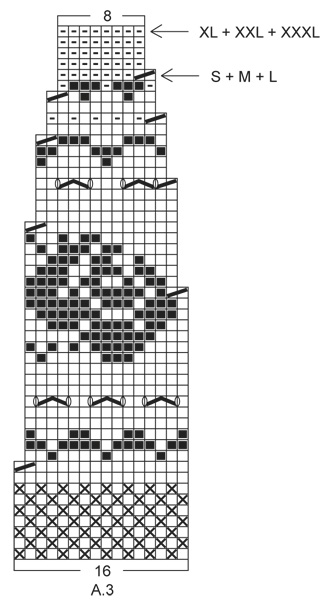
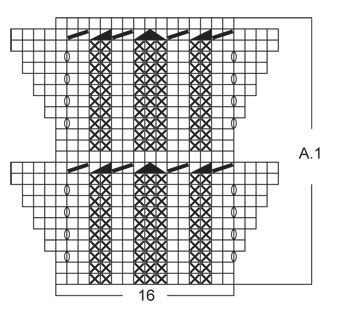
GARTER ST (worked in the round): * K 1 round and P 1 round *, repeat from *-*. 1 ridge = 2 rounds. PATTERN: See diagrams A.1 to A.4. DECREASE TIP: Dec for waist at the 4 markers. Dec as follows after 1st and 3rd marker: K 2 tog. Dec as follows before 2nd and 4th marker: Beg 2 sts before marker, slip 1 st as if to K, K 1, psso. INCREASE TIP: Inc at the 4 markers. Inc as follows: Make 1 YO after 1st and 3rd marker and before 2nd and 4th marker. On next round K YOs twisted to avoid holes. MOSS ST: ROUND 1: * K 1, P 1 *, repeat from *-*. ROUND 2: P over K and K over P. Repeat 2nd round. RAGLAN: Dec for raglan on each side of A.2 in every transition between sleeves and body. Dec as follows after A.2: Slip 1 st as if to K, K 1, psso. Dec as follows before A.2: Beg 2 sts before A.2 and K 2 tog. ---------------------------------------------------------- BODY: Worked in the round on circular needle. Cast on 208-224-240-272-288-320 sts on circular needle size 2.5 mm with light pearl grey / light grey. Work 2 ridges in GARTER ST - see explanation above. Switch to circular needle size 3 mm and K 1 round. Then work pattern in the round according to diagram A.1 (= 13-14-15-17-18-20 repetitions on round). When A.1 has been worked, K 1 round while adjusting the no of sts to 206-222-242-266-290-318. Then work in stocking st. REMEMBER THE KNITTING TENSION When piece measures 10-10-10-10-12-12 cm, insert 4 markers in piece as follows: Insert 1st marker after the first 25-28-31-36-42-48 sts, 2nd marker after the next 53-55-59-61-61-63 sts, 3rd marker after the next 50-56-62-72-84-96 sts and 4th marker after the next 53-55-59-61-61-63 sts (25-28-31-36-42-48 sts remain on needle after last marker). On next round, dec at the 4 markers – READ DECREASE TIP (= 4 sts dec). Repeat dec on every 4th round 7-7-7-7-6-6 times in total = 178-194-214-238-266-294 sts. When piece measures 24 cm in all sizes, inc at the 4 markers - READ INCREASE TIP (= 4 sts inc). Repeat inc every 4th-4th-4th-4th-6th-6th round 7-7-7-7-6-6 times in total = 206-222-242-266-290-318 sts. Continue to work until piece measures 36-37-38-39-39-41 cm. Work next round as follows: Cast off 5-5-5-6-6-6 sts for armhole, work 93-101-111-121-133-147 sts in stocking st (= front piece), cast off 10-10-10-12-12-12 sts for armhole, work 93-101-111-121-133-147 sts in stocking st (= back piece) and cast off the last 5-5-5-6-6-6 sts for armhole, cut the yarn. Put piece aside and knit the sleeves. SLEEVE: Worked in the round on double pointed needles. Cast on 56-56-58-60-62-62 sts on double pointed needles size 2.5 mm with light pearl grey / light grey. K 1 round. Then work MOSS ST - see explanation above for 3-3-3-4-4-4 cm. Switch to double pointed needles size 3 mm. Insert 1 marker at beg of round (= mid under sleeve) and work in stocking st. When piece measures 8-10-10-10-10-10 cm, inc 2 sts mid under sleeve. Repeat inc every 9th-7th-7th-6th-6th-5th round 12-14-14-16-16-18 times in total = 80-84-86-92-94-98 sts. When piece measures 42-42-41-41-40-40 cm (NOTE: Shorter measurements in the larger sizes because of wider shoulders), cast off the middle 10-10-10-12-12-12 sts under sleeve (i.e. cast off 5-5-5-6-6-6 sts on each side of marker) = 70-74-76-80-82-86 sts remain on needle. Put piece aside and knit another sleeve. YOKE: Slip sleeves on to same circular needle as body and work with light pearl grey / light grey as follows: Work sts from first sleeve AT THE SAME TIME insert 1 marker in first st and 1 marker in last st on sleeve, work sts from front piece, work sts from the other sleeve AT THE SAME TIME insert 1 marker in first st and 1 marker in last st on sleeve and work sts from back piece = 326-350-374-402-430-466 sts on needle and 4 markers in piece. Then work in stocking st with A.2 in every transition between body and sleeves (arrow in diagram shown st with marker). AT THE SAME TIME dec for RAGLAN on each side of A.2 in every transition between body and sleeves – see explanation above (= 8 sts dec). Repeat dec for raglan every 4th round 5-6-7-7-8-8 times in total = 286-302-318-346-366-402 sts. After last dec K 1 round while dec 14-14-14-10-14-18 sts evenly = 272-288-304-336-352-384 sts on needle. Then work pattern in the round according to diagram A.3 (= 17-18-19-21-22-24 repetitions of 16 sts). Continue pattern and dec as shown in diagram. When A.3 has been worked (finish after round marked with arrow for correct size), there are 136-144-152-168-176-192 sts on needle. K 1 round with pink / coral while dec 22-28-30-42-50-56 sts evenly = 114-116-122-126-126-136 sts. ELEVATION IN BACK OF NECK: For better fit work an elevation at the back of neck. Insert 1 marker mid back. K 1 round with dark indigo / indigo. Then K 10-11-12-12-12-13 sts past marker, turn, tighten yarn and P 20-22-24-24-24-26 sts back. Turn, tighten yarn and K 30-33-36-36-36-39 sts, turn, tighten yarn and P 40-44-48-48-48-52 sts back. Turn, tighten yarn and K 50-55-60-60-60-65 sts, turn, tighten yarn and P 60-66-72-72-72-78 sts back. Turn, tighten yarn and K 70-77-84-84-84-91 sts, turn, tighten yarn and P 80-88-96-96-96-104 sts back. Turn piece, tighten yarn and K until mid back. NECK EDGE: Switch to a short circular needle size 2.5 mm and K 1 round with dark indigo / indigo while dec 10-10-10-12-12-12 sts evenly = 104-106-112-114-114-124 sts on needle. Then continue pattern in the round according to diagram A.4. When A.4 has been worked, loosely cast off with K. ASSEMBLY: Sew the openings under the sleeves. ---------------------------------------------------------- Wrist warmers: See DROPS 165-10 or "Related patterns" in pattern on website. ---------------------------------------------------------- |
||||||||||||||||||||||||||||
Diagram explanations |
||||||||||||||||||||||||||||
|
||||||||||||||||||||||||||||
 |
||||||||||||||||||||||||||||
 |
||||||||||||||||||||||||||||
 |
||||||||||||||||||||||||||||
 |
||||||||||||||||||||||||||||
Have you finished this pattern?Tag your pictures with #dropspattern #vintagerosesweater or submit them to the #dropsfan gallery. Do you need help with this pattern?You'll find 31 tutorial videos, a Comments/Questions area and more by visiting the pattern on garnstudio.com. © 1982-2026 DROPS Design A/S. We reserve all rights. This document, including all its sub-sections, has copyrights. Read more about what you can do with our patterns at the bottom of each pattern on our site. |
||||||||||||||||||||||||||||


With over 40 years in knitting and crochet design, DROPS Design offers one of the most extensive collections of free patterns on the internet - translated to 17 languages. As of today we count 325 catalogues and 12298 patterns translated into English (UK/cm).
We work hard to bring you the best knitting and crochet have to offer, inspiration and advice as well as great quality yarns at incredible prices! Would you like to use our patterns for other than personal use? You can read what you are allowed to do in the Copyright text at the bottom of all our patterns. Happy crafting!
Post a comment to pattern DROPS 165-9
We would love to hear what you have to say about this pattern!
If you want to leave a question, please make sure you select the correct category in the form below, to speed up the answering process. Required fields are marked *.