DROPS Alpaca
DROPS Alpaca
100% Alpaca
from 3.40 £ /50g
Get the yarn to make this pattern from 27.20£.

The yarn cost is calculated from the pattern’s smallest size and the yarn’s cheapest product type. Looking for an even better price? You might find it on the DROPS Deals!

DROPS SS24

Vintage Rose

Knitted DROPS jumper with round yoke and rose pattern in Alpaca or Flora. Size: S - XXXL.

DROPS 165-9
DROPS design: Pattern no z-715
Yarn group A
----------------------------------------------------------
Size: S - M - L - XL - XXL - XXXL
Materials:
DROPS ALPACA from Garnstudio
300-350-400-400-450-500 g colour no 9020, light pearl grey
50 g for all sizes of the following colours:
colour no 4305, dark indigo
colour no 2921, pink

Or use:
DROPS FLORA from Garnstudio
250-300-350-350-400-450 g colour no 03, light grey
50 g for all sizes of the following colours:
colour no 10, indigo
colour no 19, coral

DROPS DOUBLE POINTED NEEDLES AND CIRCULAR NEEDLE (40 and 80 cm) SIZE 3 mm - or size needed to get 24 sts x 32 rounds in stocking st = 10 x 10 cm.
DROPS DOUBLE POINTED NEEDLES and CIRCULAR NEEDLE (40 and 80 cm) SIZE 2.5 mm - for edges.

-------------------------------------------------------

Alternative Yarn – See how to change yarns here
Yarn Groups A to F – Use the same pattern and change the yarn here
Yarn usage using an alternative yarn – Use our yarn converter here

-------------------------------------------------------

DROPS Alpaca
DROPS Alpaca
100% Alpaca
from 3.40 £ /50g
Get the yarn to make this pattern from 27.20£.

The yarn cost is calculated from the pattern’s smallest size and the yarn’s cheapest product type. Looking for an even better price? You might find it on the DROPS Deals!

Pattern instructions

NOTE: This pattern is written in British English. All measurements in charts are in cm. For conversion from cm to inches - click here. There are different terms for crocheting in British and American English. If this pattern includes crochet, click for "crochet terms" here. For this pattern in American English, please click here.
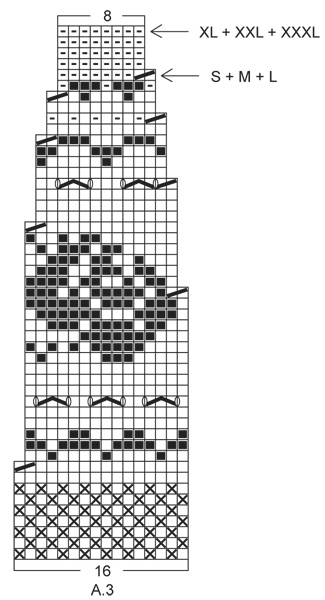
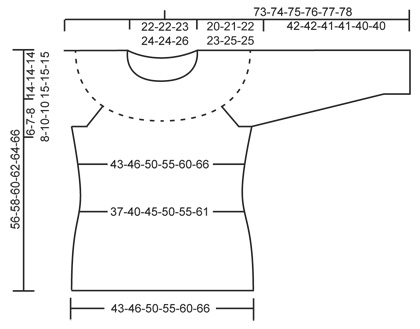
GARTER ST (worked in the round):
* K 1 round and P 1 round *, repeat from *-*. 1 ridge = 2 rounds.

PATTERN:
See diagrams A.1 to A.4.

DECREASE TIP:
Dec for waist at the 4 markers.
Dec as follows after 1st and 3rd marker: K 2 tog.
Dec as follows before 2nd and 4th marker: Beg 2 sts before marker, slip 1 st as if to K, K 1, psso.

INCREASE TIP:
Inc at the 4 markers.
Inc as follows: Make 1 YO after 1st and 3rd marker and before 2nd and 4th marker. On next round K YOs twisted to avoid holes.

MOSS ST:
ROUND 1: * K 1, P 1 *, repeat from *-*.
ROUND 2: P over K and K over P.
Repeat 2nd round.

RAGLAN:
Dec for raglan on each side of A.2 in every transition between sleeves and body.
Dec as follows after A.2: Slip 1 st as if to K, K 1, psso.
Dec as follows before A.2: Beg 2 sts before A.2 and K 2 tog.
----------------------------------------------------------

BODY:
Worked in the round on circular needle. Cast on 208-224-240-272-288-320 sts on circular needle size 2.5 mm with light pearl grey / light grey. Work 2 ridges in GARTER ST - see explanation above. Switch to circular needle size 3 mm and K 1 round. Then work pattern in the round according to diagram A.1 (= 13-14-15-17-18-20 repetitions on round). When A.1 has been worked, K 1 round while adjusting the no of sts to 206-222-242-266-290-318. Then work in stocking st. REMEMBER THE KNITTING TENSION When piece measures 10-10-10-10-12-12 cm, insert 4 markers in piece as follows: Insert 1st marker after the first 25-28-31-36-42-48 sts, 2nd marker after the next 53-55-59-61-61-63 sts, 3rd marker after the next 50-56-62-72-84-96 sts and 4th marker after the next 53-55-59-61-61-63 sts (25-28-31-36-42-48 sts remain on needle after last marker).
On next round, dec at the 4 markers – READ DECREASE TIP (= 4 sts dec). Repeat dec on every 4th round 7-7-7-7-6-6 times in total = 178-194-214-238-266-294 sts. When piece measures 24 cm in all sizes, inc at the 4 markers - READ INCREASE TIP (= 4 sts inc). Repeat inc every 4th-4th-4th-4th-6th-6th round 7-7-7-7-6-6 times in total = 206-222-242-266-290-318 sts. Continue to work until piece measures 36-37-38-39-39-41 cm. Work next round as follows: Cast off 5-5-5-6-6-6 sts for armhole, work 93-101-111-121-133-147 sts in stocking st (= front piece), cast off 10-10-10-12-12-12 sts for armhole, work 93-101-111-121-133-147 sts in stocking st (= back piece) and cast off the last 5-5-5-6-6-6 sts for armhole, cut the yarn. Put piece aside and knit the sleeves.

SLEEVE:
Worked in the round on double pointed needles. Cast on 56-56-58-60-62-62 sts on double pointed needles size 2.5 mm with light pearl grey / light grey. K 1 round. Then work MOSS ST - see explanation above for 3-3-3-4-4-4 cm. Switch to double pointed needles size 3 mm. Insert 1 marker at beg of round (= mid under sleeve) and work in stocking st. When piece measures 8-10-10-10-10-10 cm, inc 2 sts mid under sleeve. Repeat inc every 9th-7th-7th-6th-6th-5th round 12-14-14-16-16-18 times in total = 80-84-86-92-94-98 sts. When piece measures 42-42-41-41-40-40 cm (NOTE: Shorter measurements in the larger sizes because of wider shoulders), cast off the middle 10-10-10-12-12-12 sts under sleeve (i.e. cast off 5-5-5-6-6-6 sts on each side of marker) = 70-74-76-80-82-86 sts remain on needle. Put piece aside and knit another sleeve.

YOKE:
Slip sleeves on to same circular needle as body and work with light pearl grey / light grey as follows: Work sts from first sleeve AT THE SAME TIME insert 1 marker in first st and 1 marker in last st on sleeve, work sts from front piece, work sts from the other sleeve AT THE SAME TIME insert 1 marker in first st and 1 marker in last st on sleeve and work sts from back piece = 326-350-374-402-430-466 sts on needle and 4 markers in piece.
Then work in stocking st with A.2 in every transition between body and sleeves (arrow in diagram shown st with marker). AT THE SAME TIME dec for RAGLAN on each side of A.2 in every transition between body and sleeves – see explanation above (= 8 sts dec). Repeat dec for raglan every 4th round 5-6-7-7-8-8 times in total = 286-302-318-346-366-402 sts. After last dec K 1 round while dec 14-14-14-10-14-18 sts evenly = 272-288-304-336-352-384 sts on needle. Then work pattern in the round according to diagram A.3 (= 17-18-19-21-22-24 repetitions of 16 sts). Continue pattern and dec as shown in diagram. When A.3 has been worked (finish after round marked with arrow for correct size), there are 136-144-152-168-176-192 sts on needle. K 1 round with pink / coral while dec 22-28-30-42-50-56 sts evenly = 114-116-122-126-126-136 sts.

ELEVATION IN BACK OF NECK:
For better fit work an elevation at the back of neck. Insert 1 marker mid back. K 1 round with dark indigo / indigo. Then K 10-11-12-12-12-13 sts past marker, turn, tighten yarn and P 20-22-24-24-24-26 sts back. Turn, tighten yarn and K 30-33-36-36-36-39 sts, turn, tighten yarn and P 40-44-48-48-48-52 sts back. Turn, tighten yarn and K 50-55-60-60-60-65 sts, turn, tighten yarn and P 60-66-72-72-72-78 sts back. Turn, tighten yarn and K 70-77-84-84-84-91 sts, turn, tighten yarn and P 80-88-96-96-96-104 sts back. Turn piece, tighten yarn and K until mid back.

NECK EDGE:
Switch to a short circular needle size 2.5 mm and K 1 round with dark indigo / indigo while dec 10-10-10-12-12-12 sts evenly = 104-106-112-114-114-124 sts on needle. Then continue pattern in the round according to diagram A.4. When A.4 has been worked, loosely cast off with K.

ASSEMBLY:
Sew the openings under the sleeves.

----------------------------------------------------------
Wrist warmers:
See DROPS 165-10 or "Related patterns" in pattern on website.
----------------------------------------------------------

Diagram

symbols = K with light pearl grey or light grey in diagram A.1-A.3, dark indigo or indigo in diagram A.4
symbols = P with light pearl grey or light grey in diagram A.1-A.3, dark indigo or indigo in diagram A.4
symbols = 1 YO between 2 sts
symbols = K 2 tog with base colour in pattern
symbols = P 2 tog with light pearl grey or light grey.
symbols = slip 1 st as if to K, K 2 tog with light pearl grey or light grey, psso
symbols = P 3 tog with light pearl grey or light grey.
symbols = K with dark indigo or indigo
symbols = K with pink or coral
diagram
diagram
diagram
diagram

Each of our patterns has specific tutorial videos to help you.

Do you have a question? See a list of frequently asked questions (FAQ)

Knitting tension is what determines the final measurements of your work, and is usually measured per 10 x 10 cm. It is provided like so: number of stitches in width x number of rows in height - eg: 19 stitches x 26 rows = 10 x 10 cm.

The knitting tension is very individual; some people knit/crochet loosely while others work tightly. You adjust the knitting tension with the needle size, which is why the suggested needle size is only meant as a guide! You need to adjust this (up or down) to ensure that YOUR knitting tension matches the knitting tension provided in the pattern. If you work with a different knitting tension than provided you will have a different yarn consumption, and your work will have different measurements than what the pattern suggests.

The knitting tension also determines which yarns can replace each other. As long as you achieve the same knitting tension you can replace one yarn with another.

See DROPS lesson: How to measure your tension/gauge

See DROPS video: How to make a gauge tension swatch

The required amount of yarn is provided in grams, eg: 450 g. To calculate how many balls you’ll need you first need to know how many grams are in 1 ball (25g, 50g or 100g). This information is available if you click on the individual yarn quality on our pages. Divide the amount required with the amount of each ball. For example, if each ball is 50g (the most common amount), the calculation will be as follows: 450 / 50 = 9 balls.

The important thing when changing from one yarn to another is that the knitting/crochet tension remains the same. This is so that the measurements of the finished piece will be the same as on the sketch provided. It is easier to achieve the same knitting tension using yarns from the same yarn group. It is also possible to work with multiple strands of a thinner yarn to achieve the knitting tension of a thicker one. Please try our yarn converter. We recommend you to always work a test swatch.

Please NOTE: when changing yarn the garment might have a different look and feel to the garment in the photo, due to individual properties and qualities of each yarn.

See DROPS lesson: Can I use a different yarn than the one mentioned in the pattern?

All our yarns are categorised into yarn groups (from A to F) according to thickness and knitting tension – group A contains the thinnest yarns and group F the thickest. This makes it easier for you to find alternative yarns to our patterns, should you wish to switch yarn. All yarns within the same group have a similar knitting tension and can easily replace each other. However, different yarn qualities have different structures and properties which will give the finished work a unique look and feel.

Click here for an overview of the yarns in each yarn group

At the top of all our patterns you’ll find a link to our yarn calculator, which is a helpful tool should you wish to use a different yarn than suggested. By filling in the yarn quality you wish to replace, the amount (in your size) and number of strands, the calculator will present good alternative yarns with the same knitting tension. Additionally it will tell you how much you’ll require in the new qualities and whether you’ll need to work with multiple strands. Most skeins are 50g (some are 25g or 100g).

If the pattern is worked with multiple colours, every colour will have to be calculated separately. Similarly, if the pattern is worked with several strands of different yarns (for example 1 strand Alpaca and 1 strand Kid-Silk) you will have to find alternatives for each, individually.

Click here to see our yarn calculator

Since different yarns have different qualities and textures we have chosen to keep the original yarn in our patterns. However, you can easily find options among our available qualities by using our yarn calculator, or simply pick a yarn from the same yarn group.

It is possible that some retailers still have discontinued yarns in stock, or that someone has a few skeins at home that they would like to find patterns for.

The yarn calculator will provide both alternative yarn as well as required amount in the new quality.

If you think it's hard to decide what size to make, it can be a good idea to measure a garment you own already and like the size of. Then you can pick the size by comparing those measures with the ones available in the pattern's size chart.

You'll find the size chart at the bottom of the pattern.

See DROPS lesson: How to read size chart

The needle size provided in the pattern serves only as a guide, the important thing is to follow the knitting tension. And since knitting tension is very individual, you will have to adjust the needle size to ensure that YOUR tension is the same as in the pattern – maybe you’ll have to adjust 1, or even 2 needle sizes, up or down to achieve the correct tension. For this, we recommend that you work test swatches.

Should you work with a different knitting tension than the one provided, the measurements of the finished garment might deviate from the measurement sketch.

See DROPS lesson: How to measure your tension/gauge

See DROPS video: How to make a tension/gauge swatch

Working a garment top-down provides more flexibility and room for personal adjustment. For example it is easier to try the garment on while working, as well as making adjustments to length of yoke and shoulder caps.

The instructions are carefully explaining every step, in the correct order. Diagrams are adjusted to the knitting direction and are worked as usual.

The diagram depicts all rows/rounds, and every stitch seen from the right side. It is read from bottom to top, from right to left. 1 square = 1 stitch.

When working back and forth, every other row is worked from the right side and every other row is worked from the wrong side. When working from the wrong side, the diagram will have to be worked reversed: from left to right, knit stitches are purled, purl stitches are knit etc.

When working in the round every round is worked from the right side and the diagram are worked from right to left on all rounds.

See DROPS lesson: How to read knitting diagrams

The diagram depicts all rows/rounds, and every stitch seen from the right side. It is worked from bottom to top, from right to left.

When working back and forth every other row is worked from the right side: from right to left and every other row is worked from the wrong side: from left to right.

When working in the round, every row in the diagram are worked from the right side, from right to left.

When working a circular diagram you start in the middle and work your way outwards, counter clockwise, row by row.

The rows usually start with a given number of chain stitches (equivalent to the height of the following stitch), this will either be depicted in the diagram or explained in the pattern.

See DROPS lesson: How to read crochet diagrams

Instructions for working several diagrams after each other on the same row/round, will often be written like so: “work A.1, A.2, A.3 a total of 0-0-2-3-4 times". This means you work A.1 once, then A.2 is worked once, and A.3 is repeated (in width) the number of times provided for your size – in this case like so: S = 0 times, M = 0 times, L=2 times, XL= 3 times and XXL = 4 times.

The diagrams are worked as usual: begin with the first row in A.1, then work the first row in A.2 etc.

See DROPS lesson: How to read knitting diagrams

See DROPS lesson: How to read crochet diagrams

The total width of the garment (from wrist-to-wrist) will be larger in the larger sizes, despite the actual sleeves being shorter. The larger sizes have longer sleeve caps and wider shoulders, so there will be a good fit in all sizes.

The measurement sketch/schematic drawing provides information regarding the full length of the garment. If it’s a jumper or a jacket the length is measured from the highest point on the shoulder closest to the neckline, and straight down to the bottom of the garment. It is NOT measured from the tip of shoulder. Similarly, the length of yoke is measured from the highest point on the shoulder and down to where yoke is split into body and sleeves.

On a jacket measures are never taken along bands, unless specifically stated. Always measure inside band stitches when measuring the length.

See DROPS lesson: How to read a schematic drawing

Diagrams are often repeated on the round or in height. 1 repeat is the diagram the way it appears in the pattern. If it says to work 5 repeats of A.1 in the round, then you work A.1 a total of 5 times after/next to each other in the round. If it says to work 2 repeats of A.1 vertically/in height you work the entire diagram once, then begin again at the start and work the entire diagram one more time.

Chain stitches are slightly narrower than other stitches and to avoid working the cast-on edge too tight, we simply chain more stitches to begin with. The stitch count will be adjusted on the following row to fit the pattern and measurement sketch.

The rib edge is more elastic and will contract slightly compared to, for example, stocking stitch. By increasing before the rib edge, you avoid a visible difference in width between the rib edge and the rest of the body.

It’s very easy to cast off too tightly, and by making yarn overs while casting off (and simultaneously casting these off) you avoid a too tight cast off edge.

See DROPS video: How to bind off with yarn overs (yo)

To achieve an even increase (or decrease) you can increase on, for example: every 3rd and 4th row alternately, like so: work 2 rows and increase on the 3rd row, work 3 rows and increase on the 4th. Repeat this until the increase is complete.

See DROPS lesson: Increase or decrease 1 st on every 3rd and 4th row alternately

Should you prefer to work in the round instead of back and forth, you may of course adjust the pattern. You’ll need to add steeks mid-front (usually 5 stitches), and follow the instructions. When you would normally turn and work from the wrong side, simply work across the steek and continue in the round. At the end you’ll cut the piece open, pick up stitches to work bands, and cover the cut edges.

See DROPS video: How to knit steeks and cut open

Should you prefer to work back and forth instead of in the round, you may of course adjust the pattern so you work the pieces separately and then assemble them at the end. Divide the stitches for the body in 2, add 1 edge stitch in each side (for sewing) and work the front and back pieces separately.

See DROPS lesson: Can I adapt a pattern for circular needles into straight needles?

Pattern repeats can vary slightly in the different sizes, in order to get the correct proportions. If you’re not working the exact same size as the garment in the photo, yours might deviate slightly. This has been carefully developed and adjusted so that the complete impression of the garment is the same in all sizes.

Make sure to follow instructions and diagrams for your size!

If you have found a pattern you like which is available in women’s size it’s not very difficult to convert it to men’s size. The biggest difference will be the length of sleeves and body. Start working on the women size that you think would fit across the chest. The additional length will be worked right before you cast off for the armhole/sleeve cap. If the pattern is worked top-down you can add the length right after the armhole or before the first decrease on sleeve.

Regarding additional yarn amount, this will depend on how much length you add, but it is better with a skein too many than too few.

All yarns will have excess fibres (from production) that might come off as lint or shedding. Brushed yarns (ie hairier yarns) have more of these loose, excess fibres, causing more shedding.

Shedding also depends on what is worn under or over the garment, and whether this pulls at the yarn fibres. It’s therefore not possible to guarantee that there will be no shedding

Below are some tips on how to get the best result when working with hairier yarns:

1. When the garment is finished (before you wash it) shake it vigorously so the looser hairs come off. NOTE: do NOT use a lint roller, brush or any method that pulls at the yarn.

2. Place the garment in a plastic bag and put it in your freezer - the temperature will cause the fibres to become less attached to each other, and excess fibres will come off easier.

3. Leave in the freezer for a few hours before taking it out and shaking it again.

4. Wash the garment according to the instructions on the yarn label.

Pilling is a natural process that happens to even the most exclusive of fibers. It's a natural sign of wear and tear that is hard to avoid, and that is most visible in high friction areas of your garment like a sweater's arms and cuffs.

You can make your garment look as new by removing the pilling, using a fabric comb or a pill/lint remover.

Still can't find the answer you need? Then scroll down and leave your question so one of our experts can try to help you. This will be done normally within 5 to 10 working days.
In the meantime, you can read the questions and answers that others have left to this pattern or join the DROPS Workshop on Facebook to get help from fellow knitters/crocheters!

You might also like...

Post a comment to pattern DROPS 165-9

We would love to hear what you have to say about this pattern!

If you want to leave a question, please make sure you select the correct category in the form below, to speed up the answering process. Required fields are marked *.

Comments / Questions (52)

country flag Hanne Salomonsen wrote:

Hanne Salomonsen 23.09.2018 - 21:35: Jeg læser og forstår opskriften: bærestykke 326 m, der strikkes mønster A2 = -48 m og strikkes raglan = -40 m og derefter tages der yderlige 14 m ind dvs ialt - 102 m, til 224 m, men mønstret siger 272 m??

27.09.2018 - 11:32

DROPS Design answered:

Hej Hanne, det ser ud som om at du strikker den mindste størrelse: 326 - 40 = 286 - 14 = 272 masker. Ud over de 40 masker du tager ind til raglan, tages der ikke ind i A.2. God fornøjelse!

28.09.2018 - 15:05

country flag Hanne Salomonsen wrote:

Jeg læser og forstår opskriften: bærestykke 326 m, der strikkes mønster A2 = -48 m og strikkes raglan = -40 m og derefter tages der yderlige 14 m ind dvs ialt - 102 m, til 224 m, men mønstret siger 272 m??

23.09.2018 - 21:35

country flag Hilde wrote:

Hei. Ser at det på bildet er perlestrikk i overgang arme - bol. Dette ser jeg ikke beskrevet i oppskriften. Det går en rett på mønster A2.

20.06.2018 - 17:10

DROPS Design answered:

Hei Hilde. Perlestrikken er tegnet inn på starten av diagram A.3. God fornøyelse.

22.06.2018 - 08:31

country flag Florence wrote:

Bonjour, je suis en train de tricoter ce pull en XL , je voudrais savoir si le début du rang marque le milieu du du dos ou le milieu de l’emmanchure. En effet les marqueurs délimitent 4 parties: deux de 72m et deux de 61m, et je voudrais savoir à quel endroit rabattre pour l’emmanchure : au milieu de la partie la plus large (72m) ou de celle de 61m ? J’espère avoir exprimé cela clairement. Merci d’ avance pour vos explications.

20.02.2018 - 22:21

DROPS Design answered:

Bonjour Florence, les marqueurs 1 à 4 placées au début du dos & devant sont au milieu devant et au milieu dos, le tour commence sur le côté du pull, ainsi, quand vous rabattez les mailles des emmanchures vous avez: début du tour, 6 m rabattues, 147 m pour le devant, 12 m rabattues, 147 m pour le dos et les 6 dernières m du tour sont rabattues également. Les diminutions et les augmentations faites aux marqueurs doivent être au milieu de chaque pièce. Bon tricot!

21.02.2018 - 09:15

country flag Linda Blommers wrote:

Is echt een prachtige trui geworden! Heb wel een vraag over de raglan. De raglan loopt niet aan beide zijden even schuin, de raglan aan de rechter kant (voor A2)loopt schuiner dan links. Ik heb het patroon helemaal gevolgd en kom er niet uit waardoor dit komt....misschien toch door patroon A2?

13.12.2017 - 13:27

DROPS Design answered:

Hallo Linda, Je mindert steeds aan beide kanten van A.2, dus aan beide kanten van de raglanlijnen, dus deze zouden wel symmetrisch moeten zijn. Kan het dat je ergens minderingen en of omslagen van A.2 vergeten bent?

13.12.2017 - 15:42

country flag Linda Blommers wrote:

Ik brei deze trui in maat XXL, bij het lijf staat breien tot een hoogte van 39 cm. Bij het plaatje met de afmetingen onderop zou ik voordat ik met de armen en de pas begin 64 cm. moeten hebben? Klopt de te breien hoogte van het lijf wel? hartelijke groet

15.11.2017 - 10:18

DROPS Design answered:

Hoi Linda, Ja, dit klopt. De totale lengte is 64 cm. Tot de armsgaten is het 39 cm. Je breit dan nog 10 cm raglan en 15 cm van de pas. Deze maten staan ook aangegeven in de tekening (aan de rechter kant van de linker maatlijn.)

15.11.2017 - 10:58

country flag Else Mørup wrote:

Hej angående omslagene i mønster A2 og A3, skal jeg strikke dem drejet ret, for jeg synes mine huller bliver meget store? mvh else

25.09.2017 - 18:18

DROPS Design answered:

Hei Else. Kastene skal strikkes vridd rett slik at det blir et minst mulig hull, men et lite hull vil det uansett bli, men vil jevne seg ut etter hvert. Se gjerne på videoen "Hvordan øke med et kast" under oppskriften der vi viser hvordan vi strikker i fremre eller bakre maskebuen avhengig av om man vil ha større eller mindre hull. God Fornøyelse!

27.09.2017 - 08:53

Irene N wrote:

Lurer på om mønsteret A3 kommet skeivt ut med rosene på et tidspunkt i fellingen? Det gjør eg allerede i første runde med rosene.., men det vil jo vise!?!?!? Eller?

27.08.2017 - 00:26

DROPS Design answered:

Hej Irene, diagrammet A.3 stemmer rundt, så hvis du følger diagrammet får du roserne som på billedet. God fornøjelse!

05.09.2017 - 15:54

country flag Camilla wrote:

Hej Igen. Jeg tror ikke jeg har stillet spørgsmålet godt nok, for der er stadig alt for få masker. Jeg starter med 402m. Men skal trække 48 m fra idet der tages ind i A2(= 8m/omgang x 6 omgange= 48m). Så skal jeg OGSÅ tage 56 m ind til raglan(= 8m/omgang x 7 omgange= 56). Så har jeg 298m og IKKE 346m tilbage. Derefter skal jeg tage 10 m ind. Det bliver 288. Og så har jeg alt for få masker til at kunne lave 21 rapporter a 16 m (21x16=336). Jeg tror der er fejl i opskriften??!

27.02.2017 - 17:10

DROPS Design answered:

Hej Camilla. Der er ikke fejl i opskriften. Hvis du laeser mit svar, saa kan du ogsaa se hvordan jeg har regnet det ud.

28.02.2017 - 15:50

country flag Camilla Bille wrote:

Hjælp til bærestykket. Jeg starter med 402m. A2= 8m/omgang x 6 omgange= 48m( - kun strikket de 12 omgange som diagram A2 viser) Raglan= 8m/omgang x 7 omgange= 56 Så har jeg 298m og IKKE 346m! Og der svares til Joans spørgsmål at man skat fortsætte med A2 til man er færdig med ragland, men så bliver det endnu færre masker!!!

15.02.2017 - 18:26

DROPS Design answered:

Hej Camilla. Du lukker af til raglan paa hver side af A.2 som angivet: 8 m x 7 gange = 56 m og herefter strikkes der 1 omg ret hvor du tager 10 m ind jaevnt fordelt: 336 m som angivet i opskriften. Herefter strikker du A.3 hvor der ogsaa tages ind.

23.02.2017 - 13:46