
Popular categories
Looking for a yarn?


Comments / Questions (38)
![]() Hana Mikulandová wrote:
Hana Mikulandová wrote:
Dobrý den,chtěla bych se zeptat kolik řetízkových ok mám udělat na velikost 0/1 měsíců?
01.02.2016 - 13:09DROPS Design answered:
Dobrý den, čepeček začínáme pro všechny velikosti stejně, tj. 4 řo. U nejmenší velikosti 0/1 měsíc končíme s rozšiřováním po dokončení 8. kruhové řady (= 48 KS), pak postupujeme podle popisu v odstavci VŠECHNY VELIKOSTI. Hodně zdaru! Hana
01.02.2016 - 18:23
![]() Bianca wrote:
Bianca wrote:
Super tolle Anleitung, die Mütze gehört bei mir zu einem Taufkleid
30.01.2016 - 13:54
![]() Willow wrote:
Willow wrote:
Please disregard my earlier posts as I have already figured them out! Now, in the Fan Edge sec. do I start at the corner where at bottom of Eyelet sec. or 5 rows in to exclude the Eyelet sec.? With the eyelet sec. it is 72 stitches w/o it is 62. Either way, do I need to adjust my stitches for R1? 72 is a multiple of 3 with no room for first sc. 62 is multiple of 3 with 2 left over, should I just do sc in beginning and end. Please help.
07.12.2015 - 05:17DROPS Design answered:
Dear Willow, the fan edge is worked along last row on hat, ie 62 sts in 1st size, inc 2 sts evenly on 1st row to get 64 sts: work then a total of 21 times (sc, ch3, skip 2 sts) (= 21 ch-loops) and finish with 1 sc in last st. Happy crocheting!
07.12.2015 - 11:40
![]() Willow wrote:
Willow wrote:
Please clarify the 5+1 under the eyelet section. I am just beginning the the eyelet section and I have 10, 6, and 10 (26). If I add 2dc in each dc, I will have 36 stitches. My stitches aren't working out on the "Work next row as follows: ch 1, 1 sc in each of the first 2 sc, * skip 2 sc, ch 2, 1 sc in each of the next 3 sc *, repeat from *-* until 4 sts remain, skip 2 sc, ch 2 and work 1 sc in each of the last 2 sc." Please help.
04.12.2015 - 04:40DROPS Design answered:
Dear Willow, see below how to crochet this row over 36 sc. Happy crocheting!
04.12.2015 - 09:18
![]() Willow wrote:
Willow wrote:
I am beginning the Eyelet Tie section. I have 10 stitches on my short sides and 6 stitches in middle, a total of 26. If I do 2 dc in each dc I will have total of 36. This is divisible by 5, 7 times with 1 stitch remaining. But at "ch 1, 1 sc in each of the first 2 sc, * skip 2 sc, ch 2, 1 sc in each of the next 3 sc *, repeat from *-* until 4 sts remain, skip 2 sc, ch 2 and work 1 sc in each of the last 2 sc." , it won't work with 36 stitches. Where am I messing up?
04.12.2015 - 04:27DROPS Design answered:
Dear Willow, work as follows over 36 sc: 2 sc (over 2 sc), repeat a total of 6 times: *skip 2 sc, ch 2, 1 sc in each of the next 3 sc* (= you work over 5 sc a total of 6 times = 30 sc from previous row), finish with skip 2 sc, ch2 and 1 sc in each of the last 2 sc (4 sc at the end of row), so that you have worked over 2+30+4=36 sc from previous row. Happy crocheting!
04.12.2015 - 09:17
![]() Willow wrote:
Willow wrote:
Please clarify "do not work over sc in 6 btwn two markers". Thank you!!
19.11.2015 - 17:02DROPS Design answered:
Dear Willow, these 6 sts are between both markers on mid back: 1st marker = beg of round, 1nd marker is inserted after the 6th st from beg of round seen from RS. Happy crocheting!
20.11.2015 - 09:47
![]() Willow wrote:
Willow wrote:
Thank you so much for getting back to me quickly. I almost put a marker after every 6 stitches. It says to dc in every sc but round 8 was dc so I'm confused where sc are. What does "increase at the same time mean". Where are am I increasing 20? If round 8 is all dc then do I just crochet 2 dc in each of the first 6 stitches? That would only be an increase of 6. What do I do in the remaining 42 stitches? And how do I get 60? That would be an increase of 12....
19.11.2015 - 16:57DROPS Design answered:
Dear Willow, on round 8 you worked 1 sc in every dc (=48 sc). Then place 2 markers from RS: 1st one at beg of round and 2nd one after 6 sts. Starting from WS from marker at beg of round work 1 dc in each of the next 42 st (48 sts from previous row less 6 sts unworked) to 2nd marker (= you leave 6 sts unworked at mid back), at the same time inc 20 sts evenly to get 62 dc at the end of this row between both markers - see here how to inc evenly. Happy crocheting!
20.11.2015 - 09:45
![]() Willow wrote:
Willow wrote:
I am stuck. I finished round 8. I have 48 stitches. I don't understand what to do next? Under All sizes, what does this section mean? Beg from WS at marker at beg of round and work 1 dc in every sc until second marker AT THE SAME TIME inc 20-26-20-28 (20-22) dc evenly over these sts – READ INCREASE TIP = 62-68-74-80 (84-86) dc on row (do not work over the 6-6-6-8 (8-8) sc between the 2 markers).
19.11.2015 - 06:23DROPS Design answered:
Dear Willow, after you have 48 sts (1st size), go to "All sizes" and insert 2 markers: 1 at the beg of round and 1 after 6 sts. Then work as stated, and follow instructions for 1st size (= 1st of the numbers). Happy crocheting!
19.11.2015 - 10:11
![]() AUJOGUE wrote:
AUJOGUE wrote:
Bonjour, a la seconde étape du bonnet j'ai du mal a comprendre certaines phrases, pourriez vous m'expliquer s'il vous plait. "1 autre marqueur après 6-6-6-8 (8-8) m (vu sur l'endroit)." Que veulent dire les 8-8 entre parenthèse et cette phrase non plus "augmenter 20-26-20-28 (20-22) B à intervalles réguliers" en vous remerciant sincerement
12.10.2015 - 19:20DROPS Design answered:
Bonjour Mme Aujogue, ce bonnet existe en 6 tailles: du 0/1 mois au 12/18 mois avant la parenthèse et les 2 plus grandes tailles: 2 et 3/4 ans dans la parenthèse. Chaque chiffre/nombre se réfère à la taille dans l'ordre indiqué. Voir ici comment répartir des augmentations. Bon crochet!
13.10.2015 - 09:34
![]() Louise Tremblay wrote:
Louise Tremblay wrote:
Bonjour; je ne comprends pas du tout quoi faire avec l'arrière du bonnet; avez-vous une photo pour voir comment faire? Merci.
20.08.2015 - 17:25DROPS Design answered:
Bonjour Mme Tremblay, le fond du bonnet est un simple rond fait de ms et de brides: on commence par un rond de 12 B, puis 12 ms, puis on augmente tous les 2 tours: 24 B, puis 24 ms, puis 36 B, 36 ms et ainsi de suite jusqu'à la taille souhaitée. Bon crochet!
20.08.2015 - 18:24
|
||||||||||
Camille#camillebonnet |
||||||||||
|
|
||||||||||
Crochet baby bonnet with fan pattern in DROPS BabyAlpaca Silk. Size 0 - 4 years.
DROPS Baby 25-14 |
||||||||||
|
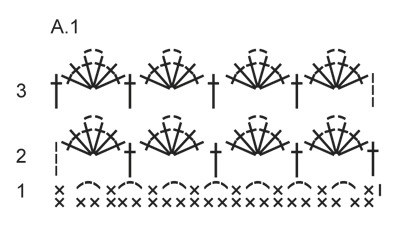
CROCHET INFO: Replace first dc at beg of every dc round/row with 1 ch. Finish round with 1 sl st in ch from beg of round. Finish row with 1 dc in 3rd ch from beg of previous row. Replace first tr at beg of every tr round/row with 3 ch. Finish round with 1 sl st in 3rd ch from beg of round. Finish row with 1 tr in ch from beg of previous row. TEXTURE ROWS: * 1 row dc from WS, 1 row tr from RS *, repeat from *-* (1 row dc + 1 row tr = 1 texture row). INCREASE TIP: Inc 1 dc/tr by working 2 dc/tr in same st. PATTERN: See diagram A.1. ---------------------------------------------------------- BONNET: Piece is first worked in the round, from mid back, then work back and forth over head. Work 4 ch on hook size 3.5 mm with powder and form a ring with 1 sl st in first ch. ROUND 1: LES HEKLEINFO! Work 12 tr in ch-ring. ROUND 2: Work 1 dc in every tr = 12 dc. ROUND 3: Work 2 tr in every dc = 24 tr. ROUND 4: Work 1 dc in every tr = 24 dc. ROUND 5: * Work 1 tr in first dc, 2 tr in next dc *, repeat from *-* the entire round = 36 tr. ROUND 6: Work 1 dc in every tr = 36 dc. ROUND 7: * Work 1 tr in each of the first 2 dc, 2 tr in next dc *, repeat from *-* the entire round = 48 tr. ROUND 8: Work 1 dc in every tr = 48 dc. Stop here in size 0/1 + 1/3 months. ROUND 9: * Work 1 tr in each of the first 3 dc, 2 tr in next dc *, repeat from *-* the entire round = 60 tr. ROUND 10: Work 1 dc in every tr = 60 dc. Stop here in size 6/9 + 12/18 months. ROUND 11: * Work 1 tr in each of the first 4 dc, 2 tr in next dc *, repeat from *-* the entire round = 72 tr. ROUND 12: Work 1 dc in every tr = 72 dc. Stop here in size 2 + 3/4 years. ALL SIZES: Insert 1 marker at beg of round and 1 marker after 6-6-6-8 (8-8) sts (seen from RS). Beg from RS at marker at beg of round and work 1 tr in every dc until second marker AT THE SAME TIME inc 20-26-20-28 (20-22) tr evenly over these sts – READ INCREASE TIP = 62-68-74-80 (84-86) tr on row (do not work over the 6-6-6-8 (8-8) dc between the 2 markers). Then work TEXTURE ROWS back and forth – see explanation above, until piece measures approx. 8-9-10-11 (12-13) cm from markers – finish after 1 row with dc from WS. Fasten off. EYELET HOLES FOR TIES: Work an edge at the bottom of hat with powder as follows: Beg from RS and work dc along one short side at the bottom of bonnet (work 1 dc in every dc-row and 2-3 dc in every tr-row), work 1 dc in each of the 6-6-6-8 (8-8) dc between the 2 markers on circle and work dc along the other short side (1 dc in every dc-row and 2-3 dc in every tr-row). Turn piece and work 1 row more with dc AT THE SAME TIME adjust dc-no so that it is divisible by 5 + 1. Work next row as follows: 1 ch, 1 dc in each of the first 2 dc, * skip 2 dc, 2 ch, 1 dc in each of the next 3 dc *, repeat from *-* until 4 sts remain, skip 2 dc, work 2 ch and 1 dc in each of the last 2 dc. Work 2 rows back and forth with dc (1 dc in every dc and 2 dc in every ch-space). Fasten off. TIES: Cut 4 lengths off white yarn of 2.5 metres each. Twine the strands tog until they resist, fold the string double so that it twines again. Make a knot at each end. Thread tie up and down through the eyelet holes on hat. FAN EDGE: Switch to off white and work 1 row dc from WS at the front of hat AT THE SAME TIME inc evenly to 64-70-76-82 (88-94) dc – READ INCREASE TIP. Then work FAN PATTERN according to diagram A.1, i.e. work as follows: ROW 1 (= RS): 1 ch, 1 dc in first dc, * 3 ch, skip 2 sts, 1 dc in next st *, repeat from *-* the entire row = 21-23-25-27 (29-31) ch-spaces, turn. ROW 2 (= WS): 3 ch (= 1 tr), 3 tr + 2 ch + 3 tr in first ch-space, * 1 tr in next ch-space, 3 tr + 2 ch + 3 tr in next ch-space *, repeat from *-* the entire row and finish with 1 tr in first dc from beg of previous row = 11-12-13-14 (15-16) tr-groups with 1 tr between every tr-group, turn piece. ROW 3 (= RS): 3 ch (= 1 tr), 3 tr + 2 ch + 3 tr in ch-space in first tr-group, * 1 tr in next tr, 3 tr + 2 ch + 3 tr in ch-space in the mid of next tr-group *, repeat from *-* the entire row and finish with 1 tr in 3rd ch from beg of previous row, fasten off. |
||||||||||
Diagram explanations |
||||||||||
|
||||||||||
 |
||||||||||
Have you finished this pattern?Tag your pictures with #dropspattern #camillebonnet or submit them to the #dropsfan gallery. Do you need help with this pattern?You'll find 11 tutorial videos, a Comments/Questions area and more by visiting the pattern on garnstudio.com. © 1982-2026 DROPS Design A/S. We reserve all rights. This document, including all its sub-sections, has copyrights. Read more about what you can do with our patterns at the bottom of each pattern on our site. |
||||||||||


With over 40 years in knitting and crochet design, DROPS Design offers one of the most extensive collections of free patterns on the internet - translated to 17 languages. As of today we count 324 catalogues and 12290 patterns translated into English (UK/cm).
We work hard to bring you the best knitting and crochet have to offer, inspiration and advice as well as great quality yarns at incredible prices! Would you like to use our patterns for other than personal use? You can read what you are allowed to do in the Copyright text at the bottom of all our patterns. Happy crafting!
Post a comment to pattern DROPS Baby 25-14
We would love to hear what you have to say about this pattern!
If you want to leave a question, please make sure you select the correct category in the form below, to speed up the answering process. Required fields are marked *.