
Popular categories
Looking for a yarn?


Comments / Questions (31)
![]() Liliane Depuis wrote:
Liliane Depuis wrote:
(sorry, verstuurde mijn vraag als opmerking, daarom hier opnieuw). Ik begrijp niet waarom er 'strepen A' en 'strepen B' zijn - ik zie nergens in het patroon strepen B voorkomen.
25.04.2014 - 12:23DROPS Design answered:
Hoi Liliane. Je hebt gelijk, er hoeft maar 1 soort strepen te zijn in dit patroon. Ik heb het verwijderd. Bedankt voor het melden.
25.04.2014 - 13:23
![]() Sarah wrote:
Sarah wrote:
Hallo, ich habe noch Fragen zu dem Pulli ohne Knöpfe (kleinste Größe). Wenn alle Maschen vor dem Passe auf der Nadel sind, habe ich 158 Maschen. Dann nehme ich 11x8 und 1x8 Maschen ab (158-96=62 Maschen). Dann lege ich 13 Maschen auf einen Hilfsfaden und kette 1x2 und 2x1 Masche ab (62-13-4=45 Maschen). In der Anleitung steht aber, dass ich auf 41 Maschen kommen müsste. Wo liegt mein Denkfehler? Außerdem frage ich mich, wo ich die Maschen für den Halsauschnitt abketten soll?
07.02.2014 - 12:28DROPS Design answered:
Liebe Sarah, Sie müssen am Hals auf beiden Seiten abnehmen. Die Maschen werden direkt am Ausschnittrand abgekettet, damit sich die Halsrundung ergibt.
08.02.2014 - 13:57
![]() Carla wrote:
Carla wrote:
Hoe moet er geminderd worden in het lijf voor de raglan 5st verdeeld over hoeveel naalden . De beschrijving is niet duidelijk
04.01.2014 - 19:16DROPS Design answered:
Hoi Carla. Je kan de t 5 st af aan beide zijkanten (waar de markeerders zijn). Dwz, zoals er staat in het patroon: st met de markeerder en 2 st aan iedere kant hiervan. Je hebt dan 92-104-116-128 of 140 st over (46-52-58-64 of 70 st per pand)
06.01.2014 - 13:20
![]() Selam wrote:
Selam wrote:
Thank you....so will the neck be open? do you have an example picture please?
11.12.2013 - 16:01DROPS Design answered:
Dear Selam, there is no buttonholes on neck, but you may add some if you like to. Happy knitting!
13.12.2013 - 18:38
![]() Selam wrote:
Selam wrote:
Hi you still have not answered my question:-)) I have finished with YOKE with buttons, how is the neck worked? back and forth? does it have buttons ? and button holes???
11.12.2013 - 14:23DROPS Design answered:
Dear Selam, buttonholes are done while knitting yoke with buttons (see "BUTTON HOLES" at the very beg of the pattern) - then neck is worked back and forth (see "NECK" but work back and forth on needle. Happy knitting!
11.12.2013 - 14:42
![]() Selam wrote:
Selam wrote:
Does the neck has bottoms on the YOKE WITH BUTTONS? I have finished with the yoke but not sure how the neck is done? is it work in round or back and forth?
11.12.2013 - 00:49DROPS Design answered:
Dear Selam, for the yoke with buttons, you start yoke casting on 4 sts for button band, then work all sts for yoke, back and forth on needle with 4 sts garter sts for button bands each side. Happy knitting!
11.12.2013 - 09:29Aleksandra Geniusz-Włodarczyk wrote:
In der Deutschen Fassung gibt es Fehler bei "ÄRMEL: Mit (...) M. anschlagen und 1 Runde glatt gestrickt. Danach 3 cm glatt stricken. Zu Nadel Nr. 4,5 wechseln und glatt stricken." Sollte es nicht mit Buendchen gemacht werden? "Danach 3 cm Bündchen stricken" ? MfG
09.11.2013 - 21:48DROPS Design answered:
Liebe Aleksandra, vielen Dank für den Hinweis. da ist unserer Überetzerin ein Fehler passiert. Wir haben das gleich korrigiert.
10.11.2013 - 09:21
![]() Isaline Henry wrote:
Isaline Henry wrote:
Bonjour, je suis à l'empiècement sans boutons, et je ne comprend pas: - le Raglan: à chacun des 4 marqueur je refais ce qu'il y a entre les *-*? - les diminutions "12 fois tous les deux rangs et 6 fois tous les rangs": je dois diminuer 12 mailles sur un rang? Et ce sur combien de rang? c'est en même temps qu'on diminue aussi de 6, ou ca vient après? Merci beaucoup d'avance.
24.06.2013 - 21:55DROPS Design answered:
Bonjour Mme Henry, pour l'empiècement sans bouton, vous tricotez comme indiqué dans le paragraphe "Diminutions raglan sans bordure de bouton.", càd en commençant par 2 m ens à l'end (début de tour), vous diminuez 1 m de chaque côté des 4 marqueurs, soit 8 m par tour de dim. En 2 ans, vous répétez ces diminutions un total de 12 fois tous les 2 tours puis 6 fois tous les 2 rangs, soit un total de 18 fois 8 m. Bon tricot!
25.06.2013 - 11:27
![]() Gloria wrote:
Gloria wrote:
Si hago la pechera con botones, ¿el cuello también tiene botones? En ese caso ¿tendría que hacer calzar los ojales para que coincidan cuando doblo el cuello hacia el lado del revés?
09.06.2013 - 14:33DROPS Design answered:
no hay botones en el cuello, sólo en la pechera.
15.06.2013 - 01:22
![]() Laura Graciani wrote:
Laura Graciani wrote:
Entiendo que se teje el cuerpo en redondopara que quede como la foto. De que longitud tienen que ser las agujas circulares, 60 o 80cm. Soy un poco novata con esta técnica. Gracias
14.12.2012 - 18:18DROPS Design answered:
Hola Laura, usa una ag de 80 cm, ya que después vas a deslizar las mangas a la misma ag circular que la pieza del cuerpo y así tendrás espacio suficiente para todos los pts.
15.12.2012 - 07:57
|
|
William#williamsweater |
|
|
|
|
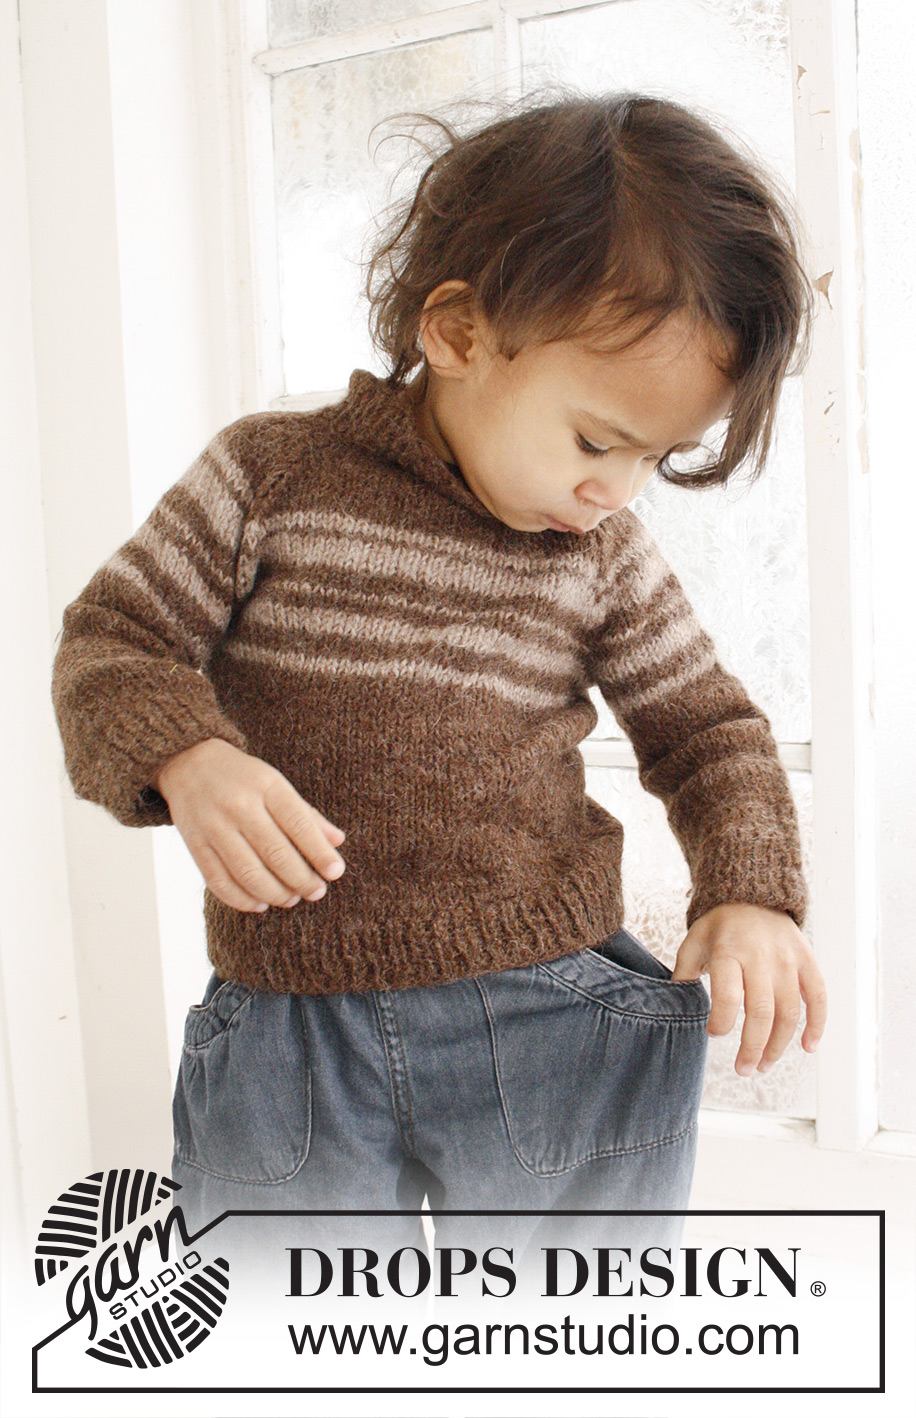
Knitted jumper with raglan and stripes for baby and children in DROPS Lima
DROPS Baby 21-29 |
|
|
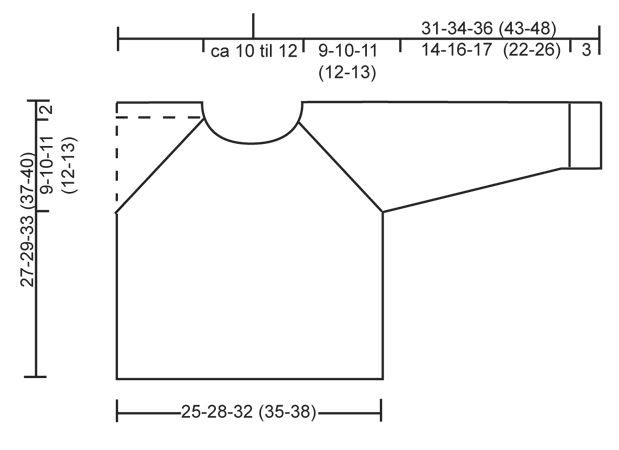
RIB: * K 1, P 1 *, repeat from *-*. STRIPES: 2 rounds light brown, 3 rounds brown, 3 rounds light brown, 2 rounds brown, 1 round light brown, 3 rounds brown, 4 rounds light brown, 1 round brown, 2 rounds light brown. DECREASE TIP FOR RAGLAN WITHOUT BUTTON BAND: K 2 tog. * Work until 3 sts remain before next marker, slip 1 st as if to K, K 1, psso, K 2, K 2 tog *, repeat from *-* at the next 2 markers, work until 4 sts remain on needle, slip 1 st as if to K, K 1, psso, K 2. DECREASE TIP FOR RAGLAN WITH BUTTON BAND: DEC AS FOLLOWS FROM RS: Work 4 band sts in garter st, K 2 tog. * Work until 3 sts remain before next marker, slip 1 st as if to K, K 1, psso, K 2, K 2 tog *, repeat from *-* at the next 2 markers, work until 6 sts remain on needle, slip 1 st as if to K, K 1, psso, work 4 band sts in garter st. DEC AS FOLLOWS FROM WS: Work 4 band sts in garter st, P 2 tog, * Work until 3 sts remain before next marker, P 2 twisted tog (i.e. work in back loop of st instead of front), P 2, P 2 tog *, repeat from *-* at the next 2 markers, work until 6 sts remain on needle, P 2 twisted tog, work 4 band sts in garter st. NOTE: Make sure that the sts lay in the correct direction from RS. GARTER ST (back and forth on needle): K all rows. BUTTON HOLES: Cast off for button holes on the raglan band which is on the sleeve part – assess if this is needed in the larger sizes. Make holes as follows: K 1, K 2 tog, 1 YO, K 1. Cast off for button holes when band measures: Size 1/3 months: 2, 5 and 8 cm Size 6/9 months: 3, 6 and 9 cm Size 12/18 months: 3, 7 and 10 cm Size 2 years: 3, 7 and 11 cm Size 3/4 years: 4, 8 and 12 cm -------------------------------------------------------- JUMPER: Worked in the round on circular needle from bottom up. BODY: Cast on 102-114-126 (138-150) sts on circular needle size 3.5 mm with brown Lima. Work 1 round in stocking st, then continue with RIB for 3 cm - see explanation above. Switch to circular needle size 4.5 mm and work 1 round in stocking st. Work next round as follows: Insert a marker in the 1st st (= beg of round), work 50-56-62 (68-74) sts in stocking st, insert a marker (= mid in the side) in next st, work 50-56-62 (68-74) sts in stocking st. When piece measures 14-15-18 (21-23) cm, work STRIPES - see explanation above. AT THE SAME TIME when piece measures 16-17-20 (23-25) cm, cast off 5 sts in each side for armholes (= st with marker + 2 sts on each side of this) = 92-104-116 (128-140) sts. Put piece aside and knit the sleeves. SLEEVE: Cast on 30-30-36 (36-36) sts on double pointed needles size 3.5 mm with brown Lima. Work 1 round in stocking st, continue with rib for 3 cm. Switch to double pointed needles size 4.5 mm, continue in stocking st. Insert a marker in the 1st st on round, AT THE SAME TIME when piece measures 6 cm, inc 2 sts mid under sleeve on each side of marker every 3-2-3 (2.5-2.5) cm a total of 4-6-5 (7-9) times = 38-42-46 (50-54) sts. When piece measures 15-17-18 (23-27) cm work STRIPES. When piece measures 17-19-20 (25-29) cm (adjust so that same no stripes has been worked as on body), cast off 5 sts mid under sleeve = 33-37-41 (45-49) sts. Put piece aside and knit another sleeve. YOKE: Slip sleeves on to same circular needle as body where armholes were cast off = 158-178-198 (218-238) sts. Insert a marker in every transition between body and sleeves. Then continue the piece with or without button holes – see explanation below. YOKE WITH BUTTONS: Then the piece is worked back and forth from right "raglan seam" at the front. Cast on 4 extra sts on the front piece part (= button band) = 162-182-202 (222-242) sts. Read all of the following section before continuing! Continue in stocking st and with stripes as well as 4 sts in GARTER ST at beg and end of row (for button band). At the same time dec for raglan – see DECREASE TIP – dec on every other row: 11-11-12 (12-13) times and then on every row: 1-3-4 (6-7) times. NOTE: Also cast off for BUTTON HOLES - see explanation above. At the same time when piece measures 23-25-29 (32-35) cm, slip the middle 13-13-13 (15-15) sts on a stitch holder for neck. Continue to cast off towards the neck on every other row: 2 sts 1 time and 1 st 2-2-2 (3-3) times. After all dec for raglan and cast offs for neck, 45-49-53 (53-57) sts remain on needle. YOKE WITHOUT BUTTONS: Then work in the round. Continue in stocking st and with stripes. At the same time dec for raglan – see DECREASE TIP – dec on every other row: 11-11-12 (12-13) times and then on every row: 1-3-4 (6-7) times. At the same time when piece measures 23-25-29 (32-35) cm, slip the middle 13-13-13 (15-15) sts on a stitch holder for neck. Continue to cast off towards the neck on every other row: 2 sts 1 time and 1 st 2-2-2 (3-3) times. After all dec for raglan and cast offs for neck, 41-45-49 (49-53) sts remain on needle. NECK: Work in the round for yoke without buttons and back and forth for yoke with buttons. Pick up approx. 23 to 27 sts at the front of neck (incl sts on stitch holder, without sts on buttonband) with brown = 68 to 84 sts. Slip all sts on double pointed needles size 3.5 mm – work 1 round/row in stocking st while at the same time dec/inc sts evenly to 64-76 sts. Work rib K 1/P 1 for 4 cm, loosely cast off. ASSEMBLY: Sew the openings under the sleeves tog. If button band has been worked: Place button bands on top of each other with the button holes part at the top and fasten in the bottom edge from WS. Sew on buttons. |
|
 |
|
Have you finished this pattern?Tag your pictures with #dropspattern #williamsweater or submit them to the #dropsfan gallery. Do you need help with this pattern?You'll find 24 tutorial videos, a Comments/Questions area and more by visiting the pattern on garnstudio.com. © 1982-2026 DROPS Design A/S. We reserve all rights. This document, including all its sub-sections, has copyrights. Read more about what you can do with our patterns at the bottom of each pattern on our site. |


With over 40 years in knitting and crochet design, DROPS Design offers one of the most extensive collections of free patterns on the internet - translated to 17 languages. As of today we count 324 catalogues and 12290 patterns translated into English (UK/cm).
We work hard to bring you the best knitting and crochet have to offer, inspiration and advice as well as great quality yarns at incredible prices! Would you like to use our patterns for other than personal use? You can read what you are allowed to do in the Copyright text at the bottom of all our patterns. Happy crafting!
Post a comment to pattern DROPS Baby 21-29
We would love to hear what you have to say about this pattern!
If you want to leave a question, please make sure you select the correct category in the form below, to speed up the answering process. Required fields are marked *.