
Popular categories
Looking for a yarn?


Comments / Questions (6)
![]() Helen G B wrote:
Helen G B wrote:
I am knitting the sleeve and instructions are to knit in stockinette until piece measures 74-76-78-79-81cm. However the diagram measurements suggest total sleeve lengths to be 68-69-70-71-72cm. Could you please advise which is correct? Thankyou
16.04.2024 - 23:42DROPS Design answered:
Hi helen, The measurements in the size chart are for under the sleeve (from the armhole to cuff). The length of the sleeve given in the knitting instructions are for the top of the sleeve (from shoulder to cuff). Happy knitting!
17.04.2024 - 06:46
![]() Monique Menez wrote:
Monique Menez wrote:
Pour le devant, vous dites à 12 cm de hauteur totale augmenter 1 m de chaque côté.... Voir comment augmenter 2 m. Ma question est de savoir combien de mailles doit on augmenter ? 1 ou 2 Merci pour votre réponse Monique
24.02.2021 - 19:31DROPS Design answered:
Bonjour Monique, on augmente 5 fois 1 m de chaque côté tous les 6 rangs, la phrase suivante était mal expliquée, vous allez en fait augmenter 2 mailles tous les 6 rangs - la référence est faite à la partie AUGMENATIONS au début des explications qui indique comment augmenter. Bon tricot!
25.02.2021 - 07:19
![]() DUGAST Brigitte wrote:
DUGAST Brigitte wrote:
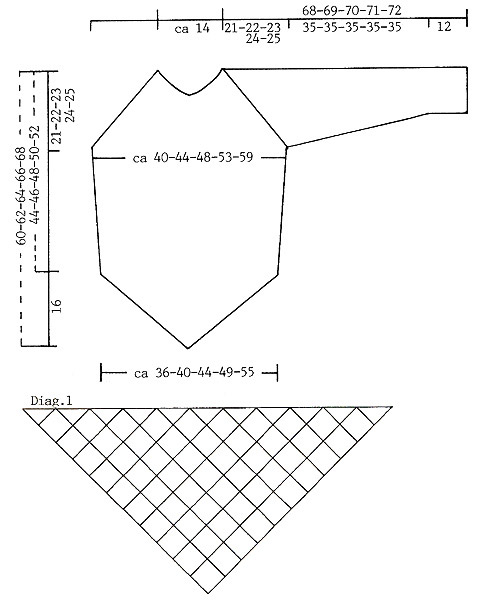
Bonjour ! Je ne trouve pas de correspondance entre les explications du modèle 80-11(pull) et le diagramme proposé . Que signifie "ca" devant les mesures du diagramme ? le nombre de mailles à tricoter ne donne pas le nombre de cm du diagramme. Les hauteurs en cm données dans l'explication ne sont pas celles données dans le diagramme. Que faut il suivre ? les explications ou le diagramme ? Merci de m'aider à y voir plus clair ! Brigitte
01.11.2015 - 14:19DROPS Design answered:
Bonjour Mme Dugast, pour former le chevron, il faudra davantage de mailles pour le devant et le dos - les mesures de l'emmanchure correspondent bien à celle du schéma - ca = environ. Bon tricot!
02.11.2015 - 08:58Anniek wrote:
Hij is af, hij is leuk, maar hij valt erg groot. Dit model is nou juist leuk als hij nauw aansluit en dat doet 'ie bij mij nu zeker niet. En de halsopening is juist zeer strak, (ik heb geen buitensporig groot hoofd). Toch een mooie en lekkere warme trui. Wellicht maak ik 'm nog eens maar dan zeker een maat kleiner ... alleen hoe krijg ik die dan over mijn hoofd? ;)
26.11.2014 - 10:25
![]() Anniek wrote:
Anniek wrote:
Ik heb het voorpand gebreid zoals beschrijving. Het is bizar maar ik hou nu 28 steken aan weerszijden van de merkdraad over, terwijl in de beschrijving staat dat het totaal op 28 uit moet komen. Ook als ik het rekensommetje maak: 134 - (2x32) - (2x21) kom ik uit op totaal 28. Ik begrijp niet hoe het kan.
27.10.2014 - 17:57DROPS Design answered:
Ik heb het patroon nagerekend en het klopt, dus u doet iets niet volgens de beschrijving. Helaas kunnen we op afstand niet beoordelen wat. Mindert u inderdaad aan elke kant van de markeerder in het midden, dus 2 st per keer? Vraag anders bij uw winkel of een andere brei(st)er even mee te kijken met uw werk.
28.10.2014 - 10:00
![]() C Van Pel wrote:
C Van Pel wrote:
Waarom wordt het voorpand in 1stuk gebreid en het achterpand niet?
02.12.2013 - 15:17DROPS Design answered:
Hoi. Je begint met 2 delen voor de split. Als deze klaar is worden de delen samen op de nld gezet en verder in één deel gebreid.
03.12.2013 - 10:58
|
|
DROPS 80-11 |
|
|
|
|
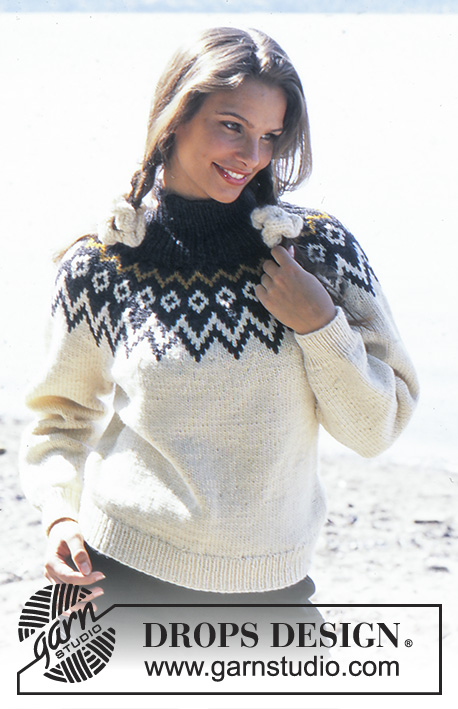
DROPS Pullover in Karisma Superwash
DROPS 80-11 |
|
|
Gauge: 20 sts x 26 rows on larger needles in stockinette st = 10 x 10 cm – in order for the pieces to fit together, you must obtain both st and row gauge accurately. Knitting tips (for decreasing front and back): Dec at each side of the marker at center front. On the back dec inside of 1 edge st at center back split, then dec at each side of the center back marker. Dec as follows from right side: Before the marker (or edge st): K 2 tog After the marker (or edge st): Sl 1 st as if to knit, K 1, psso. Dec as follows from wrong side: Before the marker (or edge st): slip 2 sts, return to left needle one by one, twisting each, then P 2 tog After the marker (or edge st): P 2 tog Increasing tips: Inc 1 st by knitting 2 sts in the st next to the outermost st. Inc 2 sts by knitting 2 sts in each of the 2 sts next to the outermost st. Front: Cast on loosely 92-102-112-124-140 sts on larger needles with medium grey. Put a marker in the center of work, after 46-51-56-62-70 sts. Change to smaller needles, knit 4 rows garter st (dec 1 st each side of the marker every other row and inc 1 st at each side edge every other row – see knitting and increasing tips. Change to larger needles and stockinette st, continuing dec/inc every other row. When the piece measures 12 cm (at the side) inc 1 extra st at each side every 6 rows 5 times – see tip for increasing 2 sts = 102-112-122-134-150 sts. When the piece measures 23-24-25-26-27 cm (at the side) start armhole shaping by not increasing at each side. Continue to dec 1 st at each side of the marker at center front as follows: every other row: 34-35-34-32-28 times and then every row: 3-7-13-21-33 times = 28 sts remain on needle. Put sts on a st holder. The piece measures approx. 60-62-64-66-68 cm from point at lower edge and up to the top. Back: The back is knit in 2 parts, then joined, forming a split at lower edge. Side-1: Cast on loosely 47-52-57-63-71 sts on larger needles with medium grey. Change to smaller needles 4 and knit 4 rows garter st (dec 1 st at the side which will be center back every other row and inc 1 st at the side edge every other row – see knitting and increasing tips. Change to larger needles and stockinette st, but keep the edge st at center back in garter st. Read the entire next section before knitting: When the piece measures 12 cm inc 1 extra st at side edge every 6 rows 5 times as on front. When the piece measures 15 cm end split and bind off the edge st at center back edge. Put sts on a st holder. Side-2: Knit the same as side 1, reversing shaping. Back: Put both sides on the same needle, with the garter st edges meeting up to form the split. Then knit the rest the same as the front. Continue to make the extra inc at each side every 6 rows until there are 102-112-122-134-150 sts. Sleeve: Cast on 46-48-50-52-54 sts on smaller needles with light grey. Knit 6 rows stockinette st (= rolled edge), then knit 4 rows garter st. Change to larger needles and reverse stockinette st. When the piece measures 12 cm (measure from the 1st row of garter st) inc 1 st at each side 16-17-18-19-20 times: Size XS: alternately every 5th and 6th row. Sizes S/M and M: every 5 rows Sizes L and XL: alternately every 4th and 5th row = 78-82-86-90-94 sts. When the piece measures 47 cm bind off 3 sts at each side. Then dec 1 st at each side every other row until 10-10-10-12-14 sts remain. Continue in stockinette st until the piece measures 74-76-78-79-81 cm, put sts on a st holder. Assembly: Sew raglan seams using 1 edge st as seam allowance – remember that the sleeve is reverse stockinette and the body is stockinette st. Sew sleeve and side seams using edge sts as a seam allowance. Collar: Put sts from st holders around the neck on smaller double-pointed needles = 76-76-76-80-84 sts; join and place a marker at the join. Knit stockinette st with medium grey – on the 1st row K 2 tog over the raglan seams = 72-72-72-76-80 sts. After 10 rows bind off all sts, the neckband will roll. Sew 4 large Xs with Highlander over raglan seams front and back. Sew 3 large Xs over split at center back. |
|
 |
|
Have you finished this pattern?Tag your pictures with #dropspattern or submit them to the #dropsfan gallery. Do you need help with this pattern?You'll find 30 tutorial videos, a Comments/Questions area and more by visiting the pattern on garnstudio.com. © 1982-2026 DROPS Design A/S. We reserve all rights. This document, including all its sub-sections, has copyrights. Read more about what you can do with our patterns at the bottom of each pattern on our site. |


With over 40 years in knitting and crochet design, DROPS Design offers one of the most extensive collections of free patterns on the internet - translated to 17 languages. As of today we count 324 catalogues and 12290 patterns translated into English (UK/cm).
We work hard to bring you the best knitting and crochet have to offer, inspiration and advice as well as great quality yarns at incredible prices! Would you like to use our patterns for other than personal use? You can read what you are allowed to do in the Copyright text at the bottom of all our patterns. Happy crafting!
Post a comment to pattern DROPS 80-11
We would love to hear what you have to say about this pattern!
If you want to leave a question, please make sure you select the correct category in the form below, to speed up the answering process. Required fields are marked *.