
Popular categories
Looking for a yarn?


Comments / Questions (30)
![]() Linda wrote:
Linda wrote:
Findes der diagram til de hæklede ruder?
17.06.2022 - 21:46DROPS Design answered:
Hei Linda. Til denne oppskriften er det bare skriftlig forklaring til den heklete ruten. mvh DROPS Design
20.06.2022 - 08:17
![]() Karin wrote:
Karin wrote:
Hallo liebes drops team Was bedeutet bitte "1 Ndl. re von links gestrickt" ? Vielen Dank u Grüße
22.05.2022 - 07:48DROPS Design answered:
Liebe Karin, hier sollen Sie eine Rückreihe mit rechten Maschen stricken. Viel Spaß beim stricken!
23.05.2022 - 08:20
![]() Manon Cloutier wrote:
Manon Cloutier wrote:
Bonjour à vous tous! J'avais compris cette partie, en faite ce que je ne sais pas, c'est quel point utilisé pour la couture? Merci de votre patience!
08.10.2018 - 16:10DROPS Design answered:
Bonjour Mme Cloutier, cousez à petits points en faisant en sorte que la couture soit le moins visible possible. Bon assemblage!
09.10.2018 - 08:59
![]() Manon Cloutier wrote:
Manon Cloutier wrote:
Coudre ce cercle à la jupe et au haut de la robe – assembler de sorte que l’anneau de motif soit au dessus des pièces au tricot, pour cacher les bordures. Je ne sais pas trop comment assembler le haut et le bas de la robe à l'anneau de motif, vous pouvez m'aider s.v.p.
07.10.2018 - 01:09DROPS Design answered:
Bonjour Mme Cloutier, l'anneau de carrés au crochet doit être au-dessus de la partie jersey, assemblez ces carrés au jersey en les posant au-dessus du jersey (vu sur l'endroit). Bon tricot!
08.10.2018 - 08:44
![]() Manon Cloutier wrote:
Manon Cloutier wrote:
Bonjour... Rien d'étonnant, je sais;-)! J'ai encore besoin de votre précieuse aide! Je travail dans la taille S et je n'arrive pas à saisir la section ''assemblage'', j'ai beau essayer, je n'y arrive tout simplement pas;(! Mes carrés sont tous fait et j'arrive pour les joindre ensembles et zuttttt , j'y arrive pas! S.O.S.
24.09.2018 - 00:36DROPS Design answered:
Bonjour Mme Cloutier, les carrés sont assemblés entre eux 2 par 2 sur un des côtés jusqu'à ce qu'ils forment un anneau. Cette vidéo montre comment faire (suivez bien les indications du modèle, la vidéo est "standard"). Quand vous les avez tous assemblé, vous avez un "anneau" que vous allez coudre entre le haut et le bas de la robe. Bon assemblage!
24.09.2018 - 10:05
![]() Manon Cloutier wrote:
Manon Cloutier wrote:
A 3-3-4-4-4 cm de hauteur totale, augm 1 m de chaque côté 5-5-4-4-4 fois tous les 2 cm. En même temps, à 10-10-11-12-12 cm de hauteur totale, diviser l’ouvrage en 2 pour l’encolure et mettre la moitié des m en attente sur un fil, puis diminuer pour former l’encolure V : 8-8-8-9-9 fois 1 m tous les 4 rangs, puis 4 fois 1 m tous les 2 rangs. Comment augmenter et diminuer en même temps? Je n'arrive tout simplement pas sniffff
27.08.2018 - 13:41DROPS Design answered:
Bonjour Mme Cloutier, vous commencez d'abord par augmentez de chaque côté comme indiqué, puis, à 10-12 cm (cf taille), divisez l'ouvrage en 2 pour l'encolure et continuez chaque côté séparément en continuant les augmentations jusqu'à ce qu'elles soient finies et en même temps, diminuez pour l'encolure: pour le côté gauche (quand on porte la robe): vous augmentez en début de rang sur l'endroit et diminuez en fin de rang sur l'endroit, pour le côté droit, vous diminuez en début de rang sur l'endroit et augmentez en fin de rang sur l'endroit. Bon tricot!
05.09.2018 - 12:34Bob Waddell wrote:
Please disregard my question from a couple of days ago about round 7 of the diamond pattern. I discovered that I had misread the instructions for round 6 and it caused issues in the following round. All is well.
23.06.2015 - 17:04Bob Waddell wrote:
Is it possible that there is a slight error in the instruction for the 7th round of the diamonds pattern? In the corners the dc in next dc, 4 ch, dc in next dc does not work out correctly. It looks like "1 dc in next dc, 4 ch, 1 dc in next dc (= corner)" should be "1 dc in next dc, 4 ch, 1 dc in same dc (= corner)". Please let me know if I am missing something.
22.06.2015 - 02:15DROPS Design answered:
Dear Mr Waddell, on round 6, you have in each coerner (in the dtr from round 5) 1 dc, 2 ch, 1 dc. On round 7 you work 1 dc in the dc, 4 ch, 1 dc in the next dc. Happy crocheting!
22.06.2015 - 19:12
![]() Elisabeth Wigg wrote:
Elisabeth Wigg wrote:
Nettopp ferdig med en nydelig kjole til datter :) Lett å følge oppskrift, sammenhekling av ruter ble redusert til 5lm for å passe. Men trådmengdene ble akkurat nok, ingen plass for svinn av bomullstråden u/shine.
06.06.2015 - 08:50
![]() Renate wrote:
Renate wrote:
Hallo, was bedeutet bitte bei Reihe 6: 1 feste Masche oben am Blatt, bedeutet das in die Luftmasche? Danke Schöne Grüße Renate
03.06.2014 - 18:38DROPS Design answered:
Antwort siehe unten! :-)
04.06.2014 - 11:05
|
|
Just You and I |
|
|
|
|
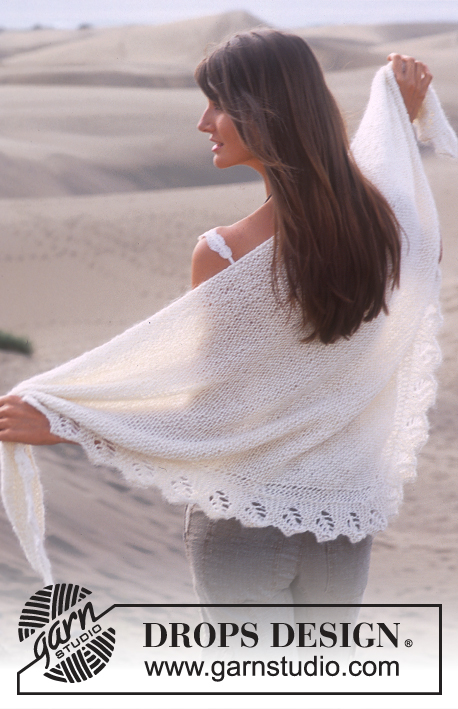
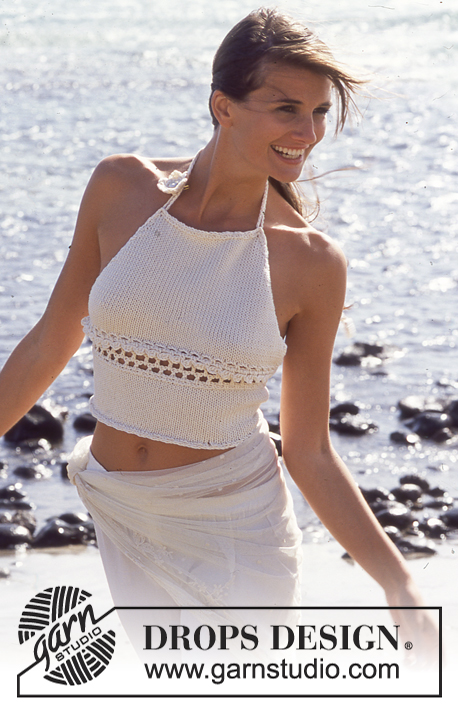
DROPS Dress with crochet waistband in Safran and Cotton Viscose
DROPS 94-30 |
|
|
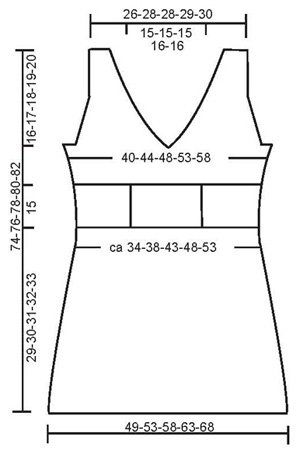
Knitting tension: 16 sts x 20 rows with 1 thread of each yarn quality in stocking stitch on needle size 5.5mm = 10 x 10 cm Crochet tension: 1 diamond using crochet hook size 5mm should measure 15 x 15 cm Decreasing tips (applies to armhole and neck): Decrease within 2 edge sts from the right side. Dec as follows after 2 edge sts: slip 1 st as if to knit, K1, psso. Dec as follows before 2 edge sts: K2 tog. DRESS: The dress is knitted in several pieces. Start with the skirt (front and back piece), then knit the top (front and back piece). Crochet the diamonds for the waistband and sew this to skirt and top pieces. SKIRT: Cast on 80-86-94-102-110 sts (inclusive of 1 edge st each side, edge sts are knitted in garter st throughout) on needle size 5.5 with 1 thread of each yarn quality (= double thread). Knit 1 row from the wrong side and continue in stocking stitch. When piece measures 5-5-5-6-6 cm dec 1 st each side on every 2 cm a total of 12 times = 56-62-70-78-86 sts. When piece measures 29-30-31-32-33 cm knit 1 row from the wrong side and cast off. Knit another piece and sew pieces together at sides within 1 edge st. TOP - FRONT PIECE: Cast on 56-62-70-78-86 sts (inclusive of 1 edge st each side) on needle size 5.5 with 1 thread of each yarn quality (= double thread). Knit 1 row from the wrong side and continue in stocking st. When piece measures 3-3-4-4-4 cm inc 1 st each side on every 2 cm a total of 5-5-4-4-4 times. At the same time, when piece measures 10-10-11-11-12 cm divide the piece mid front for neck and put half the stitches on a thread. Now decrease for V-neck - see Decreasing tips: on every 4th row 1 st a total of 8-8-8-9-9 times and then on every other row 1 st 4 times. At the same time when piece measures 15 cm dec 4-5-6-8-10 sts at side for armhole. Now dec 1 st for armhole on every other row – see Decreasing tips – a total of 8-9-11-12-13 times. After all decreases for armhole and neckline have been made, there are 9-10-10-10-11 sts remaining. Continue until piece measures 31-32-33-34-35 cm and cast off. Repeat the other side. Note! Knit 1st row from mid front. Start by picking up a st in the first st on the other piece and knit this together with 1st st on row (to avoid a “hole” at the bottom of the V-neck). TOP - BACK PIECE: Cast on and knit as top front but without the decreases for V-neck. Cast off for armhole as for front piece = 42-44-44-46-48 sts. Continue until piece measures 29-30-31-32-33 cm. Now cast off the middle 22-22-22-24-24 sts for neck. Dec 1 st towards neckline on next row = 9-10-10-10-11 sts left on each shoulder. Continue until piece measures 31-32-33-34-35 cm and cast off. Sew shoulder and side seams within 1 edge st. CROCHET DIAMONDS - for waistband: Crochet 4-5-5-6-6 diamonds as explained below. Crochet the diamonds together to form a ring and attach to skirt and top pieces. 1 diamond: Crochet 4 ch using crochet hook size 5 mm and 1 thread of each yarn quality (double thread) and form a ring with a sl st in 1st ch. 1st round: 3 ch (= 1 tr), 11 tr in ring and finish with 1 sl st in 3rd ch from beginning of round = 12 tr 2nd round: *4 ch, 1 tr in the first of the 4 ch, skip 1 tr, 1 sl st in next tr*, repeat from *-* a total of 6 times but finish with 1 sl st in sl st from the end of previous row (instead of in next tr) = 6 leaves 3rd round: 3 ch, 1 dc at the top of first leaf, *7 ch, 1 dc at the top of next leaf*, repeat from *-* a total of 6 times but finish with 1 sl st in first dc from beginning of round (instead of a dc at the top of next leaf) = 6 ch-loops 4th round: *4 ch, 1 tr in the first of the 4 ch, 1 dc in ch-loop, 4 ch, 1 tr in the first of the 4 ch, 1 dc in dc between ch-loops*, repeat from *-* a total of 6 times but finish with 1 sl st in sl st from the end of previous round (instead of a dc in dc between ch-loops) = 12 leaves 5th round: 3 ch, *1 dc at the top of first leaf, 4 ch, 1 dc at the top of next leaf, 4 ch, 1 dc at the top of next leaf, 4 ch, 1 dtr in dc between the next 2 leaves, 4 ch*, repeat from *-* a total of 4 times and finish with 1 sl st in first dc from beginning of round = 4 corner dtr and 16 ch-loops 6th round: *2 ch, 1 dc in ch-loop, 2 ch, 1 dc at the top of leaf, 2 ch, 1 dc in ch-loop, 2 ch, 1 dc at the top of leaf, 2 ch, 1 dc in ch-loop, 2 ch, 1 dc in corner tr, 2 ch, 1 dc in corner tr, 2 ch, 1 dc in ch-loop, 2 ch, 1 dc at the top of leaf* , repeat from *-* a total of 4 times but finish with 1 sl st in sl st from the end of previous round (instead of 1 dc at the top of leaf) = 36 ch-loops with 2 ch. 7th round: *6 ch, skip 1 dc, 1 dc in next dc (over leaf), 6 ch, skip 1 dc, 1 dc in next dc, 6 ch, skip 1 dc, 1 dc in next dc, 4 ch, 1 dc in next dc (= corner), 6 ch, skip 1 dc, 1 dc in next dc*, repeat from *-* a total of 4 times but finish with 1 sl st in sl st from the end of previous round (instead of 1 dc in next dc), Cut the thread. Assembly: Crochet the diamonds together as follows: Size S + M + XL: 1 dc in ch-loop at the corner of first diamond, 1 dc in ch-loop at corner of second diamond, 2 ch, 1 dc in next dc in first diamond, 1 dc in next dc in second diamond, *6 ch, 1 dc in next dc of first diamond, 1 dc in next dc of second diamond*, repeat from *-* a total of 4 times, 2 ch, 1 dc in ch-loop at corner of first diamond, 1 dc in ch-loop at corner of second diamond. Cut the thread. Size L +XXL: Crochet as described for sizes S/M/XL but replace each dc with a tr (i.e. crochet 1 tr in ch-loop at corner of first diamond, 1 tr in ch-loop at corner of second diamond, etc). When all diamonds are joined as described above, you’ll have a ring of diamonds. Sew the ring to skirt and top pieces – joined them so that the ring of diamonds are on top of the pieces, i.e. hides the edges. Crochet border at neck and armholes: Using crochet hook size 5mm and 1 thread of each yarn quality: 1 dc in first st, *1 ch, skip 1 st, 1 dc in next st*, repeat from *-* and finish with 1 ch and 1 dc in first st from beginning of round – the edge should be even and not wavy. Crochet border at skirt bottom edge: Use crochet hook size 5 mm and 1 thread of each yarn quality: 1st round: 1 dc in first st, *1 ch, skip approx 2 sts (1-1.5 cm), 1 dc in next st*, repeat from *-* and finish with 1 ch and 1 sl st in first dc from beginning of round. 2nd round: 1 ch, 1 sl st in first ch, *4 ch, 1 tr in the first of the 4 ch just crochet, skip 1 ch, 1 dc in next ch*, repeat from *-* but finish with 1 sl st in sl st from beginning of round (instead of 1 dc in next ch). 3rd round: 3 ch, 1 dc at the top of loop, *3 ch, 1 dc at the top of next loop*, repeat from *-* and finish with 3 ch and 1 sl st in first dc from beginning of round. 4th round: crochet sl st to the middle of ch-loop, *4 ch, a tr in the first of the 4 ch just crochet, 1 dc in next ch-loop*, repeat from *-* and finish with 1 sl st in first sl st from beginning of round. _____________________________________________________________________ Hairpin with flower: Use crochet hook size 3mm and 1 thread of Cotton Viscose: Crochet 4 ch and form a ring with a sl st. 1st round: 3 ch (= 1 tr), 11 tr in ring and finish with 1 sl st in 3rd ch from beginning of round = 12 tr 2nd round: 1 ch, *3 ch, 1 tr in the first of the 3 ch just crochet, skip 1 tr, 1 dc in next tr*, repeat from *-* a total of 6 times and finish with 1 sl st in first ch from beginning of round = 6 leaves. Sew flower to hairpin. |
|
 |
|
Have you finished this pattern?Tag your pictures with #dropspattern or submit them to the #dropsfan gallery. Do you need help with this pattern?You'll find 24 tutorial videos, a Comments/Questions area and more by visiting the pattern on garnstudio.com. © 1982-2026 DROPS Design A/S. We reserve all rights. This document, including all its sub-sections, has copyrights. Read more about what you can do with our patterns at the bottom of each pattern on our site. |


With over 40 years in knitting and crochet design, DROPS Design offers one of the most extensive collections of free patterns on the internet - translated to 17 languages. As of today we count 324 catalogues and 12290 patterns translated into English (UK/cm).
We work hard to bring you the best knitting and crochet have to offer, inspiration and advice as well as great quality yarns at incredible prices! Would you like to use our patterns for other than personal use? You can read what you are allowed to do in the Copyright text at the bottom of all our patterns. Happy crafting!
Post a comment to pattern DROPS 94-30
We would love to hear what you have to say about this pattern!
If you want to leave a question, please make sure you select the correct category in the form below, to speed up the answering process. Required fields are marked *.