
Popular categories
Looking for a yarn?


Comments / Questions (78)
![]() C.Sinnema wrote:
C.Sinnema wrote:
In patroon staat dat je 4 steken moet afkanten voor armsgat. Dit moet zijn 2 anders klopt patroon niet.
13.11.2012 - 13:04DROPS Design answered:
Het patroon klopt. Je moet 4 st afkanten aan beide zijkanten (8 st in totaal) en dus 2 st aan beide "zijkanten" van het voor- en achterpand.
14.11.2012 - 13:46
![]() DROPS Design NL wrote:
DROPS Design NL wrote:
Daarbij is dit patroon berekend voor onze oude Karisma. Deze had een wat langere looplengte dan de nieuwe (110 ipv 100). Ik heb een opmerking in het patroon gezet (doen we ook lopend op alle oude patronen, maar het staat op de kleurenoverzicht van Karisma).
02.02.2012 - 09:53
![]() DROPS Design NL wrote:
DROPS Design NL wrote:
Hoi. Ja, dat zou wel kunnen kloppen. De looplengte voor Lima is ca 90 m per 50 gr en die voor Karisma ca 100 m per 50 gr. Hou altijd rekening met de looplengte als u een alternatief garen kiest.
02.02.2012 - 09:50
![]() Lucy wrote:
Lucy wrote:
Ik heb deze trui gebreit met LIMA wol in de maat small/medium voor heren en ik had 3 bollen wol extra nodig.
02.02.2012 - 09:44
![]() Drops Design France wrote:
Drops Design France wrote:
Bonjour Miossec, cette note n'apparaît pas dans le modèle original, vous pouvez ainsi tricoter M.1 comme le diagramme ou choisir de faire la torsade de M.1 dès le 1er rang. Bon tricot !
19.12.2011 - 13:24
![]() Miossec wrote:
Miossec wrote:
Bonjour, dans le modèle homme 52-7, vous indiquer en correction 'au 1rang de m1 ... faire 1 torsade sur 4 mailles..' mais quelle sorte de torsade (mailles en attente devant/ derrière ??) de plus, pouvez-vous me confirmer que les grilles sont à lire à partir du coin haut droit, puis vers la gauche, pour toutes les lignes ? (je débute en tricot avec aiguille ciculaire) je vous remercie pour votre réponse
16.12.2011 - 10:13
![]() DROPS Design NL wrote:
DROPS Design NL wrote:
Hoi. Het patroon en teltekening klopt. Ik heb ook een reactie gestuurd naar Dolce Lana op uw vraag, met uitleg over wat ik denk fout gaat. Succes.
10.11.2011 - 17:57
![]() Lucy wrote:
Lucy wrote:
HELP!!! Het telpatroon M1 geeft niet het resultaat zoals de kabel op de foto. Alstublief dringend assistentie gevraagd. Groetjes Lucy
09.11.2011 - 20:44
![]() DROPS Design NL wrote:
DROPS Design NL wrote:
Ja, eigenlijk wel. Berekenen hoe groot voorpand en achterpand moet worden en zet daarbij 1 st op aan de zijkanten (= kantst). Meerder/minder dan aan de zijkanten enz. Succes. Gr. Tine
07.01.2011 - 11:02
![]() Marij-ann wrote:
Marij-ann wrote:
Ik wil graag breien op de ouderwetse manier met 2 pennen. Moet ik alles dan gewoon door 2 delen? Gr. Marij-Ann
06.01.2011 - 18:19
|
|||||||||||||||||||||||||
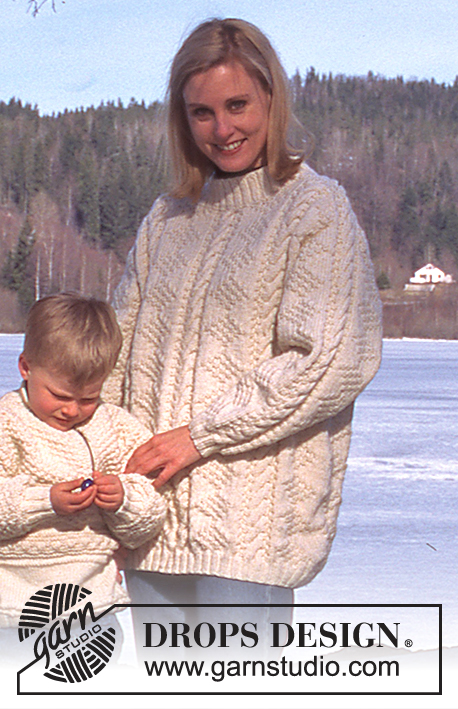
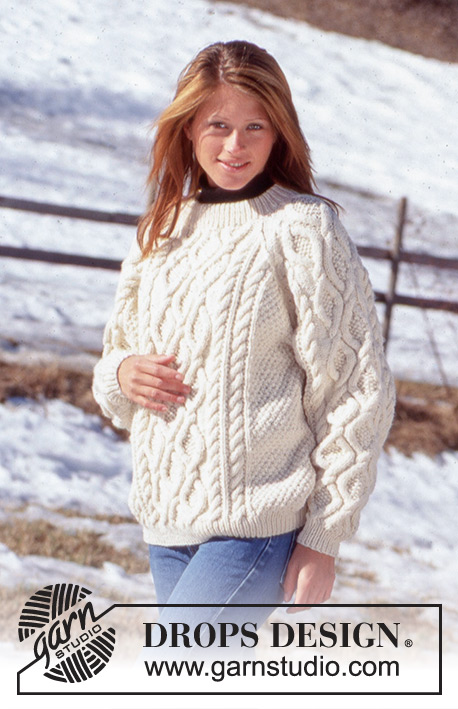
Comforting Cables |
|||||||||||||||||||||||||
 |
 |
||||||||||||||||||||||||
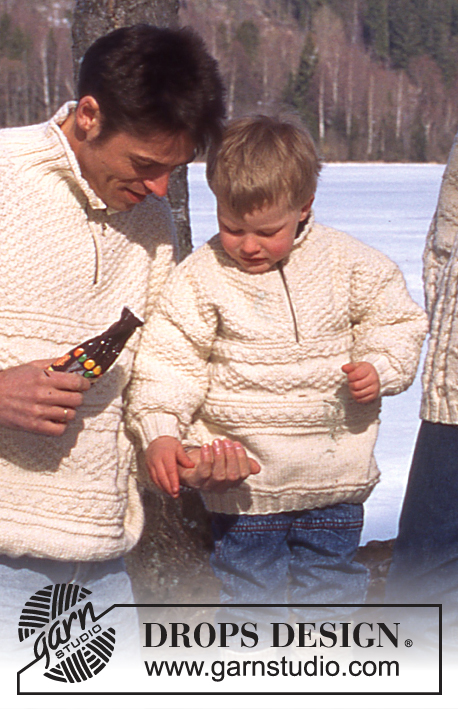
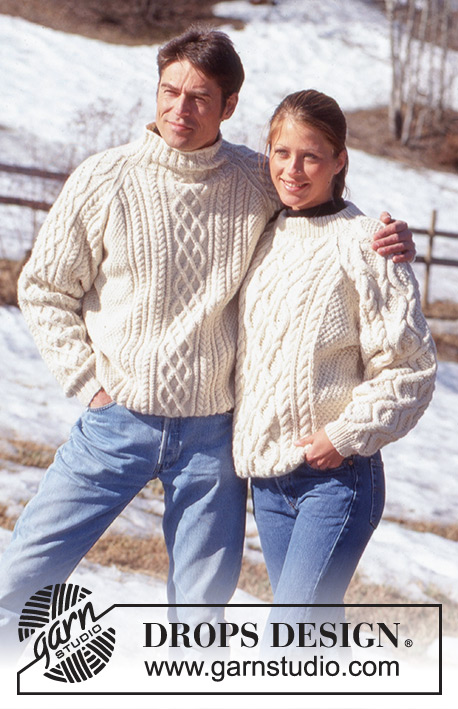
DROPS Raglan Sweater for men in Karisma Superwash
DROPS 52-7 |
|||||||||||||||||||||||||
|
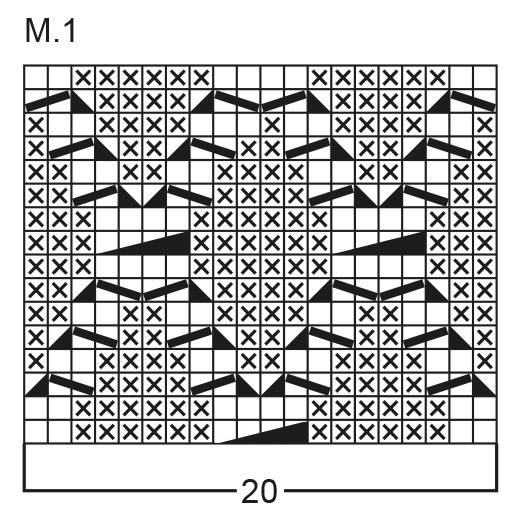
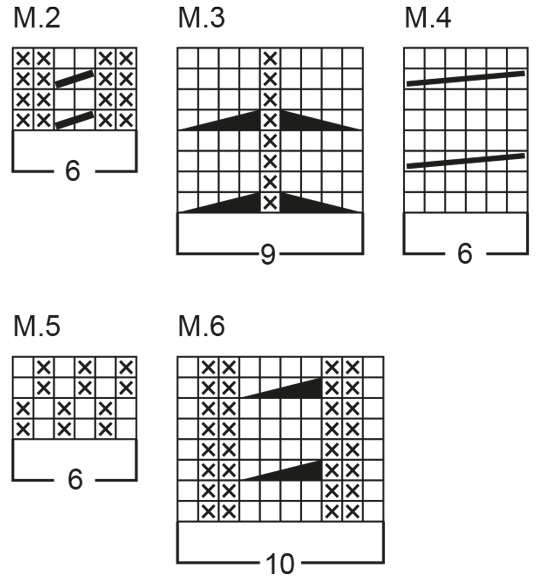
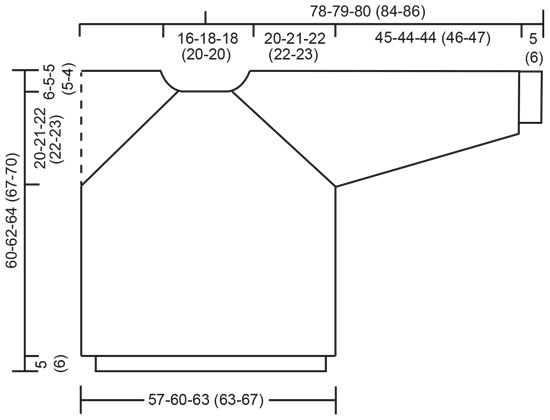
Gauge: 21 sts and 28 rows on larger needle in Pattern 5 = 10 x 10 cm NOTE: row gauge is very important during raglan shaping -- if your gauge is not correct your armhole sizing will not be correct. Rib: * knit 2, purl 2 *. Repeat from * - *. Pattern: See charts (1 chart = 1 repeat). The chart is showing every row in pattern from the right side. Note: On 1st row of M1, after K2, P6; make a cable over following 4 sts. Rib: *knit 2, purl 2*. Repeat from * - *. BODY: Numbers in () = men's sizes. Cast on 188-192-200 (200-208) sts on smaller circular needles; join and place a marker at the join. Knit rib for 5-5-5 (6-6) cm - on the last row inc 88-96-100 (100-108) sts evenly distributed on the row = 276-288-300 (300-316) sts. Change to larger circular needles and establish the pattern as follows (start at the marker): 26-29-32 (32-36) sts of Pattern 5, Pattern 2, Pattern 4, Pattern 2, Pattern 3, Pattern 2, Pattern 1 (this is the center front panel), Pattern 2, Pattern 3, Pattern 2, Pattern 4, Pattern 2, 26-29-32 (32-36) sts of Pattern 5, place a marker for the side, 26-29-32 (32-36) sts of Pattern 5, Pattern 2, Pattern 4, Pattern 2, Pattern 3, Pattern 2, Pattern 1, Pattern 2, Pattern 3, Pattern 2, Pattern 4, Pattern 2, 26-29-32 (32-36) sts of Pattern 5. When the work measures 34-36-37 (40-43) cm bind off 2 sts on each side of each marker for armholes = 134-140-146 (146-154) sts for front and back. Put the work aside. Sleeves: Cast on 52-52-52 (56-56) sts on smaller double pointed needles; join and place a marker at the join. Knit rib for 5-5-5 (6-6) cm - on the last row inc 22-22-22 (18-18) sts evenly distributed on the row = 74-74-74 (74-74) sts. Change to larger double-pointed needles and establish the pattern as follows: Pattern 4, Pattern 2, Pattern 3, Pattern 2, Pattern 1, Pattern 2, Pattern 3, Pattern 2, Pattern 4. Knit the pattern as established and at the same time inc 1 st each side of marker every 4th row 27-27-29 (29-29) times = 128-128-132 (132-132) sts. Knit the first 6 increases in Pattern 2 and the remaining increases in Pattern 5. When the work measures 50-49-49 (52-53) cm, bind off 2 sts each side of marker and put the work aside = 124-124-128 (128-128) sts. Body: Put the sleeves in on the same circular needles as the body where 4 sts have been bind off = 516-528-548 (548-564) sts on needle. Put a marker in each transition between the sleeves and body = 4 markers. Continue pattern but knit the first stitch on either side of the markers in stockinette stitch (= 2 sts stockinette stitch in the transitions from body to sleeve). Knit 5-6-8 (8-9) rows then begin raglan shaping. Raglan shaping: Read the next section in its entirety before knitting! There are 8 decreases per row (1 stitch on each side of the 2 sts in stockinette stitch). Make the decreases as follows: Before the 2 sts stockinette stitch: Right side: K 2 tog. Wrong side: slip 2 sts, put them back on the left needle twisted (one by one), purl the 2 twisted sts together After the 2 sts stockinette stitch: Right side: slip 1, knit 1, pass the slipped stitch over (psso). Wrong side: purl 2 tog. Dec 1 st each side of each marker every row 51-52-53 (53-55) times. When 8 decreases remain bind off for the neck in the front at the same time with the raglan shaping as follows: Put the center 20-24-28 (28-32) sts on on a stitch holder, then knit the rest back and forth on needle. Then bind off at each neck edge every other row: 2 sts 1 time, 1 st 2 times. After the last decrease row 80-80-88 (88-84) sts remain on the needle. The sweater's measurement up to the shoulder = 60-62-64 (67-70) cm. Put the sts from the stitch holder back on the needle and pick up 10 sts on either side of the neck shaping = 120-124-136 (136-136) sts on needle. Change to smaller circular needles and knit 1 row, purl 1 row, knit 1 row and at the same time increase or decrease to 120-120-130 (130-140) sts evenly distributed on the row. Knit Pattern 6 for 9 cm - finish on 1st or 5th row of pattern, then 1 row *K 2 tog* across. Purl 1 row and bind off. Assembly: Sew the 4 sts at underarm together. |
|||||||||||||||||||||||||
Diagram explanations |
|||||||||||||||||||||||||
|
|||||||||||||||||||||||||
 |
|||||||||||||||||||||||||
 |
|||||||||||||||||||||||||
 |
|||||||||||||||||||||||||
Have you finished this pattern?Tag your pictures with #dropspattern or submit them to the #dropsfan gallery. Do you need help with this pattern?You'll find 27 tutorial videos, a Comments/Questions area and more by visiting the pattern on garnstudio.com. © 1982-2026 DROPS Design A/S. We reserve all rights. This document, including all its sub-sections, has copyrights. Read more about what you can do with our patterns at the bottom of each pattern on our site. |
|||||||||||||||||||||||||


With over 40 years in knitting and crochet design, DROPS Design offers one of the most extensive collections of free patterns on the internet - translated to 17 languages. As of today we count 325 catalogues and 12298 patterns translated into English (UK/cm).
We work hard to bring you the best knitting and crochet have to offer, inspiration and advice as well as great quality yarns at incredible prices! Would you like to use our patterns for other than personal use? You can read what you are allowed to do in the Copyright text at the bottom of all our patterns. Happy crafting!
Post a comment to pattern DROPS 52-7
We would love to hear what you have to say about this pattern!
If you want to leave a question, please make sure you select the correct category in the form below, to speed up the answering process. Required fields are marked *.