
Popular categories
Looking for a yarn?


Comments / Questions (2)
![]() Marion wrote:
Marion wrote:
Ich habe eine Frage zum Muster A2: Wenn ich eine Mache abhebe, zwei zusammenstricke und die erste Masche dann darüber hebe, bleibt nur noch eine Masche übrig. Wo kommt die 2. Masche her, die ich brauche um in der 3. Reihe einen Umschlag zwischen zwei Masche zu machen ? Vielen Dank für ihre Antwort
06.04.2026 - 12:07DROPS Design answered:
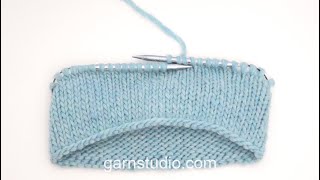
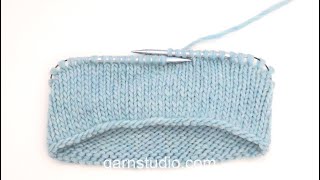
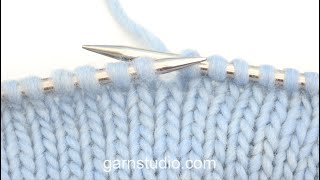
Liebe Marion, in A.2 sollen die 2 Maschen nicht zusammen gestrickt werden, diese Maschen sollen separat gestrickt werden, so sind es 2 Maschen übrig nach der 1. Reihe. In diesem Video zeigen wir, wie man so einen Zopf strickt. Viel Spaß beim Stricken!
08.04.2026 - 11:34
![]() Ola wrote:
Ola wrote:
Kalkulator zamykania oczek źle działa . Nie jest prawidłowy. Jeżeli mam do zamknięcia 20 oczek, on pokazuje mi że mam przerobić 1 oczko na prawo i zamknąć 2 oczka razy 20, więc zostaje mi 41 oczek zamiast 40
08.03.2026 - 15:25DROPS Design answered:
Witaj Olu, rzadko będzie tak idealnie, że da się podzielić liczbę oczek bez reszty. Nie szkodzi, że jest o 1 oczko więcej. To nie będzie widoczne. Pozdrawiamy!
11.03.2026 - 10:18
|
||||||||||||||||||||||
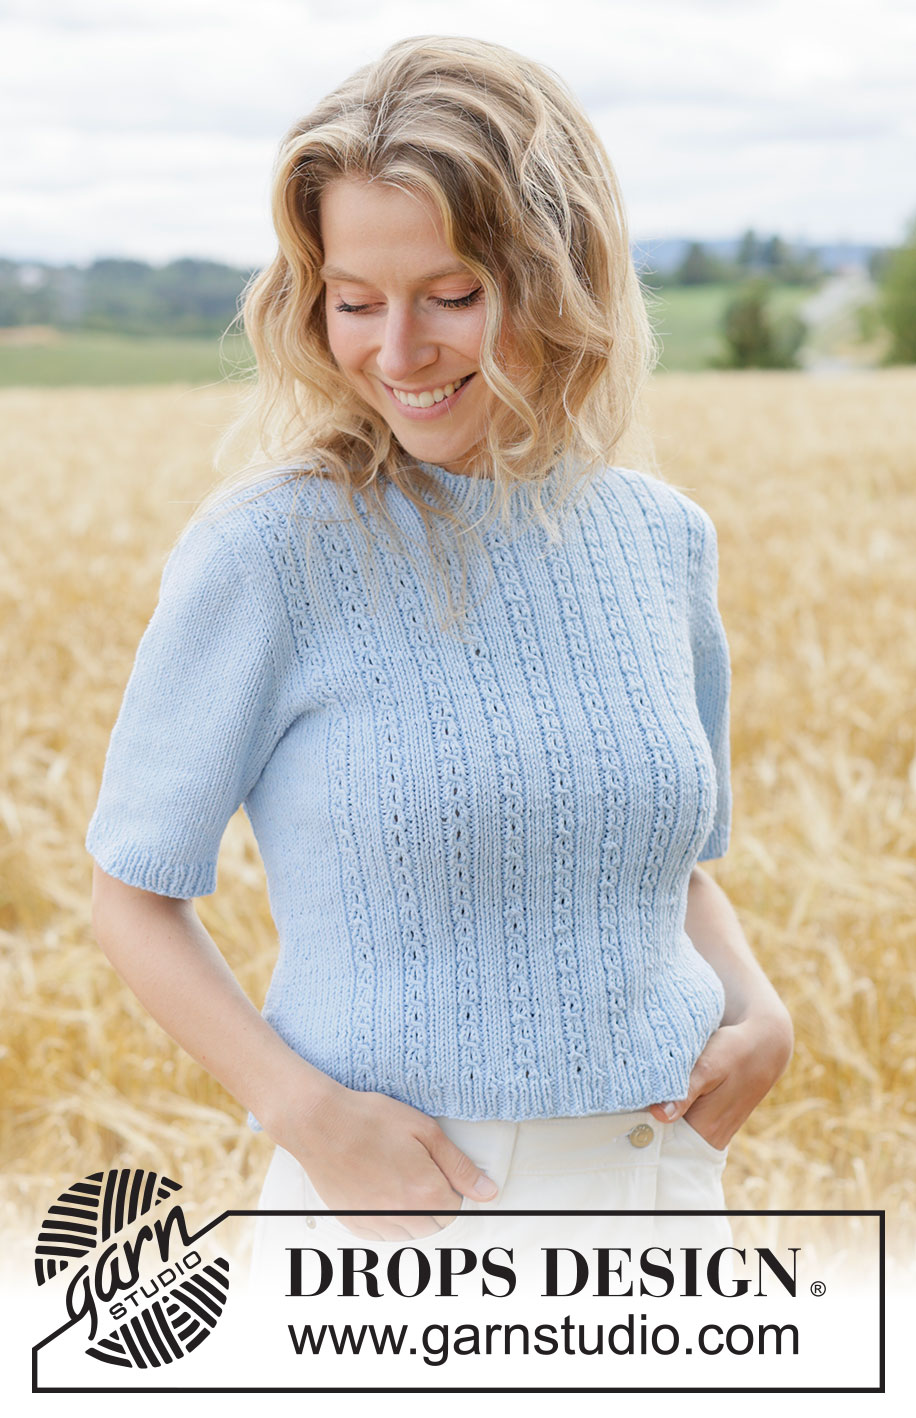
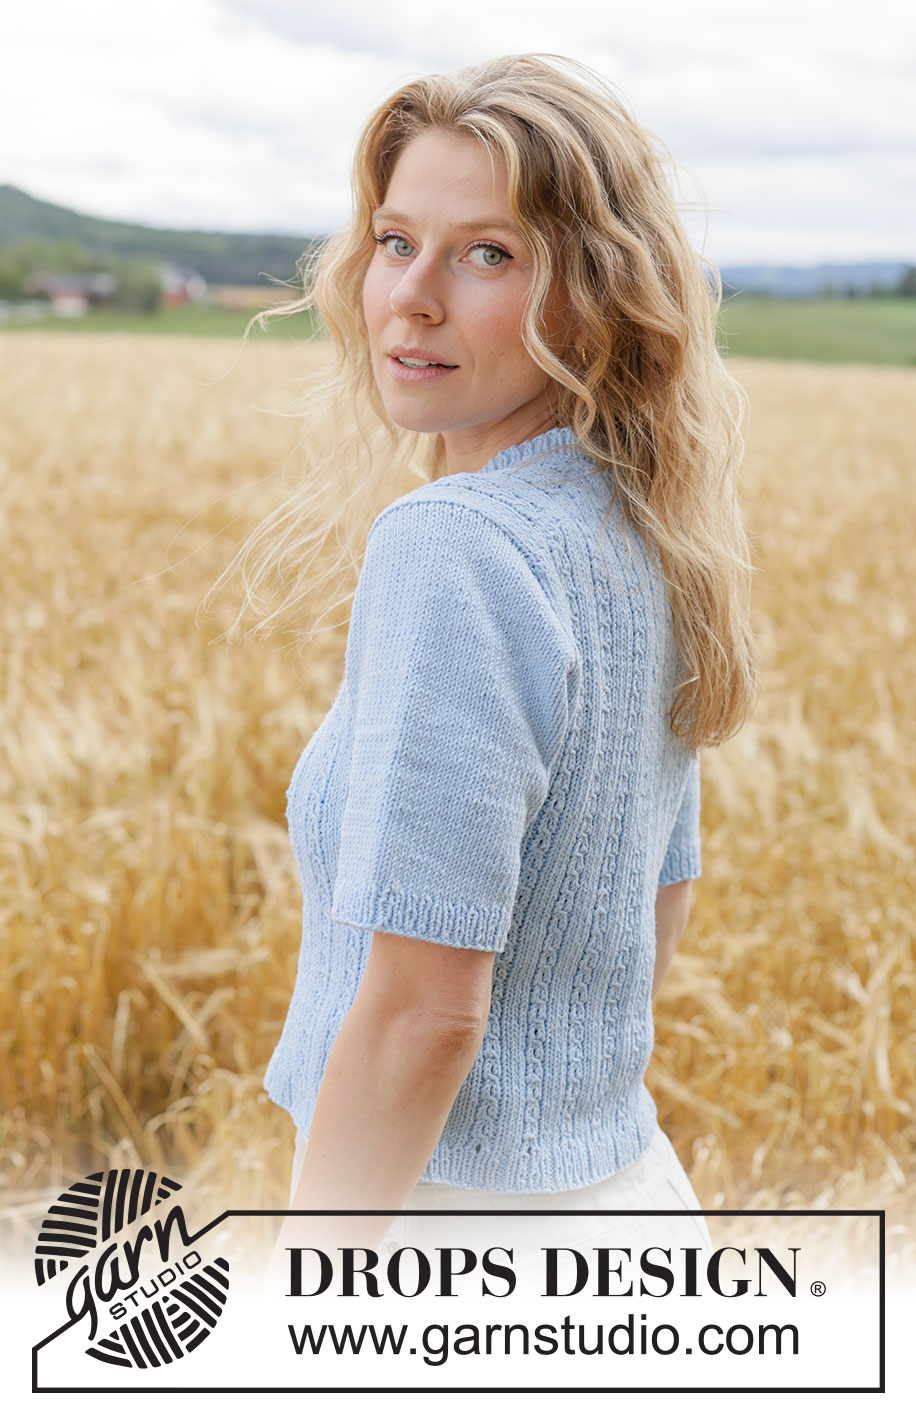
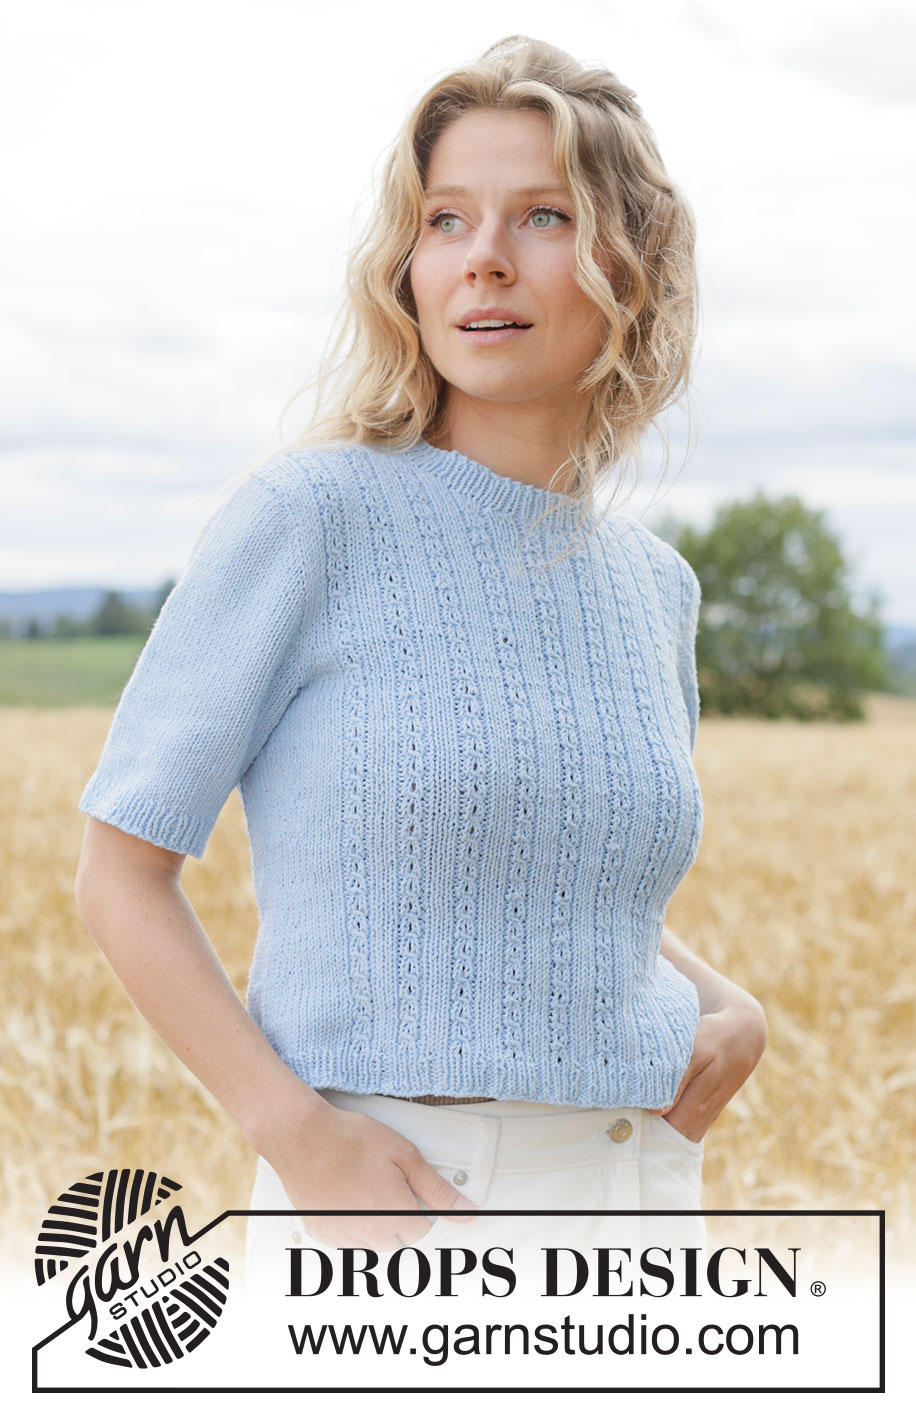
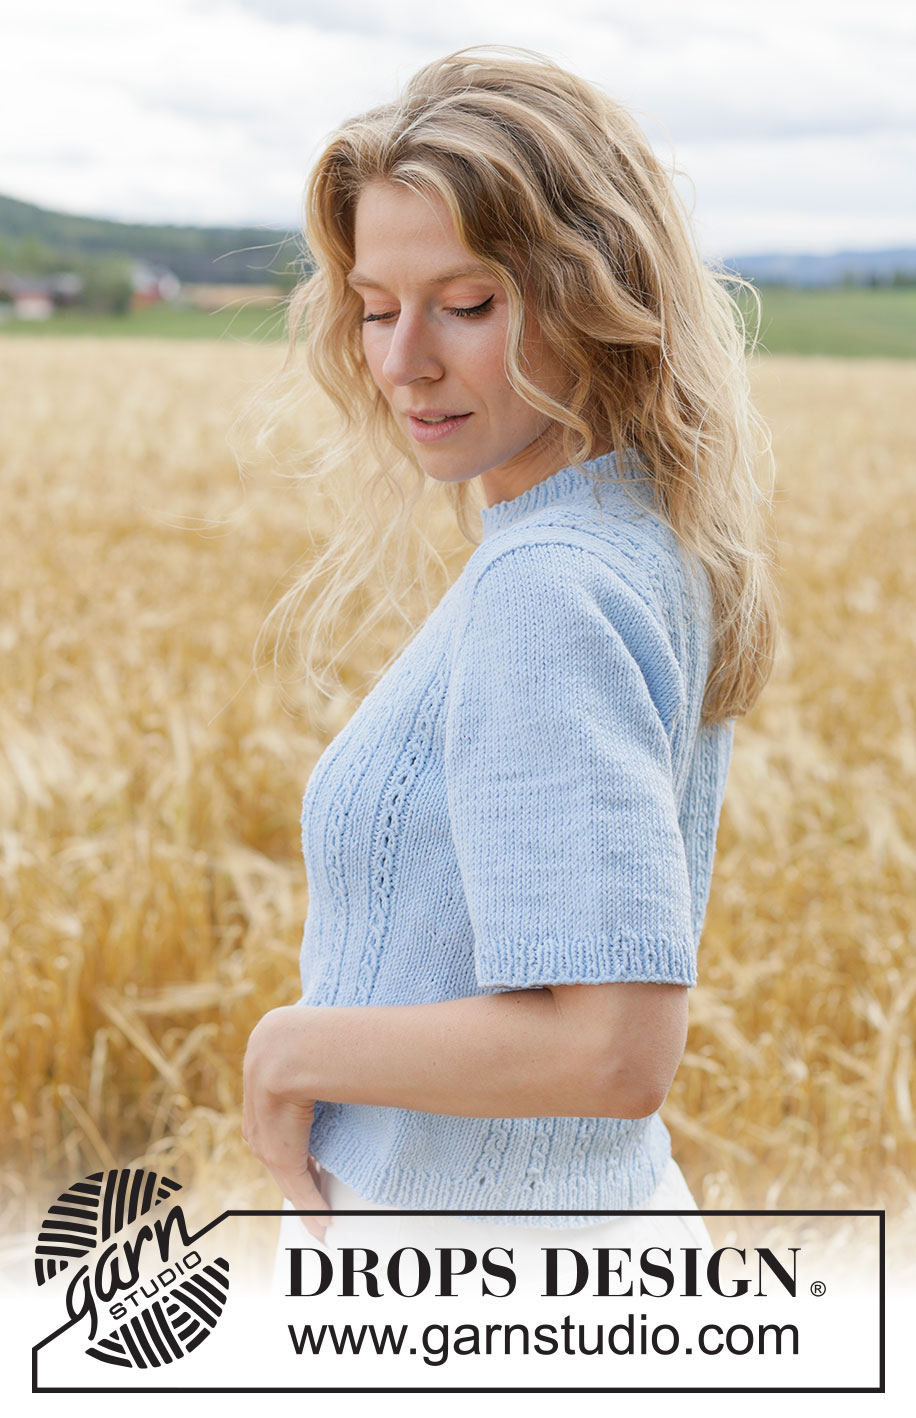
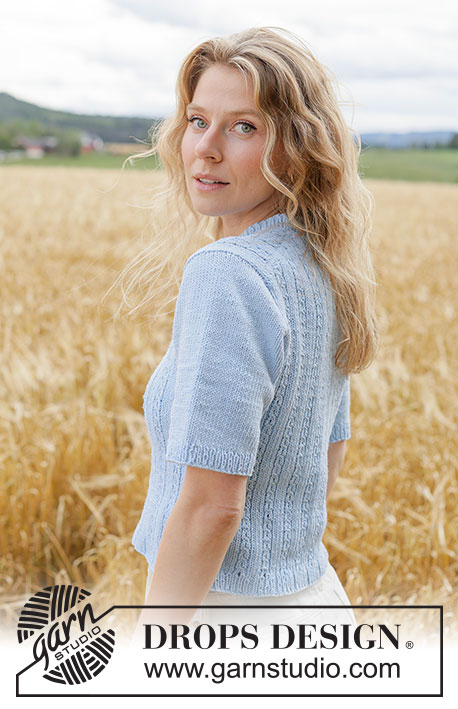
Ocean Dream Tee#oceandreamtee |
||||||||||||||||||||||
 |
 |
|||||||||||||||||||||
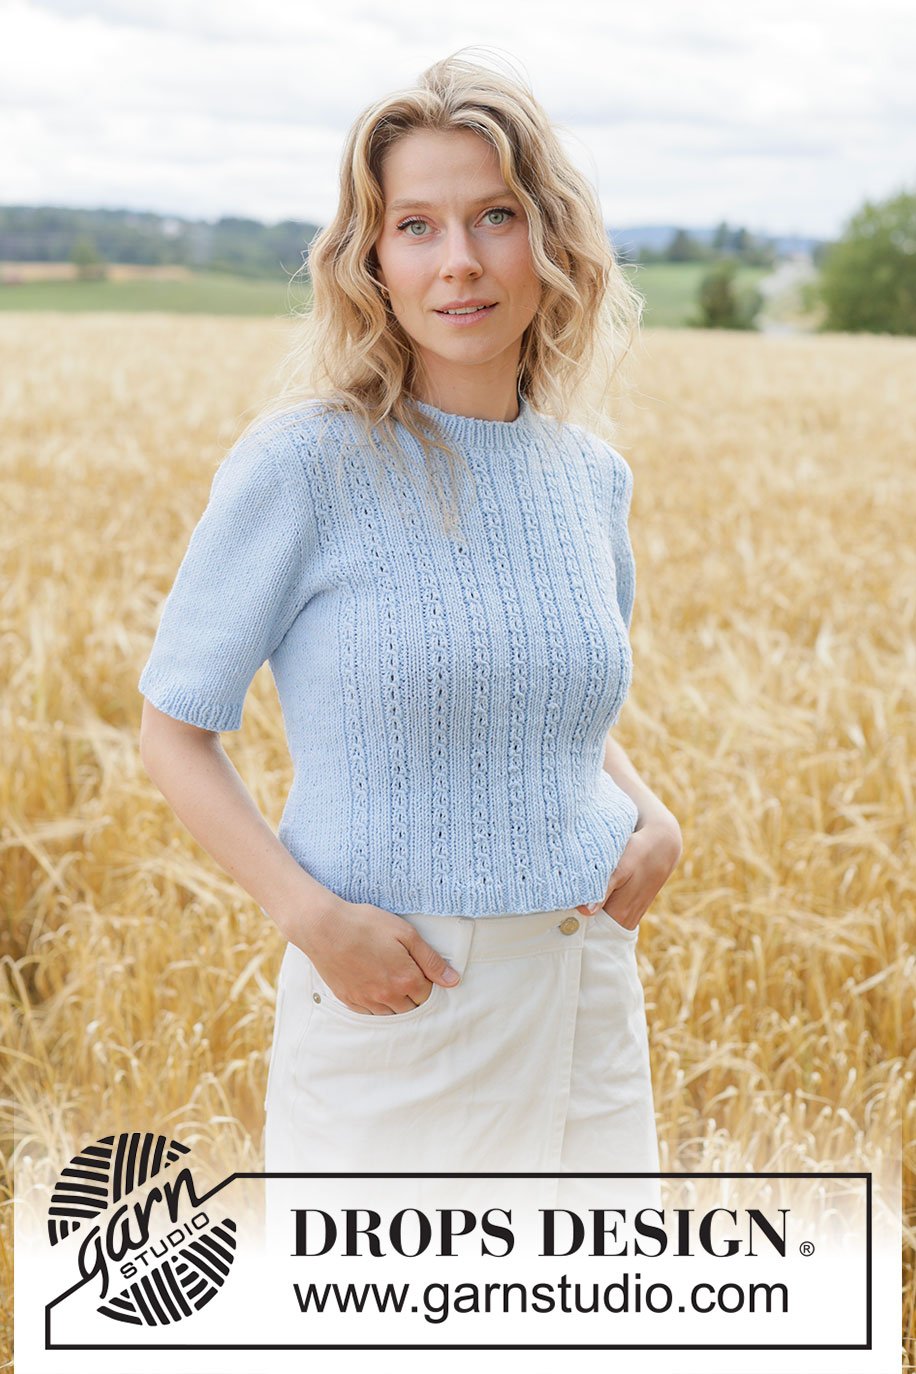
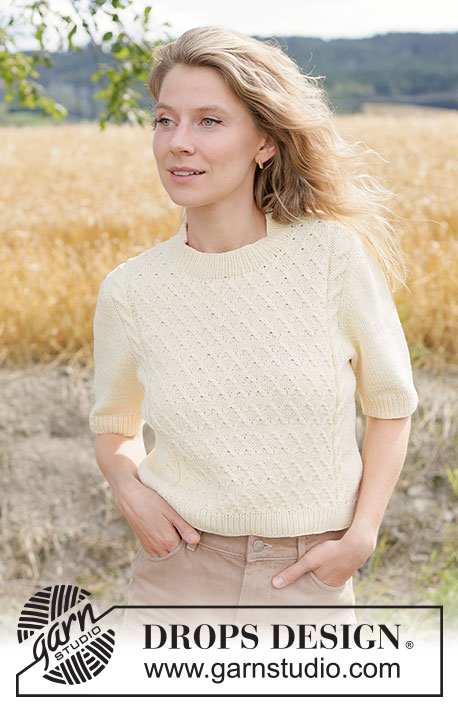
Knitted jumper in DROPS Cotton Light or DROPS Muskat. The piece is worked top down with European yoke, lace pattern and short sleeves. Sizes XS - XXXL.
DROPS 266-19 |
||||||||||||||||||||||
|
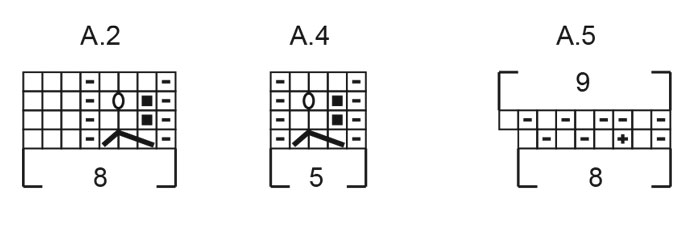
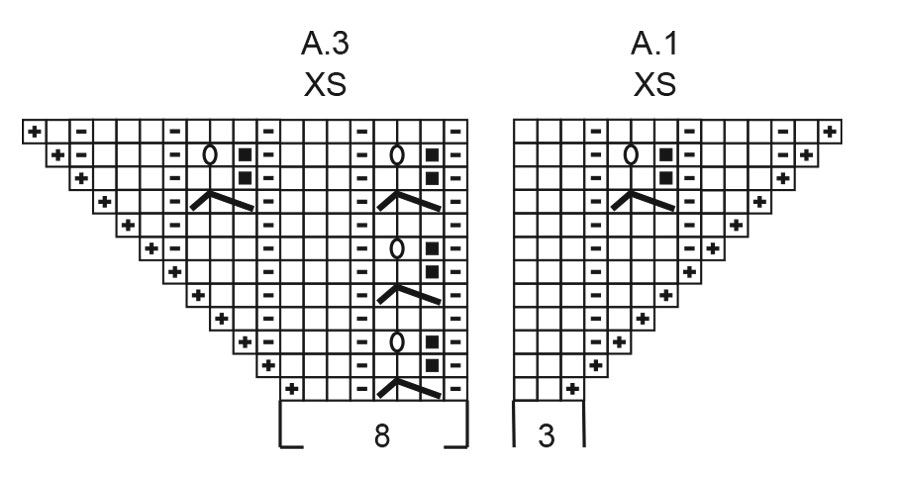
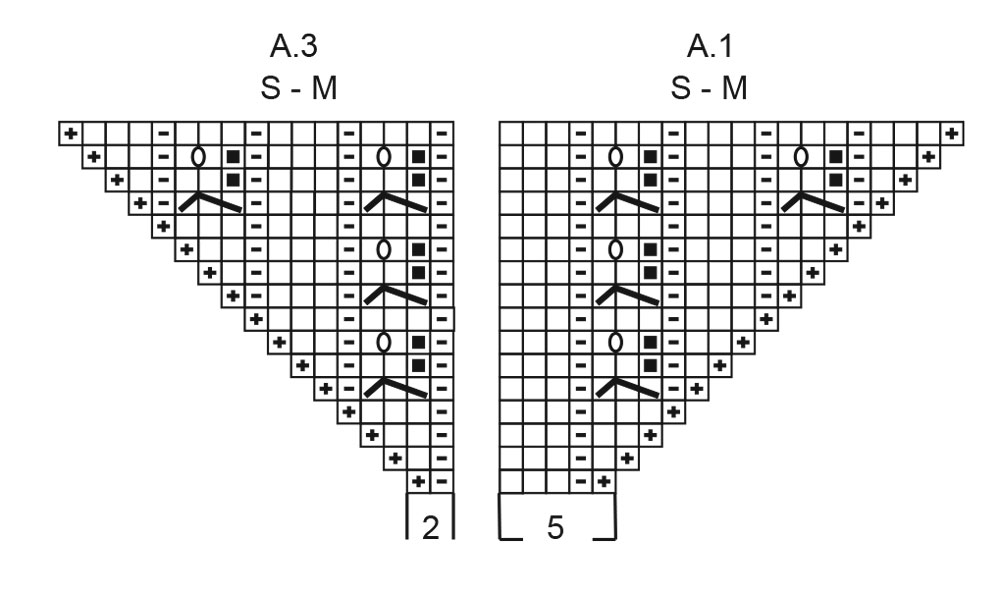
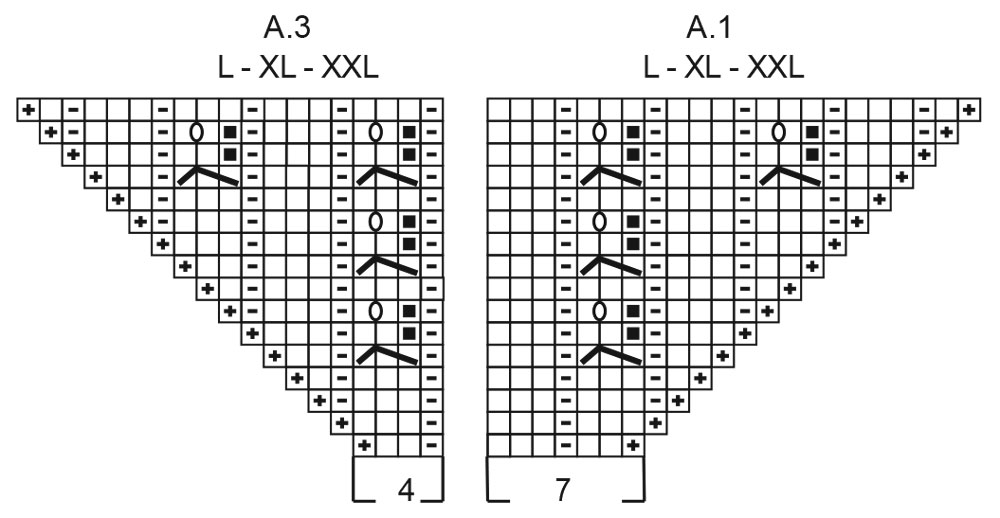
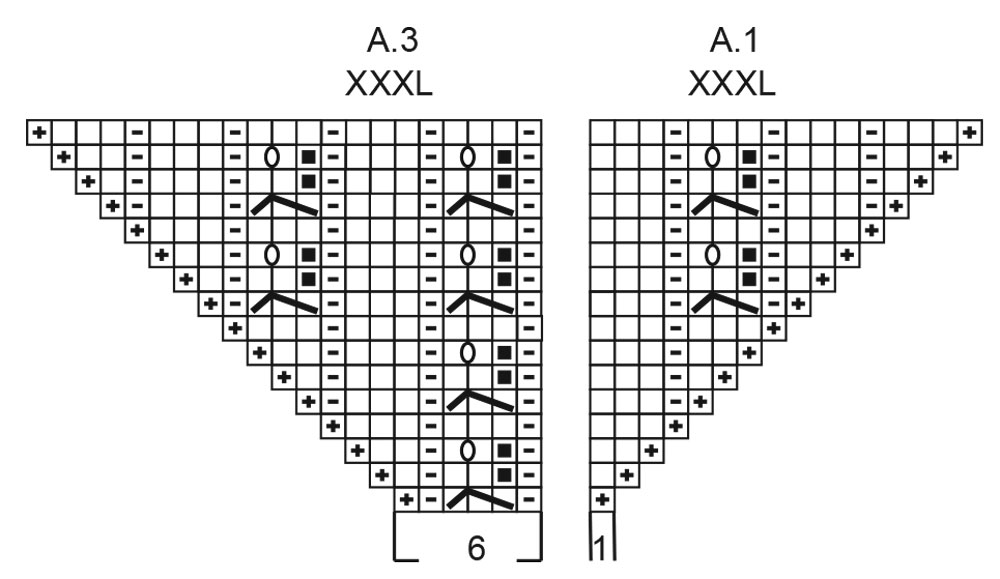
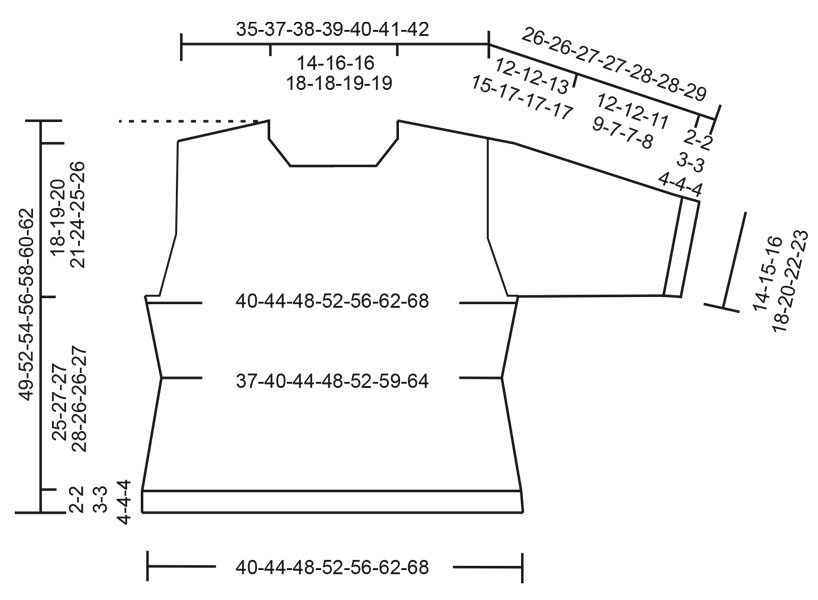
------------------------------------------------------- EXPLANATIONS FOR THE PATTERN: ------------------------------------------------------- PATTERN: See diagrams A.1 to A.5. Choose diagram for your size (applies to A.1 and A.3). The diagrams show the pattern from the right side. The diagrams are read from right to left when working from the right side and left to right when working from the wrong side. PATTERN TIP-1: When increasing on the back piece, work the new stitches into the pattern as shown in A.1 and A.3 – do not work lace pattern (A.4) until there is room for a full repeat of A.4 in width. When you have room for 10-10-10-10-10-12-12 repeats of A.4, work any further increased stitches in stocking stitch. When the increases are finished, work pattern as follows (seen from the right side): 3-5-5-7-7-3-5 stocking stitches, (A.2) 9-9-9-9-9-11-11 times, A.4, 3-5-5-7-7-3-5 stocking stitches. PATTERN TIP-2: When increasing for the neckline on the front pieces, work the new stitches into the pattern – do not work lace pattern (A.4) until there is room for a full repeat of A.4 in width. NOTE! After casting on mid-front for the neckline do not work lace pattern across these stitches until you have worked 3 rows with knit and purl as shown in A.2/A.4. INCREASE TIP-1: INCREASE 1 STITCH TOWARDS LEFT (new stitch twists to left): Use the left needle to pick up the strand between 2 stitches from the row below, pick up the strand from the front and knit through the stitch-loop that lies on the back of the needle. INCREASE 1 STITCH TOWARDS THE RIGHT (new stitch twists to right): Use the left needle to pick up the strand between 2 stitches from the row below, pick up the strand from the back and knit through the stitch-loop that lies on the front of the needle. SLEEVE TIP: When knitting up stitches under the sleeve, you can get a small hole in the transition between stitches on the body and sleeve. This hole can be closed by picking up the strand between 2 stitches and working this strand twisted together with the first stitch between body and sleeve. DECREASE TIP: Decrease 1 stitch on each side of the marker-thread as follows: Work until there are 4 stitches left before the marker-thread, knit 2 together, knit 4 (marker-thread sits in the middle of these 4 stitches), slip 1 stitch knit-wise, knit 1 and pass the slipped stitch over the knitted stitch (2 stitches decreased). INCREASE TIP-2 (for sides of body): Work until there are 4 stitches left before the marker-thread, increase 1 stitch towards the right, knit 4 (marker-thread sits in the middle of these 4 stitches), increase 1 stitch towards the left. ------------------------------------------------------- START THE PIECE HERE: ------------------------------------------------------- JUMPER – SHORT OVERVIEW OF THE PIECE. The pattern uses both long and short needles; start with the length which fits the number of stitches and change when necessary. If there is a «0» in your chosen size, skip the information and go straight to the next instruction. Work according to points 1 – 6. 1 - BACK PIECE: Cast on stitches for the back of the neck. Work the back piece back and forth, top down, increasing stitches on each side until the shoulder stitch-count has been achieved. The back piece has slightly diagonal shoulders. 2 - FRONT PIECE: Worked in 2 sections (each side of neck). Start by knitting up stitches along one back shoulder, working downwards and increasing for the neckline. Repeat on the other shoulder. 3 - YOKE: Place all the stitches on the same circular needle, work one front piece, cast on stitches mid-front for the neckline, work the second front piece, knit up stitches for one sleeve along the side of the front piece, work the back piece, knit up stitches for the second sleeve along the other side of the front piece. The yoke is continued in the round. 4 - INCREASE FOR BODY AND SLEEVES: While continuing the yoke, stitches are increased, first for the sleeves and later for both the body and sleeves. 5 - BODY AND SLEEVES: When the increases and the yoke are finished, the yoke is divided for the body and sleeves. Each piece is finished separately. 6 – NECK: The neck is worked in the round. ------------------------------------------------------- BACK PIECE: The piece is worked back and forth. Cast on 35-39-39-43-43-43-47 stitches with circular needle size 4 mm and DROPS Cotton Light or DROPS Muskat. ROW 1 (wrong side): Purl. ROW 2 (right side): Read PATTERN in explanations above. Work A.1 across 3-5-5-7-7-7-1 stitches, A.2 across the next 24-32-32-32-32-32-40 stitches (3-4-4-4-4-4-5 repeats in width), A.3 across 8-2-2-4-4-4-6 stitches (2 increased stitches). ROW 3 (wrong side): Work A.3 across 9-3-3-5-5-5-7 stitches, A.2 across 24-32-32-32-32-32-40 stitches (3-4-4-4-4-4-5 repeats in width) and A.1 across 4-6-6-8-8-8-2 stitches (2 increased stitches). Read PATTERN TIP-1 above. Continue the pattern and increase like this a total of 24-24-24-24-24-28-28 times on each side (24-24-24-24-24-28-28 rows worked) = 83-87-87-91-91-99-103 stitches. Remember to maintain the knitting tension. Cut the strand and place the stitches on a stitch holder. LEFT SHOULDER: Find the left back shoulder as follows: Lay the back piece flat, right side up, with the stitch holder/thread towards you; left side of piece = left shoulder. Use circular needle size 4 mm and DROPS Cotton Light or DROPS Muskat. Start from the right side by the neck on the left back shoulder and work as follows: Knit up 25-25-25-25-25-29-29 stitches, knitting up inside the increased stitches so the transition between the back and front piece is neat (knit up approx. 1 stitch on each row worked). All measurements on the front piece are taken from this knitted-up row. Purl 1 row from the wrong side. Then work pattern as follows: From the right side: Knit 1-3-3-1-1-1-3, purl 0-1-1-1-1-1-0, knit 0-3-3-3-3-3-0, work A.2 across 16-16-16-16-16-16-24 stitches, A.4 across 5-0-0-0-0-5-0 stitches, knit 3-2-2-4-4-3-2. From the wrong side: Purl 3-2-2-4-4-3-2, work A.4 across 5-0-0-0-0-5-0 stitches, A.2 across 16-16-16-16-16-16-24 stitches, purl 0-3-3-3-3-3-0, knit 0-1-1-1-1-1-0, purl 1-3-3-1-1-1-3. Continue this pattern until the piece measures 6-6-7-8-9-10-11 cm, finishing after a full repeat of A.4/A.2 in height. Read PATTERN TIP-2 in explanations above. Continue the pattern. Now increase for the neckline at the end of each row from the wrong side: 1 stitch 3 times, 2 stitches 2 times and 3 stitches 1 time. The last row is from the wrong side = 35-35-35-35-35-39-39 stitches. The neckline-increases are finished. The piece measures approx. 10-10-11-12-13-14-15 cm. 1-1-1-2-2-2-3 cm of the neckline-depth will lie on the back piece. Cut the strand and place the stitches on a stitch holder. Work the right front piece along the right back shoulder as follows. RIGHT SHOULDER: Use circular needle size 4 mm and DROPS Cotton Light or DROPS Muskat. Start from the right side by the armhole on the right back shoulder and work as follows: Knit up 25-25-25-25-25-29-29 stitches, knitting up inside the increased stitches so the transition between the back and front piece is neat (knit up approx. 1 stitch on each row worked). All measurements on the front piece are taken from this knitted-up row. Purl 1 row from the wrong side. Work pattern as follows: From the right side: Knit 3-5-5-7-7-3-5, work A.2 across 16-16-16-16-16-24-24 stitches, A.4 across 5-0-0-0-0-0-0 stitches, purl 0-1-1-1-1-1-0, knit 1-3-3-1-1-1-0. From the wrong side: Purl 1-3-3-1-1-1-0, knit 0-1-1-1-1-1-0, work A.4 across 5-0-0-0-0-0-0 stitches, A.2 across 16-16-16-16-16-24-24 stitches, purl 3-5-5-7-7-3-5. Continue this pattern until the piece measures 6-6-7-8-9-10-11 cm, finishing after a full repeat of A.2/A.4 in height. Remember PATTERN TIP-2. Continue the pattern Now increase for the neckline at the end of each row from the right side: 1 stitch 3 times, 2 stitches 2 times and 3 stitches 1 time. The last row is from the wrong side = 35-35-35-35-35-39-39 stitches. The piece measures approx. 10-10-11-12-13-14-15 cm. YOKE: All pieces are now worked onto the same circular needle, stitches are knitted up for the sleeves and 4 stitches are decreased as follows: ROW 1 (right side): Knit together the first 2 stitches on right front shoulder (1 stitch decrease), work to end of right shoulder, cast on 13-17-17-21-21-21-25 stitches for the neckline mid-front, work left front shoulder until there are 2 stitches left, slip 1 stitch knit-wise, knit 1 and pass the slipped stitch over the knitted stitch (1 stitch decrease): 81-85-85-89-89-97-101 stitches on the front piece, insert 1 marker, knit up 21-21-23-25-27-29-31 stitches along the left-hand side of the front piece (= sleeve-stitches, knitted up inside the outermost stitch), insert 1 marker, knit together the first 2 stitches on the back piece (1 stitch decrease), work the back piece until there are 2 stitches left, slip 1 stitch knit-wise, knit 1 and pass the slipped stitch over the knitted stitch (1 stitch decreased and 81-85-85-89-89-97-101 stitches on the back piece), insert 1 marker, knit up 21-21-23-25-27-29-31 stitches along the right-hand side of the front piece (= sleeve-stitches, knitted up inside the outermost stitch), insert 1 marker = 204-212-216-228-232-252-264 stitches. The yoke is continued in the round, with pattern on the front and back pieces and stocking stitch on the sleeves. Increase for the sleeves as follows: ROUND 2: Work to marker-2, remember PATTERN TIP-2, move the marker onto the right needle, increase 1 stitch towards the left – read INCREASE TIP-1, knit to the next marker (= sleeve), increase 1 stitch towards the right, move the marker onto the right needle, work across the back piece, move the marker onto the right needle, increase 1 stitch towards the left, knit to the next marker, increase 1 stitch towards the right (= sleeve), move the marker onto the right needle. 4 increased stitches = 208-216-220-232-236-256-268 stitches. AFTER ROUND 2: Repeat this round 2 more times = 216-224-228-240-244-264-276 stitches. Now increase on the sleeves as follows: ROUND 1: Work to marker-2 (= front piece), move the marker onto the right needle, increase 1 stitch towards the left, knit to the next marker (= sleeve), increase 1 stitch towards the right, move the marker onto the right needle, work to the next marker (= back piece), move the marker onto the right needle, increase 1 stitch towards the left, knit the next marker, increase 1 stitch towards the right (= sleeve), move the marker onto the right needle. 4 increased stitches (2 on each sleeve) = 220-228-232-244-248-268-280 stitches. ROUND 2: Continue the pattern without increasing. = 220-228-232-244-248-268-280 stitches. Work ROUNDS 1 and 2, 10-10-7-8-8-5-2 more times (a total of 11-11-8-9-9-6-3 times) = 260-268-260-276-280-288-288 stitches. Now increase on both the body and sleeves: ROUND 1: Knit 2, increase 1 stitch towards the left, work until there are 2 stitches left before the first marker, increase 1 stitch towards the right, knit 2, move the marker onto the right needle, increase 1 stitch towards the left, knit to the next marker (= sleeve), increase 1 stitch towards the right, move the marker onto the right needle, knit 2, increase 1 stitch towards the left, work until there are 2 stitches left before the next marker, increase 1 stitch towards the right, knit 2, move the marker onto the right needle, increase 1 stitch towards the left, knit to the next marker (= sleeve), increase 1 stitch towards the right, move the marker onto the right needle (8 increased stitches, 1 on each side of 2 knitted stitches in each transition between body and sleeves). The new stitches on the front and back pieces are continued in stocking stitch. ROUND 2 Continue the pattern without increasing. Work ROUNDS 1 and 2, 3-4-8-9-13-16-19 more times (8-10-18-20-28-34-40 rounds worked). A total of 4-5-9-10-14-17-20 increases in height on both the body and sleeves: 57-59-63-69-79-81-83 stitches on each sleeve, 89-95-103-109-117-131-141 stitches on the front and back pieces = 292-308-332-356-392-424-448 stitches. The sleeve measures approx. 12-12-13-15-17-17-17 cm. When the jumper is folded double at the shoulder, the piece measures approx. 17-17-19-21-24-24-25 cm from outermost on the shoulder and down the armhole. Continue working without further increases until the piece measures 18-19-20-21-24-25-26 cm, down the armhole. Now divide for the body and sleeves. DIVIDE FOR BODY AND SLEEVES Work across the 89-95-103-109-117-131-141 stitches on the front piece, place the next 57-59-63-69-79-81-83 stitches on a stitch holder for the sleeve, cast on 6-8-8-10-10-12-14 stitches (mid-under the sleeve), work across the 89-95-103-109-117-131-141 stitches on the back piece, place the next 57-59-63-69-79-81-83 stitches on a stitch holder for the sleeve, cast on 6-8-8-10-10-12-14 stitches (mid-under the sleeve). The body and sleeves are finished separately. BODY: = 190-206-222-238-254-286-310 stitches. Continue the pattern in the round, working the cast-on stitches under each sleeve in stocking stitch. Insert 1 marker-thread in the middle of these new stitches on each side; the marker-threads are used when decreasing and increasing. When you have worked 2 cm decrease 2 stitches each side – read DECREASE TIP. Decrease like this every 3-3½-3½-3½-3-3-3½ cm a total of 4 times = 174-190-206-222-238-270-294 stitches. When the body measures 13-15-15-15-13-13-15 cm from the division, increase 2 stitches each side – read INCREASE TIP-2. Increase like this every 3-3½-3½-3½-3-3-3½ cm a total of 4 times = 190-206-222-238-254-286-310 stitches. Work until the piece measures 46-49-50-51-52-54-55 cm from the cast-on edge mid-back, finishing after a full repeat of A.2 in height. Now work rib and increase as follows: Work as before to the first repeat of A.2 on the front piece. Change to circular needle size 3 mm, work A.5 across each repeat of A.2 (increasing 1 stitch in each repeat), work rib (purl 1, knit 1) across the next 18-26-34-42-54-50-62 stitches, work A.5 across each repeat of A.2 (increasing 1 stitch in each repeat), work rib (knit 1, purl 1) across the next 18-26-34-42-54-50-62 stitches. A total of 20-20-20-20-20-24-24 increased stitches = 210-226-242-258-274-310-334 stitches. Continue the rib, repeating the last row in A.5 onwards. When the rib measures 2-2-3-3-4-4-4 cm, cast off with knit above knit and purl above purl. The jumper measures approx. 48-51-53-54-56-58-59 cm from mid-back and 49-52-54-56-58-60-62 cm from the shoulder. SLEEVES: Place the 57-59-63-69-79-81-83 sleeve-stitches from one stitch holder onto circular needle size 4 mm and knit up 1 stitch in each of the 6-8-8-10-10-12-14cast-on stitches under the sleeve – read SLEEVE TIP = 63-67-71-79-89-93-97 stitches. Insert a marker-thread in the middle of the 6-8-8-10-10-12-14 new stitches under the sleeve, it is used when decreasing under the sleeve. Work stocking stitch in the round. AT THE SAME TIME, after 2 rounds decrease mid-under the sleeve – read DECREASE TIP as follows: Decrease 2 stitches every 5-5-4-2-1-0-0 cm a total of 2-2-2-2-3-1-1 times = 59-63-67-75-83-91-95 stitches. Continue working until the sleeve measures 12-12-11-9-7-7-8 cm from the division. Change to double pointed needles size 3 mm. Work rib (knit 1, purl 1), AT THE SAME TIME increase 11-11-13-15-17-17-19 stitches evenly on the first round = 70-74-80-90-100-108-114 stitches. When the rib measures 2-2-3-3-4-4-4 cm, cast off slightly loosely with rib. The sleeve measures approx. 14-14-14-12-11-11-11 cm from the division and 26-26-27-27-28-28-29 cm from the shoulder. NECK: Use circular needle size 3 mm. Start on one shoulder and knit up 88 to 122 stitches around the neckline, knitting up inside 1 stitch (the stitch count should be divisible by 4). Work rib (knit 1, purl 1) for 2-2-3-3-3-4-4 cm. Cast off slightly loosely with rib. |
||||||||||||||||||||||
Diagram explanations |
||||||||||||||||||||||
|
||||||||||||||||||||||
 |
||||||||||||||||||||||
 |
||||||||||||||||||||||
 |
||||||||||||||||||||||
 |
||||||||||||||||||||||
 |
||||||||||||||||||||||
 |
||||||||||||||||||||||
Have you finished this pattern?Tag your pictures with #dropspattern #oceandreamtee or submit them to the #dropsfan gallery. Do you need help with this pattern?You'll find 49 tutorial videos, a Comments/Questions area and more by visiting the pattern on garnstudio.com. © 1982-2026 DROPS Design A/S. We reserve all rights. This document, including all its sub-sections, has copyrights. Read more about what you can do with our patterns at the bottom of each pattern on our site. |
||||||||||||||||||||||


With over 40 years in knitting and crochet design, DROPS Design offers one of the most extensive collections of free patterns on the internet - translated to 17 languages. As of today we count 325 catalogues and 12298 patterns translated into English (UK/cm).
We work hard to bring you the best knitting and crochet have to offer, inspiration and advice as well as great quality yarns at incredible prices! Would you like to use our patterns for other than personal use? You can read what you are allowed to do in the Copyright text at the bottom of all our patterns. Happy crafting!
Post a comment to pattern DROPS 266-19
We would love to hear what you have to say about this pattern!
If you want to leave a question, please make sure you select the correct category in the form below, to speed up the answering process. Required fields are marked *.