
Popular categories
Looking for a yarn?


Comments / Questions (109)
![]() Lucille wrote:
Lucille wrote:
Vous parlez de 8 augmentations. Il y a 4 augmentations au rang pair et 4 augmentations à tous les 4 rangs pour le devant! Est-ce que c’est correct? Merci
26.03.2026 - 19:16DROPS Design answered:
Bonjour Lucille, aux rangs où il est indiqué que l'on augmente 8 mailles, on augmente effectivement ces 8 mailles sur l'endroit (ex. Rang 1 des rangs 1 et 2 à répéter ou bien Rang 1 des rangs 1 à 4 à répéter): 1 m pour chaque devant + 2 pour chaque manche + 2 pour le dos; (ne pas oublier d'augmenter pour l'encolure aussi), on va ensuite augmenter 4 m seulement 1 m pour chaque devant et 2 pour le dos. Bon tricot!
27.03.2026 - 07:18
![]() Lilianne wrote:
Lilianne wrote:
V-NECK: Start to increase for the V-neck on the first row from the right side, then every 4th row 10-10-11-11-12-13 times, increasing 1 stitch inside the bands on each side. Where IS this supposed to BE ? I thought the increases are only before and after the marked stitches.
26.03.2026 - 02:09DROPS Design answered:
Hi Lillianne, The increases for raglan are either side of the marker stitches but you also need to increase for the V-neck. The V-neck increases are just after the band at the beginning of the row and just before the band at the end of the row. Regards, Drops Team.
26.03.2026 - 06:30
![]() Asun wrote:
Asun wrote:
Me gustaría hacer este patrón con hilo Safran y agujas de 3mm. He buscado la conversión pero solo encuentro la cantidad de hilo que necesitaría. ¿Sería posible tener el patrón de la talla S para este hilo? Muchas gracias
19.03.2026 - 09:50
![]() Mauguin wrote:
Mauguin wrote:
Concernant la bordure devant droit, les instructions disent de la mettre à l'endroit après les mailles de l'empiècement mais je pense qu'il faut plutôt la mettre sur l'envers. Je ne comprends pas, pouvez vous m'éclaircir s'il vous plaît. Cordialement
15.03.2026 - 15:54DROPS Design answered:
Bonjour Mme Mauguin, le dernier rang de la bordure du devant droit doit être un rang sur l'envers, quand on monte ensuite les mailles de l'empiècement, on va ainsi pouvoir tricoter ces mailles sur l'endroit. Sur l'envers on tricote ensuite d'abord les mailles de la bordure du devant droit, puis celles de l'empiècement et enfin on termine par les mailles de la bordure du devant gauche). Bon tricot!
16.03.2026 - 10:24
![]() Jenny wrote:
Jenny wrote:
I worked out my earlier question. However I have another one. For v-neck start increase on the 1st row then every 4th (10 times) is that every 1st and 4th row? Or after you have completed the 1st row increase ONLY every 4th row?
28.02.2026 - 07:47DROPS Design answered:
Dear Jenny, increase for V-neck as follows: (1 row from RS increasing, 3 rows without increasing) and work these 4 rows a total of 10 times so that you have increased 10 sts for neck. Happy knitting!
02.03.2026 - 08:14
![]() Jenny wrote:
Jenny wrote:
I have started on the yoke worked the left band cast on 60 stitches worked the right band and I have 68 stitches in total as per the pattern. However when I insert the markers, the amount of stitches does not add up. Pattern says count five stitches so that’s 5+16 for the sleeve +22 stitches for the backpiece +16+5 = 64 stitches I have 68 stitches this does not add up. Can you please shed light on why this is? Even if I disregard the 2 x 4 bands at each end, it still doesn’t add up.
28.02.2026 - 04:33DROPS Design answered:
Dear Jenny, note that the markers should be inserted each in a stitch (and not between sts), so that you will have: 5+1+16+1+22+1+16+1+5=68. Happy knitting!
02.03.2026 - 08:12
![]() Christin wrote:
Christin wrote:
Jag planerar att sticka Delicate Dance Cardigan (DROPS 258‑14), men personen som ska bära koftan har väldigt känslig hud. Därför vill jag vara helt säker på att garnet jag använder inte kliar eller irriterar. Vilket eller vilka garn rekommenderar ni som hudvänliga alternativ till de föreslagna garnen (DROPS Brushed Alpaca Silk och DROPS Flora), men som fortfarande fungerar bra till samma mönster och stickfasthet?
08.02.2026 - 18:43DROPS Design answered:
Hei Christin. Om et garn klør eller ikke på en person med känslig hud er vanskelig for oss å gi svar på. Noen vil syns det klør andre ikke. Vedkommende som skal ha plagget bør kjenne og følge på garnet. Skal man være 100% på at garnet ikke klør, bør man kanskje gå for et bomull eller lin garn, men man vil ikke få den mohairaktige følelsen man ser på bildet til Delicate Dance Cardigan. mvh DROPS Design
09.02.2026 - 14:11
![]() Gabriele wrote:
Gabriele wrote:
Guten Tag, kann ich folgende Farben kombinieren? Drops Brushed Alpaca Silk Garn Unicolor 21 Salbeigrün und DROPS Flora Garn Unicolor 34 Helles Meeresgrün. Oder ist eine andere Farbkombination in einem Grünton besser geeignet?
25.01.2026 - 16:55DROPS Design answered:
Liebe Gabriele, Sie können die beiden Farben gut kombinieren. Die beiden Farben sind nicht ganz identisch, sodass Sie einen ganz leichten Melange-Effekt erzielen werden, aber die Farbtöne passen gut zueinander und die Jacke wird damit sicherlich schön aussehen, wenn Ihnen dieser blassgrüne Farbton gut gefällt. Viel Spaß beim Stricken!
29.01.2026 - 11:28
![]() Nelly wrote:
Nelly wrote:
Bonjour. Je ne comprends pas le patron. 20 rangs d'échantillon = 10 cm donc environ 40rg = 20 cm Mais pour tricoter jusqu'à division du corps et manches il faut 40 rangs pour raglan et encolure + 9 x 4 rangs avant de diviser corps et manches soit 76 rangs. Je ne vois pas comment on peut arriver à 21 cm.... Pourriez-vous m'éclairer svp !!
20.01.2026 - 15:39DROPS Design answered:
Bonjour Nelly, les augmentations de l'encolure se font en même temps que les augmentations du raglan, donc en taille S, pour le raglan, on va tricoter d'abord 6 rangs (on augmente 3 x tous les 2 rangs) puis 36 rangs (on répète 9 x les rangs 1 à 4) vous avez ainsi 42 rangs soit 21 cm. Bon tricot!
23.01.2026 - 07:59
![]() Kikiceleste wrote:
Kikiceleste wrote:
Bonjour Est ce que je peux rajouter des mailles et faire un i-cord ? parce que je n’arrive jamais à coudre joliment.
20.01.2026 - 12:37DROPS Design answered:
Bonjour Kikiceleste, je ne suis pas bien sûre de comprendre où vous voulez ajouter des mailles. Mais vous pouvez tout à fait modifier les explications pour faire différemment si vous le souhaitez. Bon tricot!
23.01.2026 - 07:44
|
|
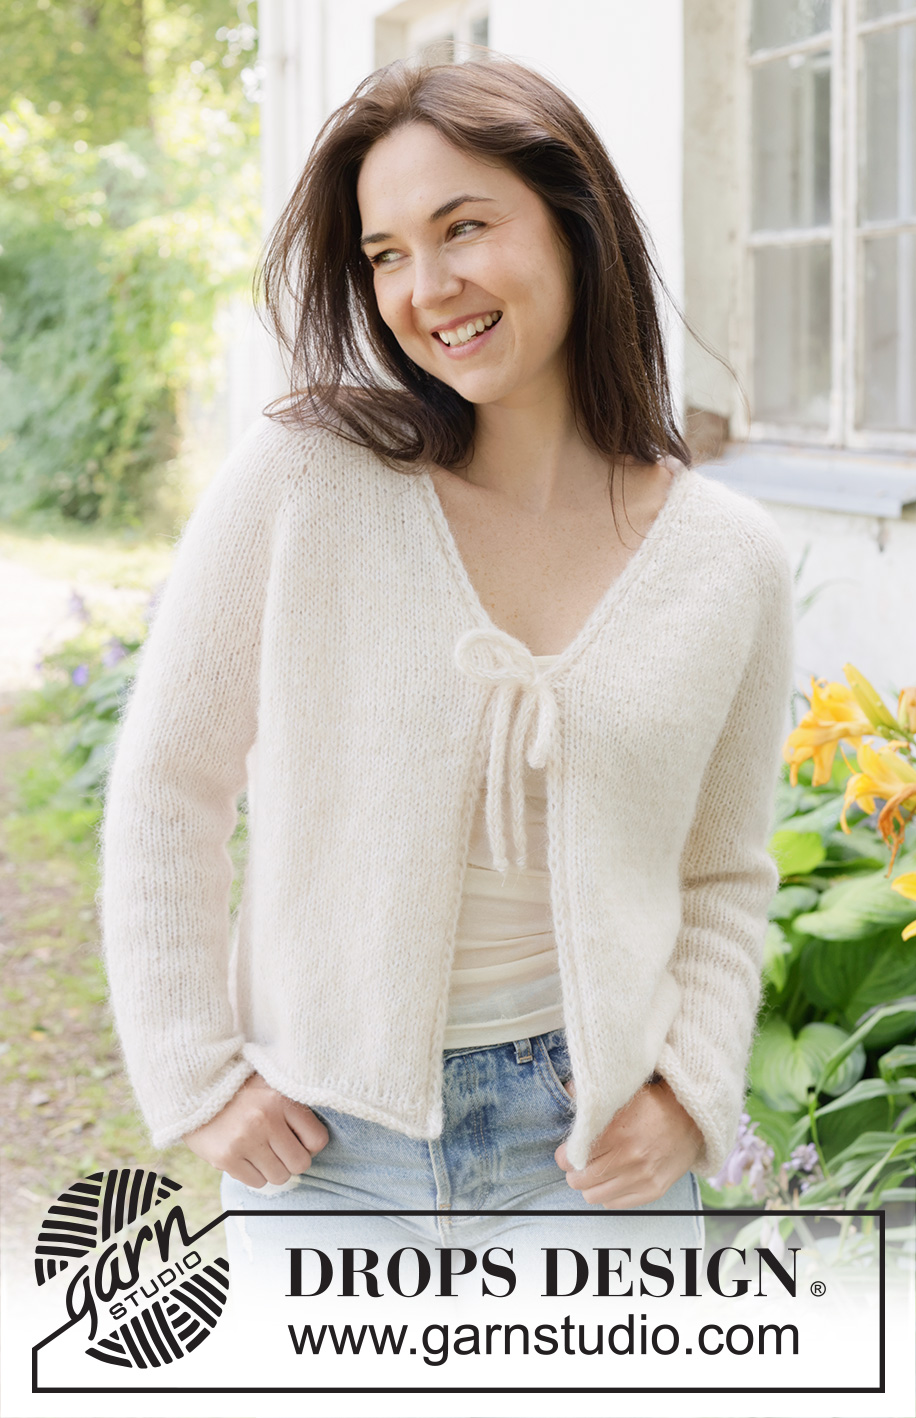
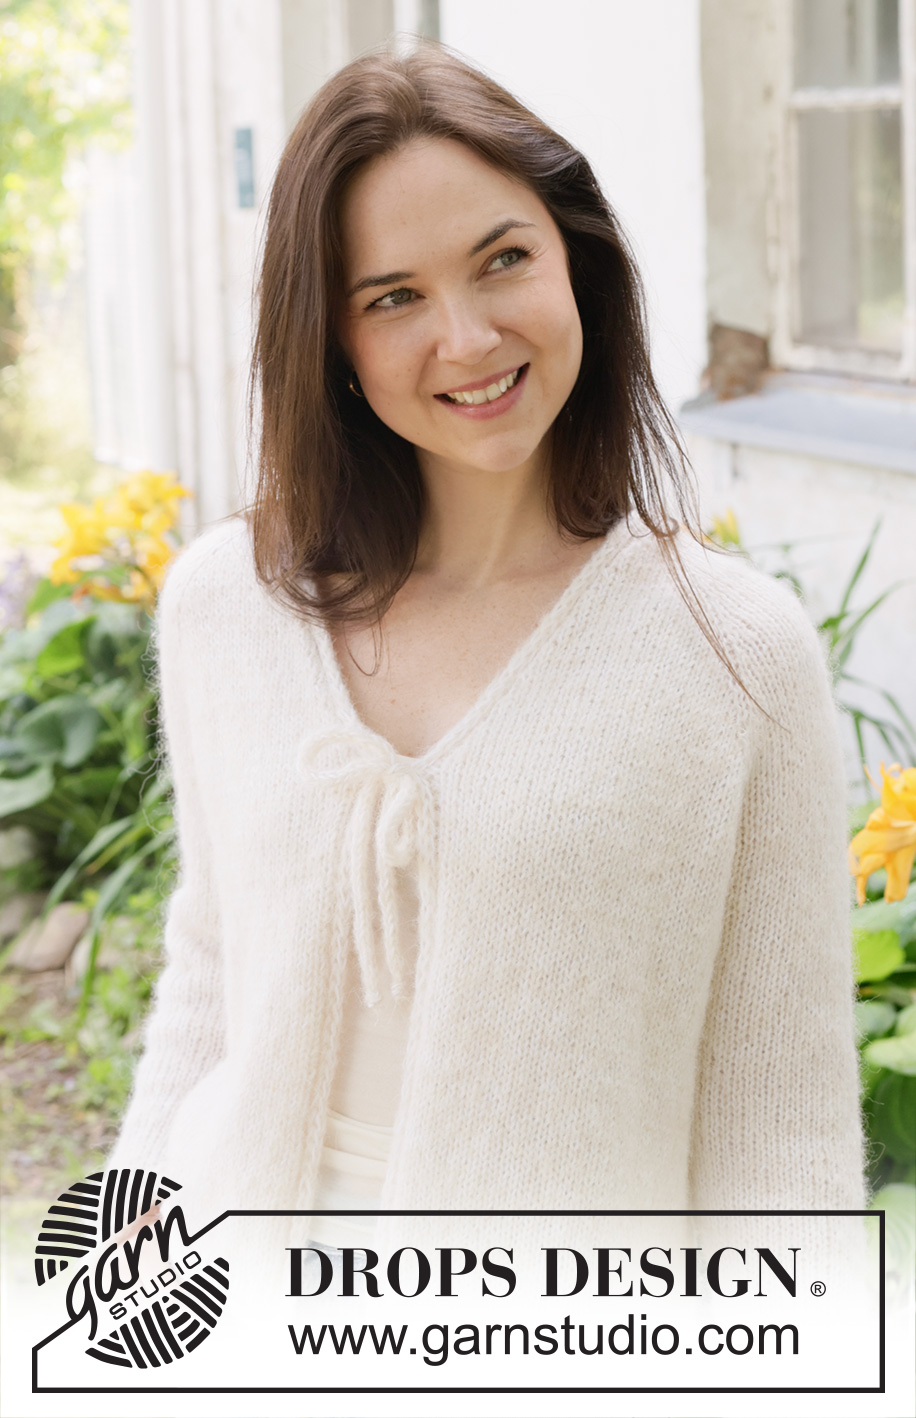
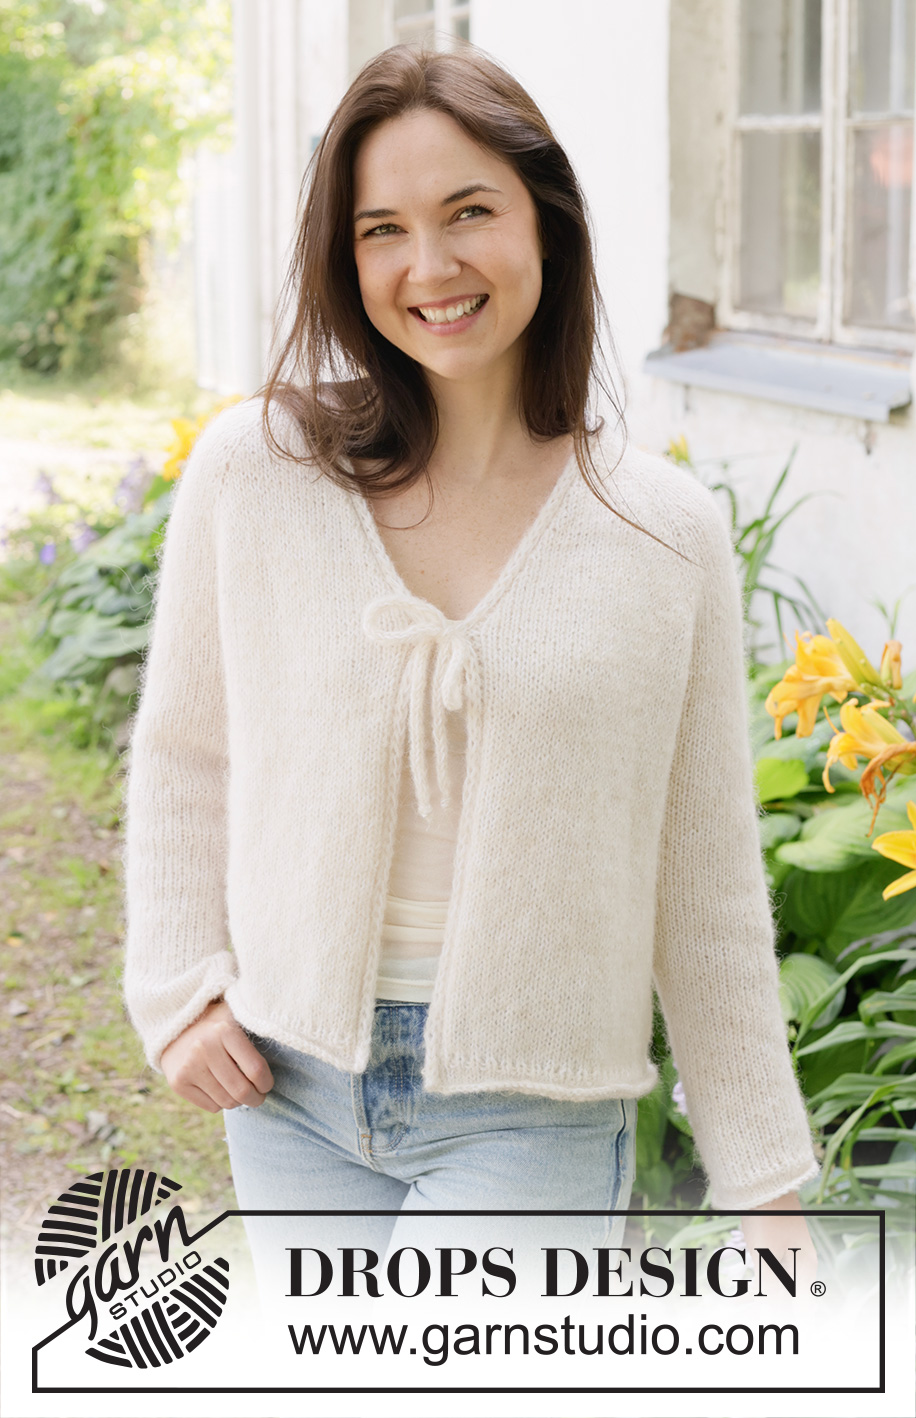
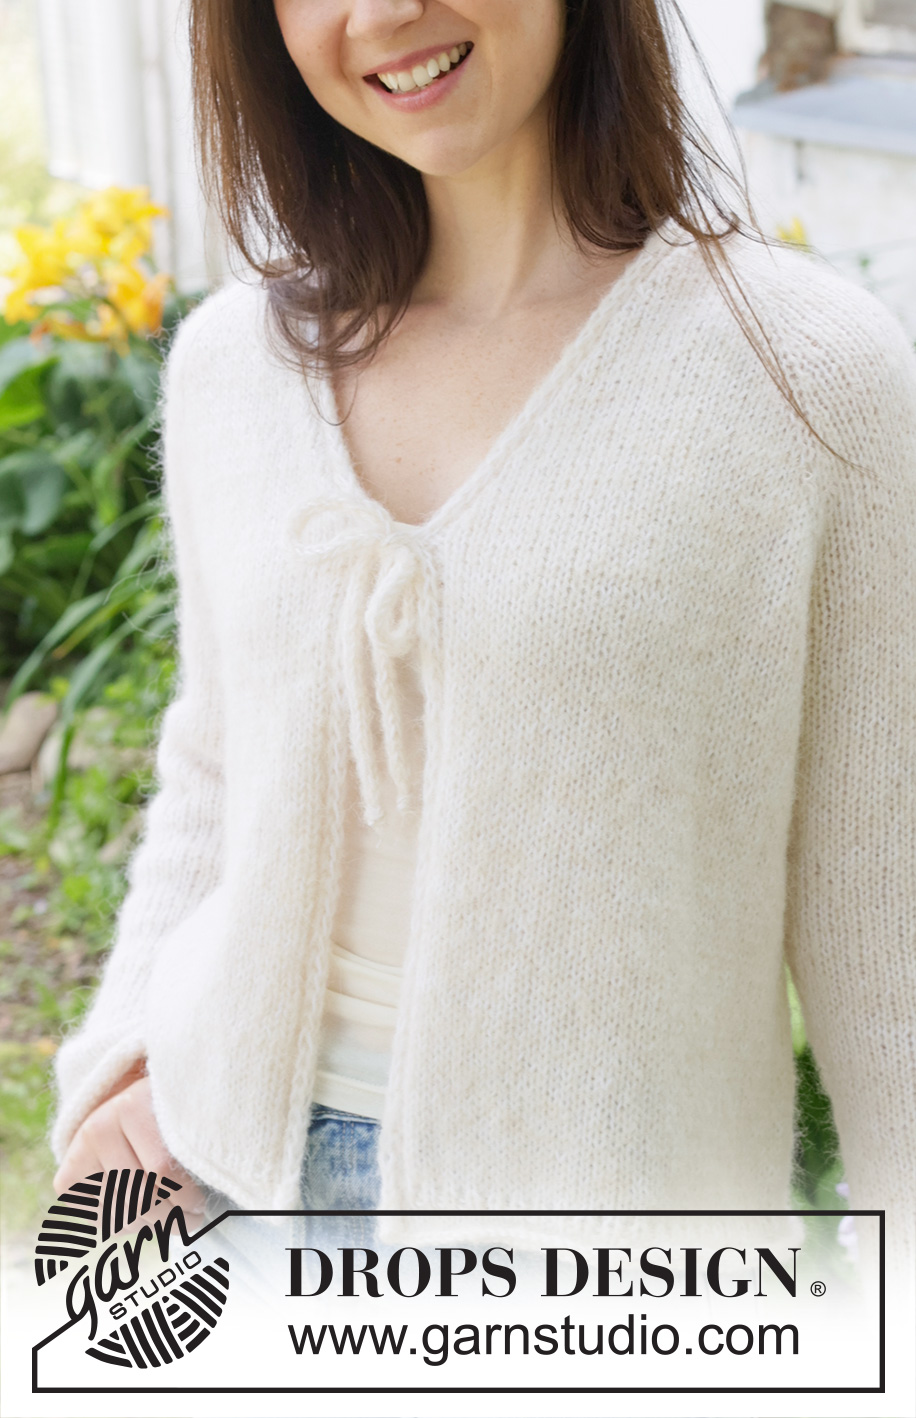
Delicate Dance Cardigan#delicatedancecardigan |
|
 |
 |
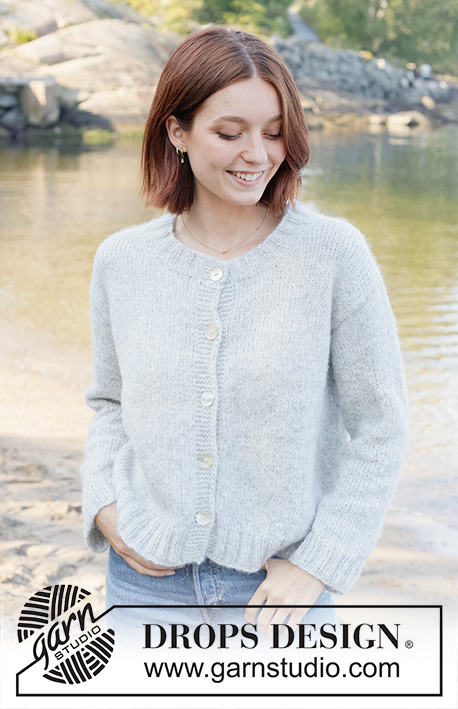
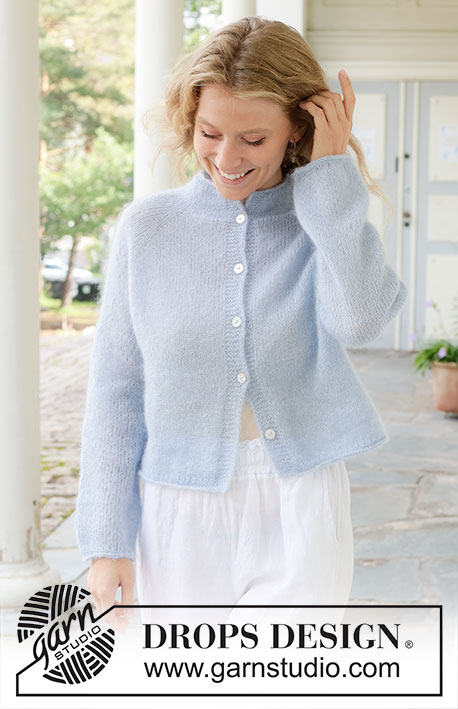
Knitted jacket in DROPS Brushed Alpaca Silk and DROPS Flora. The piece is worked top down with raglan, V-neck, rolled edges and I-cord. Sizes S - XXXL.
DROPS 258-14 |
|
|
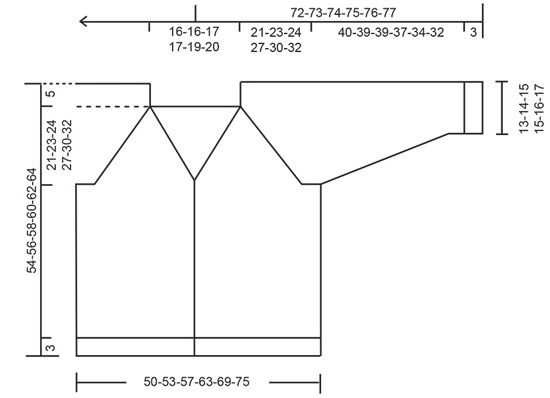
------------------------------------------------------- EXPLANATIONS FOR THE PATTERN: ------------------------------------------------------ RAGLAN: Increase 1 stitch by working 1 yarn over, which is worked twisted on the next row to avoid a hole. V-NECK: Increase 1 stitch by working 1 yarn over, which is worked twisted on the next row to avoid a hole. DECREASE TIP (mid-under sleeves): Decrease 1 stitch on each side of the marker-thread as follows: Work until there are 3 stitches left before the marker-thread, knit 2 together, knit 2 (marker-thread sits between these 2 stitches), slip 1 stitch knit-wise, knit 1 and pass the slipped stitch over the knitted stitch. ------------------------------------------------------- START THE PIECE HERE: ------------------------------------------------------- JACKET – SHORT OVERVIEW OF THE PIECE. The pattern uses both long and short needles; start with the length which fits the number of stitches and change when necessary. The bands are worked first, then stitches are cast on between them for the yoke, which is worked back and forth, top down and from mid front. When the yoke is finished, it is divided for body and the sleeves. The body is continued back and forth, while the sleeves wait. The sleeves are worked in the round, top down. Two ties are worked to finish (used to close the jacket). RIGHT BAND: Cast on 4 stitches with circular needle size 5.5 mm, 1 strand DROPS Brushed Alpaca Silk and 1 strand DROPS Flora (2 strands). RIGHT SIDE: Purl 2, slip 1 stitch purl-wise with strand in front, knit 1. WRONG SIDE: Slip 1 stitch purl-wise with strand in front, knit 3. Repeat these 2 rows until the band measures 19-19-20-20-20-21 cm, finishing after a row from the wrong side. Cut the strand and lay the piece to one side. LEFT BAND: Cast on 4 stitches with circular needle size 5.5 mm, 1 strand DROPS Brushed Alpaca Silk and 1 strand DROPS Flora (2 strands). RIGHT SIDE: Slip 1 stitch purl-wise with strand in front, knit 1, purl 2. WRONG SIDE: Knit 2, slip 1 stitch purl-wise with strand in front, knit 1. Repeat these 2 rows until the band measures 19-19-20-20-20-21 cm, finishing after a row from the wrong side. Now cast on stitches for the yoke between the bands as described below. YOKE: Work the left band as before, then cast on 60-60-62-62-64-66 stitches, work the right band as before (from the right side) = 68-68-70-70-72-74 stitches. Purl 1 row from the wrong side with 4 band stitches on each side. Insert 4 markers without working the stitches as follows: Count 5 stitches (= front piece), insert 1 marker in the next stitch, count 16 stitches (= sleeve), insert 1 marker in the next stitch, count 22-22-24-24-26-28 stitches (= back piece), insert 1 marker in the next stitch, count 16 stitches (= sleeve), insert 1 marker in the next stitch, there are 5 stitches left after the last marker (= front piece). Work stocking stitch back and forth with 4 band-stitches as before on each side. AT THE SAME TIME increase for both RAGLAN and the V-NECK – read descriptions above. Read both sections below before continuing. Remember to maintain the knitting tension. V-NECK: Start to increase for the V-neck on the first row from the right side, then every 4th row 10-10-11-11-12-13 times, increasing 1 stitch inside the bands on each side. RAGLAN: ROW 1 (right side): Increase on each side of each marker-stitch (8 increased stitches). ROW 2 (wrong side): Work stocking stitch and bands as before. Work ROWS 1 and 2 a total of 3-3-6-7-4-4 times (6-6-12-14-8-8 worked rows). Then increase as follows: ROW 1 (right side): Increase on each side of each marker-stitch (8 increased stitches). ROW 2 (wrong side): Work stocking stitch and bands as before. ROW 3 (right side): Increase only on the front and back pieces, i.e., before marker-stitches 1 and 3 and after marker-stitches 2 and 4 – do not increase on the sleeves (= 4 increased stitches). ROW 4 (wrong side): Work stocking stitch and bands as before. Work ROWS 1 to 4 a total of 9-10-9-10-13-14 times (= 36-40-36-40-52-56 rows worked; you have increased a total of 9-10-9-10-13-14 times on the sleeves and 18-20-18-20-26-28 times on the front and back pieces). All increases for raglan and the V-neck are finished. You have increased a total of 12-13-15-17-17-18 times on the sleeves and 21-23-24-27-30-32 times on the front and back pieces. There are 220-232-248-268-284-300 stitches. The yoke measures approx. 21-23-24-27-30-32 cm from the cast-on edge mid-back. Now divide for the body and sleeves. DIVIDE FOR BODY AND SLEEVES: Work the 4 band stitches as before, then 33-35-37-40-44-47 stocking stitches (= front piece), place the next 40-42-46-50-50-52 stitches on 1 thread for the sleeve, cast on 8-10-12-14-16-18 stitches (under sleeve), work 66-70-74-80-88-94 stocking stitches (= back piece), place the next 40-42-46-50-50-52 stitches on 1 thread for the sleeve, cast on 8-10-12-14-16-18 stitches (under sleeve), work 33-35-37-40-44-47 stocking stitches (= front piece) and the 4 band stitches as before. The body and sleeves are finished separately. BODY: = 156-168-180-196-216-232 stitches. Work stocking stitch back and forth with 4 band-stitches as before on each side until the piece measures 46-48-50-52-54-56 cm mid-back. On the last row decrease 1 stitch approx. mid-back = 155-167-179-195-215-231 stitches. Now you work a rolled edge, starting from the right side as follows: Work the band as before, * knit 1, purl 1 * until there are 5 stitches left on the row, knit 1 and 4 band stitches as before. Then work from the wrong side as follows: Work the band as before, * purl 1, knit 1 * until there are 5 stitches left on the row, purl 1 and 4 band stitches as before. Work 4 rows of stocking stitch. Cast off. The jacket measures approx. 49-51-53-55-57-59 cm mid-back and 54-56-58-60-62-64 cm from top of shoulder. SLEEVES: Place the 40-42-46-50-50-52 sleeve-stitches from one thread on circular needle size 5.5 mm and knit up 1 stitch in each of the 8-10-12-14-16-18 stitches cast on under the sleeve = 48-52-58-64-66-70 stitches. Insert a marker-thread in the middle of the stitches under the sleeve. Start at the marker-thread and work stocking stitch in the round. When the sleeve measures 3 cm, decrease 2 stitches under the sleeve – read DECREASE TIP. Decrease like this every 10-8-6-3½-3½-2½ cm a total of 4-5-7-9-9-10 times = 40-42-44-46-48-50 stitches. Continue working until the sleeve measures 40-39-39-37-34-30 cm from the division. There is 3 cm left to finished length. Work 2 rounds of rib (knit 1, purl 1). Knit 4 rounds. Cast off. The sleeve measures approx. 43-42-42-40-37-35 cm. ASSEMBLY: Sew the bands together mid-back and sew the bands to the neckline. TIES: Work a tube of 4 stitches, using double pointed needles size 5.5 mm. Cast on 4 stitches with 1 strand of each quality (2 strands). Knit 1 row, then work as follows: * Push all stitches to the right end of the needle without turning, tighten the strand and knit 1 row *, work from *-* until the tube measures 25 to 30 cm. Cut the strands. Work 1 more tie in the same way. Sew 1 tie onto each side, approx. 2 cm below the last increase for the V-neck. Tie a bow mid-front. |
|
 |
|
Have you finished this pattern?Tag your pictures with #dropspattern #delicatedancecardigan or submit them to the #dropsfan gallery. Do you need help with this pattern?You'll find 30 tutorial videos, a Comments/Questions area and more by visiting the pattern on garnstudio.com. © 1982-2026 DROPS Design A/S. We reserve all rights. This document, including all its sub-sections, has copyrights. Read more about what you can do with our patterns at the bottom of each pattern on our site. |
|


With over 40 years in knitting and crochet design, DROPS Design offers one of the most extensive collections of free patterns on the internet - translated to 17 languages. As of today we count 325 catalogues and 12298 patterns translated into English (UK/cm).
We work hard to bring you the best knitting and crochet have to offer, inspiration and advice as well as great quality yarns at incredible prices! Would you like to use our patterns for other than personal use? You can read what you are allowed to do in the Copyright text at the bottom of all our patterns. Happy crafting!
Post a comment to pattern DROPS 258-14
We would love to hear what you have to say about this pattern!
If you want to leave a question, please make sure you select the correct category in the form below, to speed up the answering process. Required fields are marked *.