
Popular categories
Looking for a yarn?


Comments / Questions (33)
![]() Wil wrote:
Wil wrote:
Ik wil graag deze trui gaan breien maar ik kan nergens vinden wat de bovenwijdte is. Welke maat is bv S of L ? De trui brei ik voor mijn dochter die in het buitenland woont. Ik kan dus niet passen.
25.04.2026 - 13:14DROPS Design answered:
Dag Wil,
Onderaan de beschrijving, in de maattekening staan de afmetingen aangegeven voor iedere maat.
25.04.2026 - 19:21
![]() Emma wrote:
Emma wrote:
I’m at the back piece and the instructions reads „AT THE SAME TIME knitting the knit stitches in cables together 2 by 2 (= 8-8-8-12-12-12 stitches decreased)“. What exactly is meant? Thanks for you help!
02.02.2026 - 19:20DROPS Design answered:
Dear Emma, in every cable you knit 2 stitches (2 knitted stitches, not the purled stitches) together until all knitted stitches of the cable are knitted together so you get half of the number of stitches you had before in the cable. A cable of 4 stitches afterwards consists of 2 stitches. Happy knitting!
05.02.2026 - 00:43
![]() Judith Schmidt wrote:
Judith Schmidt wrote:
Sehr geehrtes Drops Team, ich schreibe gerade meine Masterarbeit zum Thema Strickmuster und vergleiche dabei historische mit aktuellen Mustern. Meine Frage nun: Können Sie mir sagen, in welchem Jahr diese Anleitung von Ihnen geschrieben wurde? Herzlichen Dank im Voraus. Judith Schmidt
14.01.2026 - 11:47DROPS Design answered:
Liebe Judith, vielen Dank für Ihre Anfrage. Diese Anleitung haben wir im Februar 2025 veröffentlicht. Wir wünschen Ihnen viel Erfolg bei Ihrer Masterarbeit.
14.01.2026 - 18:05
![]() Solveig wrote:
Solveig wrote:
Angående avmaskning för hals. Gör ett förtydligande i mönstret att det är flätorna i mittpartiet (halsringning) som avmaskning ska ske och inte flätorna på sidorna. Jag har försökt jättelänge för att förstå mönstret. Förklara tydligare vilka flätor det gäller.
16.11.2025 - 19:33
![]() Sylviane Gaspard wrote:
Sylviane Gaspard wrote:
Petite précision : je tricote ce pull en aller retour avec des aiguilles droites.
17.10.2025 - 09:46DROPS Design answered:
Bonjour Sylviane, si vous tricotez en allers et retours avec des aiguilles droites: dans les rangs sur l'endroit (impairs) vous lisez les diagrammes de droit a gauche et dans les rangs sur l'envers (pairs) de gauche a droit. Bon tricot!
17.10.2025 - 10:31
![]() Sylviane Gaspard wrote:
Sylviane Gaspard wrote:
Bonjour, je voudrais savoir dans quel sens doit-on lire le schéma A2 ? Toujours de gauche à droite ? Ou de gauche a droite pour les rangs endroit (impairs) et de droite à gauche pour les rangs pairs ? Merci
17.10.2025 - 09:41DROPS Design answered:
Bonjour Sylviane, en tricotant en rond: le schema est toujours lu de droit a gauche. En allers et retours: dans les rangs endroit (impairs) de droit a gauche, dans les rangs envers (pairs) de gauche a droit. Regardez la lecon ICI. Bon tricot!
17.10.2025 - 10:14
![]() Ina Van Velzen-Morsink wrote:
Ina Van Velzen-Morsink wrote:
Hallo ik heb gebreid. Kunt u met n rondbreinaald tot 29 cm, onder verdelen voor de armsgaten staat: begin 4 steken etc, deze 4 steken gewoon breien toch en dan 8 afkanten , dan krijg je toch n gat , ik snap het niet helemaal kunt u het uitleggen? Alvast bedankt mvg. Ina
22.08.2025 - 21:52DROPS Design answered:
Hi Ina, don't knit the last 4 stitches in the round. Cast off the next 8 (4 stitches in each side of marker thread), please see the video how to cast off HERE. Do the same on the other side of the jumper. Happy knitting!
22.10.2025 - 11:35
![]() Hilkka wrote:
Hilkka wrote:
Olen tehnyt hiha-aukkojen kavennukset mutta kavennus ei ole keskellä sileää neuletta eli oikealla kapea sileä( 6 silmukkaa) ja vasemmalla ( 18 silmukkaa) kuuluisiko hihakavennus keskelle sileää neuletta? Nyt sileä osuudet eri näköiset
20.07.2025 - 14:07DROPS Design answered:
Hei, kun päätät kädenteitä varten, aloita 4-6-8-10-11-12 silmukkaa ennen kerroksen vaihtumiskohtaa. Tällä tavoin päätettyjen silmukoiden kummallekin puolelle jää esim. koossa S 14 silmukkaa sileää neuletta.
21.07.2025 - 16:59
![]() Sidsel Angly wrote:
Sidsel Angly wrote:
Jeg kan ikke finde ud af hvad der menes med “ På næste omgang lukkes der 8-12-16-20-22-24 masker af midt under ærmet, men for at undgå at klippe tråden startes omgangen 4-6-8-10-11-12 masker før mærketråden midt under ærmet“ ., hvordan starter jeg 6 masker inde ?
06.07.2025 - 18:47DROPS Design answered:
Hei Sidsel. 1. merketråde = begynnelsen av omgangen og når du skal felle til ermhull (str. M) skal det felles 6 masker før og 6 masker etter 1. merketråd, og for å slippe å klippe tråden, starter man 6 masker før 1. merketråd (altså, du strikker ikke de 6 siste maskene på omgangen før du feller til ermhull. mvh DROPS Design
31.07.2025 - 08:39
![]() Shruti wrote:
Shruti wrote:
Pattern A2 is not looking right on my knitting. im a beginner. purl and knit stitching are confusing in circular knitting.what should i do, please help
24.06.2025 - 16:07DROPS Design answered:
Dear Shruti, when you work in the round, you will read the diagrams from the right towards the left on every row, so you will always work K over K or P over P just as shown in diagram; when you will work back and forth afterwards, just read diagrams from the left towards the right from the wrong side. Read more about diagrams here. Happy knitting!
26.06.2025 - 16:43
|
||||||||||||||||||||||
April Snow#aprilsnowsweater |
||||||||||||||||||||||
 |
 |
|||||||||||||||||||||
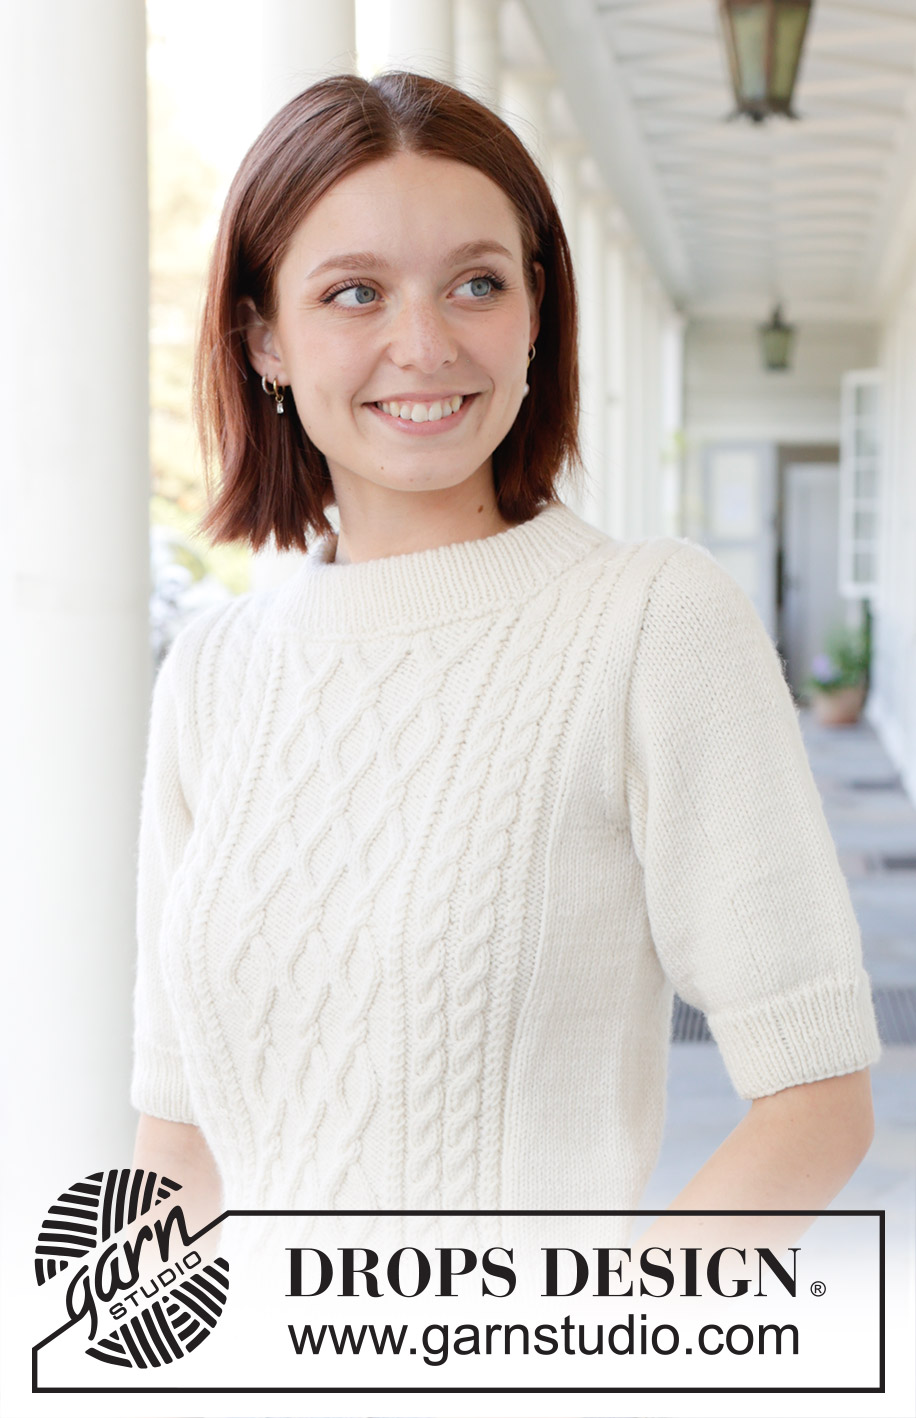
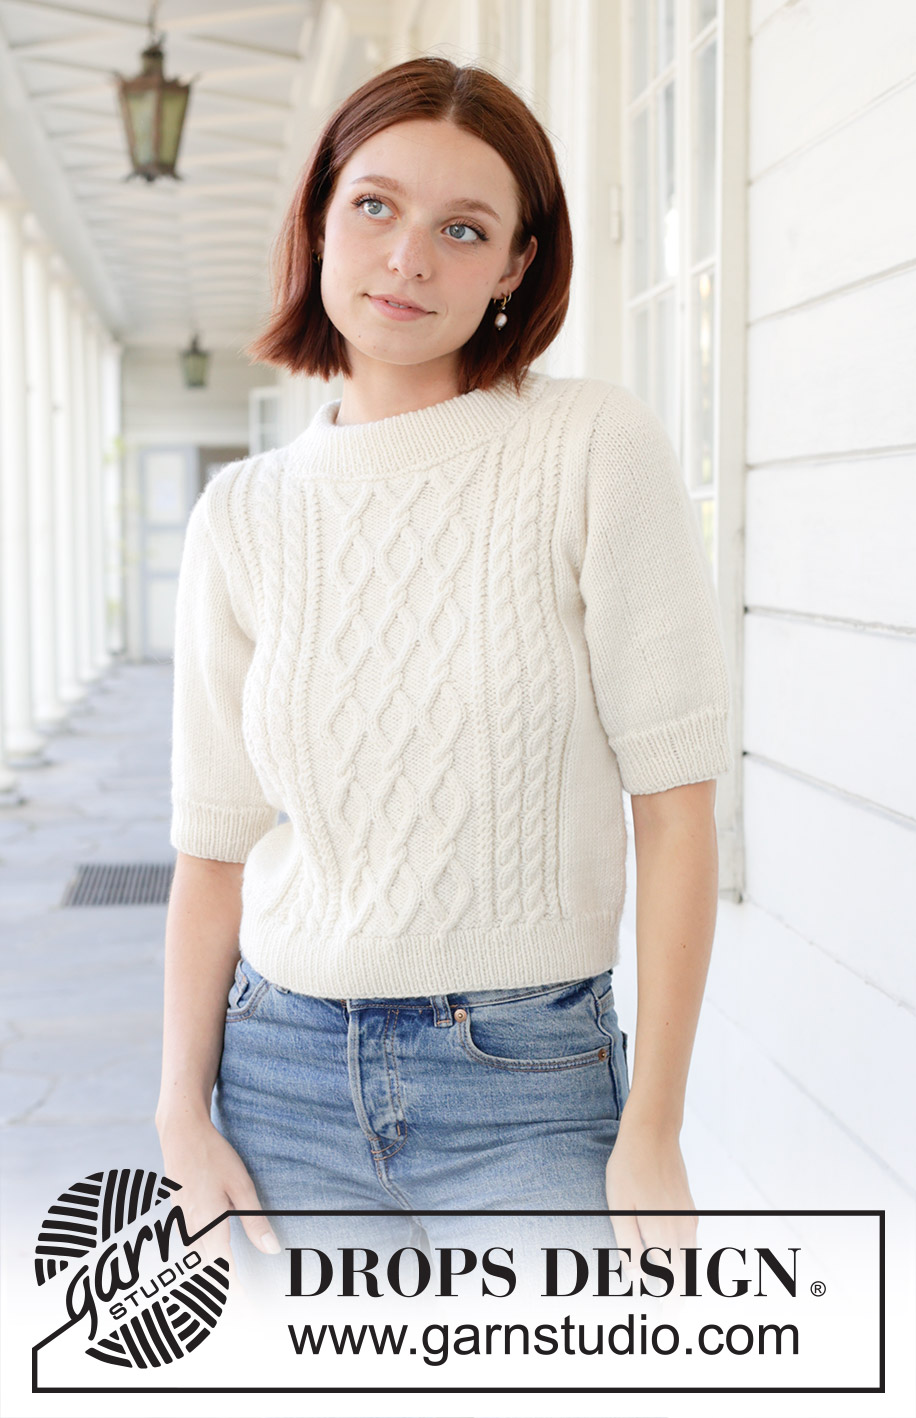
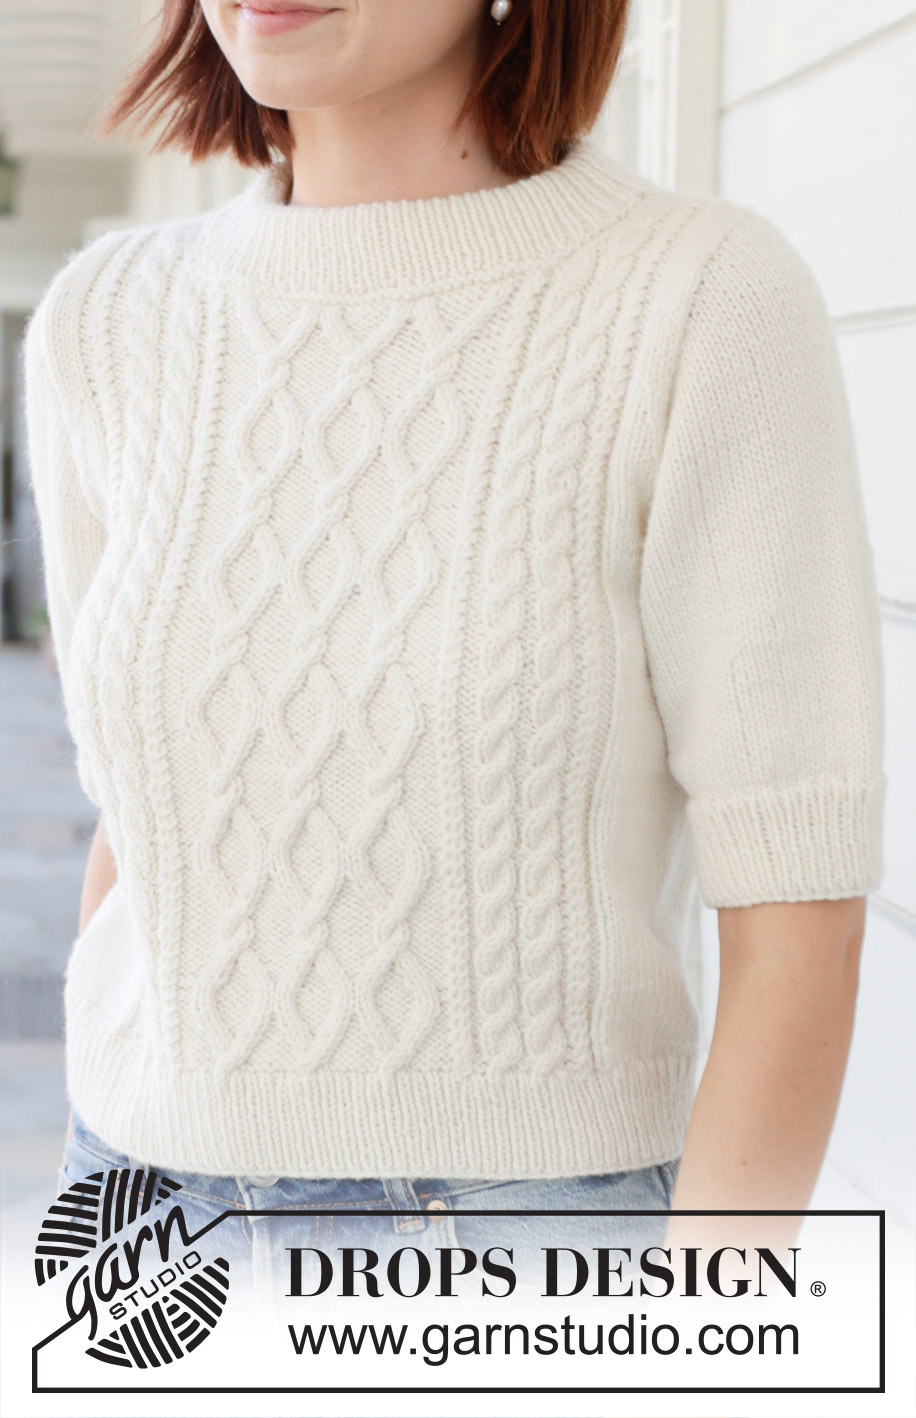
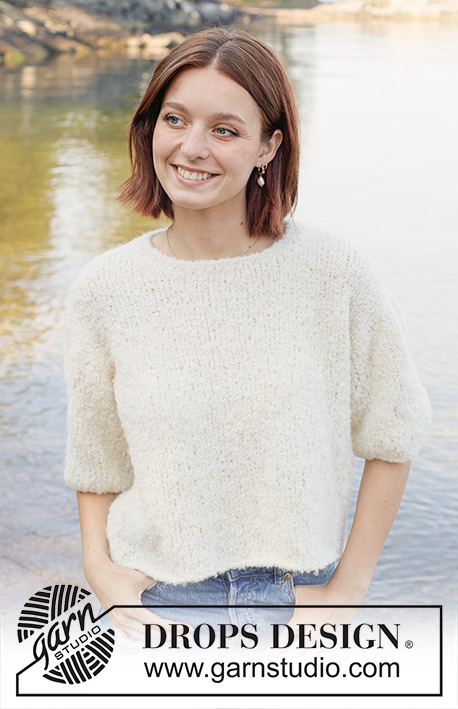
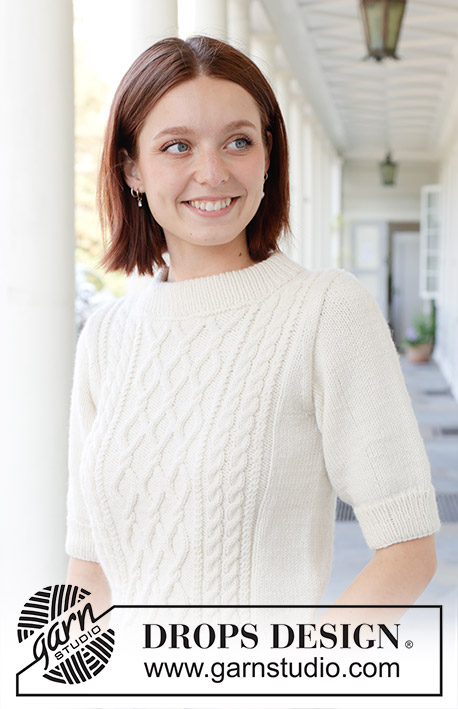
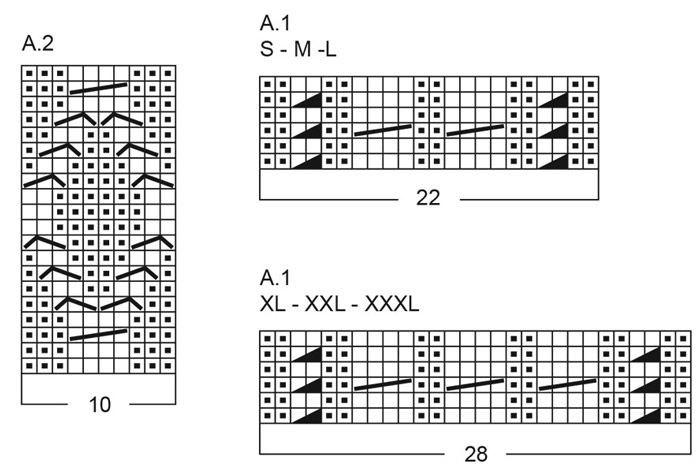
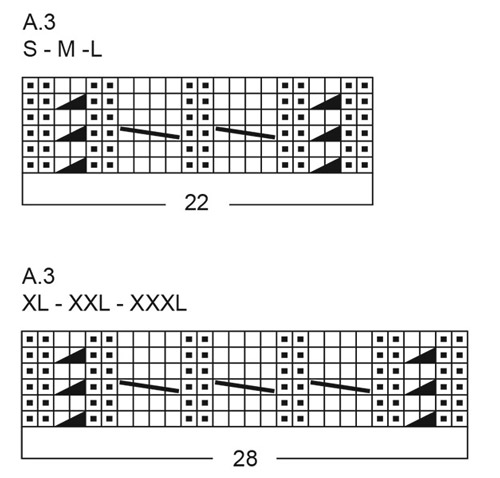
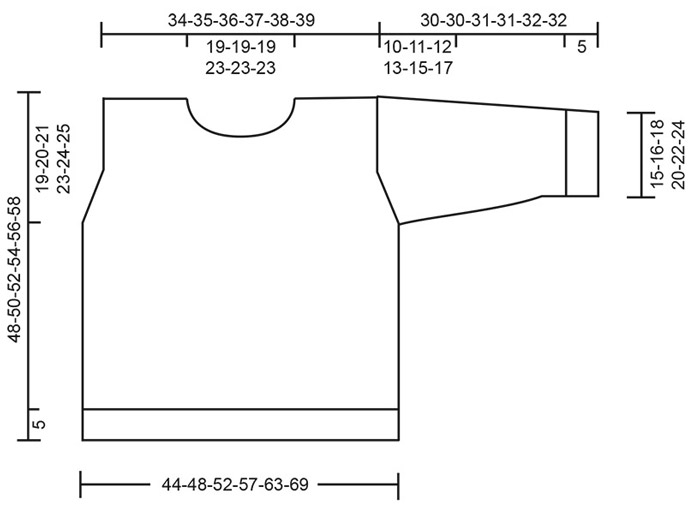
Knitted jumper in DROPS Daisy or DROPS Merino Extra Fine. Piece is knitted bottom up with cables, short sleeves and double neck edge. Size: S - XXXL.
DROPS 259-1 |
||||||||||||||||||||||
|
---------------------------------------------------------- EXPLANATION FOR THE PATTERN: ---------------------------------------------------------- GARTER STITCH (when working back and forth): Knit on all rows, i.e. knit from right side and knit from wrong side. 1 ridge vertically = knit 2 rows. PATTERN: See diagrams A.1 to A.3. Choose diagram for desired size – applies to A.1 and A.3 . Diagrams show all rows in pattern seen from the right side. DECREASE TIP: All decreases are done from the right side! Work 1 stitch in garter stitch, knit 2, slip 1 stitch knitwise, knit 1, pass slipped stitch over stitch worked (= 1 stitch decreased), work until 5 stitches remain, knit 2 together (= 1 stitch decreased), finish with knit 2 and 1 stitch in garter stitch. INCREASE TIP: Increase 1 stitch on each side of marker thread as follows: Work until 1 stitch remains before marker thread, make 1 yarn over, knit 2 (marker thread is in the middle of these 2 stitches), make 1 yarn over (= 2 stitches increased). On next round knit yarn over twisted to avoid holes. Then work the new stitches in stocking stitch. ---------------------------------------------------------- START THE PIECE HERE: ---------------------------------------------------------- JUMPER - SHORT OVERVIEW OF THE PIECE: In this pattern needles of different length have been used, begin with fitting length for number of stitches and switch as needed. Piece is worked in the round on circular needle, from the bottom and up to armholes. Then divide the piece for front piece and back piece, and finish each part separately back and forth. Work pattern both on the front and back. Work sleeves bottom up, and work in the round on needle until armhole, then work sleeve back and forth on needle. Sew parts together. Finish by picking up stitches around the neck and work a neck edge in the round. If 0 stitches is given for the chosen size, it means that you skip the information and jump to next information. BODY: Cast on 222-242-264-288-318-350 stitches on circular needle size 3 mm with DROPS Daisy or DROPS Merino Extra Fine. Work rib (= knit 1/purl 1) for 5 cm. Knit 1 round while AT THE SAME TIME decreasing 2-6-8-4-10-18 stitches evenly = 220-236-256-284-308-332 stitches. Insert 1 marker thread at beginning of round, and 1 marker thread after 110-118-128-142-154-166 stitches = in the sides on body. Switch to circular needle size 4 mm and work pattern from beginning of round as follows: *Work 18-22-27-28-34-40 stitches in stocking stitch, work A.1 (= 22-22-22-28-28-28 stitches), work A.2 3 times in total (= 30 stitches), work A.3 (= 22-22-22-28-28-28 stitches), work 18-22-27-28-34-40 stitches in stocking stitch *, work from *-* 1 more time. Continue the pattern like this. Remember to follow the knitting tension! Work until piece measures 29-30-31-31-32-33 cm from cast-on edge - adjust so that next round is an uneven numbered round in pattern (the cable needles will then be from right side when working back and forth afterwards). Now divide the piece for front piece and back piece. DIVIDING FOR ARMHOLES: Work next round as follows: Begin 4-6-8-10-11-12 stitches before the beginning of round, cast off the next 8-12-16-20-22-24 stitches on round for armhole, work 102-106-112-122-132-142 stitches (= front piece), cast off the next 8-12-16-20-22-24 stitches for armhole, work 102-106-112-122-132-142 stitches as before (= back piece). Now work front piece and back piece back and forth on needle until finished measurements. BACK PIECE: = 102-106-112-122-132-142 stitches. Continue pattern and stocking stitch back and froth as before with 1 edge stitch in GARTER STITCH in each side – read explanation above – AT THE SAME TIME on next row from right side decrease for armhole inside 3 stitches – read DECREASE TIP. Decrease like this every other row 1-1-2-4-11-18 times in total, then every 4th row 5-6-7-7-4-1 times in total = 90-92-94-100-102-104 stitches remain. When piece measures 44-46-48-50-52-54 cm, cast off the middle 42-42-42-54-54-54 stitches for neck while AT THE SAME TIME knitting the knit stitches in cables together 2 by 2 (= 8-8-8-12-12-12 stitches decreased) and finish each shoulder separately. SHOULDERS: Now cast off stitches for neck on every other row as follows: Cast off 2 stitches 2 times = 20-21-22-19-20-21 stitches remain on each shoulder. Cast off when piece measures 48-50-52-54-56-58 cm. FRONT PIECE: = 102-106-112-122-132-142 stitches. Continue pattern and stocking stitch back and forth as before with 1 edge stitch in GARTER STITCH in each side – read explanation above – AT THE SAME TIME on next row from right side decrease for armhole inside 3 stitches – read DECREASE TIP. Decrease like this every other row 1-1-2-4-11-18 times in total, then every 4th row 5-6-7-7-4-1 times in total = 90-92-94-100-102-104 stitches remain. When piece measures 42-44-45-46-47-48 cm, work next row from wrong side as follows: Work as before over the first 26-27-28-25-26-27 stitches, knit over knit and purl over purl over the next 38-38-38-50-50-50 stitches while AT THE SAME TIME knitting the knit stitches in cables together 2 by 2 (= 8-8-8-12-12-12 stitches decreased), slip these 30-30-30-38-38-38 middle stitches on a thread for neck, work the remaining 26-27-28-25-26-27 stitches as before. Now finish each shoulder separately. SHOULDERS: 1st row is from wrong side as before. Then cast off stitches for neck on every row from neck as follows: Cast off 2 stitches 1 time, then 1 stitch 4 times = 20-21-22-19-20-21 stitches remain on each shoulder. Cast off when piece measures 48-50-52-54-56-58 cm. SLEEVES: Work sleeve in the round on needle, then finish sleeve cap back and forth on needle. Cast on 76-80-90-102-112-122 stitches on double pointed needles size 3 mm. Work rib (= knit 1/purl 1) for 5 cm. On next round switch to double pointed needles size 4 mm and knit 1 round while AT THE SAME TIME decreasing 12-12-14-18-20-22 stitches evenly on row = 64-68-76-84-92-100 stitches. Insert 1 marker thread mid under sleeve, this is used when increasing stitches under sleeve. Work in stocking stitch in the round. When sleeve measures 8-9-10-8-10-10 cm from cast-on edge, increase 2 stitches mid under sleeve - read INCREASE TIP. Increase like this every 5-4-5-4-5-0 cm 3-3-2-3-2-1 times in total = 70-74-80-90-96-102 stitches. Work in stocking stitch until sleeve measures 20-19-19-18-17-15 cm from cast-on edge. Now work sleeve cap as explained below. SLEEVE CAP: On next round cast off 8-12-16-20-22-24 stitches mid under sleeve but to avoid cutting the yarn at begin round 4-6-8-10-11-12 stitches before stitch with marker thread mid under sleeve, cast off and then work in stocking stitch the rest of round = 62-62-64-70-74-78 stitches. Then finish the piece back and forth on needle while AT THE SAME TIME casting off for sleeve cap the beginning of every row as follows: Cast off 2 stitches 3 times in each side, 1 stitch 4-6-8-10-14-18 times in each side = 42-38-36-38-34-30 stitches remain, then cast off 2 stitches at the beginning of every row until sleeve measures 30-30-31-31-32-32 cm. Cast off the remaining stitches. ASSEMBLY: Sew the shoulder seams. Sew sleeve in armhole. NECK EDGE: Use circular needle size 3 mm, pick up stitches around the neck from right side as follows: Begin at one shoulder seam and pick up approx. 116-116-118-140-144-146 stitches including stitches on thread mid front – number of stitches must be divisible by 2. Purl 1 round and knit 1 round. Work rib (= knit 1/purl 1) in the round for 10-10-10-11-11-11 cm. Cast off somewhat loosely and fold neck edge double towards the wrong side and fasten with a couple of stitches. |
||||||||||||||||||||||
Diagram explanations |
||||||||||||||||||||||
|
||||||||||||||||||||||
 |
||||||||||||||||||||||
 |
||||||||||||||||||||||
 |
||||||||||||||||||||||
Have you finished this pattern?Tag your pictures with #dropspattern #aprilsnowsweater or submit them to the #dropsfan gallery. Do you need help with this pattern?You'll find 34 tutorial videos, a Comments/Questions area and more by visiting the pattern on garnstudio.com. © 1982-2026 DROPS Design A/S. We reserve all rights. This document, including all its sub-sections, has copyrights. Read more about what you can do with our patterns at the bottom of each pattern on our site. |
||||||||||||||||||||||


With over 40 years in knitting and crochet design, DROPS Design offers one of the most extensive collections of free patterns on the internet - translated to 17 languages. As of today we count 325 catalogues and 12298 patterns translated into English (UK/cm).
We work hard to bring you the best knitting and crochet have to offer, inspiration and advice as well as great quality yarns at incredible prices! Would you like to use our patterns for other than personal use? You can read what you are allowed to do in the Copyright text at the bottom of all our patterns. Happy crafting!
Post a comment to pattern DROPS 259-1
We would love to hear what you have to say about this pattern!
If you want to leave a question, please make sure you select the correct category in the form below, to speed up the answering process. Required fields are marked *.