
Popular categories
Looking for a yarn?


Comments / Questions (34)
![]() Fatima Tameur wrote:
Fatima Tameur wrote:
Bonjour, Désolée, mais pour moi ce n’est pas très clair. Pour les diminutions pour la taille XL, après avoir fait la m. lisière puis la m. endroit, faut-il tricoter 2x2m ensemble pour faire les diminutions puis la figure 1 et inversément pour la fin du rang ? Je vous remercie d'avance pour votre réponse. Je vous souhaite une belle fin de journée. Cordialement, Fatima Tameur
08.05.2025 - 17:05DROPS Design answered:
Bonjour Mme Tameur, diminuez comme indiqué sous DIMINUTIONS: après les 2 premières mailles comme dans A.1 pour diminuer 2 m/A.2 pour diminuer 1 m pour le devant droit; avant les 2 dernières mailles comme dans A.1 pour diminuer 2 m et avant les 2 dernières mailles comme dans A.3 pour diminuer 1 m pour le devant bauche. Dans tous les cas, vous tricotez 3 m ens à l'env sur l'envers, mais dans A.2 et dans A.3, au rang suivant sur l'envers, faites 1 jeté en plus pour qu'il n'y ait finalement qu'une seule maille de diminuée: dans A.2 tricotez 1 m env, 1 jeté et dans A.3, 1 jeté, 1 m env. Bon tricot!
09.05.2025 - 07:45
![]() Fatima Tameur wrote:
Fatima Tameur wrote:
Bonjour, je suis arrivée au 39 cm du gilet mais je ne comprends pas très bien comment il faut faire pour les diminution. Je vous remercie d'avance pour votre réponse. Belle journée. Cordialement, Fatima Tameur
06.05.2025 - 12:24DROPS Design answered:
Bonjour Mme Tameur, vous tricotez la taille XL? À 39 cm de hauteur totale, vous commencez à diminuer pour l'encolure: diminuez d'abord 4 fois 2 m de chaque côté tous les 4 rangs puis 4 fois 1 maille 4 fois tous les rangs (les dernières diminutions se feront probablement après avoir divisé l'ouvrage aux emmanchures, car en même temps, à 46 cm vous rabattre 8 mailles pour chacune des emmanchures et terminerez chaque partie séparément. Retrouvez sous DIMINUTIONS au début des explications comment diminuer 2 m/ 1 m au début du rang (devant droit)/à la fin du rang (devant gauche). Bon tricot!
06.05.2025 - 13:42
![]() Pinçon wrote:
Pinçon wrote:
Merci pour votre réponse, je prendrai peut être des aiguilles circulaires pour les manches. Cordialement
28.02.2025 - 17:44
![]() Pinçon wrote:
Pinçon wrote:
Bonjour, Je voulais savoir si au lieu des aiguilles circulaires, je peux utiliser des aiguilles simples de même numéro ? Je n'aime pas beaucoup tricoter avec des aiguilles circulaires... Merci pour votre réponse. Cordialement
28.02.2025 - 14:52DROPS Design answered:
Bonjour Mme Pinçon, tout à fait, vos mailles seront juste davantage serrées lorsque vous tricoterez le bas du gilet, pour les manches, cette leçon pourra vous aider à adapter les explications. Bon tricot!
28.02.2025 - 17:14
![]() Nicole Chapdelaine wrote:
Nicole Chapdelaine wrote:
Bonjour La veste se fait en point jersey alors pourquoi le Diagramme Merci
13.02.2025 - 16:00DROPS Design answered:
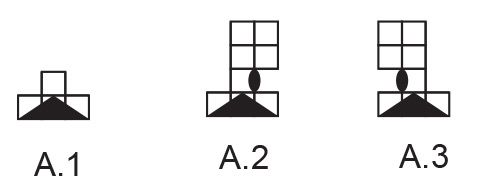
Bonjour Mme Chapdelaine, les diagrammes A.1 à A.3 montrent les diminutions pour l'encolure et les emmanchures - cf POINT FANTAISIE et DIMINUTIONS au début des explications. Bon tricot!
14.02.2025 - 08:23
![]() Patricia wrote:
Patricia wrote:
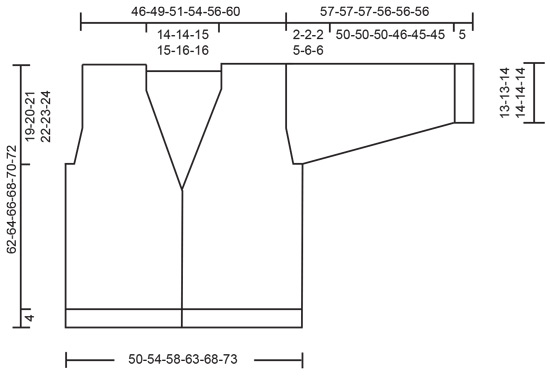
Hello, Does the measurement in the overview of the next section include the ribbed area? For example, I am working on the XL size and the measurement is 15¾". I am not able to tell with the schematic. Also, are the measurements for the schematic in centimeters or inches? Thank you for the clarification.
16.01.2025 - 03:49DROPS Design answered:
Dear Patricia, rib are included there, measure from cast on edge. All measurements in chart are in cm - convert into inches here. Happy knititng!
16.01.2025 - 16:36
![]() Fortuna wrote:
Fortuna wrote:
Buona sera non riesco a capire le diminuzioni sia di 1 che di 2 maglie . Non mi sono chiari i diagrammi Grazie
03.01.2025 - 16:29DROPS Design answered:
Buonasera Fortuna, per le diminuzioni deve leggere le istruzioni all'inizio del lavoro. I diagrammi si leggono dal basso verso l'alto, da destra verso sinistra per la lavorazione in piano. Buon lavoro!
03.01.2025 - 17:54
![]() Gunhild Hansen wrote:
Gunhild Hansen wrote:
Jeg strikker denne i str. XL. Ved felling til ermetopp står det at man skal felle 5 masker i beg. av hver pinne 5 ganger, og at dette skal bli 12 masker felt til sammen. Det får jeg ikke til å stemme. Hva er riktig - 5x5 masker felt (altså 25 masker totalt) eller 12 masker totalt? Jeg får heller ikke 6 omganger (omg. med felling under armen samt 5 fellingsomg.) til å bli 5 cm. Er det noe jeg har misforstått her?
02.01.2025 - 21:28
![]() Mette wrote:
Mette wrote:
Ærmer str s: Når ærmet måler 12 cm tages ud på hver side af mærket. Dette gentages herefter 10 gange med 4,5 cm mellemrum. 4,5cm x10 udtagninger= 45 cm+ de 12 cm inden udtagning= 57 Alligevel skal der lukkes af til ærmekuppel efter 55 cm?
12.12.2024 - 12:08DROPS Design answered:
Hei Mette. Når ermet mål 12 cm starter økningen = 12 cm / 1. økning, så øker du ved hver 4,5 cm 9 ganger til = 16,5cm /2. økning - 21 cm/3. økning - 25,5 cm /4. økning - 30 cm /5. økning - 34,5cm /6. økning - 39 cm/7. økning - 43,5 cm /8. økning - 48 cm /9. økning - 52,5 cm /10. økning. Strikk 2,5 cm, nå starter fellingene. mvh DROPS Design
16.12.2024 - 08:59
![]() Karin Feingold wrote:
Karin Feingold wrote:
I have one sleeve to go plus the bands and am out of wool! Your estimate for balls of yarn required for a medium sweater are off! Other than that the work is progressing well!
07.12.2024 - 14:41
|
|||||||||||||
City Ranger#cityrangercardigan |
|||||||||||||
 |
 |
||||||||||||
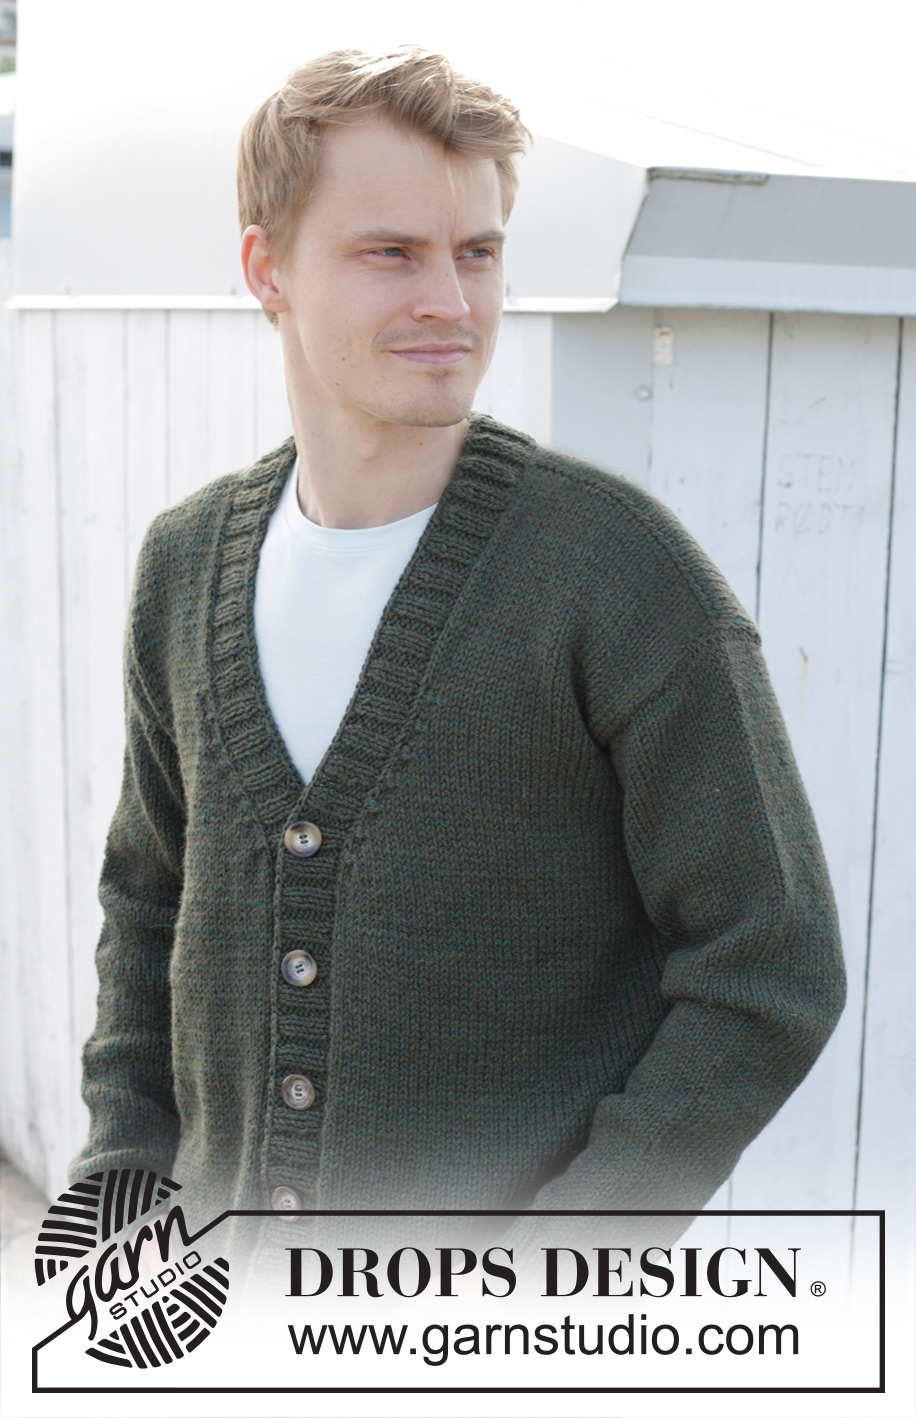
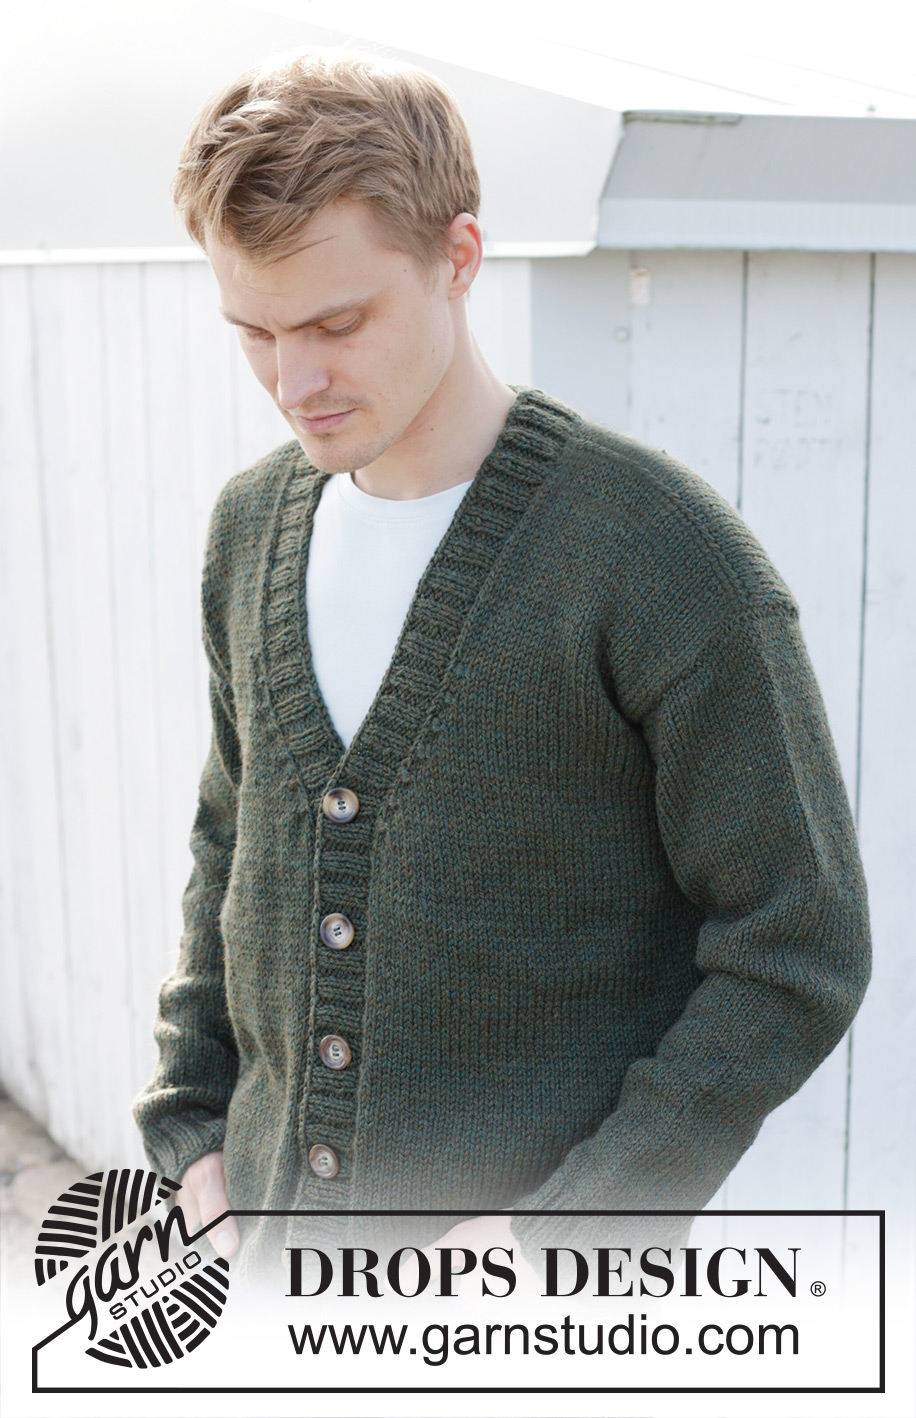
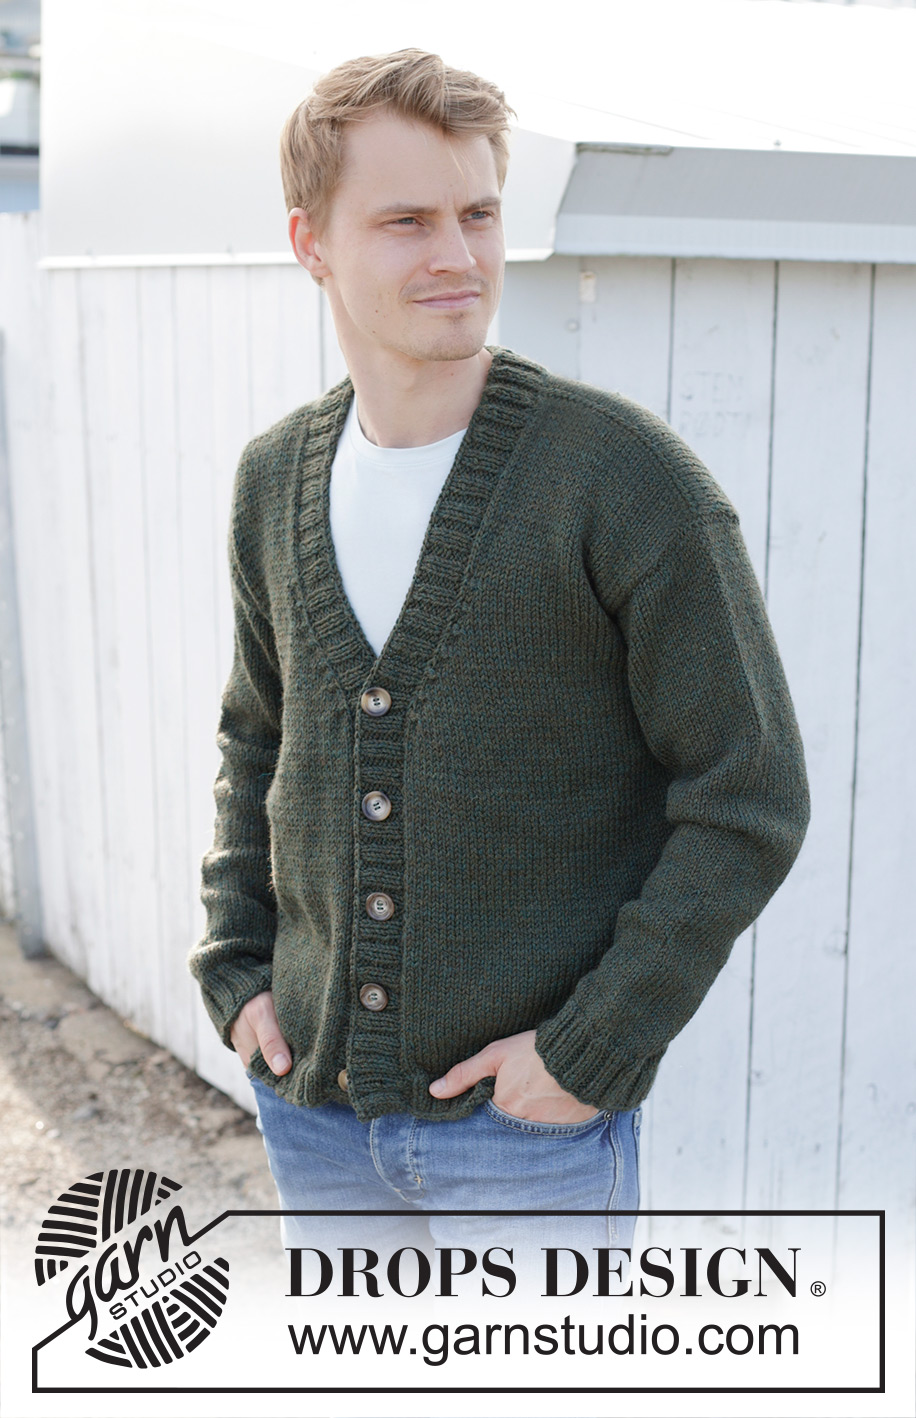
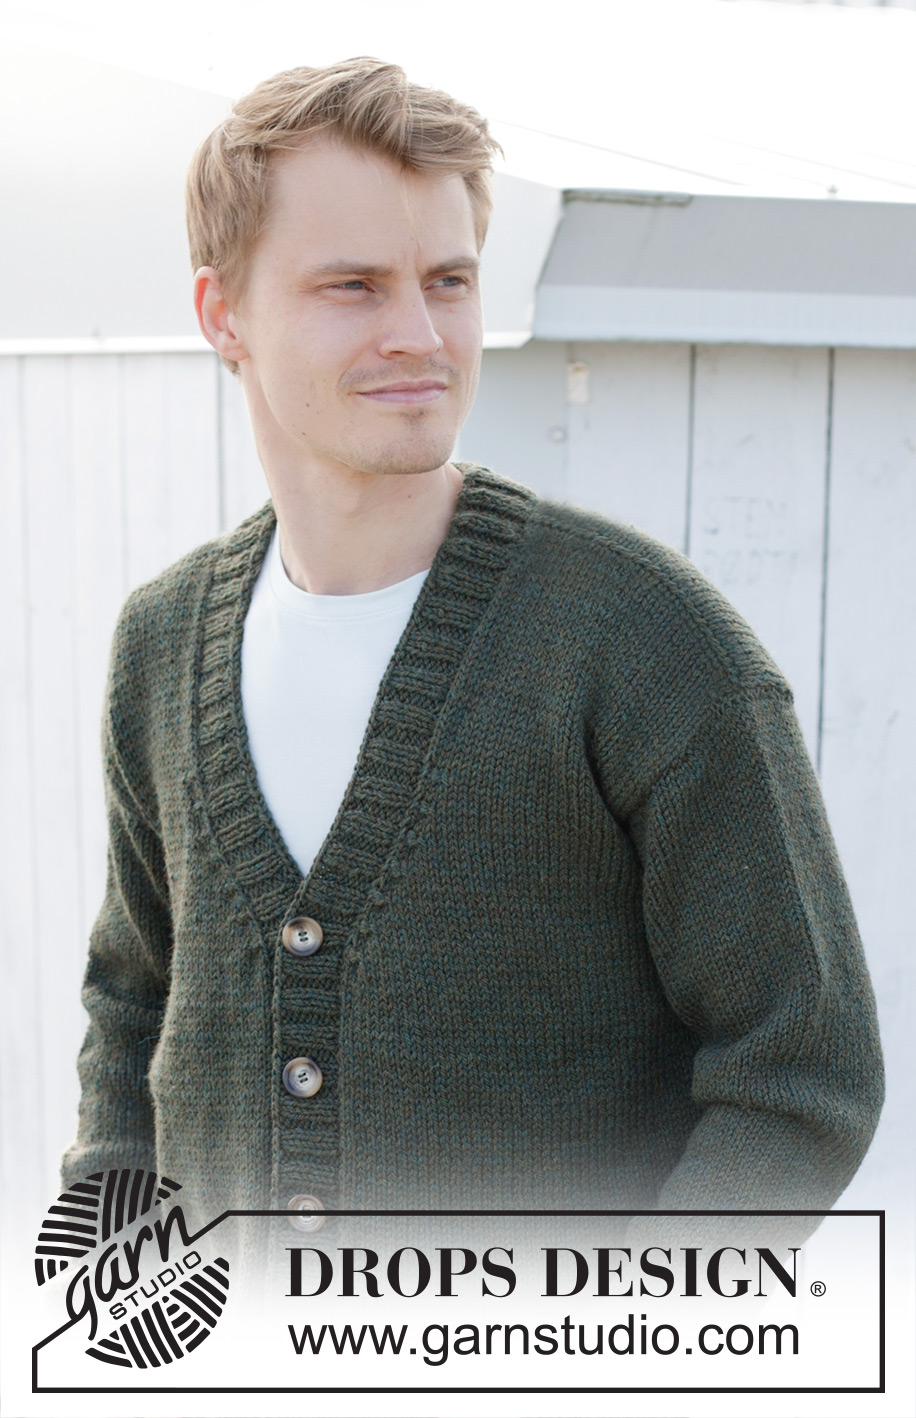
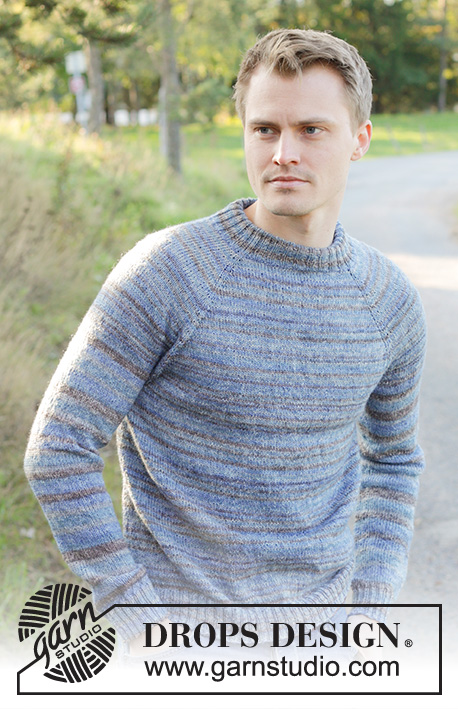
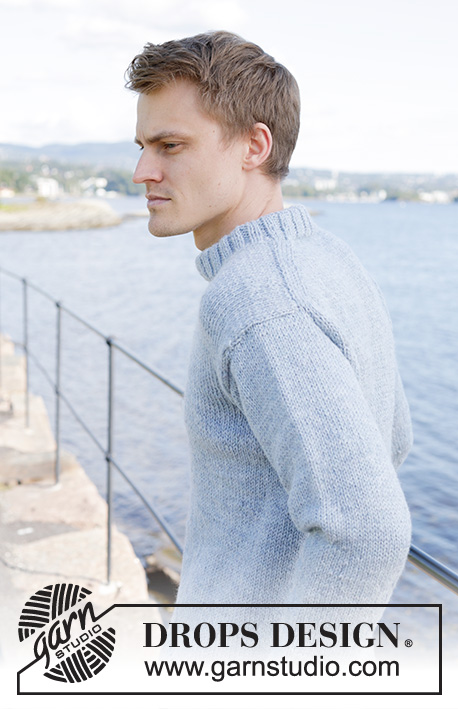
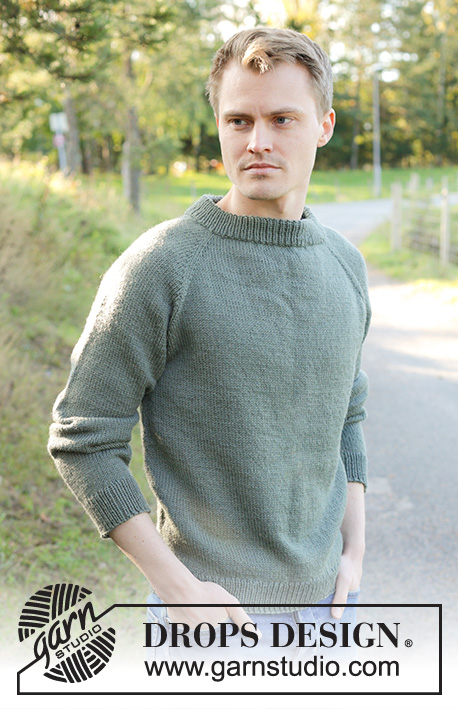
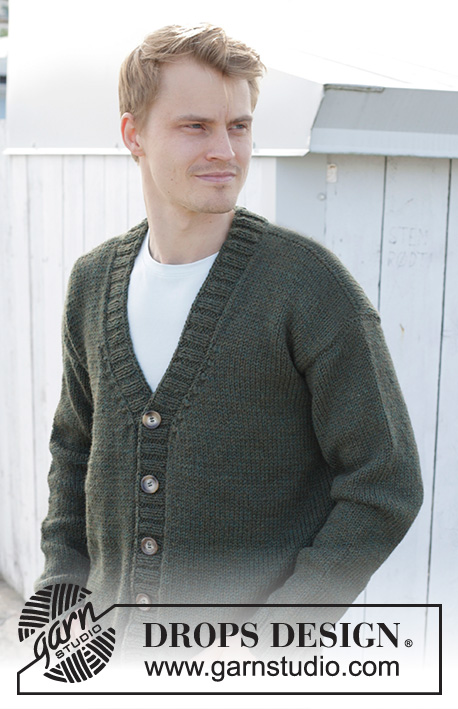
Knitted jacket for men in DROPS Nepal. The piece is worked bottom up with V-neck. Sizes S - XXXL.
DROPS 246-7 |
|||||||||||||
|
------------------------------------------------------- EXPLANATIONS FOR THE PATTERN: ------------------------------------------------------- GARTER STITCH (worked back and forth): Knit all rows. 1 ridge = knit 2 rows. PATTERN: See diagrams A.1 to A.3. The diagrams show all rows in the pattern from the right side. DECREASE TIP (for V-neck and armholes): All decreases are worked from the right side! DECREASE 2 STITCHES AT BEGINNING OF ROW: Work 1 edge stitch in garter stitch, knit 1, work A.1 over the next 3 stitches. DECREASE 2 STITCHES AT END OF ROW: Work until there are 5 stitches left on the row, work A.1 over the next 3 stitches, knit 1 and 1 edge stitch in garter stitch. DECREASE 1 STITCH AT BEGINNING OF ROW: Work 1 edge stitch in garter stitch, knit 1, A.2 over the next 3 stitches. DECREASE 1 STITCH AT END OF ROW: Work until there are 5 stitches left on the row, work A.3 over the next 3 stitches, knit 1 and 1 edge stitch in garter stitch. INCREASE TIP (for sleeves): Knit to 1 stitch past the marker-thread, make 1 yarn over, knit to 1 stitch before the marker-thread, make 1 yarn over. On the next round knit the yarn overs twisted, then work the new stitches in stocking stitch. BUTTONHOLES: Work 5 buttonholes on the right band. 1 buttonhole = knit 2 together and make 1 yarn over – NOTE: It is neatest, when working the buttonholes, to purl 2 together in each purled section (seen from the right side). Knit the yarn over on the next row to leave a hole. The bottom buttonhole is worked 5 cm from the bottom edge and the top buttonhole 25-27-29-30-31-32 cm below the shoulder. The other 3 buttonholes are worked evenly between these two. ------------------------------------------------------- START THE PIECE HERE: ------------------------------------------------------- JACKET – SHORT OVERVIEW OF THE PIECE: The body is worked back and forth with circular needle, bottom up as far as the armholes, divided and then the front and back pieces are finished separately back and forth with circular needle. The sleeves are worked in the round with double pointed needles/short circular needle, bottom up as far as the sleeve cap, which is then finished back and forth with circular needle. The neck/bands are worked to finish. BODY: Cast on 192-208-224-240-264-280 stitches with circular needle size 4 mm and DROPS Nepal. Purl 1 row from the wrong side. Then work as follows from the right side: 1 GARTER STITCH – read description above, * purl 2, knit 2 *, work from *-* until there are 3 stitches left, purl 2 and 1 garter stitch. Continue this rib back and forth for 4 cm. Knit 1 row from the right side and decrease 30-34-38-38-46-46 stitches evenly spread = 162-174-186-202-218-234 stitches. Change to circular needle size 5.5 mm. Insert 1 marker-thread 41-44-47-51-55-59 stitches in from each side (= 80-86-92-100-108-116 stitches on the back piece between the markers). Allow the threads to follow your work onwards; they mark the sides and are used when working the armholes. Work stocking stitch with 1 garter stitch on each side. REMEMBER THE KNITTING TENSION! OVERVIEW OF THE NEXT SECTION: When the piece measures 38-38-38-39-40-41 cm, start to decrease for the V-neck. AT THE SAME TIME, cast off for the armholes and finish each section separately. Read V-NECK and ARMHOLES before continuing. V-NECK: When the piece measures 38-38-38-39-40-41 cm, decrease for the neck on the next row from the right side – read DECREASE TIP. Decrease 2 stitches on each side every 4th row 4 times in all sizes. Then decrease 1 stitch on each side every 4th row 3-3-4-4-5-5 times. ARMHOLES: AT THE SAME TIME, when the piece measures 43-44-45-46-47-48 cm, cast off for the armholes on the next row from the right side as follows: Work until there are 2-3-4-4-4-5 stitches left before the first marker-thread, cast off 4-6-8-8-8-10 stitches, work until there are 2-3-4-4-4-5 stitches left before the second marker-thread, cast off 4-6-8-8-8-10 stitches and work to end of row. Finish the front and back pieces separately. LEFT FRONT PIECE: Start from the wrong side and work stocking stitch, with 1 garter stitch on each side, and continue to decrease for the V-neck. In addition, work the armhole as follows: ARMHOLES: At the beginning of the next row from the right side decrease 1-1-1-2-2-2 stitches, then decrease 1 stitch every 4th row 0-0-0-1-3-3 times – remember DECREASE TIP. After all the decreases for the neck and armhole there are 27-29-30-32-33-36 stitches on the shoulder. Continue with stocking stitch and 1 garter stitch on each side until the piece measures 62-64-66-68-70-72 cm. Cast off. RIGHT FRONT PIECE: Start from the wrong side and work stocking stitch, with 1 garter stitch on each side, and continue to decrease for the V-neck. In addition, work the armhole as follows: ARMHOLE: At the end of the next row from the right side decrease 1-1-1-2-2-2 stitches, then decrease 1 stitch every 4th row 0-0-0-1-3-3 times – remember DECREASE TIP. After all the decreases for the neck and armhole there are 27-29-30-32-33-36 stitches on the shoulder. Continue with stocking stitch and 1 garter stitch on each side until the piece measures 62-64-66-68-70-72 cm. Cast off. BACK PIECE: = 76-80-84-92-100-106 stitches. Start from the wrong side and work stocking stitch, with 1 garter stitch on each side, and work the armholes as follows: On the next row from the right side, decrease 1-1-1-2-2-2 stitch on each side, then 1 stitch on each side every 4th row, 0-0-0-1-3-3 times – remember DECREASE TIP = 74-78-82-86-90-96 stitches. When the piece measures 59-61-63-65-67-69 cm, cast off the middle 18-18-20-20-22-22 stitches for the neckline (28-30-31-33-34-37 stitches on each shoulder). Finish each shoulder separately. On the next row from the neck cast off 1 stitch by the neck = 27-29-30-32-33-36 stitches. Cast off when the piece measures 62-64-66-68-70-72 cm. Work the other shoulder in the same way. SLEEVES: Cast on 48-48-52-52-56-56 stitches with double pointed needles size 4 mm and DROPS Nepal. Knit 1 round. Then work rib in the round (knit 2, purl 2) for 5 cm. Knit 1 round and decrease 8-6-8-8-10-10 stitches evenly spaced = 40-42-44-44-46-46 stitches. Insert 1 marker-thread at the beginning of the round (mid-under sleeve). Allow the thread to follow your work onwards – it is used when increasing under the sleeve. Change to double pointed needles size 5.5 mm and work stocking stitch. When the sleeve measures 12-12-9-11-9-12 cm, increase 1 stitch on each side of the marker-thread – read INCREASE TIP. Increase like this every 4½-4-4-3-3-2½ cm a total of 10-11-12-13-14-15 times = 60-64-68-70-74-76 stitches. When the sleeve measures 55-55-55-51-50-50 cm, work as follows: Start 2-3-4-4-4-5 stitches before the marker-thread, cast off 4-6-8-8-8-10 stitches and work to the end of the round = 56-58-60-62-66-66 stitches. Start from the wrong side and work the sleeve cap back and forth. Cast off stitches at the beginning of each row as follows: Cast off 9-9-10-5-4-4 stitches 2-2-2-5-6-6 times on each side = 20-22-20-12-18-18 stitches. Cast off. The sleeve measures approx.57-57-57-56-56-56 cm. Work the other sleeve in the same way. ASSEMBLY: Sew the shoulder seams inside the cast-off edge. Sew in the sleeves inside the 1 edge stitch on the armholes. BANDS/NECK: Insert 1 marker, in the middle of the back piece. The bands/neck are knitted up inside 1 edge stitch. Start from the right side at the bottom of the right front piece and knit up 131-135-139-143-149-153 stitches up the front piece to the marker mid-back, with circular needle size 4 mm – leave the marker in place. Knit up 131-135-139-143-149-153 stitches down the left front pieces = a total of 262-270-278-286-298-306 stitches (should be divisible by 4 + 2. It is important that the bands are neither too tight nor too loose. Work as follows from the wrong side: 2 garter stitches, * purl 2, knit 2 *, work from *-* until there are 4 stitches left, purl 2 and 2 garter stitches. Continue this rib for 2 cm. Now work the BUTTONHOLES on the right band – read description above. Continue working until the rib measures 4 cm. Cast off a little loosely. Sew the buttons onto the left band. |
|||||||||||||
Diagram explanations |
|||||||||||||
|
|||||||||||||
 |
|||||||||||||
 |
|||||||||||||
 |
|||||||||||||
Have you finished this pattern?Tag your pictures with #dropspattern #cityrangercardigan or submit them to the #dropsfan gallery. Do you need help with this pattern?You'll find 30 tutorial videos, a Comments/Questions area and more by visiting the pattern on garnstudio.com. © 1982-2026 DROPS Design A/S. We reserve all rights. This document, including all its sub-sections, has copyrights. Read more about what you can do with our patterns at the bottom of each pattern on our site. |
|||||||||||||


With over 40 years in knitting and crochet design, DROPS Design offers one of the most extensive collections of free patterns on the internet - translated to 17 languages. As of today we count 324 catalogues and 12290 patterns translated into English (UK/cm).
We work hard to bring you the best knitting and crochet have to offer, inspiration and advice as well as great quality yarns at incredible prices! Would you like to use our patterns for other than personal use? You can read what you are allowed to do in the Copyright text at the bottom of all our patterns. Happy crafting!
Post a comment to pattern DROPS 246-7
We would love to hear what you have to say about this pattern!
If you want to leave a question, please make sure you select the correct category in the form below, to speed up the answering process. Required fields are marked *.