
Popular categories
Looking for a yarn?


Comments / Questions (52)
![]() 周岐蓁 wrote:
周岐蓁 wrote:
ThankS ! Nice pattern!
16.05.2025 - 11:53
![]() Györki Mária wrote:
Györki Mária wrote:
Szeretném megkérdezni az xxxl méret milyen mellbőséghez van? Köszö nöm
10.05.2025 - 08:16
![]() MARIA MARGARITA CABRERA CAVIERES wrote:
MARIA MARGARITA CABRERA CAVIERES wrote:
Agradezco la oportunidad para felicitar a los creadores de esta página porque permite aprender de las personas que saben tanto y que son desinteresadas y muestran y comparten sus conocimientos.
10.04.2025 - 15:57
![]() Ingrid Neven wrote:
Ingrid Neven wrote:
Beste,ivm de steken meerderen,dat is nu heel goed gelukt,zonder gaatjes,nu zie je de rij waar je de steken hebt moeten meerderen,wat kan ik daaraan doen om dat verschil niet te hart laten opvallen,heb al een paar keer uitgetrokken,maar blijf het zien,wat zou jij doen of wat is uw idee,gr
07.04.2025 - 14:02DROPS Design answered:
Dag Ingrid,
Het is helaas niet helemaal te voorkomen dat je dit een beetje ziet.
09.04.2025 - 10:33
![]() M Gulen wrote:
M Gulen wrote:
Als je naald 11 gebreid hebt van A2 moet je de steken dan weer terugzetten bij de volgende naald
07.04.2025 - 11:53DROPS Design answered:
Dag M Gulen,
Nee, je hoeft geen steken terug te zetten. Er zit een verspring in waar de steken worden samen gebreid en waar de omslagen komen, maar je kunt gewoon door breien, je hoeft nergens steken terug te zetten in het telpatroon.
09.04.2025 - 10:35
![]() Christine Lynch wrote:
Christine Lynch wrote:
If you drop down to a US4 needle on the Green Grove Sweater to meet gauge would you drop down to a US0 for the neck or slightly larger?
31.03.2025 - 19:58DROPS Design answered:
Dear Mrs Lynch, you can probably go down to a needle size US0, just make sure it's not too tight when you work neck. Happy knitting!
01.04.2025 - 08:50
![]() Christine Lynch wrote:
Christine Lynch wrote:
In the Green Grove Sweater, when knitting the graph pattern there are yarn overs. In the tips it refers to a kint in the back loop on increase stitches, would you bo the same in the design pattern listed on the graph? Than you!
31.03.2025 - 19:48DROPS Design answered:
Hi Christine, No, the yarn overs in the diagrams are part of the lace pattern, so are worked through the front loop to leave holes. Happy knitting!
01.04.2025 - 06:45
![]() Christine Lynch wrote:
Christine Lynch wrote:
I did a swatch for gage and it come up with 18 stitches by 29 rows for the Green Grove Sweater. I went up a needle size and I blocked the piece. I read you don't block I was wondering why. And if I just went by the measurements using the size 6 instead of 7 because I prefer the tighter weave would it work? Thank you
28.03.2025 - 18:21DROPS Design answered:
Dear Christine, if you have a 18 stitches x29 rows gauge you would need to use a smaller needle (you have too few stitches), not a larger needle, to work the pattern tighter. You'd need to try with a US4 needle instead to try a get the correct gauge. This way the weave should look even tighter and the gauge would also be closer to the actual one probably, so you could work the pattern as it is. The gauge should not be blocked if the final piece isn't blocked; otherwise it wouldn't reflect the gauge that you'll have as you work the pattern, so the garment might not have the correct shape/measurements at the end. Happy knitting!
30.03.2025 - 20:28
![]() Ingrid Neven wrote:
Ingrid Neven wrote:
Beste,ik zij aan het begin van de halsrand met 180 steken,en 5 cm,nu moet ik 36 steken meerderen,waardoor ik gaatjes heb en mog nog 2cm breien, vindt het zo vreselijk,heb al vanalles gedaan maar krijg het niet mooi,,heb uw hulp nodig,gr
18.03.2025 - 11:44DROPS Design answered:
Dag Ingrid,
Bij het meerderen maak je omslagen en deze brei je op de volgende naald gedraaid om een gaatje te voorkomen. Wat je in plaats van omslagen maken ook kunt doen om te meerderen is de draad tussen twee steken opnemen en deze gedraaid recht breien. Zie deze video.
18.03.2025 - 20:08
![]() Anne wrote:
Anne wrote:
Bonjour, je me demande s'il n'y a pas une erreur sur cette partie du patron : Quand la manche mesure 4-3-3-2 cm depuis la division, diminuer 2 mailles au milieu sous la manche - voir DIMINUTIONS. Diminuer ainsi 2-3-3-3 fois au total tous les 4-3-3-2 cm = 78-84-88-92 mailles. Comment peut-on arriver à 88 mailles pour la taille L après diminution en partant de 82 mailles ? 🤔
17.03.2025 - 14:02DROPS Design answered:
Bonjour, notez que la taille L est la 1ère des 4 tailles dans ce paragraphe (L à XXXL), autrement dit, vous allez diminuer en taille L à partir de 4 cm et 2 fois au total tous les 4 cm = il reste 78 mailles. Bon tricot!
17.03.2025 - 15:36
|
||||||||||||||||||||||
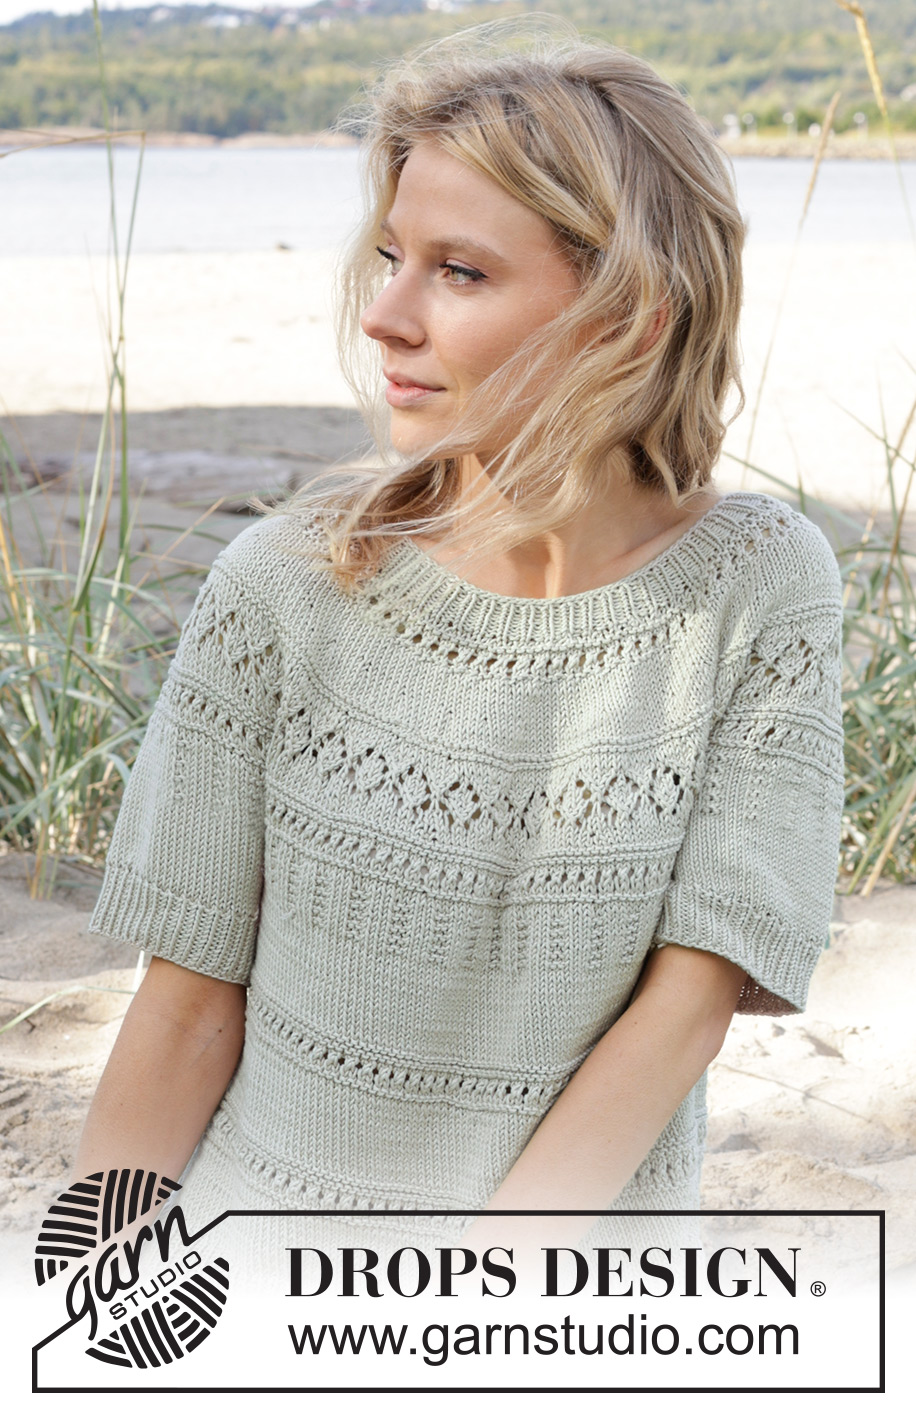
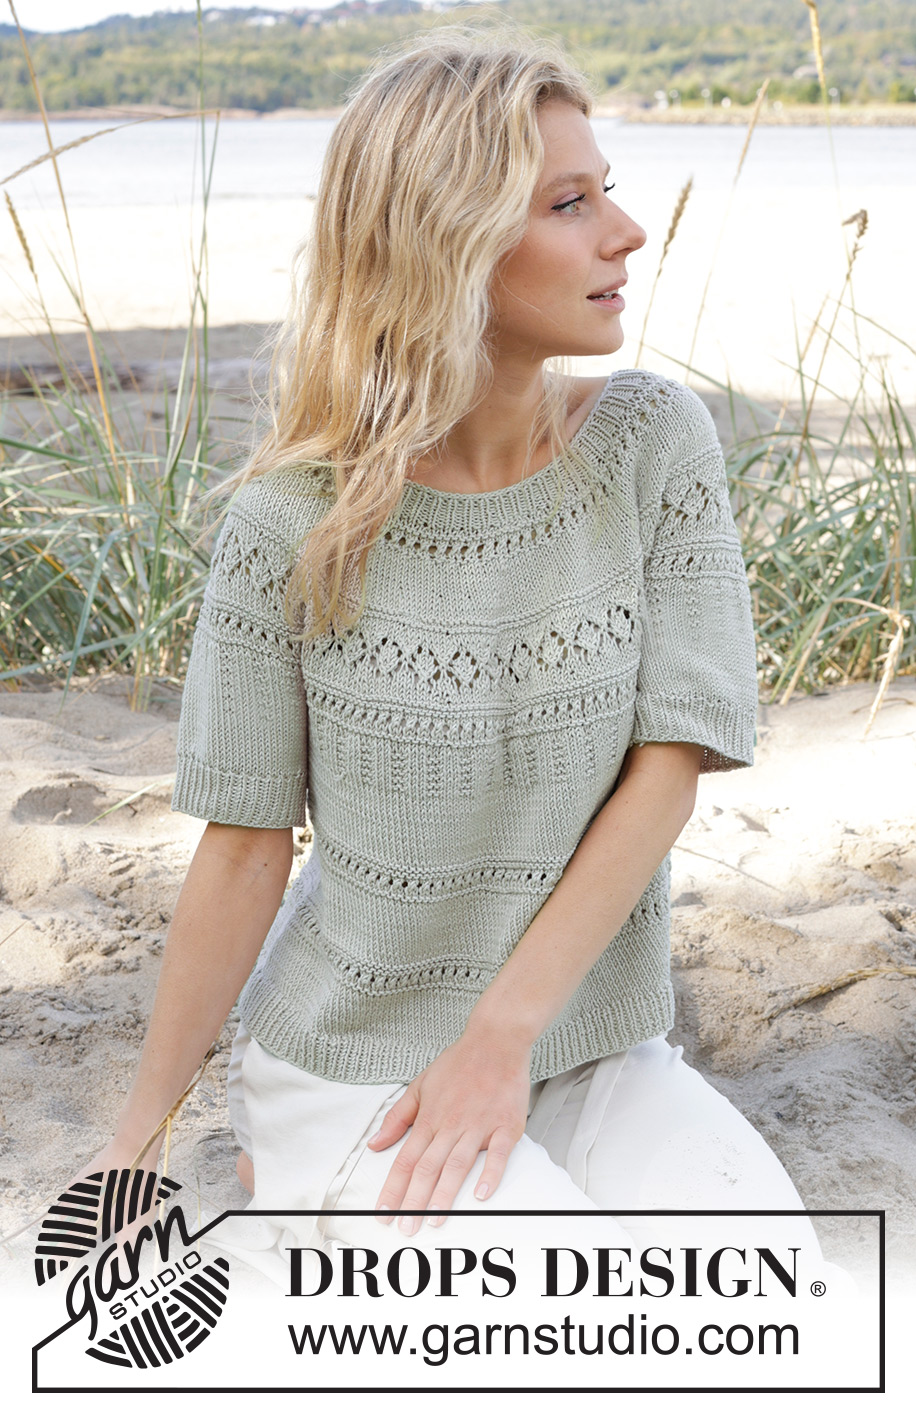
Green Grove Tee#greengrovetee |
||||||||||||||||||||||
 |
 |
|||||||||||||||||||||
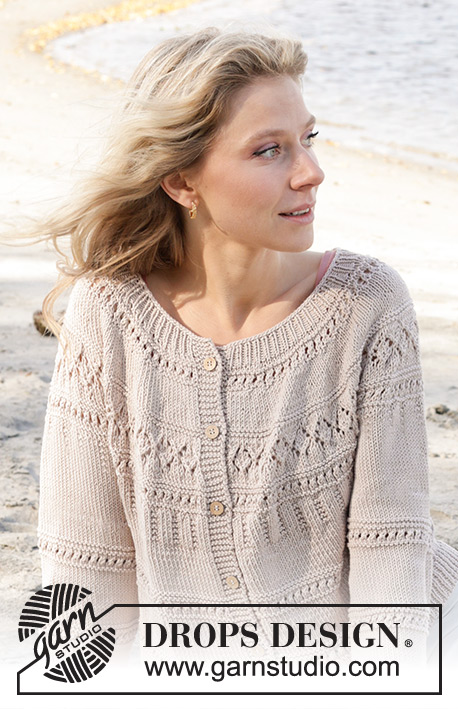
Knitted jumper with short sleeves in DROPS Muskat or DROPS Cotton Merino. Piece is knitted top down with round yoke and lace pattern. Size: S - XXXL
DROPS 239-26 |
||||||||||||||||||||||
|
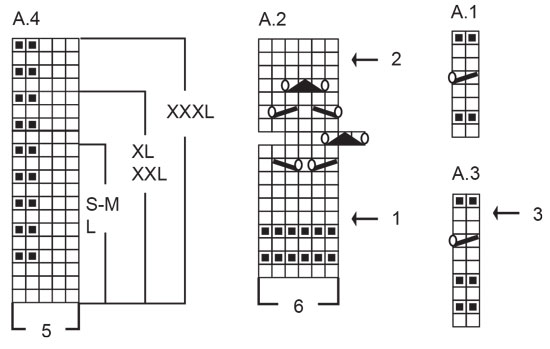
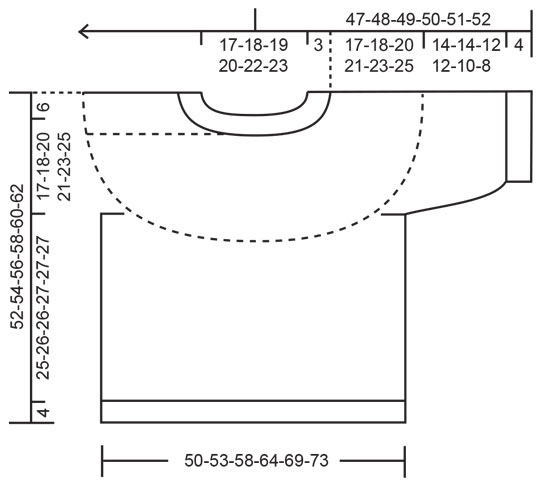
---------------------------------------------------------- EXPLANATION FOR THE PATTERN: ---------------------------------------------------------- INCREASE TIP: Increase 1 stitch by making 1 yarn over. On next round work yarn over twisted to avoid holes. PATTERN: See diagrams A.1 to A.4. Diagrams show all rows in pattern seen from the right side. DECREASE TIP (applies to sleeves sizes L, XL, XXL and XXXL): Decrease 1 stitch on each side of marker thread as follows: Work until 3 stitches remain before marker thread, knit 2 together, knit 2 (marker thread is between these 2 stitches), slip 1 stitch knitwise, knit 1, pass slipped stitch over stitch worked (2 stitches decreased). ---------------------------------------------------------- START THE PIECE HERE: ---------------------------------------------------------- JUMPER - SHORT OVERVIEW OF THE PIECE: Work neck edge and yoke in the round on circular needle from mid back, top down. Now divide yoke for body and sleeves. Work the body in the round on circular needle. Work sleeves in the round on double pointed needles/a short circular needle. NECK EDGE: Cast on 122-126-130-136-142-148 stitches on short circular needle size 3 mm with DROPS Muskat or DROPS Cotton Merino. Knit 1 round. Then work rib (= knit 1/purl 1) for 3 cm. When rib is done, knit 1 round while at the same time increasing 36-38-40-44-48-52 stitches evenly - read INCREASE TIP = 158-164-170-180-190-200 stitches. Insert 1 marker in middle of round. Measure yoke from this marker. YOKE: Switch to circular needle size 4 mm. Work A.1 in the round on yoke. When A.1 has been worked, continue in stocking stitch in the round. REMEMBER THE KNITTING TENSION! When piece measures 4-4-5-5-6-6 cm from marker, increase 40-44-50-56-60-64 stitches evenly – remember INCREASE TIP = 198-208-220-236-250-264 stitches. When piece measures 7-7-8-8-9-10 cm from marker, work A.2 in the round on yoke. NOTE! On 11th round in diagram displace beginning of round 2 stitches to the right to make the pattern fit the entire round. Then begin next round as before. AT THE SAME TIME on every round marked with arrow in diagram increase evenly as follows: Arrow-1: Increase 42-44-50-58-62-66 stitches evenly = 240-252-270-294-312-330 stitches (there is now room for 40-42-45-49-52-55 repetitions of A.2 in the round on yoke). Arrow-2: Increase 38-42-48-56-58-58 stitches evenly = 278-294-318-350-370-388 stitches. When A.2 has been worked, work A.3 in the round on yoke. AT THE SAME TIME on every round marked with arrow increase evenly as follows: Arrow-3: Increase 32-36-42-50-50-52 stitches evenly = 310-330-360-400-420-440 stitches. When A.3 has been worked, work A.4 in the round on yoke. When A.4 has been worked in your size, work in stocking stitch but note that in some sizes divide the body and sleeves as explained below, before A.4 is done. DIVIDING FOR BODY AND SLEEVES: When piece measures 17-18-20-21-23-25 cm from marker, divide yoke for body and sleeves. If A.4 is not done in your size, finish A.4 on body and sleeves. Work 47-51-55-61-65-69 stitches as before (half back piece), slip the next 60-64-70-78-80-82 stitches on a thread for sleeve, cast on 10-10-12-12-14-16 new stitches on needle (in the side under sleeve), work 95-101-110-122-130-138 stitches in stocking stitch (front piece), slip the next 60-64-70-78-80-82 stitches on a thread for sleeve, cast on 10-10-12-12-14-16 new stitches on needle (in the side under sleeve), and work the last 48-50-55-61-65-69 stitches as before (half back piece). Finish body and sleeves separately. Now measure piece from here. BODY: = 210-222-244-268-288-308 stitches. If A.4 is not done on yoke in your size, finish A.4 (the pattern will not fit mid under each sleeve, but make sure that pattern is continued correctly over stitches from yoke and work pattern as far as possible in towards each side under sleeves, work the remaining stitches in stocking stitch). When A.4 has been worked, continue in stocking stitch. When 6-6½-7-7-7½-7½ cm in stocking stitch have been worked after A.4, work A.3 in the round on body. When A.3 has been worked, work in stocking stitch for 6-6½-7-7-7½-7½ cm. Then work A.3 in the round on body again. When A.3 has been worked, continue in stocking stitch. When piece measures 25-26-26-27-27-27 cm from division, knit 1 round while increasing 20-22-22-26-28-30 stitches evenly = 230-244-266-294-316-338 stitches. Switch to circular needle size 3 mm. Work rib (knit 1/purl 1) for 4 cm. Loosely cast off. Jumper measures approx. 52-54-56-58-60-62 cm from shoulder. SLEEVES: Slip the 60-64-70-78-80-82 stitches from thread in one side of piece on double pointed needles or a short circular needle size 4 mm and pick in addition up 1 stitch in each of the 10-10-12-12-14-16 stitches cast on under sleeve = 70-74-82-90-94-98 stitches. Insert 1 marker thread mid under sleeve (in the middle of the 10-10-12-12-14-16 stitches). Begin round at marker thread. If A.4 is not done on yoke in your size, finish A.4 (the pattern will not fit mid under sleeve, but make sure that pattern is continued correctly over stitches from yoke and work pattern as far as possible towards mid under sleeves, work the remaining stitches in stocking stitch). When A.4 has been worked, continue in stocking stitch in the round. In size L, XL and XXXL decrease stitches mid under sleeve as explained below (in S and M no stitches are decreased). SIZE L, XL, XXL AND XXXL: When sleeve measures 4-3-3-2 cm from division, decrease 2 stitches mid under sleeve - read DECREASE TIP. Decrease like this every 4-3-3-2 cm 2-3-3-3 times in total = 78-84-88-92 stitches. ALL SIZES: When sleeve measures 14-14-12-11-10-8 cm from division, knit 1 round while decreasing 4-6-8-10-10-10 stitches evenly = 66-68-70-74-78-82 stitches. Switch to double pointed needles size 3 mm. Work rib (knit 1/purl 1) for 4 cm. Loosely cast off. Sleeve measures approx. 18-18-16-16-14-12 cm from division. Work the other sleeve the same way. |
||||||||||||||||||||||
Diagram explanations |
||||||||||||||||||||||
|
||||||||||||||||||||||
 |
||||||||||||||||||||||
 |
||||||||||||||||||||||
Have you finished this pattern?Tag your pictures with #dropspattern #greengrovetee or submit them to the #dropsfan gallery. Do you need help with this pattern?You'll find 28 tutorial videos, a Comments/Questions area and more by visiting the pattern on garnstudio.com. © 1982-2026 DROPS Design A/S. We reserve all rights. This document, including all its sub-sections, has copyrights. Read more about what you can do with our patterns at the bottom of each pattern on our site. |
||||||||||||||||||||||


With over 40 years in knitting and crochet design, DROPS Design offers one of the most extensive collections of free patterns on the internet - translated to 17 languages. As of today we count 324 catalogues and 12290 patterns translated into English (UK/cm).
We work hard to bring you the best knitting and crochet have to offer, inspiration and advice as well as great quality yarns at incredible prices! Would you like to use our patterns for other than personal use? You can read what you are allowed to do in the Copyright text at the bottom of all our patterns. Happy crafting!
Post a comment to pattern DROPS 239-26
We would love to hear what you have to say about this pattern!
If you want to leave a question, please make sure you select the correct category in the form below, to speed up the answering process. Required fields are marked *.