
Popular categories
Looking for a yarn?


Comments / Questions (11)
![]() Madeleine wrote:
Madeleine wrote:
J'ai acheté 11 balles de Drops Mérino pour ce modèle et je suis choquée de cette commande. La laine est vraiment de mauvaise qualité avec des noeuds ( parfois3) dans chaque balle et des brins qui sont cassés à plusieurs endroits d'un même balle et qui dédouble le fil. Je m'attendais à de la qualité à ce prix là. Première et dernière commande pour de la laine Drops
21.06.2025 - 07:09
![]() Isabelle wrote:
Isabelle wrote:
Bonjour. Je tricote les manches en rond mais lorsque je tricote le motif A3 la fin du rang n\'est pas en face du début de rang. Je vois un décalage du motif . Comment faire pour aligner les rangs en tricotant le motif? Merci par avance de votre réponse. Isabelle
26.03.2025 - 16:18DROPS Design answered:
Bonjour Isabelle, pour aligner les côtes mousse à la transition entre les tours, vous pouvez légèrement serrer le fil au début du tour endroit juste après le tour envers pour essayer d'aligner la première et la dernière maille envers du tour. Bon tricot!
27.03.2025 - 07:55
![]() Isabelle wrote:
Isabelle wrote:
Merci de la rapidité et la clarté de votre réponse.
10.03.2025 - 10:35
![]() Isabelle wrote:
Isabelle wrote:
Bonjour pour les motifs A2 le nombre de mailles est de 283 mailles(taille L) mais si j'enlève 12 mailles de bordures il reste 271 mailles. Cela ne correspond pas aux motifs A2a+A2b qui font 13 mailles + 6 mailles restantes pour A2c .283-12( pour bordures) =271mailles ce qui fait 20 motifs A2a+A2c soit 20×13= 260 mailles donc j'ai 11 mailles de trop. Je ne comprends pas. Pouvez-vous m'aider? Merci
09.03.2025 - 17:34DROPS Design answered:
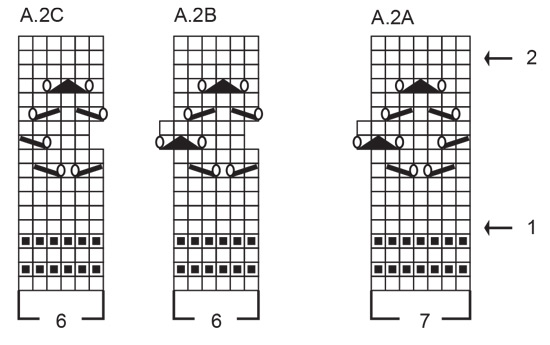
Bonjour Isabelle, lorsque vous tricotez les diagrammes A.2, le diagramme A se fait une seule fois au début du rang sur l'endroit (à la fin sur l'envers), on répète ensuite le B et on termine par le C (début sur l'envers), soit avec 283 mailles au début: 6 m point mousse, 7 m de A.2A, 43 fois les 6 mailles de A.2B, 6 mailles de A.2C et 6 m point mousse soit 6+7+(43x6)+6+6=283. Bon tricot!
10.03.2025 - 09:44
![]() Laura Koskimies-Dickins wrote:
Laura Koskimies-Dickins wrote:
Hi, when the stitch pattern on row 9 has a yarn over marked with a slash-circle-circle-slash, should it be knitted like this: knit two stitches together, yarn over, knit one stitch, yarn over, slip one stitch, knit one stitch, and pass the slipped stitch over?"
13.10.2024 - 08:29DROPS Design answered:
Dear Mrs Koskimies-Dickins, on row 9 in A.2A work: (K1, K2 tog, YO, K1, YO, slip 1 as if to K, psso, K1). Happy knitting!
14.10.2024 - 08:35
![]() Laura wrote:
Laura wrote:
I am new to knitting, and I wonder when it says a.2a, a.2b and a2c (- 6 both ends), do I knit the whole round according the 2a 2b and 2c ? Hope you got my question...
09.10.2024 - 21:13DROPS Design answered:
Dear Laura, work as follows: 6 front band sts as before, then work the 7 stitches A.2A, now repeat the 6 stitches A.2B until 12 stitches remain, and finish row with the 6 sts A.2C and 6 front band stitches as before, from WS read diagrams from the left towards the right and work A.2C, repeat A.2B and finish with A.2A before front band sts. Happy knitting!
10.10.2024 - 09:10
![]() Diana wrote:
Diana wrote:
Wat zijn de afmetingen van dit vest in de verschillende maten? De patroontekening ontbreekt namelijk. Vriendelijke groet, Diana Labrie
12.03.2023 - 21:05DROPS Design answered:
Dag Diana,
Helemaal onderaan het patroon, onder de telpatronen, vind je de maattekening.
14.03.2023 - 20:44
![]() María Del Carmen wrote:
María Del Carmen wrote:
Arena
20.01.2023 - 16:13
![]() Marja Stoelwinder wrote:
Marja Stoelwinder wrote:
Mooie vest
18.01.2023 - 08:59
![]() Doris wrote:
Doris wrote:
Sehr schöne Jacke, immer tragbar.
18.01.2023 - 07:58
|
||||||||||||||||||||||
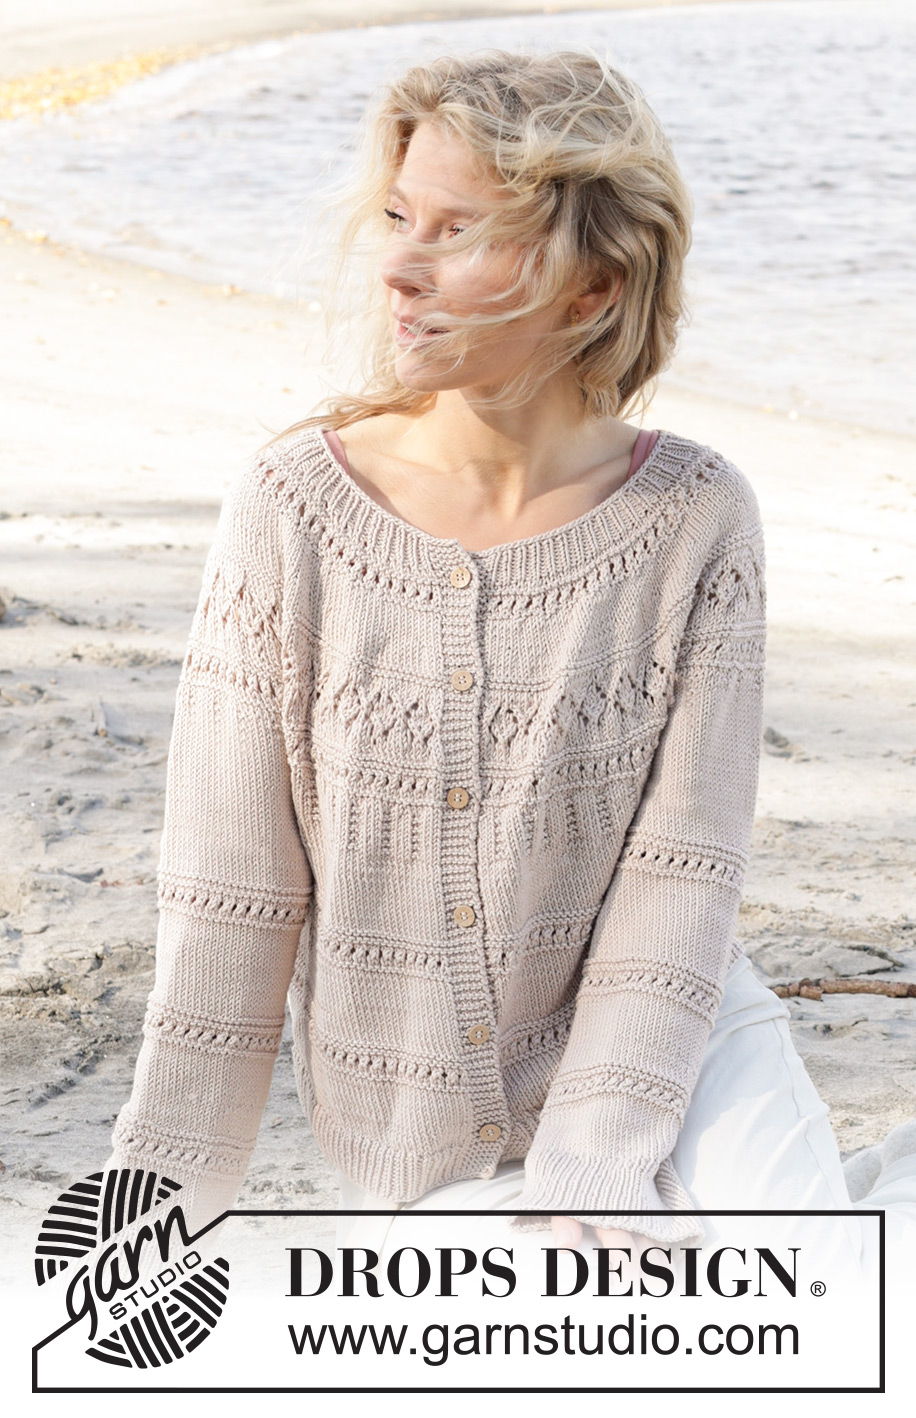
Sand Piper Cardigan#sandpipercardigan |
||||||||||||||||||||||
 |
 |
|||||||||||||||||||||
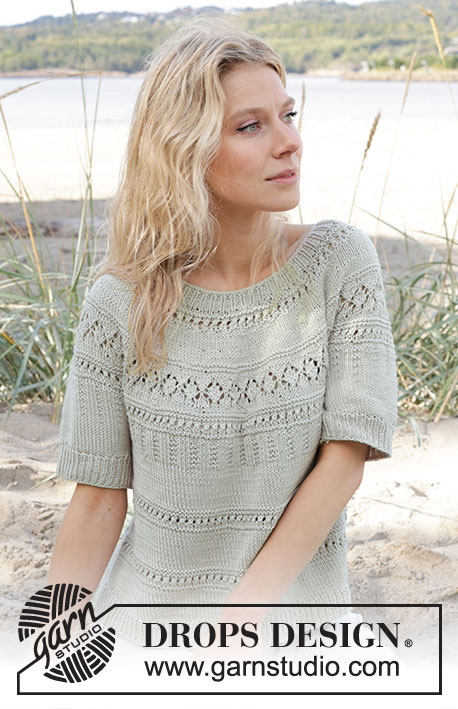
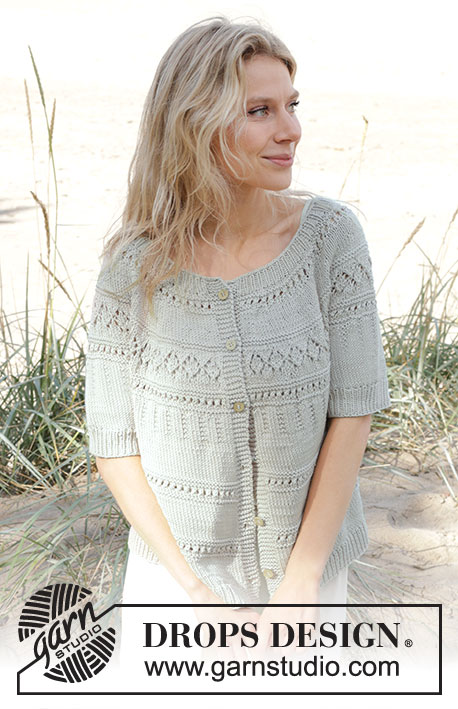
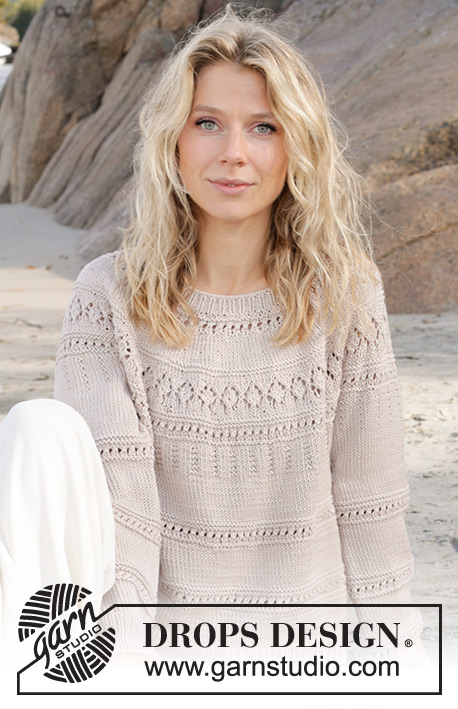
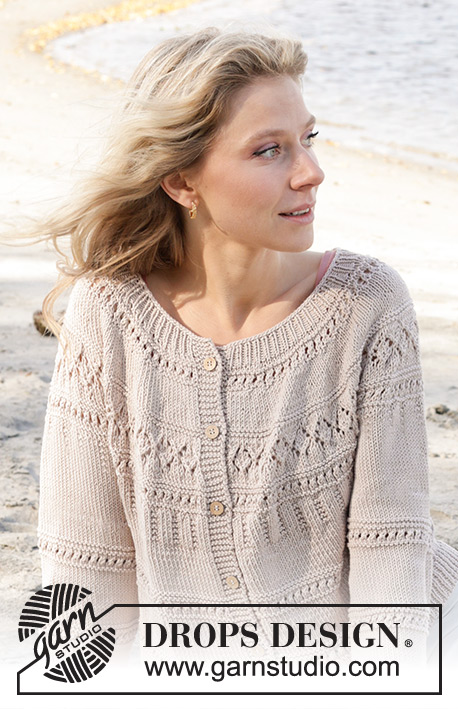
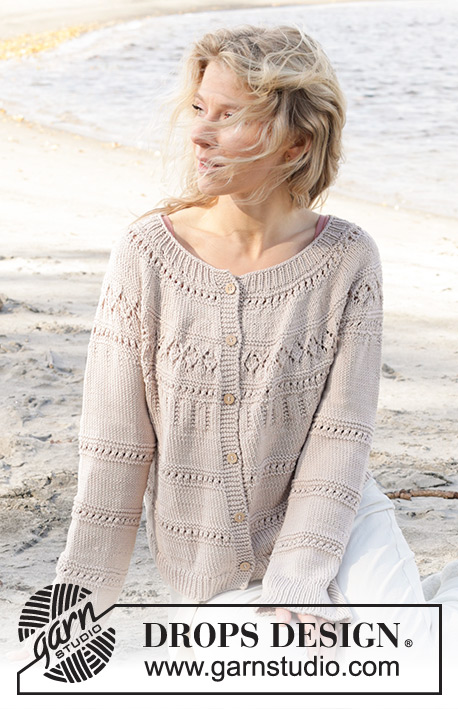
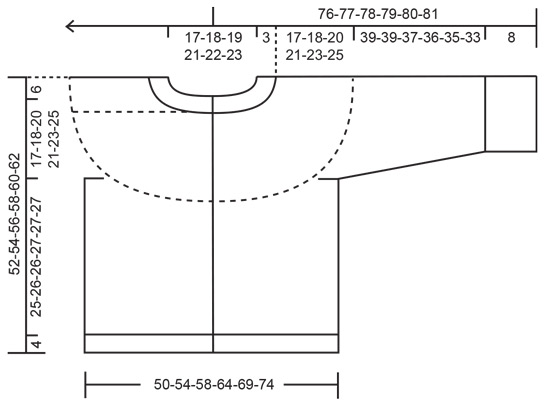
Knitted jacket in DROPS Muskat or DROPS Cotton Merino. The piece is worked top down, with round yoke and lace pattern. Sizes S - XXXL.
DROPS 239-3 |
||||||||||||||||||||||
|
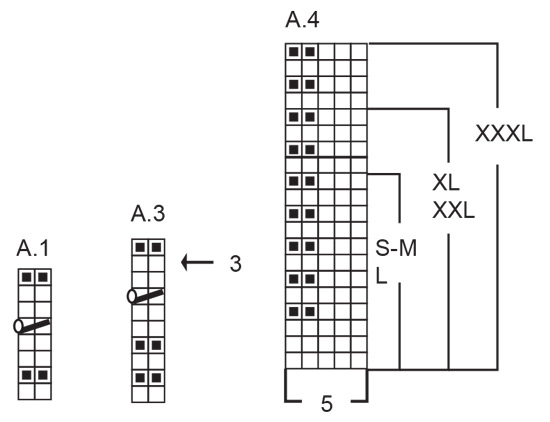
------------------------------------------------------- EXPLANATIONS FOR THE PATTERN: ------------------------------------------------------- RIDGE/GARTER STITCH (worked back and forth): Knit all rows. 1 ridge = knit 2 rows. INCREASE TIP: Increase 1 stitch by making 1 yarn over, which is worked twisted on the next row to avoid a hole. PATTERN: See diagrams A.1 to A.4. The diagrams show all rows in the pattern from the right side. DECREASE TIP (for sleeves): Decrease 1 stitch on either side of the marker-thread as follows: Work until there are 3 stitches left before the marker-thread, knit 2 together, knit 2 (marker-thread sits between these 2 stitches), slip 1 stitch as if to knit, knit 1 and pass the slipped stitch over the knitted stitch (2 stitches decreased). BUTTONHOLES: Work buttonholes on the right band (when the garment is worn). Work from the right side when there are 4 stitches left on the row as follows: Make 1 yarn over, knit 2 together and knit 2. On the next row (wrong side), knit the yarn over to leave a hole. The first buttonhole is worked on the first row from the right side when the neck is finished. Then work the other 5-5-5-6-6-6 buttonholes with approx. 8-8½-9-8-8-8½ cm between each one. ------------------------------------------------------- START THE PIECE HERE: ------------------------------------------------------- JACKET – SHORT OVERVIEW OF THE PIECE. The neck and yoke are worked back and forth with circular needle, from mid front and top down. The yoke is divided for body and sleeves and the body continued back and forth with circular needle. The sleeves are worked in the round with double pointed needles/short circular needle. NECK: Cast on 133-137-143-149-155-161 stitches with circular needle size 3 mm and DROPS Muskat or DROPS Cotton Merino. Purl 1 row from the wrong side. Work the next row from the right side as follows: 6 band stitches in GARTER STITCH – read description above, * knit 1, purl 1 *, work from *-* until there are 7 stitches left, knit 1 and 6 band stitches in garter stitch. Continue this rib for 3 cm. After the rib, work as follows from the wrong side: 6 band stitches in garter stitch, purl until there are 6 stitches left, at the same time increase 36-38-40-44-48-50 stitches evenly spaced – read INCREASE TIP, 6 band stitches in garter stitch = 169-175-183-193-203-211 stitches. Insert 1 marker after the band at the beginning of the row. The yoke is measured from this marker. YOKE: Change to circular needle size 4 mm. Work as follows from the right side: 6 band stitches in garter stitch, work A.1 until there are 7 stitches left, work the first stitch in A.1 (on row 5 in the diagram this stitch is knitted), 6 band stitches in garter stitch (the yarn overs from the increases are knitted twisted to avoid holes). Remember the BUTTONHOLES on the right band – read description above. REMEMBER THE KNITTING TENSION! When A.1 is finished, work stocking stitch back and forth with 6 band stitches in garter stitch on each side. When the yoke measures 4-4-5-5-6-6 cm from the marker, increase 42-44-50-56-60-66 stitches evenly spaced (do not increase over the bands) = 211-219-233-249-263-277 stitches. When the yoke measures 7-7-8-8-9-10 cm from the marker, work the next row from the right side as follows: 6 band stitches in garter stitch, A.2A, work A.2B until there are 12 stitches left, work A.2C and 6 band stitches in garter stitch. Continue this pattern and on each row marked with an arrow in the diagram increase as follows (do not increase over the bands): Arrow-1: Increase 42-46-50-58-62-66 stitches evenly spaced = 253-265-283-307-325-343 stitches (there is now room for 38-40-43-47-50-53 repeats of A.2B). Arrow-2: Increase 38-42-46-56-58-58 stitches evenly spaced = 291-307-329-363-383-401 stitches. When A.2 is finished work the next row as follows from the right side: 6 band stitches in garter stitch, work A.3 until there are 7 stitches left, work the first stitch in A.3 (on row 7 in the diagram this stitch is knitted), 6 band stitches in garter stitch. Continue this pattern and increase on the row marked with an arrow as follows: Arrow-3: Increase 29-38-41-47-52-54 stitches evenly spaced = 320-345-370-410-435-455 stitches. When A.3 is finished work the next row from the right side: 6 band stitches in garter stitch, work A.4 until there are 9 stitches left, work the first 3 stitches in A.4 so the pattern is symmetrical, 6 band stitches in garter stitch. Continue this pattern. When A.4 is finished in your size, continue with stocking stitch and 6 band stitches in garter stitch on each side; , be aware that in some sizes A.4 is not finished when you start dividing for the body and sleeves. DIVIDE FOR BODY AND SLEEVES: When the yoke measures 17-18-20-21-23-25 cm, divide for the body and sleeves; if A.4 is not finished in your size it will be finished on the body and sleeves. Work 53-57-60-66-72-75 stitches as before (front piece), place the next 60-64-70-78-80-82 stitches on a thread for the sleeve, cast on 10-10-12-12-14-16 stitches (in side under sleeve), work 94-103-110-122-131-141 stitches (back piece), place the next 60-64-70-78-80-82 stitches on a thread for the sleeve, cast on 10-10-12-12-14-16 stitches (in side under sleeve), work the last 53-57-60-66-72-75 stitches (front piece). The body and sleeves are finished separately. The piece is now measured from here. BODY: = 220-237-254-278-303-323 stitches. Finish A.4 if necessary in your size (the pattern will not fit under the sleeves – work the remaining stitches in stocking stitch; make sure the pattern continues correctly from the yoke). When A.4 is finished continue with stocking stitch and 6 band stitches in garter stitch on each side; on the first row adjust the stitch-number to 221-237-255-279-303-323 stitches (if A.4 was finished on the yoke, adjust the stitch number on the first row on the body). When you have worked 6-6½-7-7-7½-7½ cm stocking stitch after A.4, work the next row from the right side as follows: * 6 band stitches in garter stitch, work A.3 until there are 7 stitches left, work the first stitch in A.3 (on row 7 in the diagram this stitch is knitted), 6 band stitches in garter stitch *. When A.3 is finished, continue with stocking stitch and 6 band stitches in garter stitch on each side for 6-6½-7-7-7½-7½ cm, with the next row from the right side. Work from *-* one more time. When A.3 is finished continue with stocking stitch and 6 band stitches in garter stitch on each side. When the body measures 25-26-26-27-27-27 cm from the division, knit 1 row from the right side and increase 22-24-24-26-26-28 stitches evenly spaced (do not increase over the bands) = 243-261-279-305-329-351 stitches. Change to circular needle size 3 mm. Work the next row from the wrong side: 6 band stitches in garter stitch, * purl 1, knit 1 *, work from *-* until there are 7 stitches left, purl 1 and 6 band stitches in garter stitch. Continue this rib for 4 cm. Cast off a little loosely. The jacket measures approx. 52-54-56-58-60-62 cm from the shoulder. SLEEVES: Place the 60-64-70-78-80-82 stitches from the thread on the one side of the piece on short circular needle/double pointed needles size 4 mm and knit up 1 stitch in each of the new stitches cast on under the sleeve = 70-74-82-90-94-98 stitches. Insert a marker in the middle of the new stitches under the sleeve. Start at the marker thread. Finish A.4 if necessary in your size (the pattern will not fit under the sleeves – work the remaining stitches in stocking stitch; make sure the pattern continues correctly from the yoke). When A.4 is finished continue with stocking stitch. You will now start to decrease and work pattern. Read DECREASE and PATTERN before continuing! DECREASE: When the sleeve measures 4-4-4-4-3-3 cm from the division, decrease 2 stitches under the sleeve – read DECREASE TIP. Decrease like this every 8-8-4-3-2½-2½ cm a total of 5-5-8-11-12-13 times = 60-64-66-68-70-72 stitches. PATTERN: After working 7-8-7-6-5-5 cm stocking stitch, continue as follows: * Work A.3 around the sleeve, then work 7 cm stocking stitch *, work from *-* one more time, then work A.3 one more time. When A.3 is finished, continue with stocking stitch. When the sleeve measures 39-39-37-37-35-33 cm, knit 1 round and increase 12-12-12-12-14-14 stitches evenly spaced = 72-76-78-80-84-86 stitches. Change to double pointed needles size 3 mm. Work rib (knit 1, purl 1) for 8 cm. Cast off a little loosely. The sleeve measures approx. 47-47-45-45-43-41 cm. Work the other sleeve in the same way. ASSEMBLY: Sew the buttons onto the left band. |
||||||||||||||||||||||
Diagram explanations |
||||||||||||||||||||||
|
||||||||||||||||||||||
|
||||||||||||||||||||||
|
||||||||||||||||||||||
|
||||||||||||||||||||||
Have you finished this pattern?Tag your pictures with #dropspattern #sandpipercardigan or submit them to the #dropsfan gallery. Do you need help with this pattern?You'll find 32 tutorial videos, a Comments/Questions area and more by visiting the pattern on garnstudio.com. © 1982-2025 DROPS Design A/S. We reserve all rights. This document, including all its sub-sections, has copyrights. Read more about what you can do with our patterns at the bottom of each pattern on our site. |
||||||||||||||||||||||


With over 40 years in knitting and crochet design, DROPS Design offers one of the most extensive collections of free patterns on the internet - translated to 17 languages. As of today we count 314 catalogues and 11822 patterns translated into English (UK/cm).
We work hard to bring you the best knitting and crochet have to offer, inspiration and advice as well as great quality yarns at incredible prices! Would you like to use our patterns for other than personal use? You can read what you are allowed to do in the Copyright text at the bottom of all our patterns. Happy crafting!
Post a comment to pattern DROPS 239-3
We would love to hear what you have to say about this pattern!
If you want to leave a question, please make sure you select the correct category in the form below, to speed up the answering process. Required fields are marked *.