
Popular categories
Looking for a yarn?


Comments / Questions (46)
![]() Andrea Baumann wrote:
Andrea Baumann wrote:
Ist es richtig, dass man am Schluss des Rumpfes Maschen ZUNEHMEN muss, bevor das Rippenmuster gestrickt wird? Ich kenne es eher, dass die Maschen entweder so bleiben oder abgenommen werden.
01.04.2026 - 12:55DROPS Design answered:
Liebe Frau Baumann, ja so ist es richtig, man braucht mehr Maschen für Rippenmuster mit kleineren Nadeln als für Glattrechts mit grösseren Nadeln, deshalb soll man zunehmen, so wird das Bündchen die Arbeit nicht zusammenziehen. Viel Spaß beim Stricken!
07.04.2026 - 16:19
![]() Ninnu wrote:
Ninnu wrote:
Monissa ohjeissa mainitaan aloituskohta takaa keskeltä, mutta tässä ei ole mainintaa mistä kohtaa esim. raidoitus tulisi aloittaa vai tulisiko se aloittaa merkkilangasta (takaa keskeltä)?
27.02.2026 - 14:21DROPS Design answered:
Hei, kerroksen vaihtumiskohta on hihan ja takakappaleen rajakohdassa. Eli kerroksen ensimmäinen silmukka on ensimmäisellä merkillä merkitty silmukka.
02.03.2026 - 18:56
![]() Yvette wrote:
Yvette wrote:
Bonjour , j’aimerai faire une réhausse sur le dos. Faut il la faire après les augmentations indiquées et sur combien de mailles ? Après les 10 m d’augmentation le dos compte 43 m. Merci d’avance et bonne journée. Cordialement Yvette
05.02.2026 - 06:24DROPS Design answered:
Bonjour Yvette, vous pouvez tricoter la réhausse comme indiqué dans cette vidéo (ajustez le nombre de rangs raccourcis en fonction de la hauteur souhaitée pour la réhausse), après les augmentations de la fin du col, autrement dit, en même temps que vous tricotez les premières augmentations du raglan (attention, la vidéo montre la technique, pour le nombre d'augmentations, basez-vous bien sur les explications du pull). Bon tricot!
06.02.2026 - 16:51
![]() Thérèse wrote:
Thérèse wrote:
Should the sweater have short rows, so that the front does not choke us?
08.01.2026 - 23:35DROPS Design answered:
Hi Therese, This pattern does not have short rows as the neck is quite loose. However, you can work an elevation at the back of the neckline if you wish. Here is a link to our video on how to work an elevation with short rows: https://www.garnstudio.com/video.php?id=894&lang=us Regards, Drops Team.
09.01.2026 - 06:40
![]() Merle wrote:
Merle wrote:
Hej, Wann nehme ich welche Länge der Rundnadeln?
29.11.2025 - 22:21DROPS Design answered:
Liebe Frau Merle, beginnen Sie mit der kürzeren Nadel, und wenn es dann zuviele Maschen für die 40 cm Nadel wechseln Sie für die längere. Sie können auch direkt mit der längeren Nadel mit Magic Loop Technik stricken. Viel Spaß beim Stricken!
01.12.2025 - 08:56
![]() Doris wrote:
Doris wrote:
Hallo liebes Drops-Team! Ich habe nur eine kurze Frage: entscheide ich selber, wann ich welche Stricknadellänge nehme und ob ich die kurze Nadellänge ( 40cm) nehme oder ein Nadelspiel? Vielen Dank im voraus! VG Doris
11.11.2025 - 12:46DROPS Design answered:
Liebe Doris, also die 40 cm Rundnadel benutzen Sie wenn es genügend Maschen dafür sind, und dann nach Abnahmen können Sie mit einem Nadelspiel stricken. Viel Spaß beim Stricken!
21.11.2025 - 14:43
![]() Cecile wrote:
Cecile wrote:
Quelle est en cm l'aisance idéale pour ce modèle svp?
02.11.2025 - 20:38DROPS Design answered:
Bonjour Cécile, mesurez un pull similaire que vous avez et dont vous aimez la forme et comparez ces mesures à celles du schéma en bas de page, vous trouverez ainsi la taille adéquate et l'aisance souhaitée. Retrouvez plus d'infos ici. Bon tricot!
03.11.2025 - 08:54
![]() Kari wrote:
Kari wrote:
Hei. Blir det riktig at jeg skal starte fargestifte i midtmasken med merke nr1? Blir det rett at dette er begynnelsen av omgangen?
30.09.2025 - 21:13DROPS Design answered:
Hei Karl, 1. merke er satt i den 2. masken på omgangen. Omgangen begynner bak på høyre skulder. Hilsen Drops Team.
01.10.2025 - 06:53
![]() Lisa wrote:
Lisa wrote:
Hi, ich würde meinen Pulliver gerne flauschiger haben, welche wolle könnte ich benutzen, bei der sich die Anleitung nicht verändert?
10.08.2025 - 11:55DROPS Design answered:
Liebe Lisa, hier finden Sie alle unsere Modellen für 22-20 Maschen Maschenprobe, filtern und sortieren Sie diese Anleitungen, so finden Sie alle mögliche Garne. Gerne kann Ihnen Ihr DROPS Händler auch per E-Mail oder Telefon die beste passende Garne empfehlen. Viel Spaß beim Stricken!
11.08.2025 - 07:58
![]() Margaret Birks wrote:
Margaret Birks wrote:
Does this mean that i only increase on raglan every 2 nd round , and every round raglans plus back and front in sleeves .?
19.05.2025 - 16:07DROPS Design answered:
Dear Mrs Birks, you first increase 8 sts on every other round (until you get 198-338 sts), then you will increase alternetaly 4 sts = only at the beginning + at the end of front/back piece (not on sleeves) on every other round and 8 sts = at the beginning + at the end of front/back pieces and sleeves. Happy knitting!
19.05.2025 - 16:13
|
|
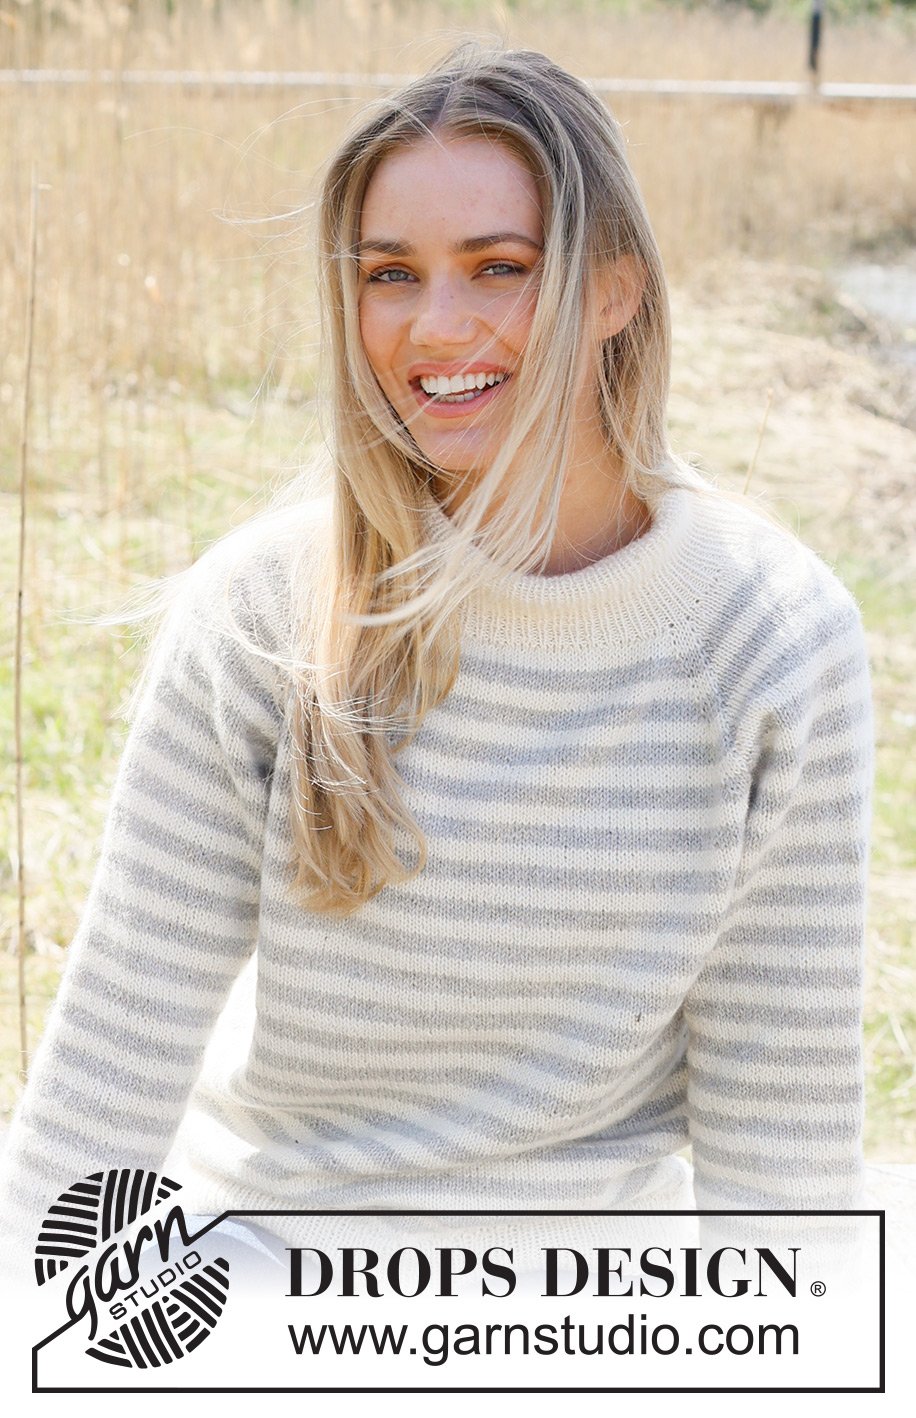
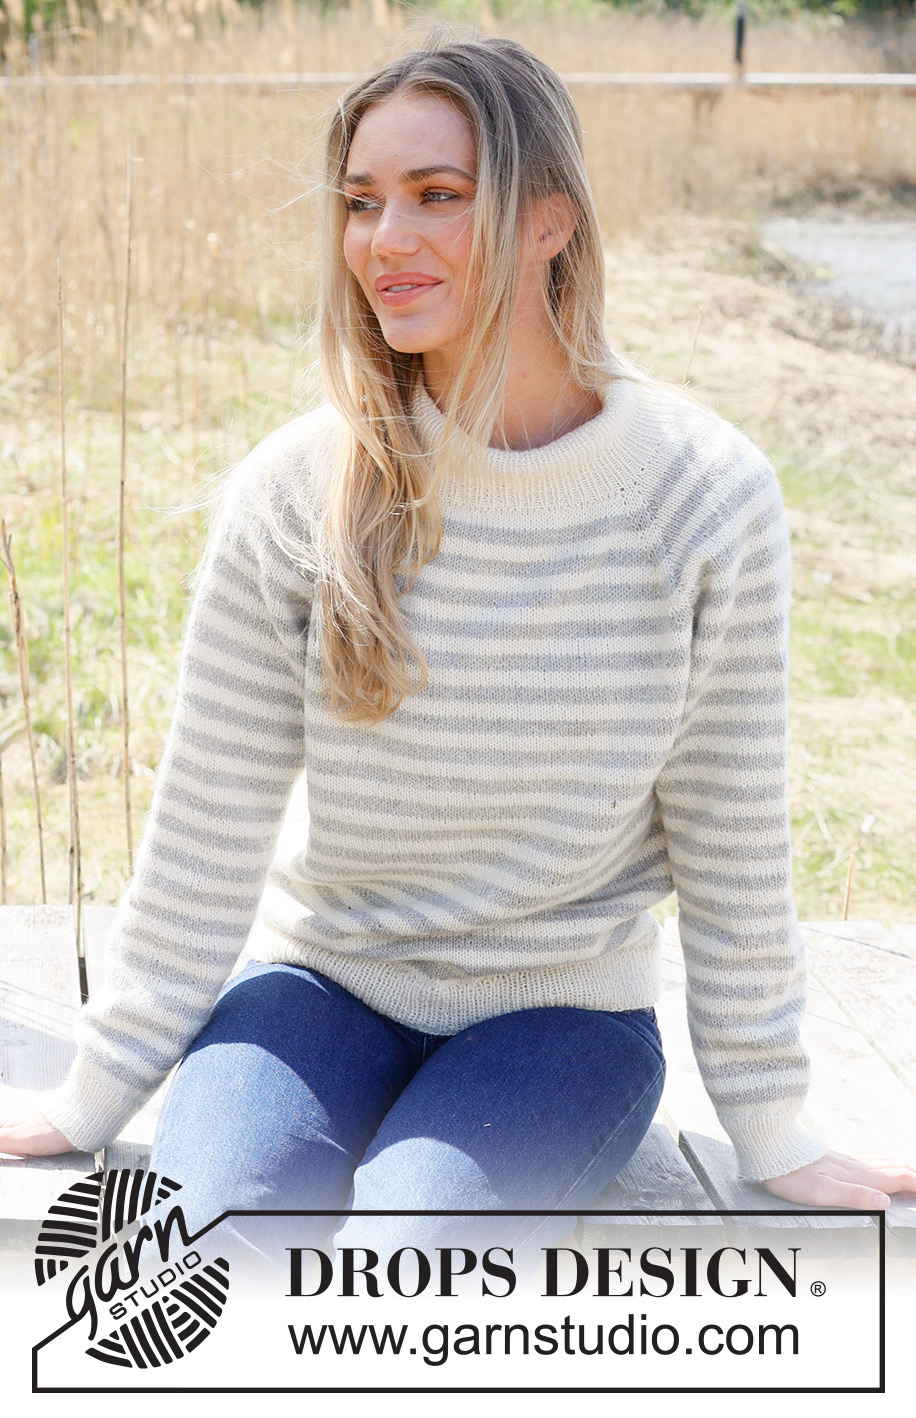
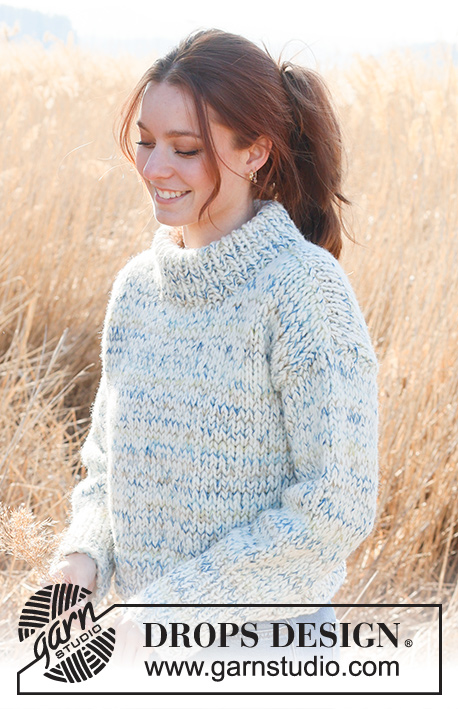
Latitude#latitudesweater |
|
 |
 |
Knitted jumper in DROPS Karisma or DROPS Puna. The piece is worked top down with double neck, raglan and stripes. Sizes S - XXXL.
DROPS 235-18 |
|
|
------------------------------------------------------- EXPLANATIONS FOR THE PATTERN: ------------------------------------------------------- RAGLAN: Increase 1 stitch on each side of 3 stitches (marker-stitch is the middle of these 3 stitches) in each transition between the body and sleeves: Increase 1 stitch by making 1 yarn over which is then knitted twisted on the next round = no hole. Work the new stitches in stocking stitch. STRIPES: * 4 rounds with colour off white, 4 rounds with colour light pearl grey/light grey *, repeat from *-*. DECREASE TIP (for sleeves): Decrease 1 stitch on either side of the marker as follows: Work until there are 3 stitches left before the marker, knit 2 together, knit 2 (marker sits between these 2 stitches), slip 1 stitch as if to knit, knit 1 and pass the slipped stitch over the knitted stitch (2 stitches decreased). ------------------------------------------------------- START THE PIECE HERE: ------------------------------------------------------- JUMPER – SHORT OVERVIEW OF THE PIECE: The neck, yoke and body are worked in the round with circular needle, top down. The sleeves are worked in the round with short circular needle/double pointed needles. DOUBLE NECK: Cast on 108-112-118-124-128-134 stitches with short circular needle size 4 mm and colour off white DROPS Karisma or DROPS Puna. Change to circular needle size 3 mm and work rib in the round (knit 1, purl 1) for 13 cm (the neck is folded double later). YOKE: Change to circular needle size 4 mm. Insert 4 markers while working the next round as follows: Knit 1 and insert marker-1 in this stitch, knit 27 (sleeve), knit 1 and insert marker-2 in this stitch, knit 25-27-30-33-35-38 (front piece), knit 1 and insert marker-3 in this stitch, knit 27 (sleeve), knit 1 and insert marker-4 in this stitch, knit 25-27-30-33-35-38 (back piece). Knit 1 round and increase 5-7-5-10-11-18 stitches evenly between markers 2 and 3 (30-34-35-43-46-56 stitches on the front piece) and between markers 4 and 1 (30-34-35-43-46-56 stitches on the back piece) = 118-126-128-144-150-170 stitches. Insert a marker-thread between markers 4 and 1; the yoke is measured from here. Continue with stocking stitch, increase to RAGLAN and work STRIPES – read descriptions above. Increase every 2nd round 10-13-18-17-20-21 times = 198-230-272-280-310-338 stitches. REMEMBER THE KNITTING TENSION! Continue increases for raglan, but every 2nd increase is only worked on body (4 stitches increased on these rounds), i.e. increase on every 2nd round on the body and on every 4th round on the sleeves. Increase like this 20-20-18-20-20-22 times on the body (10-10-9-10-10-11 times on the sleeves). You have now increased a total of 30-33-36-37-40-43 times on the body and 20-23-27-27-30-32 times on the sleeves. There are now for the body 90-100-107-117-126-142 stitches between markers 2 and 3 and between markers 4 and 1, and there are for the sleeves 67-73-81-81-87-91 stitches between markers 1 and 2 and between markers 3 and 4. When all the increases to body and sleeves are finished there are 318-350-380-400-430-470 stitches. Continue with stocking stitch and stripes until the yoke measures 23-24-26-27-29-31 cm from the marker-thread. Now divide for the body and sleeves as follows: Knit 1 (marker-stitch 1 belongs to the back piece), place the next 67-73-81-81-87-91 stitches on 1 thread for the sleeve, cast on 8-8-8-10-10-10 stitches under the sleeve, work 92-102-109-119-128-144 stitches (front piece), place the next 67-73-81-81-87-91 stitches on 1 thread for the sleeve, cast on 8-8-8-10-10-10 stitches under the sleeve, work the last 91-101-108-118-127-143 stitches (rest of the back piece). The body and sleeves are finished separately. THE PIECE IS NOW MEASURED FROM HERE. BODY: = 200-220-234-258-276-308 stitches. Continue in the round with stocking stitch and stripes for a further 26-27-27-28-28-28 cm – adjust, finishing after at least 2 rounds of colour off-white (5 cm left to finished length) and complete the piece in off-white. Change to circular needle size 3 mm. Knit 1 round and increase 20-20-24-26-26-28 stitches evenly spaced = 220-240-258-284-302-336 stitches. Work rib (knit 1, purl 1) for 5 cm. Cast off with knit over knit and purl over purl. The jumper measures approx. 60-62-64-66-68-70 cm from the shoulder down. SLEEVES: Place the 67-73-81-81-87-91 stitches from the thread on the one side of the piece on short circular needle/double pointed needles size 4 mm and knit up 1 stitch in each of the new stitches cast on under the sleeve = 75-81-89-91-97-101 stitches. Insert a marker in the middle of the new stitches under the sleeve. Allow the marker to follow your work onwards; it will be used when decreasing under the sleeve. Continue in the round with stocking stitch and stripes for 5 cm. Now decrease 2 stitches under the sleeve – read DECREASE TIP. Decrease like this every 3-2½-2-1½-1½-1 cm a total of 10-12-15-15-16-17 times = 55-57-59-61-65-67 stitches. Continue working until the sleeve measures 37-37-35-34-33-31 cm from the division – adjust, finishing after at least 2 rounds of colour off-white, complete the sleeve in off-white. Change to double pointed needles size 3 mm and knit 1 round where you increase 5-7-5-7-7-5 stitches evenly spaced = 60-64-64-68-72-72 stitches. Change to double pointed needles size 3 mm and work rib (knit 1, purl 1) for 5 cm. Cast off with knit over knit and purl over purl. The sleeve measures approx. 42-42-41-39-38-36 cm from the division. Work the other sleeve in the same way. ASSEMBLY: Fold the neck double to the inside and sew down with a couple of stitches in each transition between body and sleeves. |
|
 |
|
Have you finished this pattern?Tag your pictures with #dropspattern #latitudesweater or submit them to the #dropsfan gallery. Do you need help with this pattern?You'll find 30 tutorial videos, a Comments/Questions area and more by visiting the pattern on garnstudio.com. © 1982-2026 DROPS Design A/S. We reserve all rights. This document, including all its sub-sections, has copyrights. Read more about what you can do with our patterns at the bottom of each pattern on our site. |
|


With over 40 years in knitting and crochet design, DROPS Design offers one of the most extensive collections of free patterns on the internet - translated to 17 languages. As of today we count 324 catalogues and 12290 patterns translated into English (UK/cm).
We work hard to bring you the best knitting and crochet have to offer, inspiration and advice as well as great quality yarns at incredible prices! Would you like to use our patterns for other than personal use? You can read what you are allowed to do in the Copyright text at the bottom of all our patterns. Happy crafting!
Post a comment to pattern DROPS 235-18
We would love to hear what you have to say about this pattern!
If you want to leave a question, please make sure you select the correct category in the form below, to speed up the answering process. Required fields are marked *.