
Popular categories
Looking for a yarn?


Comments / Questions (30)
![]() Maria wrote:
Maria wrote:
Cerco modelli lavorati coi ferri diritti,ma non ne trovo,mi potreste indicare schemi maglioncino,cardigan da donna ,NON lavorati coi ferri circolari? Grazie
09.04.2026 - 13:22DROPS Design answered:
Buonasera Maria, molti dei modelli riportati sul sito sono lavorati con i ferri circolari ma in piano, non in tondo. Buon lavoro!
13.04.2026 - 20:09
![]() Clotilde wrote:
Clotilde wrote:
Bonjour , J’ai sélectionné le modèle Silvère surfer gilet sans manche mais je ne sais pas me servir d\'aiguilles circulaires.Comment puis je faire en utilisant des aiguilles droites pour le nombre de mailles. Avec mes remerciements, Cordialement. Clotilde
02.04.2026 - 15:05DROPS Design answered:
Bonjour Clotilde, comme on tricote le dos et les devants en une seule pièce jusqu'aux emmanchures, vous pouvez utiliser des aiguilles droites, mais il vous faudra tricoter la bordure des emmanchures en rond. Découvrez sinon ici comment adapter un modèle pour des aiguilles droites. Bon tricot!
07.04.2026 - 17:09
![]() Sylvie Meunier wrote:
Sylvie Meunier wrote:
Bonjour, Est-il possible de prendre 2 fils : la drops alpaca et la drops kid silk à la place de la drops air. Merci
30.01.2026 - 12:17DROPS Design answered:
Bonjour Sylvie, c'est possible. N'oubliez pas toutefois de faire un echantillon au préalable. Bon tricot!
30.01.2026 - 12:29
![]() Sofie Pedersen wrote:
Sofie Pedersen wrote:
Når der skal tages ind til ærmegab, er det så kun på retsiden man tager ind? Altså hver anden pind? Og hvad med når man begynder på indtagning til halskant, er der kun på retsiden eller kan det også være vrangsiden?
15.01.2026 - 09:31DROPS Design answered:
Hei Sofie. Her mangler det litt informasjon, så oppskriften er oversendt Design avd. slik at de kan gjennomgå oppskriften og komme med en oppdatering. mvh DROPS Design
30.01.2026 - 07:09
![]() Sina wrote:
Sina wrote:
Sehr anfängerfreundlich, ich bin begeistert!!
19.12.2025 - 21:36
![]() Holly wrote:
Holly wrote:
I wish the comments could be translated into another language, because possibly the answer to my questions are in the comments already.
07.12.2025 - 00:49
![]() Holly wrote:
Holly wrote:
Hello, I am confused by the instructions for binding off armhole stitches. "Bind off on each row from the armhole as follows: 2 stitches 1-1-1-2-2-2 times and 1 stitch 4-7-8-7-10-14 times." 2 stiches 1 time, I understand as bind off 2 stitches on one row, repeat twice (3 in total). Then bind off 2 stitches 2 times??? Why not say bind off 2 stitches for 9 rows? Then the next part bind off 1 stitch 4-7-8-7-10-14.... Is it a total of 50 rows to bind off 1 stitch? Please help me,
07.12.2025 - 00:48DROPS Design answered:
Hi Holly, You bind off 2 stitches for the armhole on the first row , then work back, bind of 1 stitch on the 3rd row, work back, bind off 1 stitch, work back . Finally bind off 2 stitches, work back, then 2 stitches again. This is a total of 5 decrease-rows and 9 rows worked in your size. Remember to begin the decreases for the neckline at the correct length (the binding off for the armhole might not be finished). Regards, Drops Team.
08.12.2025 - 07:51
![]() Nathalie wrote:
Nathalie wrote:
Bonjour, J'ai terminé le devant gauche. J'avais mis en attente les mailles du dos et du devant droit. Je reprends les mailles du devant droit. Dois-je reprendre sur l'envers, là où j'ai interrompu le travail, du côté emmanchure et inverser toutes les instructions du devant gauche ? Ou bien puis-je reprendre sur l'endroit côté ouverture et reprendre sans changement les instructions du devant gauche ? Merci beaucoup de votre aide. Nathalie
26.11.2025 - 10:54DROPS Design answered:
Bonjour Nathalie, vous pouvez reprendre sur l'envers (comme le 1er rang du devant gauche) et procédez de la même façon: rabattez en début de rang à partir de l'emmanchure (= cette fois sur l'envers) et diminuez pour l'encolure en début de rang (= cette fois sur l'endroit). Bon tricot!
26.11.2025 - 16:22
![]() Nathalie wrote:
Nathalie wrote:
Bonjour, Je suis débutante et tricote ce modèle en XL. Je suis au début du devant gauche sur l'envers du travail. - Je cherche quel est le côté de l'emmanchure. Est-ce le côté où il y a les 8 mailles rabattues ? - Si c'est le cas, est-ce que cela veut dire que je vais rabattre tantôt sur l'endroit, tantôt sur l'envers de l'ouvrage ? - Est-ce qu'on rabat sur l'envers comme sur l'endroit ? Merci beaucoup de votre aide. Nathalie
20.11.2025 - 12:49DROPS Design answered:
Bonjour Nathalie, on tricote ici de bas en haut, quand on a tricoté les devants et le dos jusqu'aux emmanchures, on commençait par le devant droit pour finir par le devant gauche sur l'endroit, ainsi, sur l'envers, on commençant par le devant gauche; lorsque vous tricotez le devant gauche sur l'envers, vous commencez par le côté ouverture pour terminer par l'emmanchure et, sur l'endroit, vous commencez par l'emmanchure pour terminer par là où vous relèverez les mailles de la bordure plus tard. Bon tricot!
20.11.2025 - 16:41
![]() Minibou wrote:
Minibou wrote:
Bonjour, Le paragraphe "techniques utilisées" n'est pas bon, il y fait mention de point mousse alors que le gilet est tricoté en jersey et en côtes 2/2. Il serait bon de corriger pour ne pas induire en erreur les tricoteurs
05.11.2025 - 17:00DROPS Design answered:
Bonjour Mme Minibou, dans la section TECHNIQUES EMPLOYÉES: est effectivement décrite la technique du point mousse tricoté en allers et retours, vous allez ensuite tricoter en côtes puis en jersey avec 1 maille lisière au point mousse de chaque côté, raison pour laquelle cette technique est expliquée. Bon tricot!
06.11.2025 - 09:09
|
|
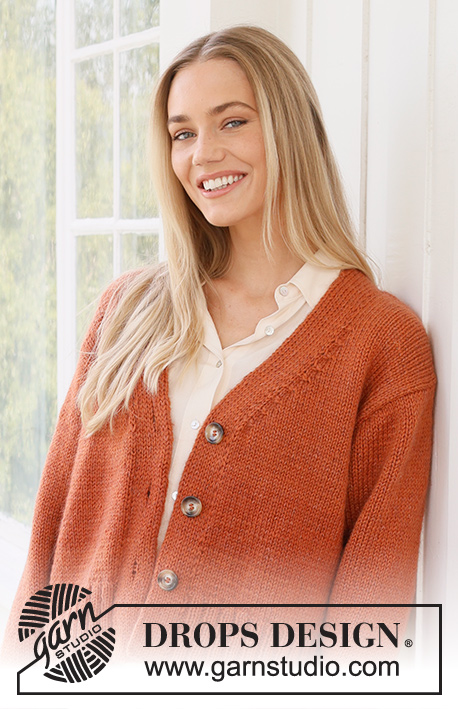
Silver Surfer#silversurfervest |
|
 |
 |
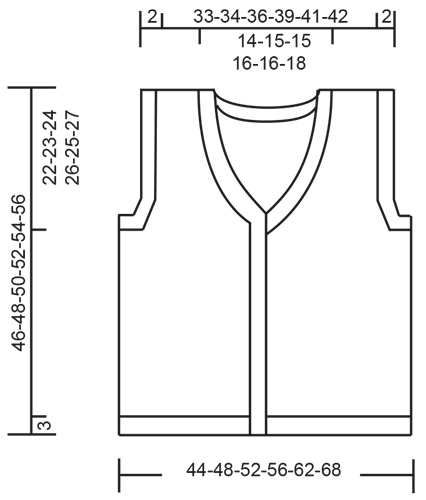
Knitted vest in DROPS Air. The piece is worked bottom up in stocking stitch with V-neck. Sizes S - XXXL.
DROPS 236-17 |
|
|
------------------------------------------------------- EXPLANATIONS FOR THE PATTERN: ------------------------------------------------------- RIDGE/GARTER STITCH (worked back and forth): Knit all rows. 1 ridge = knit 2 rows. BUTTONHOLES: Work buttonholes on the right band (when the garment is worn). 1 buttonhole = work 2 stitches together and make 1 yarn over. NOTE: It is neatest if you purl 2 stitches together in a purled section (seen from the right side). On the next row knit the yarn overs to leave holes. The first buttonhole is worked 6 cm above the bottom edge, the top buttonhole just before the beginning of the V-neck. The other 2-2-2-3-3-3 buttonholes are worked evenly between these two. ------------------------------------------------------- START THE PIECE HERE: ------------------------------------------------------- VEST – SHORT OVERVIEW OF THE PIECE: The piece is worked back and forth, bottom up as far as the armholes. Then the front and back pieces are finished separately. The bands/neck and sleeve-edges are worked to finish. BODY: Cast on 160-176-188-204-224-244 stitches with circular needle size 4 mm and DROPS Air. Purl 1 row from the wrong side. Then work as follows from the right side: 1 edge stitch in GARTER STITCH – read description above, * knit 2, purl 2 *, work from *-* until there are 3 stitches left, knit 2 and 1 edge stitch in garter stitch. Continue this rib for 3 cm. Change to circular needle size 5 mm and work stocking stitch with 1 edge stitch in garter stitch on each side and decrease 10 stitches evenly on the first row = 150-166-178-194-214-234 stitches. Continue working until the piece measures 24-25-26-28-27-29 cm from the cast-on edge. REMEMBER THE KNITTING TENSION! Work the next row as follows from the right side: Work the first 35-39-42-45-50-55 stitches, cast off 6-6-6-8-8-8 stitches, work the next 68-76-82-88-98-108 stitches, cast off 6-6-6-8-8-8 stitches and work the last 35-39-42-45-50-55 stitches. The front and back pieces are finished separately. LEFT FRONT PIECE: = 35-39-42-45-50-55 stitches. Continue with stocking stitch and 1 edge stitch in garter stitch towards mid-front. Cast off for the armhole at the beginning of every row from the side as follows: 2 stitches 1-1-1-2-2-2 times and 1 stitch 4-7-8-7-10-14 times. AT THE SAME TIME when the piece measures 27-28-29-30-31-32 cm, decrease for the neck by working 2 together inside the 1 edge stitch mid-front. Decrease like this every 1½ cm a total of 13-14-14-15-15-16 times. After all the decreases there are 16-16-18-19-21-21 stitches. Cast off when the piece measures 46-48-50-52-54-56 cm (22-23-24-25-26-27 cm from the bottom of the armhole). RIGHT FRONT PIECE: Work in the same way as the left. BACK PIECE: = 68-76-82-88-98-108 stitches. Continue with stocking stitch and cast off for the armholes at the beginning of each row as follows: 2 stitches 1-1-1-2-2-2 times and 1 stitch 4-7-8-7-10-14 times on each side = 56-58-62-66-70-72 stitches. Continue working until the piece measures 44-46-48-50-52-54 cm. On the next row from the right side cast off for the neck as follows: Work the first 17-17-19-20-22-22 stitches, cast off 22-24-24-26-26-28 stitches and work the last 17-17-19-20-22-22 stitches. Finish each shoulder separately. Continue with stocking stitch and cast off 1 stitch at the beginning of the next row from the neck = 16-16-18-19-21-21 stitches. Continue working until the piece measures 46-48-50-52-54-56 cm. Cast off. Work the other shoulder in the same way. ASSEMBLY: Sew the shoulder seams. BAND/NECK: Insert 1 marker mid-back; it is used when knitting up stitches for the neck. Start at the bottom of the right front piece, from the right side and with circular needle size 4 mm. Knit up approx. 112-118-122-126-130-136 stitches inside the 1 edge stitch, up the front piece and as far as the marker mid-back. Then knit up approx. 112-118-122-126-130-136 stitches from the marker and down the left front piece. The number of stitches is approx. 224-236-244-252-260-272 and should be divisible by 4. Work as follows from the wrong side: 1 edge stitch in garter stitch, * purl 2, knit 2 *, work from *-* until there are 3 stitches left, purl 2 and 1 edge stitch in garter stitch. When the rib measures 1 cm work the BUTTONHOLES on the right band – read description above. Work until the rib measures 2 cm. Cast off with knit over knit and purl over purl. SLEEVE-EDGES: Start from the right side at the bottom of the armhole. Use circular needle size 4 mm and knit up 84 to 124 stitches around the armhole (the number of stitches should be divisible by 4). Work rib in the round (knit 2, purl 2) for 2 cm. Cast off with knit over knit and purl over purl. Work the other sleeve-edge in the same way. ASSEMBLY: Sew the buttons onto the left band. |
|
 |
|
Have you finished this pattern?Tag your pictures with #dropspattern #silversurfervest or submit them to the #dropsfan gallery. Do you need help with this pattern?You'll find 23 tutorial videos, a Comments/Questions area and more by visiting the pattern on garnstudio.com. © 1982-2026 DROPS Design A/S. We reserve all rights. This document, including all its sub-sections, has copyrights. Read more about what you can do with our patterns at the bottom of each pattern on our site. |
|


With over 40 years in knitting and crochet design, DROPS Design offers one of the most extensive collections of free patterns on the internet - translated to 17 languages. As of today we count 324 catalogues and 12290 patterns translated into English (UK/cm).
We work hard to bring you the best knitting and crochet have to offer, inspiration and advice as well as great quality yarns at incredible prices! Would you like to use our patterns for other than personal use? You can read what you are allowed to do in the Copyright text at the bottom of all our patterns. Happy crafting!
Post a comment to pattern DROPS 236-17
We would love to hear what you have to say about this pattern!
If you want to leave a question, please make sure you select the correct category in the form below, to speed up the answering process. Required fields are marked *.