
Popular categories
Looking for a yarn?


Comments / Questions (148)
![]() Doro wrote:
Doro wrote:
Ich möchte dieses Jäckchen in der kleinsten Größe stricken und bin jetzt unter der Halsblende am Musteranfang. Habe 93M auf der Nadel und laut Diagramm + Blendenmaschen komme ich nur auf 89M. Warum habe ich 4 M zuviel?
01.07.2024 - 23:07DROPS Design answered:
Liebe Doro, beachten Sie, daß die Markierung je in einer Masche (und nicht zwischen Maschen) eingesetzt werden, deshalb haben Sie wahrscheinlich 4 Maschen zuviel. Viel Spaß beim Stricken!
02.07.2024 - 10:14
![]() Tina wrote:
Tina wrote:
Okay, jeg må vende tilbage til mit oprindelige spørgsmål så. Jeg har strikket rapporterne i højden 3 gange, er stoppet med udtagninger på for- og bagstykke og mangler nu kun raglanudtagninger på ærmerne, for at nå 255m. Jeg er på 5. pind venstre forstykke(42 m). Jeg har strikket kantmasker (6m) A1 (8m) og A2 (6m) x 4, ialt 38 masker og har nu 4 masker tilbage inden ærmet. Hvordan skal de strikkes? Jeg synes, at jeg skal bruge minimum 5 masker for at få hulmønsteret til at passe?
01.06.2024 - 13:54DROPS Design answered:
Hej Tina, de sidste 4 masker strikker du som de 4 første masker viser i A.3, hvis du ikke har nok masker til at strikke 2 sammen, så laver du kun 1 omslag og strikker de sidste i glatstrik. Du skal som sagt altid kun have samme antal udtagninger som indtagninger.
04.06.2024 - 08:50
![]() Tina wrote:
Tina wrote:
Jeg prøver lige igen, for jeg kan stadig ikke få det til at passe. Hvis mønsteret skal fortsætte uændret, er jeg vel nødt til at øge antallet af masker? Fx strikkes A3 over 5 masker på første pind, men over 9 masker på 7. pind. Hvor kommer de ekstra masker fra, hvis jeg ikke laver omslag svarende til de sorte prikker? Alternativt, hvis maskeantallet ikke skal øges, hvordan skal jeg så tilpasse mønsteret, så A3 fortsat kun strikkes over 5 masker og A4 over 6 masker?
28.05.2024 - 14:18DROPS Design answered:
Hej Tina, nej for selve hulmønsteret går kun over 6 masker, så det kan du fortsætte når du er klar med udtagningerne :)
30.05.2024 - 15:03
![]() Tina wrote:
Tina wrote:
Hej. Jeg strikker str 12/18 mdr. Jeg har strikket rapporterne i højden 3 gange og er færdig med udtagninger på for- og bagstykke, men er i tvivl om hvordan præcis jeg skal fortsætte mønsteret uden at øge maskeantallet i A3 og A4. På 1. og 3. pind i det efterfølgende har jeg strikket 5 og 6 masker af hhv A3 og A4 (er det rigtigt gjort?), men nu på 5. pind kommer jeg i problemer, fordi der jo er en ekstra maske i A1, som jeg så mangler i A3. Skal jeg "stjæle" den fra ærmet?
24.05.2024 - 14:26DROPS Design answered:
Hej Tina. det er kun de sorte ringe/prikker som øger maskeantallet, de gennemsigtige ringe er dem som hører til hulmønteret og de udligner alle indtagninger, så når du strikker dem har du samme antal masker når du er færdig med pinden :)
28.05.2024 - 10:22
![]() Louise-Marie Casseron wrote:
Louise-Marie Casseron wrote:
Merci pour votre réponse, je viens de comprendre que je lisais d'une façon incorrecte les explications (je ne tenais pas compte des virgules) toutes mes excuses
04.04.2024 - 13:59
![]() Louise-marie Casseron wrote:
Louise-marie Casseron wrote:
Merci pour votre réponse. Là, je suis au 5ème rang du diagramme (ou il y a des cases noires) .pour les devants pas de problème, mais pour le dos si j'ai bien compris j'ai 3 fois A4 (10+10+10) A2 (6) A3 (7) or je n'ai que 41 mailles alors qu'il en faudrait 43
03.04.2024 - 18:26DROPS Design answered:
Bonjour Mme Casseron, A.4 ne se tricote qu'une seule fois au début du dos, on répète ensuite A.2,et on termine par A.3, les augmentations des raglans sont les jetés au début de A.4 et à la fin de A.3; au 5è!me rang tricotez la dernière maille de A.4 avec la 1ère maille du A.2 suivant, puis la dernière maille de A.2 avec la 1ère du A.2 suivant et la dernière maille du dernier A.2 avec la 1ère maille de A.3; ainsi vous conservez bien le bon nombre de mailles dans chaque diagramme. Bon tricot!
04.04.2024 - 08:08
![]() Louise-marie Casseron wrote:
Louise-marie Casseron wrote:
Je veux faire la taille 1/3 mois. On demande de monter 93 mailles, or le premier rang des diagrammes n'a que 92 mailles
31.03.2024 - 20:33DROPS Design answered:
Bonjour Mme Casseron, tricotez ainsi: 6 m point mousse, A.1 (= 7 m), A.3 (=5m), 1 m end avec 1 marqueur, 12 m jersey (+ 4 m), 1 m avec 1 marqueur, A.4 (= 6m), 3 x A.2 (= 3x6=18 m au total), A.3 (= 5 m), 1 m end avec 1 marqueur, 12 m jersey (+ 4 m), 1 m avec 1 marqueur, A.4 (= 6 m), A.5 (= 6 m) et 6 m point mousse = 6+7+5+1+12+1+6+18+5+1+12+1+6+6+6=93 mailles (+ les augmentations des manches et des diagrammes). Bon tricot!
02.04.2024 - 14:50
![]() Florine wrote:
Florine wrote:
Bonjour, Merci pour ce retour. Je ne comprends pas car lorsque l’on calcule le nombre de mailles dans les explications qui précèdent la fin des augmentations, le dernier rang, on a 219m: 6m mousse, A1(7m), 2xA2(2x6m), A3(11m), 41m manche, A4(12m), 7xA2(7x6m),A3(11m), 41m manche, A4(12m), 2xA2(2x6m), A5(6m), 6m mousse Ça donne 219 mailles, ce que j’ai… Alors qu’il est indiqué qu’on doit avoir 197m Merci d’avance
22.03.2024 - 17:52DROPS Design answered:
Bonjour Florine, tricotez vos 197 mailles ainsi: 6 m bordure, 7 m de A.1, 18 m de A.2, 41 m jersey, 54 m de A.2 (9 fois), 41 m jersey, 18 m A.2 (3 fois), 6 m A.5 et 6 m de bordure, autrement dit, on ne tricote plus A.4 ni A.3 car les augmentations sont terminées. Bon tricot!
02.04.2024 - 08:03
![]() Florine wrote:
Florine wrote:
Bonjour, Je fais ce modèle pour la taille 1/3 mois. Je me retrouve à l’endroit où toutes les augmentations sont terminées mais j’ai 219 mailles et non 197 comme attendu dans les explications. J’ai pourtant bien ajouté 1 motif de A2 pour chaque devant et 2 pour le dos lors du dernier motif, bien fait mes 12 augmentations pour la raglan, je ne comprends pas Pouvez vous m’aider ? Merci d’avance Florine
22.03.2024 - 14:59DROPS Design answered:
Bonjour Florine, vous aviez 93 m, vous avez augmenté 4 m pour chaque manche (8 m au total) + 12 x 2 mailles x 2 manches = 48 m + dans les diagrammes pour les devants et le dos: 24 mailles à chaque fois que les 8 rangs des diagrammes ont été faits x 2 motifs en hauteur = 48 augmentations pour le raglan des devants et du dos soit: 93+8+48+48=197 mailles. Bon tricot!
22.03.2024 - 15:26
![]() Sofi wrote:
Sofi wrote:
Bonjour, je fais un 2ans, quand vous dites quand A3 et A4 ont été tricotés 3 fois en hauteur arrêtez les augmentations des devants et dos", on compte le nb de A3 et A4 à partir des côtes ou après la 1ere hauteur de diagramme fait? Merci
19.03.2024 - 11:29DROPS Design answered:
Bonjour Sofi, vous comptez le nombre de fois que vous avez tricoté les diagrammes en hauteur, soit 8 rangs pour chaque motif en hauteur x 3 = 24 rangs. Bon tricot!
19.03.2024 - 15:17
|
||||||||||||||||||||||
Cotswolds Cardigan#cotswoldscardigan |
||||||||||||||||||||||
 |
 |
|||||||||||||||||||||
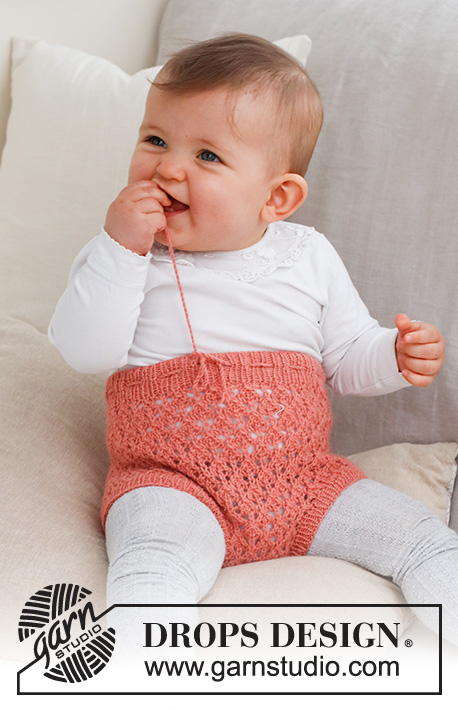
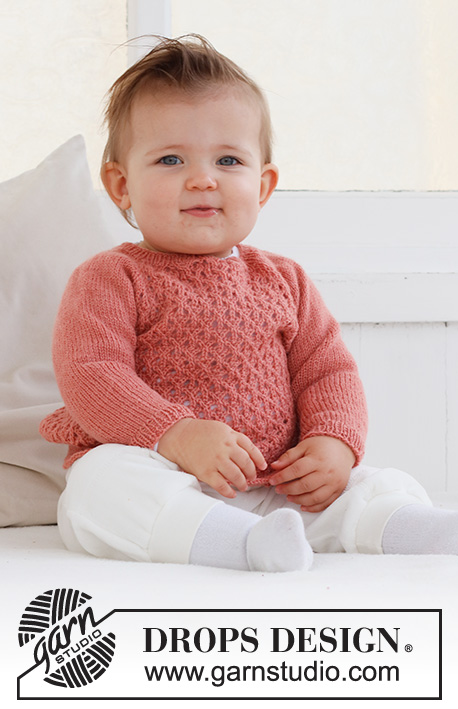
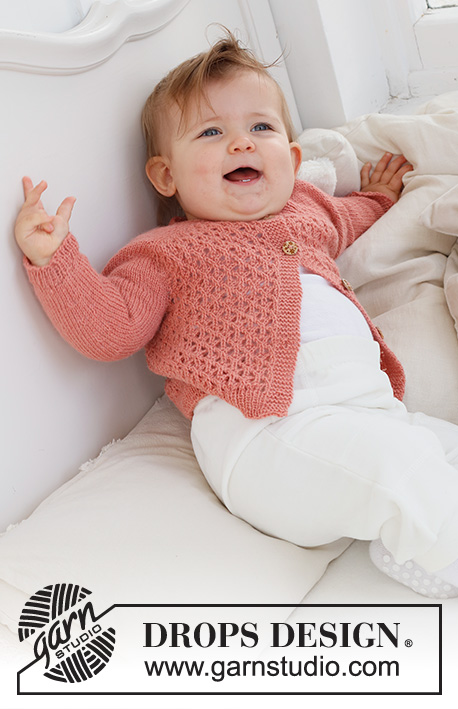
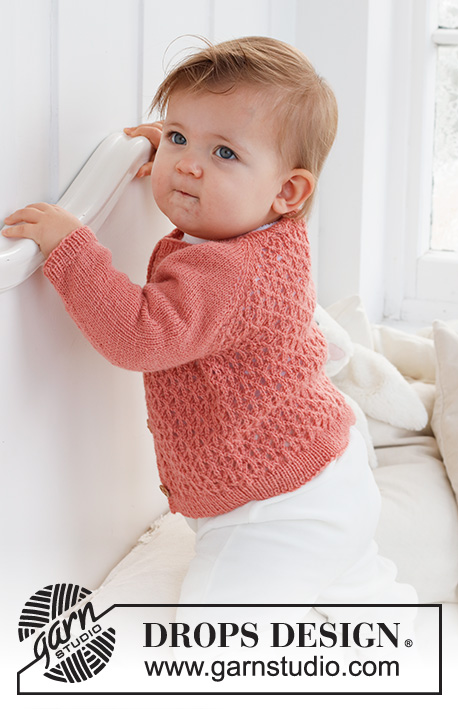
Knitted jacket for baby in DROPS Flora. The piece is worked top down, with raglan and lace pattern. Sizes 0 – 2 years.
DROPS Baby 43-2 |
||||||||||||||||||||||
|
------------------------------------------------------- EXPLANATIONS FOR THE PATTERN: ------------------------------------------------------- RIDGE/GARTER STITCH (worked back and forth): Knit all rows. 1 ridge = knit 2 rows. PATTERN: See diagrams A.1 to A.5. The diagrams show all rows in the pattern from the right side. BUTTONHOLES: Work buttonholes on the right band (when the garment is worn). Work from the right side when there are 4 stitches left on the row as follows: Make 1 yarn over, knit 2 together and knit 2. On the next row (wrong side), knit the yarn over to leave a hole. The first buttonhole is worked right after the neck. Then work the other 4 buttonholes with approx. 4½-4½-5-5½-6 cm between each one. RAGLAN: All increases are worked from the right side! On the front and back pieces the increases are included in the diagram. Increase as follows on the sleeves: Increase 1 stitch after markers 1 and 3. Knit the marker-stitch, make 1 yarn over. Increase 1 stitch before markers 2 and 4. Work as far as the marker-stitch and make 1 yarn over, knit the marker-stitch. On the next row purl the yarn overs twisted to avoid holes! Repeat this increase every row from the right side a total of 10-12-14-16-17 times. DECREASE TIP (for sleeves): Decrease 1 stitch on either side of the marker as follows: Work until there are 3 stitches left before the marker, knit 2 together, knit 2 (marker sits between these 2 stitches), slip 1 stitch as if to knit, knit 1 and pass the slipped stitch over the knitted stitch. ------------------------------------------------------- START THE PIECE HERE: ------------------------------------------------------- JACKET – SHORT OVERVIEW OF THE PIECE. The neck and yoke are worked back and forth with circular needle, top down. The yoke is divided for body and sleeves and the body continued back and forth with circular needle. The sleeves are worked in the round with double pointed needles. NECK: Cast on 93-93-93-111-111 stitches with circular needle size 2.5 mm and DROPS Flora. Purl 1 row from the wrong side with 6 band stitches in GARTER STITCH – read description above, on each side. Then work rib as follows: 6 band stitches in garter stitch, * knit 1, purl 1 *, work from *-* until there are 7 stitches left, knit 1 and 6 band stitches in garter stitch. Work this rib for 2 cm. Change to circular needle size 3 mm. YOKE: Work the BUTTONHOLE on the right band – read description above! On the first row from the right side insert 4 markers and work as follows: Front piece: 6 band stitches in garter stitch, work A.1, then A.2 0-0-0-1-1 time, A.3. Sleeve: Insert marker 1 in the next stitch, work 12 stitches in stocking stitch and increase 4 stitches evenly over these stitches, insert marker 2 in the next stitch. Back piece: Work A.4, A.2 3-3-3-4-4 times, then A.3. Sleeve: Insert marker 3 in the next stitch, work 12 stitches in stocking stitch and increase 4 stitches evenly over these stitches, insert marker 4 in the next stitch. Front piece: Work A.4, A.2 0-0-0-1-1 time, A.5 and 6 band stitches in garter stitch. Continue this pattern on the next row from right side start to increase for sleeve – read description above. REMEMBER THE KNITTING TENSION! When A.1 to A.5 are completed, work the next row from the right side as follows: 6 band stitches in garter stitch, work A.1, A.2 1-1-1-2-2 times, A.3, work stocking stitch and increase as before over the sleeve as far as marker 2, work A.4, A.2 5-5-5-6-6 times, A.3, work stocking stitch and increase as before over the sleeve as far as marker 4, work A.4, A.2 1-1-1-2-2 times, A.5 and 6 band stitches in garter stitch. Repeat this pattern in height. Each time A.3 and A.4 are repeated in height, there is room for 1 more repeat of A.2 on the front pieces and 2 more repeats on the back piece. When A.3 and A.4 have been worked 2-2-3-3-3 times in height, the increases are finished on the front and back pieces; continue increasing only on the sleeves as explained above. Continue the pattern on the front and back pieces, but without further increases. When all the increases are finished there are 189-197-229-255-259 stitches. Now work pattern as follows: 6 band stitches in garter stitch, A.1 over 7 stitches, A.2 3-3-4-5-5 times, work 37-41-45-49-51 stitches in stocking stitch, A.2 9-9-11-12-12 times, work 37-41-45-49-51 stitches in stocking stitch, A.2 3-3-4-5-5 times, A.5 and 6 band stitches in garter stitch. Continue this pattern. When you work round 5 in A.2 on the back piece, knit the first stitch in the first repeat, the last stitch in the last repeat is worked over the first stitch on the sleeve. When the piece measures 12-13-14-15-16 cm from the cast-on edge, divide for the body and sleeves as follows: 6 band stitches in garter stitch, work 25-25-31-37-37 stitches as before, place the next 37-41-45-49-51 stitches on a thread for the sleeve, cast on 6 stitches under the sleeve, work 54-54-66-72-72 stitches, place the next 37-41-45-49-51 stitches on a thread for the sleeve, cast on 6 stitches under the sleeve, work 24-24-30-36-36 stitches as before and 6 band stitches in garter stitch. BODY: = 127-127-151-169-169 stitches. Continue back and forth as follows: 6 band stitches in garter stitch, work A.1, A.2 until there are 12 stitches left, work A.5 and 6 band stitches in garter stitch. When the piece measures 9-12-13-15-17 cm from the division, increase 20-20-22-26-26 stitches evenly spaced on the next row from the right side (do not increase over the bands) = 147-147-173-195-195 stitches. Change to circular needle size 2.5 mm and work rib from the wrong side as follows: 6 band stitches in garter stitch, * purl 1, knit 1 *, work from *-* until there are 7 stitches left, purl 1 and 6 band stitches in garter stitch. Continue this rib for 3 cm. Cast off. The jacket measures approx. 24-28-30-33-36 cm from the shoulder down. SLEEVES: Place the 37-41-45-49-51 stitches from the thread on the one side of the piece on double pointed needles size 3 mm and knit up 1 stitch in each of the 6 stitches cast on under the sleeve = 43-47-51-55-57 stitches. Insert a marker thread in the middle of the new stitches under the sleeve. Start at the marker and work stocking stitch in the round for 1 cm. Now decrease 2 stitches under the sleeve – read DECREASE TIP. Decrease like this every 2½-2-2-2-2½ cm a total of 3-5-6-7-8 times = 37-37-39-41-41 stitches. When the sleeve measures 10-12-15-16-22 cm from the division increase 5 stitches evenly spaced = 42-42-44-46-46 stitches. Change to double pointed needles size 2.5 mm and work rib (knit 1, purl 1) for 3 cm. Cast off with knit over knit and purl over purl. The sleeve measures approx. 13-15-18-19-25 cm from the division. Work the other sleeve in the same way. ASSEMBLY: Sew the buttons onto the left band. |
||||||||||||||||||||||
Diagram explanations |
||||||||||||||||||||||
|
||||||||||||||||||||||
 |
||||||||||||||||||||||
Have you finished this pattern?Tag your pictures with #dropspattern #cotswoldscardigan or submit them to the #dropsfan gallery. Do you need help with this pattern?You'll find 31 tutorial videos, a Comments/Questions area and more by visiting the pattern on garnstudio.com. © 1982-2026 DROPS Design A/S. We reserve all rights. This document, including all its sub-sections, has copyrights. Read more about what you can do with our patterns at the bottom of each pattern on our site. |
||||||||||||||||||||||


With over 40 years in knitting and crochet design, DROPS Design offers one of the most extensive collections of free patterns on the internet - translated to 17 languages. As of today we count 325 catalogues and 12298 patterns translated into English (UK/cm).
We work hard to bring you the best knitting and crochet have to offer, inspiration and advice as well as great quality yarns at incredible prices! Would you like to use our patterns for other than personal use? You can read what you are allowed to do in the Copyright text at the bottom of all our patterns. Happy crafting!
Post a comment to pattern DROPS Baby 43-2
We would love to hear what you have to say about this pattern!
If you want to leave a question, please make sure you select the correct category in the form below, to speed up the answering process. Required fields are marked *.