
Popular categories
Looking for a yarn?


Comments / Questions (148)
![]() Linda wrote:
Linda wrote:
Jeg kan ikke få maskerne til at passe på den første omgang med mønster. Jeg strikker str. 6/9 mdr og 86 m. Når ærmerne bruger 24 m tilsammen er der 62 m tilbage og der skal bruges 41 m hvis jeg læser opskriften rigtigt ???
12.03.2025 - 15:07DROPS Design answered:
Hej Linda, hvad er det for 86 masker, dem finder vi ikke i opskriften... Hvor langt er du kommet, hvor mange masker har du og hvad er næste pind?
14.03.2025 - 13:49
![]() Christine wrote:
Christine wrote:
Hallo, net begonnen aan dit patroon en al een vraagje. Brei je na de boord eerst de pas ,een rij met het knoopsgat (en dan een rij terug) en begin je daarna met hetvoorpand en de rest? Dank voor je antwoord
26.02.2025 - 13:54DROPS Design answered:
Dag Christine,
Ja, het eerste knoopsgat wordt gelijk na de hals gebreid. Brei dan de andere 4 knoopsgaten met ongeveer 4½-4½ 5-5½-6 cm tussen elk. (Het aantal centimeters ertussen is dus afhankelijk van de maat die je breit.
02.03.2025 - 10:39
![]() Charlotte wrote:
Charlotte wrote:
I am knitting the 0/1 size. I've cast on 93 st, but the first row of pattern seems only to need 29 sts for the back. I have 6sts for each band, 12 for each front and each sleeve which leaves me with 33sts for the back. Following the pattern for the back I am knitting A4x1 (6sts), A2x3 (18sts)and A3 X1 (5sts) which only takes 29 sts. Where am I going wrong? Many thanks
21.02.2025 - 15:41DROPS Design answered:
Dear Charlotte, for the front piece you have: 6 band sts, A.1 (= 7 sts) and A.3 (= 5 sts), so 18 sts. For each sleeve: stitch with marker-1 ( marker-3 in the other sleeve), 12 stitches in stocking stitch (+4 increases), stitch with marker-2 (marker-4 in the other sleeve), so 14 sts (+4 increases) per sleeve. For the back piece you have: A.4 once (= 6 sts) A.2 3 times (= 6x3, 18 sts) and A.3 (= 5 sts), so 29 sts. In the other front piece you have A.4 once (= 6 sts), A.5 once (= 6 sts) and 6 band sts, so 18 sts. So you have: 18+14+29+14+18 = 93 sts. Remember that the markers in the sleeves are inserted into stitches. Happy knitting!
23.02.2025 - 20:41
![]() Janett wrote:
Janett wrote:
Hallo, nach der Halsblende in Gr. 56/62 mit 93 Maschen geht es mit dem Muster weiter. Bei den 12 Maschen für den Ärmel sollen in der 1 Reihe 4 M verteilt aufgenommen werden. Ab Reihe 3 beginnen die Raglanzunahmen. Müssen dann trotzdem noch zusätzlich Maschen am Ärmel eingearbeitet werden?
01.02.2025 - 00:01DROPS Design answered:
Liebe Janett, ja genau, für die Ärmel nehmen Sie wie unter RAGLANZUNAHMEN beschrieben. Viel Spaß beim Stricken!
03.02.2025 - 07:58
![]() Susanne wrote:
Susanne wrote:
Den opskrift kan jeg allerede ved første lixning efter kraven ikke tyde, A1, A2 engang i str. 2 år så A3 så men hvad så ?
23.01.2025 - 20:00
![]() Hanne wrote:
Hanne wrote:
Okei, dette er bare kaos! Strikker minste str. Raglan skal økes på annenhver omg. Mønster A.3 og A.4 skal repeteres 2 ganger i høyden, altså strikkes 3 ganger? Det blir 11 omg med økning på ermene? For heretter sier oppskriften skal det skal fortsettes å økes til raglan, men det er allerede for mange masker på ermene? Har visst også alt for mange masker totalt på pinnen nå, selv om mønsteret er helt perfekt… Hvor nøye er oppskriften teststrikket i minste størrelse..?
21.01.2025 - 13:26DROPS Design answered:
Hei Hanne. I str. 0/1 mnd skal A.3 og A.4 repeteres TOTALT 2 ganger i høyden (ikke tre). På ermene skal det økes på hver pinne TOTALT 10 ganger (ikke 11). Det står at man fortsetter med økningene på ermene som forklart over, men dette gjelder de største størrelsene som ikke er ferdig med ermøkningene. Etter alle økningene skal det være 189 masker (30 masker på det ene forstykket + 36 masker på ermet + 53 masker på bakstykket + 36 masker på det andre ermet + 30 masker på det andre forstykket + de 4 maskene med merkene = 30+36+53+36+30+4= 189 masker). mvh DROPS Design
27.01.2025 - 08:41
![]() Giuliana wrote:
Giuliana wrote:
Buonasera, come lavoro le maglie dove sono inseriti i segnapunti? Grazie
15.01.2025 - 23:29DROPS Design answered:
Buonasera Giuliana, deve seguire le indicazioni presenti all'inizio delle spiegazioni. Buon lavoro!
19.01.2025 - 15:03
![]() Benedicte Pahlm wrote:
Benedicte Pahlm wrote:
Strikker Cotswolds Cardigan, lurer på: Starter med å legge ut 4 m på hver erme i første runde. Andre runde skal man begynne m raglan, skal man fortsette å legge ut 4 m på hver erme i tillegg?
22.11.2024 - 10:14DROPS Design answered:
Hei Benedicte. Du øker bare 4 masker jevnt fordelt i hvert erme den ene gangen. mvh DROPS Design
25.11.2024 - 12:38
![]() Benedicte Pahlm wrote:
Benedicte Pahlm wrote:
Hei! Har begynt å strikke Cotswolds Cardigan og står fast allerede når jeg skal begynne med mønster. Får ikke tallet 93 (6-9mnd) til å gå opp, kommer til 89m når jeg følger mønsteret. Er det slik at der jeg setter på merke (totalt 4) bare skal strikke rett ?
20.11.2024 - 22:06DROPS Design answered:
Hei Benedicte, Ja, alle masker med merker i skal strikkes rett. God fornøyelse!
21.11.2024 - 07:19
![]() Miris wrote:
Miris wrote:
Bonjour, si je tricote sur l'endroit la boutonnière en suivant l'explication, je réalise la boutonnière en fin de rang endroit. Ce qui correspond au devant gauche et non au devant droit. Pouvez-vous svp, m'éclairer ? Merci
10.11.2024 - 20:36DROPS Design answered:
Bonjour Miris, quand on tricote de haut en bas, on commence sur l'endroit par le devant gauche et on termine par le devant droit, ainsi, les boutonnières vont bien se trouver sur le devant droit = en fin de rang sur l'endroit. Bon tricot!
11.11.2024 - 09:46
|
||||||||||||||||||||||
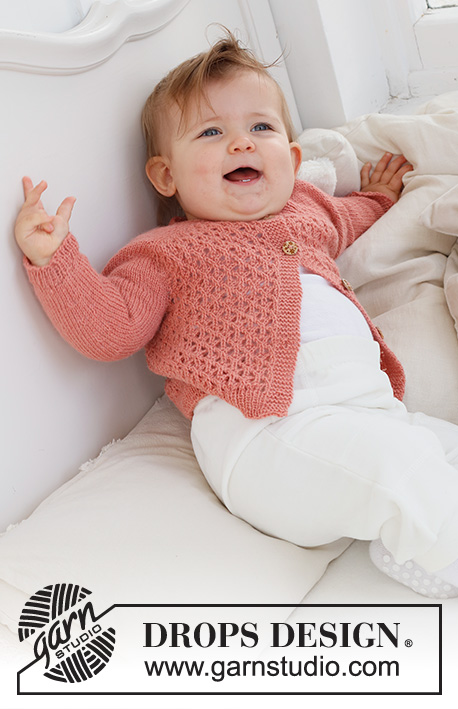
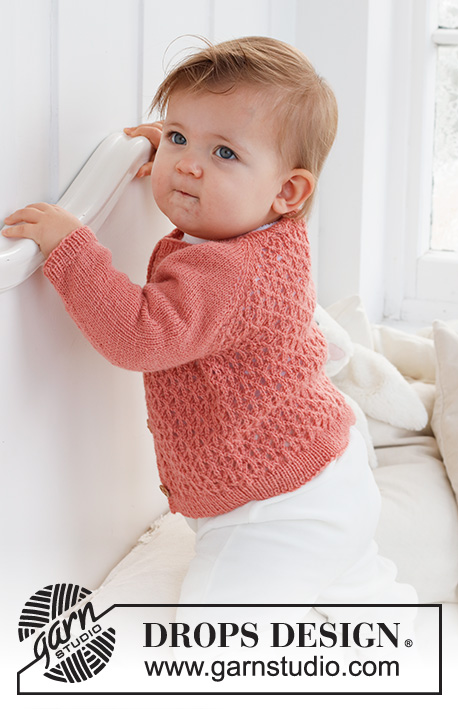
Cotswolds Cardigan#cotswoldscardigan |
||||||||||||||||||||||
 |
 |
|||||||||||||||||||||
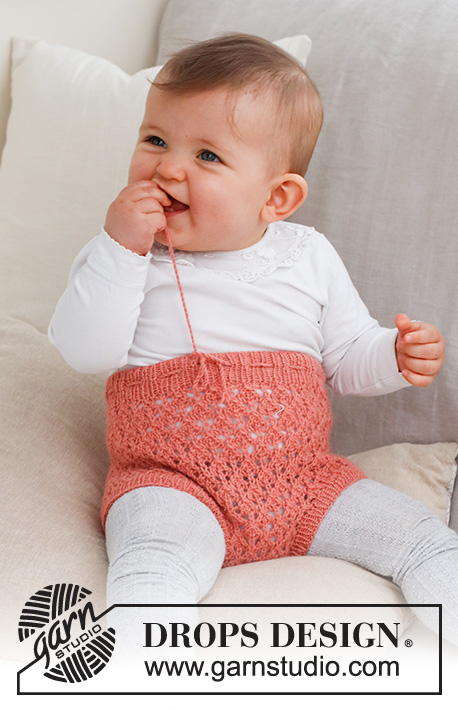
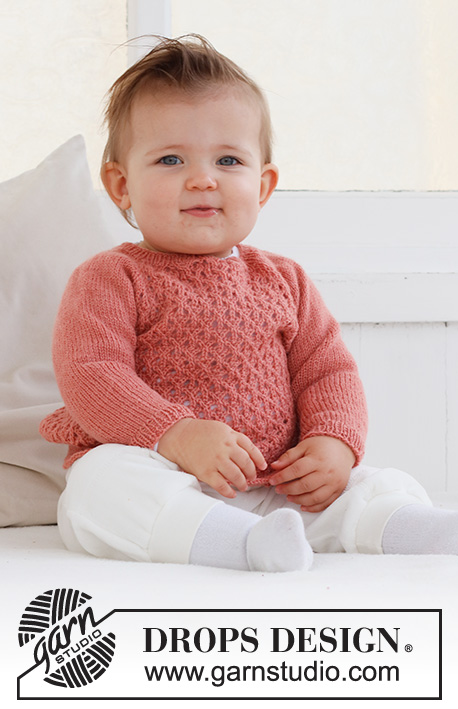
Knitted jacket for baby in DROPS Flora. The piece is worked top down, with raglan and lace pattern. Sizes 0 – 2 years.
DROPS Baby 43-2 |
||||||||||||||||||||||
|
------------------------------------------------------- EXPLANATIONS FOR THE PATTERN: ------------------------------------------------------- RIDGE/GARTER STITCH (worked back and forth): Knit all rows. 1 ridge = knit 2 rows. PATTERN: See diagrams A.1 to A.5. The diagrams show all rows in the pattern from the right side. BUTTONHOLES: Work buttonholes on the right band (when the garment is worn). Work from the right side when there are 4 stitches left on the row as follows: Make 1 yarn over, knit 2 together and knit 2. On the next row (wrong side), knit the yarn over to leave a hole. The first buttonhole is worked right after the neck. Then work the other 4 buttonholes with approx. 4½-4½-5-5½-6 cm between each one. RAGLAN: All increases are worked from the right side! On the front and back pieces the increases are included in the diagram. Increase as follows on the sleeves: Increase 1 stitch after markers 1 and 3. Knit the marker-stitch, make 1 yarn over. Increase 1 stitch before markers 2 and 4. Work as far as the marker-stitch and make 1 yarn over, knit the marker-stitch. On the next row purl the yarn overs twisted to avoid holes! Repeat this increase every row from the right side a total of 10-12-14-16-17 times. DECREASE TIP (for sleeves): Decrease 1 stitch on either side of the marker as follows: Work until there are 3 stitches left before the marker, knit 2 together, knit 2 (marker sits between these 2 stitches), slip 1 stitch as if to knit, knit 1 and pass the slipped stitch over the knitted stitch. ------------------------------------------------------- START THE PIECE HERE: ------------------------------------------------------- JACKET – SHORT OVERVIEW OF THE PIECE. The neck and yoke are worked back and forth with circular needle, top down. The yoke is divided for body and sleeves and the body continued back and forth with circular needle. The sleeves are worked in the round with double pointed needles. NECK: Cast on 93-93-93-111-111 stitches with circular needle size 2.5 mm and DROPS Flora. Purl 1 row from the wrong side with 6 band stitches in GARTER STITCH – read description above, on each side. Then work rib as follows: 6 band stitches in garter stitch, * knit 1, purl 1 *, work from *-* until there are 7 stitches left, knit 1 and 6 band stitches in garter stitch. Work this rib for 2 cm. Change to circular needle size 3 mm. YOKE: Work the BUTTONHOLE on the right band – read description above! On the first row from the right side insert 4 markers and work as follows: Front piece: 6 band stitches in garter stitch, work A.1, then A.2 0-0-0-1-1 time, A.3. Sleeve: Insert marker 1 in the next stitch, work 12 stitches in stocking stitch and increase 4 stitches evenly over these stitches, insert marker 2 in the next stitch. Back piece: Work A.4, A.2 3-3-3-4-4 times, then A.3. Sleeve: Insert marker 3 in the next stitch, work 12 stitches in stocking stitch and increase 4 stitches evenly over these stitches, insert marker 4 in the next stitch. Front piece: Work A.4, A.2 0-0-0-1-1 time, A.5 and 6 band stitches in garter stitch. Continue this pattern on the next row from right side start to increase for sleeve – read description above. REMEMBER THE KNITTING TENSION! When A.1 to A.5 are completed, work the next row from the right side as follows: 6 band stitches in garter stitch, work A.1, A.2 1-1-1-2-2 times, A.3, work stocking stitch and increase as before over the sleeve as far as marker 2, work A.4, A.2 5-5-5-6-6 times, A.3, work stocking stitch and increase as before over the sleeve as far as marker 4, work A.4, A.2 1-1-1-2-2 times, A.5 and 6 band stitches in garter stitch. Repeat this pattern in height. Each time A.3 and A.4 are repeated in height, there is room for 1 more repeat of A.2 on the front pieces and 2 more repeats on the back piece. When A.3 and A.4 have been worked 2-2-3-3-3 times in height, the increases are finished on the front and back pieces; continue increasing only on the sleeves as explained above. Continue the pattern on the front and back pieces, but without further increases. When all the increases are finished there are 189-197-229-255-259 stitches. Now work pattern as follows: 6 band stitches in garter stitch, A.1 over 7 stitches, A.2 3-3-4-5-5 times, work 37-41-45-49-51 stitches in stocking stitch, A.2 9-9-11-12-12 times, work 37-41-45-49-51 stitches in stocking stitch, A.2 3-3-4-5-5 times, A.5 and 6 band stitches in garter stitch. Continue this pattern. When you work round 5 in A.2 on the back piece, knit the first stitch in the first repeat, the last stitch in the last repeat is worked over the first stitch on the sleeve. When the piece measures 12-13-14-15-16 cm from the cast-on edge, divide for the body and sleeves as follows: 6 band stitches in garter stitch, work 25-25-31-37-37 stitches as before, place the next 37-41-45-49-51 stitches on a thread for the sleeve, cast on 6 stitches under the sleeve, work 54-54-66-72-72 stitches, place the next 37-41-45-49-51 stitches on a thread for the sleeve, cast on 6 stitches under the sleeve, work 24-24-30-36-36 stitches as before and 6 band stitches in garter stitch. BODY: = 127-127-151-169-169 stitches. Continue back and forth as follows: 6 band stitches in garter stitch, work A.1, A.2 until there are 12 stitches left, work A.5 and 6 band stitches in garter stitch. When the piece measures 9-12-13-15-17 cm from the division, increase 20-20-22-26-26 stitches evenly spaced on the next row from the right side (do not increase over the bands) = 147-147-173-195-195 stitches. Change to circular needle size 2.5 mm and work rib from the wrong side as follows: 6 band stitches in garter stitch, * purl 1, knit 1 *, work from *-* until there are 7 stitches left, purl 1 and 6 band stitches in garter stitch. Continue this rib for 3 cm. Cast off. The jacket measures approx. 24-28-30-33-36 cm from the shoulder down. SLEEVES: Place the 37-41-45-49-51 stitches from the thread on the one side of the piece on double pointed needles size 3 mm and knit up 1 stitch in each of the 6 stitches cast on under the sleeve = 43-47-51-55-57 stitches. Insert a marker thread in the middle of the new stitches under the sleeve. Start at the marker and work stocking stitch in the round for 1 cm. Now decrease 2 stitches under the sleeve – read DECREASE TIP. Decrease like this every 2½-2-2-2-2½ cm a total of 3-5-6-7-8 times = 37-37-39-41-41 stitches. When the sleeve measures 10-12-15-16-22 cm from the division increase 5 stitches evenly spaced = 42-42-44-46-46 stitches. Change to double pointed needles size 2.5 mm and work rib (knit 1, purl 1) for 3 cm. Cast off with knit over knit and purl over purl. The sleeve measures approx. 13-15-18-19-25 cm from the division. Work the other sleeve in the same way. ASSEMBLY: Sew the buttons onto the left band. |
||||||||||||||||||||||
Diagram explanations |
||||||||||||||||||||||
|
||||||||||||||||||||||
 |
||||||||||||||||||||||
Have you finished this pattern?Tag your pictures with #dropspattern #cotswoldscardigan or submit them to the #dropsfan gallery. Do you need help with this pattern?You'll find 31 tutorial videos, a Comments/Questions area and more by visiting the pattern on garnstudio.com. © 1982-2026 DROPS Design A/S. We reserve all rights. This document, including all its sub-sections, has copyrights. Read more about what you can do with our patterns at the bottom of each pattern on our site. |
||||||||||||||||||||||


With over 40 years in knitting and crochet design, DROPS Design offers one of the most extensive collections of free patterns on the internet - translated to 17 languages. As of today we count 325 catalogues and 12298 patterns translated into English (UK/cm).
We work hard to bring you the best knitting and crochet have to offer, inspiration and advice as well as great quality yarns at incredible prices! Would you like to use our patterns for other than personal use? You can read what you are allowed to do in the Copyright text at the bottom of all our patterns. Happy crafting!
Post a comment to pattern DROPS Baby 43-2
We would love to hear what you have to say about this pattern!
If you want to leave a question, please make sure you select the correct category in the form below, to speed up the answering process. Required fields are marked *.