
Popular categories
Looking for a yarn?


Comments / Questions (22)
![]() Joel wrote:
Joel wrote:
Bonjour , Dans le paragraphe 'TOUTES LES TAILLES' , tricoter 32 m , glisser 38 m en attente , monter 8 m . Je ne sais pas où monter les 8 m , après le devant droit ou au début du dos ? Désolé, je commence à tricoter , je n'ai pas d'expérience .. merci beaucoup.
24.02.2026 - 20:32DROPS Design answered:
Bonjour Joel, ces 8 mailles vont venir remplacer les mailles des manches que vous mettez en attente, retrouvez cette étape ici, en vidéo ici, à partir du time code 07:00 et/ou ici, en photos , à partir de la photo 9.. Bon tricot!
25.02.2026 - 07:31
![]() Anne-Grethe Kofoed wrote:
Anne-Grethe Kofoed wrote:
Kan garnet til denne genseren bestilles ?
07.01.2026 - 18:55
![]() Ursula Ingra Wieland wrote:
Ursula Ingra Wieland wrote:
Hi! Ich möchte die Sailor Blues für meinen Mann stricken in XXXL. Die Wolle Drops Wish gibt es aber nicht mehr. Als Alternative bekomme ich mehrere Garne vorgeschlagen, ich würde gern die Drops Andes nehmen, aber die wird mit Nadel 9 statt 8 gestrickt. Wie wirkt sich das dann auf die Anleitung aus? Was muss ich verändern. Danke für eure Hilfe!
04.01.2026 - 09:55DROPS Design answered:
Liebe Ursula, Sie können die angegeben Garnalternativen verwenden. Orientieren Sie sich auf jeden Fall an der Maschenprobe in der Anleitung, diese müssen Sie einhalten, die Nadelstärke beim Garn ist nur eine Richtlinie. Nehmen Sie also die Nadelstärke, mit der Sie die angegebene Maschenprobe erreichen - verändern sollten Sie an der Anleitung nichts. Beachten Sie auch, dass Andes schwerer ist als Wish und sich die Trageeigenschaften daher ändern können (die Jacke kann sich ggf. etwas mehr in die Länge ziehen). Sie könnten auch 2 Fäden Air nehmen (also den doppelten Faden Air), das entspricht einem Faden Wish und ist ein vergleichsweise leichtes Garn.
13.01.2026 - 11:17
![]() Jazzy wrote:
Jazzy wrote:
I did read the pattern. I'm just wondering whether you can tell me the purpose of the 2 additional stitches at the end of the double neck?
13.08.2025 - 13:07DROPS Design answered:
Dear Jazzy, in L you will work the 87 stitches as follows: 5 front band sts, (K2, P3) x 15 times (over the next 75 sts) and finish with K2, and 5 front band sts = 5+75+2+5=87 sts. So the rib starts and end with K2 inside the front band sts (seen from RS). Happy knitting!
13.08.2025 - 14:40
![]() Jazzy wrote:
Jazzy wrote:
For size L double neck, why do you end up with 2 more stitches (89) than what you cast on (87)?
13.08.2025 - 05:25DROPS Design answered:
Hi Jazzy, please follw the pattern. There are 2 additional steps before getting to the end of the double neck: 1) decrease all purl-3 to purl-2, 2) knit 1 row where you increase 17 stitches evenly spaced. Happy knitting!
13.08.2025 - 08:02
![]() Stroobandt Christine wrote:
Stroobandt Christine wrote:
Beste, Aangezien Drops Wish nergens meer te krijgen is, moet ik kiezen tussen andere gelijkaardige wolsoorten. Om een goede berekening te kunnen maken van hoeveel wol ik nodig heb, is het belangrijk te weten hoeveel meter wol er op een bolletje van 50 g Drops Wish zit. Dat vind ik nergens terug. Mvg, Christine
11.07.2025 - 14:28DROPS Design answered:
Dag Christine,
Informatie over DROPS Wish vind je via de pagina niet meer leverbare garens. (Even op 'zie meer klikken bij DROPS Wish.)
Verder hebben we een artikel op de site staan waarin uitgelegd is hoe je garen kunt vervangen door een ander garen en hoe je dit uitrekent. Zie hier.
11.07.2025 - 19:53
![]() Rossana wrote:
Rossana wrote:
Buonasera, grazie per la risposta alla quale non posso però rispondere direttamente. Nel pattern in italiano, dopo AUMENTO 2, ci sono gli aumenti per le taglie S M e per le taglie L XL prima di arrivare a TUTTE LE TAGLIE. L'aumento L XL è ripetuto 2 volte. Quale di questi 2 è quello esatto? Ho fatto uno screenshot che però non posso allegare. Grazie
03.01.2025 - 01:31DROPS Design answered:
Buonasera Rossana, grazie per la segnalazione: abbiamo corretto il testo. Buon lavoro!
03.01.2025 - 17:25
![]() Rossana wrote:
Rossana wrote:
Buongiorno e grazie per il pattern. Sto eseguendo la taglia L ma non ho capito dopo il secondo aumento con A2, c'è 2 volte l'aumento con A3 senza nessuna indicazione su quanti centimetri occorre lasciare tra l'uno e l'altro. Che cosa non capisco o faccio di sbagliato? Grazie per l'eventuale risposta
31.12.2024 - 07:35DROPS Design answered:
Buonasera Rossana, ci può spiegare meglio a quale parte del modello sta facendo riferimento? Buon lavoro!
01.01.2025 - 21:42
![]() Kelly wrote:
Kelly wrote:
I am knitting the XL pattern and am confused about the instructions for increasing the yoke. Under Increase 1, How many stitches am I increasing? Then, should I complete a purl row and move on to Increase 2, or should I only follow the instructions for Size XL?
11.12.2024 - 12:54DROPS Design answered:
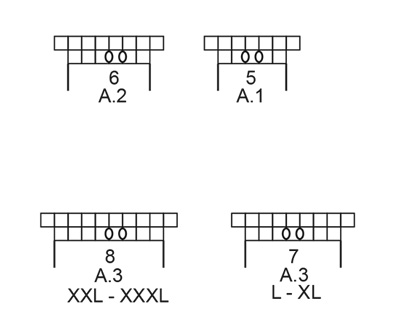
Dear Kelly, the increases are indicated in chart A.1. You increase from 5 to 7 stitches (so 2 stitches) per A.1 repeat. You have 16 repeats, so you increase 32 stitches (as indicated). Then purl 1 row (2nd row of A.1). Now continue in stocking stitch until piece measures 12cm. Now work Increase 2: You increase from 6 to 8 stitches (so 2 stitches) per A.2 repeat. You have 18 repeats, so you increase 36 stitches. Purl 1 row (2nd row of A.2). Continue in stocking stitch until piece measures 21 cm. Continue working as indicated under SIZES L AND XL. Happy knitting!
15.12.2024 - 19:18
![]() Freek wrote:
Freek wrote:
Kan ik het garenpakket bestellen Van dit patroon/ model
05.11.2024 - 18:25
|
|||||||
Sailor Blues#sailorbluesjacket |
|||||||
 |
 |
||||||
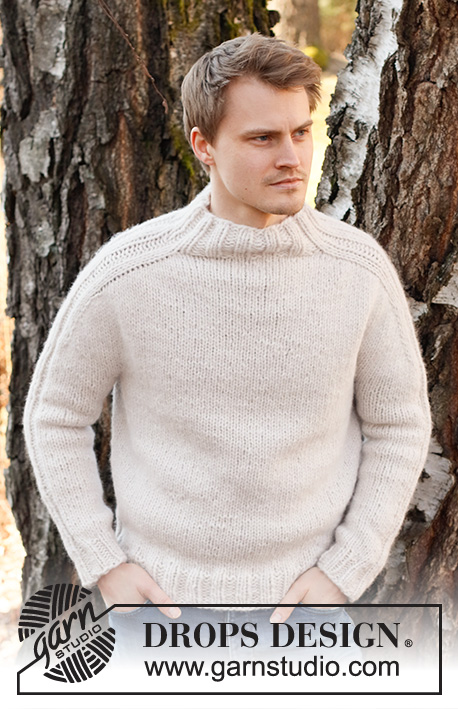
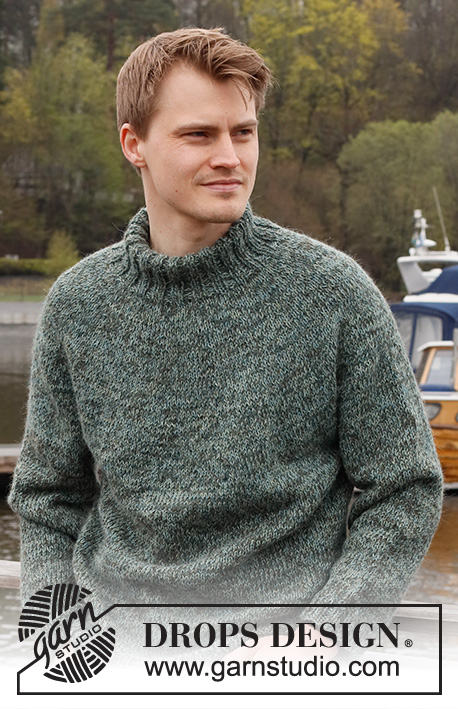
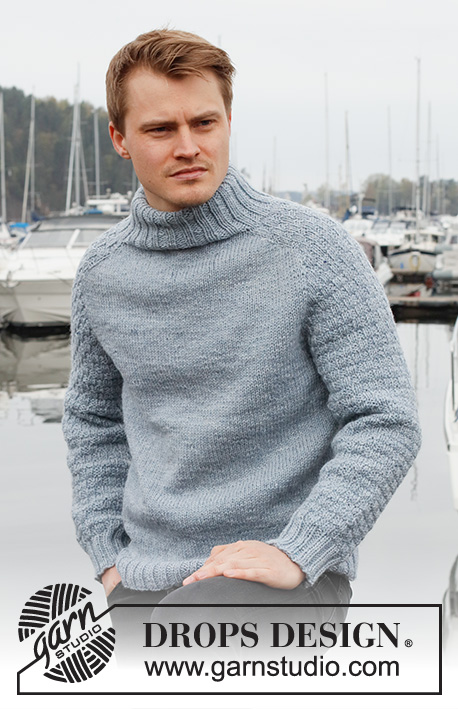
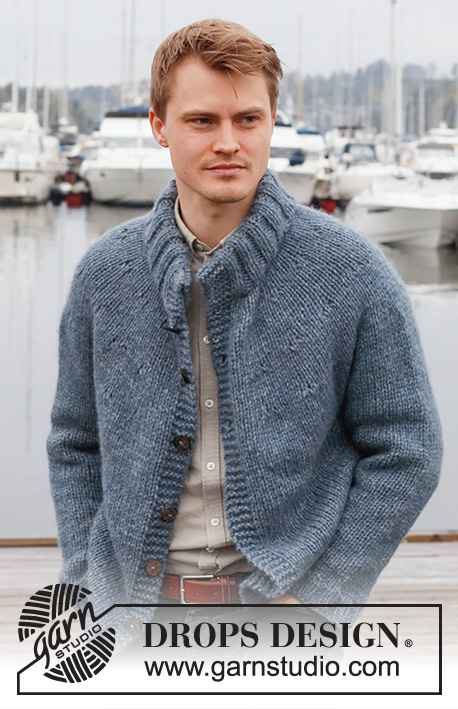
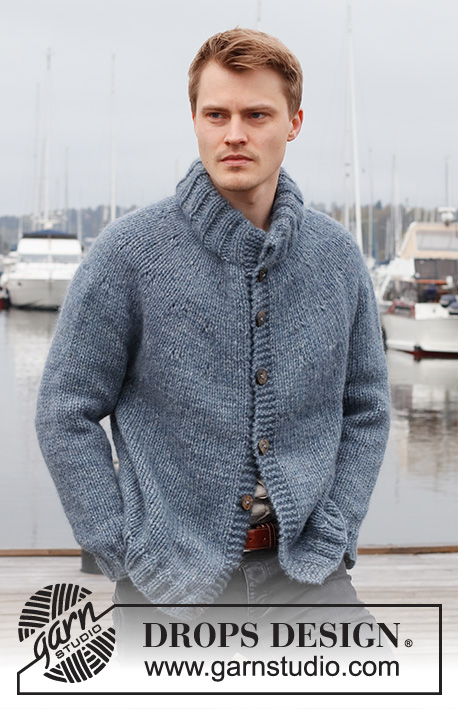
Knitted jacket for men in DROPS Wish. The piece is worked top down, with round yoke and double neck. Sizes S - XXXL.
DROPS 224-8 |
|||||||
|
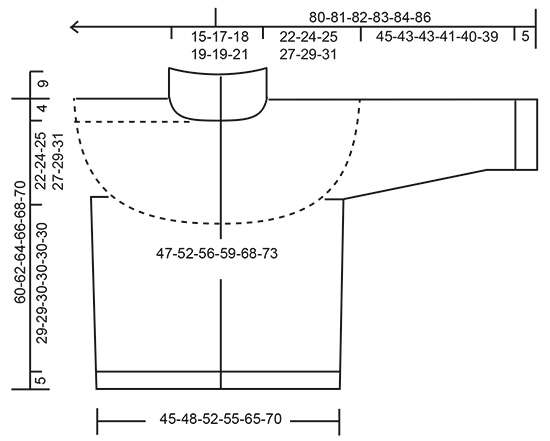
------------------------------------------------------- EXPLANATIONS FOR THE PATTERN: ------------------------------------------------------- RIDGE/GARTER STITCH (worked back and forth): Knit all rows. 1 ridge = knit 2 rows. PATTERN: See diagrams A.1 to A.3. Choose diagram for your size (applies to A.3 in sizes L, XL, XXL and XXXL). The diagrams show all rows in the pattern from the right side. INCREASE TIP (evenly spaced): To work out how to increase evenly, count the total number of stitches on the needle (e.g. 64 stitches) minus bands (e.g. 10 stitches) and divide the remaining stitches by the number of increases to be made (e.g. 13) = 4.1. In this example, increase by making 1 yarn over after approx. each 4th stitch. Do not increase over the bands. On the next row work the yarn overs twisted to avoid holes. DECREASE TIP (for body and sleeves): Decrease 1 stitch on either side of the marker thread as follows: Work until there are 3 stitches left before the marker thread, knit 2 together, knit 2 (marker thread sits between these 2 stitches), slip 1 stitch as if to knit, knit 1 and pass the slipped stitch over the knitted stitch (2 stitches decreased). BUTTONHOLES: Work buttonholes on the left band (when the garment is worn). Work from the right side at the beginning of the row as follows: Knit 1, knit 2 together, make 1 yarn over. On the next row (wrong side), knit the yarn over to leave a hole. The first buttonhole is worked after the rib on the neck is finished. Then work the other 6-6-6-7-7-7 buttonholes with approx. 8½-8½-9-8-8½-8½ cm between each one. CASTING-OFF TIP: To avoid the cast-off edge being tight you can cast off with a larger size needle. If the edge is still tight, make 1 yarn over after approx. each 6th stitch at the same time as casting off; the yarn overs are cast off as normal stitches. ------------------------------------------------------- START THE PIECE HERE: ------------------------------------------------------- JACKET – SHORT OVERVIEW OF THE PIECE. The neck and yoke are worked back and forth with circular needle, from mid front and top down. The yoke is divided for body and sleeves and the body continued back and forth with circular needle. The sleeves are worked in the round with double pointed needles/short circular needle, top down. DOUBLE NECK: Cast on 77-82-87-92-92-97 (including 5 band stitches on each side towards mid-front) with circular needle size 6 mm and DROPS Wish. Purl 1 row (= wrong side). The next row is worked as follows from the right side: 5 band stitches in GARTER STITCH – read description above, * knit 2, purl 3 *, work from *-* until there are 7 stitches left, knit 2 and 5 band stitches in garter stitch. When the rib measures 4 cm, decrease all purl-3 to purl-2 = 64-68-72-76-76-80 stitches. Continue the new rib until the neck measures 18 cm. When the rib is finished, knit 1 row where you increase 15-16-17-18-28-29 stitches evenly spaced – read INCREASE TIP = 79-84-89-94-104-109 stitches. Remember the BUTTONHOLES on the left band – read description above. Purl 1 row from the wrong side (yarn overs purled twisted and bands knitted). Insert 1 marker after the band at the beginning of the row; the yoke is measured from here! YOKE: Change to circular needle size 8 mm. Work stocking stitch with 5 band stitches in garter stitch on each side. REMEMBER THE KNITTING TENSION! When the piece measures 4 cm from the marker, work increases as follows: INCREASE 1: 5 band stitches in garter stitch, 2 stitches in stocking stitch, A.1 until there are 7 stitches left (= 13-14-15-16-18-19 repeats of 5 stitches), 2 stitches in stocking stitch, 5 band stitches in garter stitch. When A.1 has been worked in height you have increased 26-28-30-32-36-38 stitches = 105-112-119-126-140-147 stitches. Continue with stocking stitch and 5 band stitches in garter stitch on each side until the piece measures 10-11-11-12-13-14 cm from the marker. INCREASE 2: 5 band stitches in garter stitch, 3-3-4-4-5-3 stitches in stocking stitch, A.2 until there are 7-8-8-9-10-7 stitches left (= 15-16-17-18-20-22 repeats of 6 stitches), 2-3-3-4-5-2 stitches in stocking stitch, 5 band stitches in garter stitch. When A.2 has been worked in height you have increased 30-32-34-36-40-44 stitches = 135-144-153-162-180-191 stitches. Continue with stocking stitch and 5 band stitches in garter stitch on each side until the piece measures 16-18-19-21-22-24 cm from the marker. Now continue the different sizes as follows: SIZES S AND M: 5 band stitches in garter stitch, 3-4 stitches in stocking stitch, A.2 until there are 7-9 stitches left (= 20-21 repeats of 6-6 stitches), 2-4 stitches in stocking stitch, 5 band stitches in garter stitch. When A.2 has been worked in height you have increased 40-42 stitches = 175-186 stitches. SIZES L AND XL: 5 band stitches in garter stitch, 2-3 stitches in stocking stitch, A.3 – choose diagram for your size, until there are 6-7 stitches left (= 20-21 repeats of 7 stitches), 1-2 stitches in stocking stitch, 5 band stitches in garter stitch. When A.3 has been worked in height you have increased 40-42 stitches = 193-204 stitches. SIZES XXL AND XXXL: 5 band stitches in garter stitch, 5-3 stitches in stocking stitch, A.3 – choose diagram for your size, until there are 10-7 stitches left (= 20-22 repeats of 8 stitches), 5-2 stitches in stocking stitch, 5 band stitches in garter stitch. When A.3 has been worked in height you have increased 40-44 stitches = 220-235 stitches ALL SIZES: Continue with stocking stitch and 5 band stitches in garter stitch on each side until the piece measures 22-24-25-27-29-31 cm from the marker – adjust so the next row is from the wrong side. Now divide for the body and sleeves as follows: Work 29-30-32-33-37-40 stitches as before (= right front piece), place the next 35-37-38-40-40-42 stitches on 1 thread for the sleeve, cast on 4-6-8-8-10-10 stitches (= in side under sleeve), work 47-52-53-58-66-71 stitches (= back piece), place the next 35-37-38-40-40-42 stitches on 1 thread for the sleeve, cast on 4-6-8-8-10-10 stitches (= in side under sleeve), work the remaining 29-30-32-33-37-40 stitches (= left front piece). The body and sleeves are finished separately. THE PIECE IS NOW MEASURED FROM HERE! BODY: = 113-124-133-140-160-171 stitches. Insert a marker thread in the middle of the new stitches under each sleeve. Allow the threads to follow your work onwards; they are used when decreasing later. Continue with stocking stitch and 5 band stitches in garter stitch on each side for 4 cm. Now decrease 1 stitch on each side of both marker threads – read DECREASE TIP. The decreases are now finished in size S. Repeat the decrease in sizes M, L, XL, XXL and XXXL when the piece measures 15 cm from the division = 109-116-125-132-152-163 stitches. Continue with stocking stitch and 5 band stitches in garter stitch on each side until the piece measures 29-29-30-30-30-30 cm from the division; try the jacket on and work to desired length (5 cm left to finished length). Increase 23-24-27-28-32-33 stitches evenly spaced = 132-140-152-160-184-196 stitches. Change to circular needle size 6 mm and work rib from the right side as follows: 5 band stitches in garter stitch, * knit 2, purl 2 *, work from *-* until there are 7 stitches left, knit 2 and 5 band stitches in garter stitch. Continue this rib for 5 cm. Cast off with knit over knit and purl over purl – read CASTING-OFF TIP. The jacket measures approx. 60-62-64-66-68-70 cm from the shoulder down. SLEEVES: Place the 35-37-38-40-40-42 stitches from the thread on the one side of the piece on double pointed needles/short circular needle size 8 mm and knit up 1 stitch in each of the 4-6-8-8-10-10 stitches cast on under the sleeve = 39-43-46-48-50-52 stitches. Insert a marker thread in the middle of the new stitches under the sleeve. Allow the thread to follow your work onwards; it is used when decreasing later Start at the marker thread and work stocking stitch in the round for 4 cm. Then decrease 1 stitch on each side of the marker thread – read DECREASE TIP. Decrease like this every 7½-6-5-4-4-3½ cm a total of 6-7-8-9-9-10 times = 27-29-30-30-32-32 stitches. Continue working until the sleeve measures 45-44-43-41-40-39 cm from the division (shorter measurements in larger sizes due to wider neck and longer yoke). Try the jacket on and work to desired length (approx. 5 cm left to finished length). Increase 5-7-6-10-8-8 stitches evenly spaced = 32-36-36-40-40-40 stitches. Change to double pointed needles size 6 mm and work rib (knit 2, purl 2) for 5 cm. Cast off with knit over knit and purl over purl – remember CASTING-OFF TIP. The sleeve measures approx. 50-49-48-46-45-44 cm from the division. Work the other sleeve in the same way. ASSEMBLY: Fold the neck double to the inside and sew down. To avoid the neck being tight and rolling outwards, it is important that the seam is elastic. Sew together the openings at each end of the neck with small stitches. Sew the buttons onto the right band. |
|||||||
Diagram explanations |
|||||||
|
|||||||
 |
|||||||
 |
|||||||
Have you finished this pattern?Tag your pictures with #dropspattern #sailorbluesjacket or submit them to the #dropsfan gallery. Do you need help with this pattern?You'll find 31 tutorial videos, a Comments/Questions area and more by visiting the pattern on garnstudio.com. © 1982-2026 DROPS Design A/S. We reserve all rights. This document, including all its sub-sections, has copyrights. Read more about what you can do with our patterns at the bottom of each pattern on our site. |
|||||||


With over 40 years in knitting and crochet design, DROPS Design offers one of the most extensive collections of free patterns on the internet - translated to 17 languages. As of today we count 324 catalogues and 12290 patterns translated into English (UK/cm).
We work hard to bring you the best knitting and crochet have to offer, inspiration and advice as well as great quality yarns at incredible prices! Would you like to use our patterns for other than personal use? You can read what you are allowed to do in the Copyright text at the bottom of all our patterns. Happy crafting!
Post a comment to pattern DROPS 224-8
We would love to hear what you have to say about this pattern!
If you want to leave a question, please make sure you select the correct category in the form below, to speed up the answering process. Required fields are marked *.