
Popular categories
Looking for a yarn?


Comments / Questions (70)
![]() Laila Larsen wrote:
Laila Larsen wrote:
Hej skal første pind i halskanten startes med diagram a1 og hvordan strikkes: stik højre pind gennem masken under næste maske, strik 1 maske ret og slip masken der blev strikket i af venstre pind? Kan ikke finde video med det. Mvh. Laila
07.04.2022 - 13:43DROPS Design answered:
Hej Laila, Her ser du hvordan man gør Hvordan strikkes der i masken under....
08.04.2022 - 08:56
![]() Sophie wrote:
Sophie wrote:
Hello what’s the size the model is wearing ? S?
17.03.2022 - 16:43DROPS Design answered:
Dear Sophie, she might wear either a S or a M - to find your size, measure a similar garment you have and like the shape and compare these measurements to the chart; this is the best accurate way to find your size. Read more here. Happy knitting!
17.03.2022 - 17:24
![]() Wenche Heggem wrote:
Wenche Heggem wrote:
Hei jeg har strikket denne i Kid-Silk str M, jeg har nok strikket for løst, den er for stor og virker pløsete, kan jeg krympe den ved å vaske den litt hardt ? eller .. lage et bærestykke under og 'minske' den inn... har du råd ? Tusen takk!
17.03.2022 - 12:24DROPS Design answered:
Hei Wenche. Kid-Silk vil tove i vask (men ujevnt pga silken), men med et så dyrt garn og mye arbeid ved å strikke , ville jeg ikke ha vasket den i maskin for å tove/krympe den. Om du har tørketrommel, kan du evnt prøve å tove den litt der, og da sjekke den jevnlig (ofte). Men alt dette blir på eget ansvar, usikker på hvordan resultatet blir. Har du noe garn igjen fra genseren, kan du strikke en prøvelapp, fukte den og kjøre den i tørketrommel, og sjekke om resultatet blir OK for deg. mvh DROPS Design
21.03.2022 - 13:24
![]() KLra wrote:
KLra wrote:
Hej, jeg forstår ikke denne del af opskriften. Kan den forklares på en anden vis? Jeg kan slet ikke se, hvordan jeg ender på 37 masker, når jeg starter med 21... SADELSKULDER: Strik 1 maske ret * 1 ret i forreste og bagerste led af næste maske, slå om *, strik fra *-* totalt 18-18-21-21-24-24 gange, strik 1 maske ret i forreste og bagerste led af masken, strik 1 maske ret (= 37-37-43-43-49-49 masker taget ud og der er nu 58-58-67-67-76-76 masker på sadelskulderen).
12.03.2022 - 17:22
![]() Yvette Naneix wrote:
Yvette Naneix wrote:
Avec quelle autre laine pout tricoter ce modele 227/39 ? Une laine moins fragile et qui peut passer en machine . Cordialement YNaneix
27.02.2022 - 14:21DROPS Design answered:
Bonjour Mme Naneix, utilisez notre convertisseur pour voir les alternatives possibles - avec 2 fils du groupe A en Superwash (ex. Baby Merino, Fabel), ou 1 fil du groupe C (Big Merino). N'oubliez pas que l'utilisation d'une autre laine peut changer la texture du modèle. Votre magasin saura vous conseiller la meilleure alternative, même par mail ou téléphone. Bon tricot!
28.02.2022 - 10:14
![]() Aud wrote:
Aud wrote:
Hei, jeg ønsker en mer sommerlig utgave. Kan dere anbefale en annen hals?
26.02.2022 - 18:12DROPS Design answered:
Hej Aud, du kan søge efter opskrifter på rund hals hvis du synes det passer bedre til sommeren. Eller så strikker du halsen kortere og fortsætter når du har den størrelse på hals du er ude efter :)
02.03.2022 - 11:26
![]() Annie Hansson wrote:
Annie Hansson wrote:
Mönster 227-39: Sidan 4 under rubrik OKÖKNING: Rad 5:\"Sticka slätstickning till arbetet mäter 19-21-22-24-25-27 cm FRÅN MARKÖREN EFTER HALSKANTEN. VAR i beskrivningen definieras halskanten? Är det när man vänder arbetet och stickar i motsatt riktning? ELLER är det efter SADELAXEL när man övergår till rundsticka nr5 ?? ELLER någon annanstans?? Tacksam för hjälp! Annie Hansson Tfn 070 23 13 495
16.02.2022 - 17:47DROPS Design answered:
Hei Annie. Når du har 240-244-266-274-296-296 masker på pinnen, starter du på BÆRESTYKKET (OK) og du setter da en merketråd på begynnelsen av omgangen / midt bak på genseren og det er fra dette merket du skal måle ifra når du skal finne ut at arbeidet ditt måler 19-21-22-24-25-27 cm. mvh DROPS Design
21.02.2022 - 09:34
![]() Katharina Prüne wrote:
Katharina Prüne wrote:
Hallo, Ich habe gerade die Maschenprobe mit Nadelstärke 5 (wie angegeben) gestrickt. Es passt gut mit der Maschenprobe. Mir ist nur aufgefallen, dass das Muster viel durchsichtiger ist als auf dem Foto. Kann ich das irgendwie ändern oder ist das so gewollt? LG Katharina
04.02.2022 - 14:42DROPS Design answered:
Liebe Katharina, sollte Ihre Maschenprobe stimmen, dann stimmt auch die Textur, so soll es auch sein, siehe letzte Foto, wo die Ärmel etwas luftig aussieht. Viel Spaß beim stricken!
04.02.2022 - 16:07
![]() Mette Iversen wrote:
Mette Iversen wrote:
Hei, hvordan finner jeg ut hvilken str jeg trenger, ser ikke overvidden noe sted? Mvh Mette
31.01.2022 - 13:31DROPS Design answered:
Hei Mette, Du finne mål til de forskjellige størrelsene på bunnen av siden. God fornøyelse!
01.02.2022 - 06:53
![]() Martina Zelená wrote:
Martina Zelená wrote:
Hi there, I need you advice re collar. I've just finished the first 16 cm of collar and should continue the next 8 cm but number of stitches doesn't fit. I make it in size XL a I have 112 stitches on my needles but as per the pattern I should have 115, I.e. 21+14+1+39+2+14+1+21+2=115. Can you pls advise what I'm doing wrong? Thank you. Regards, Martina
29.01.2022 - 13:49DROPS Design answered:
Dear Martina, you should work A.1 over the next 18 sts instead of 21 sts, then you get the correct number of sts = 112. Happy knitting!
31.01.2022 - 08:54
|
||||||||||
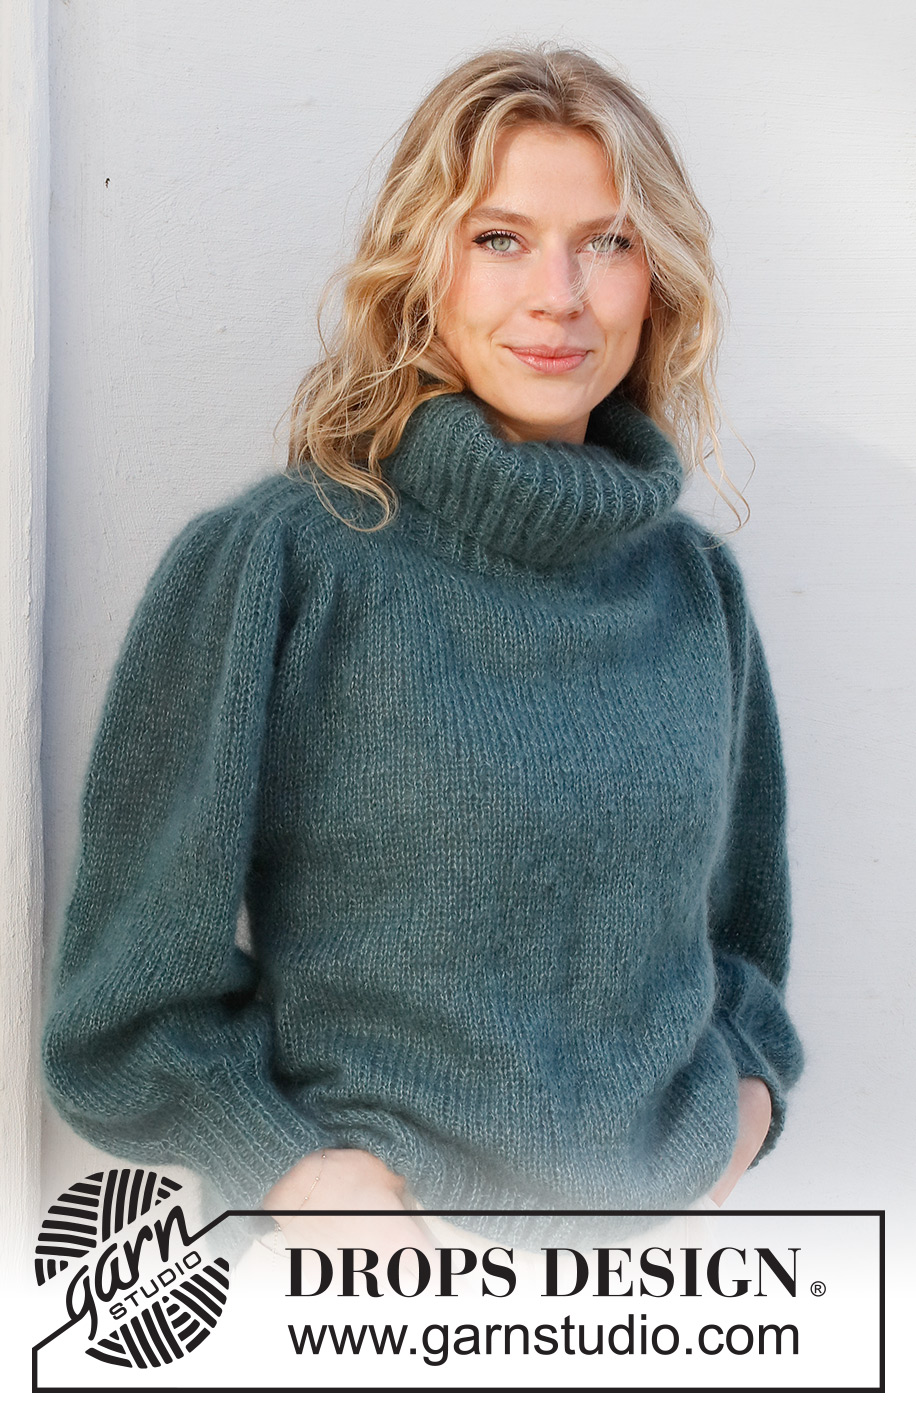
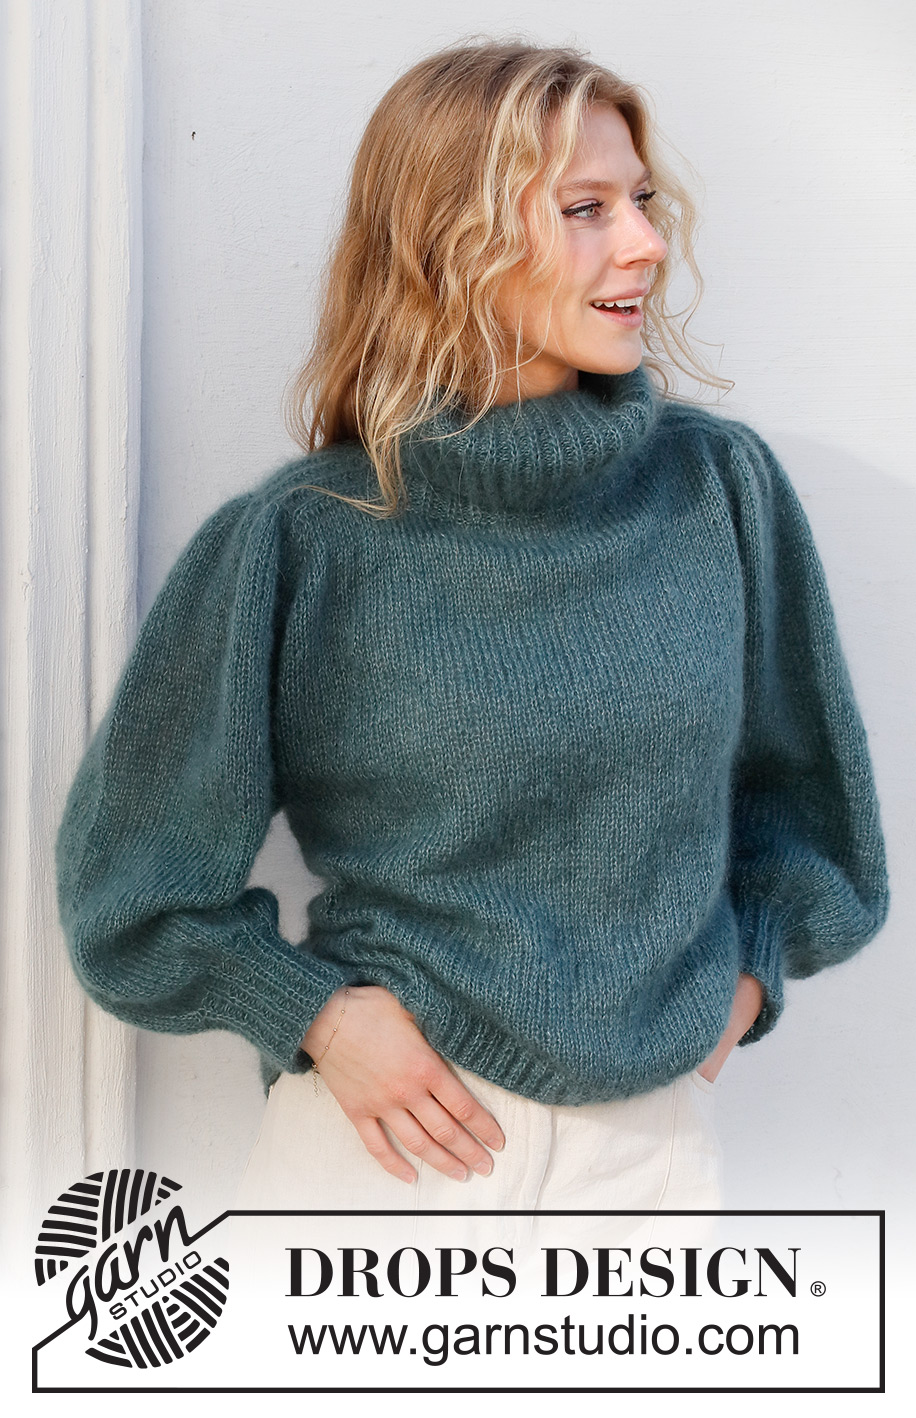
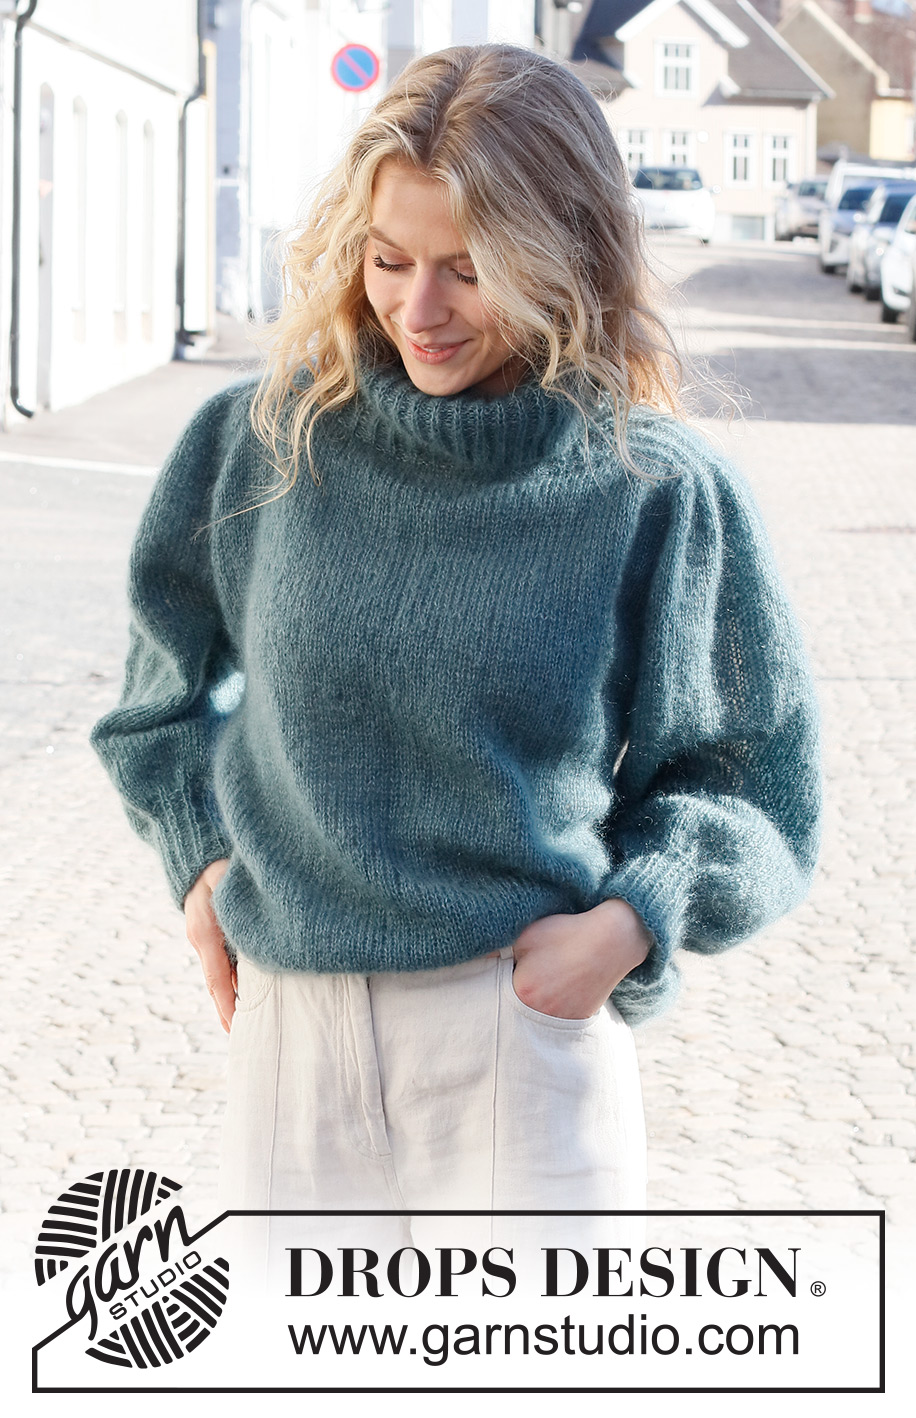
Falling Water Sweater#fallingwatersweater |
||||||||||
 |
 |
|||||||||
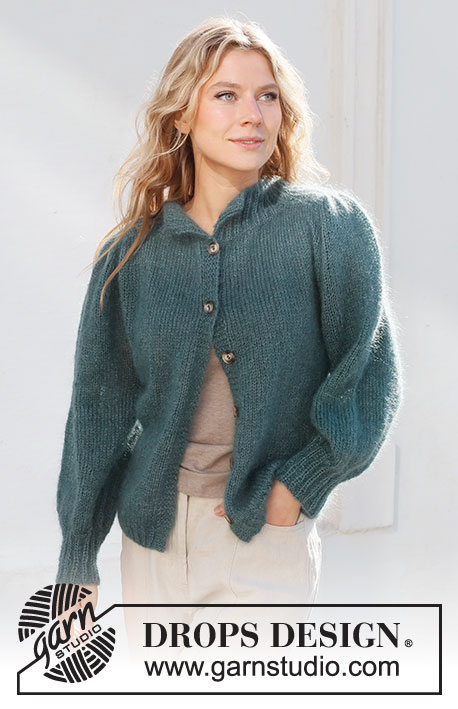
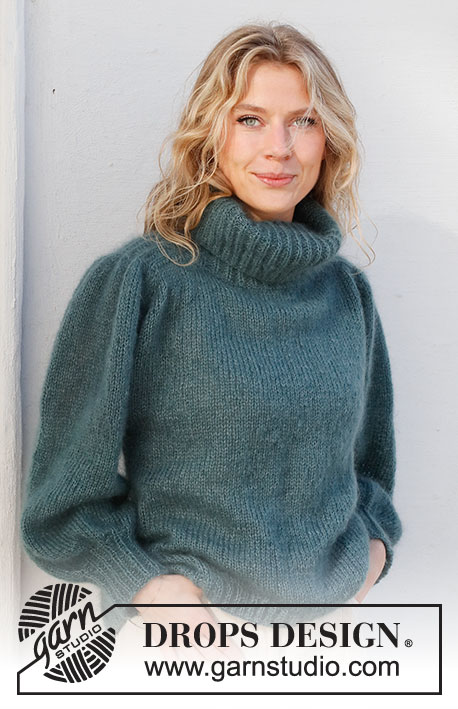
Knitted jumper in 2 strands DROPS Kid-Silk. The piece is worked top down, with saddle shoulders, puffed sleeves and high neck. Sizes S - XXXL.
DROPS 227-39 |
||||||||||
|
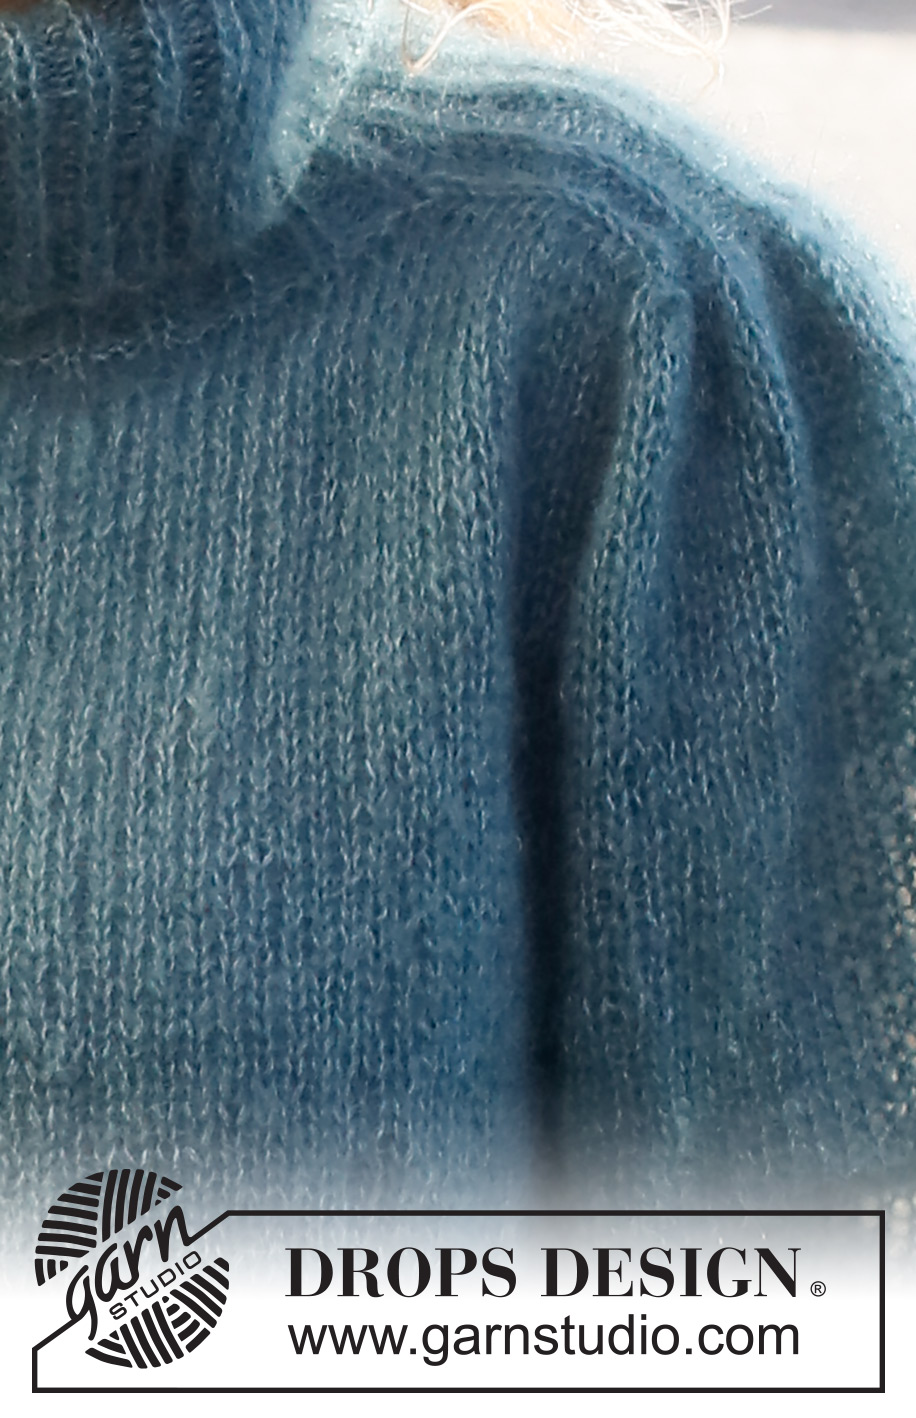
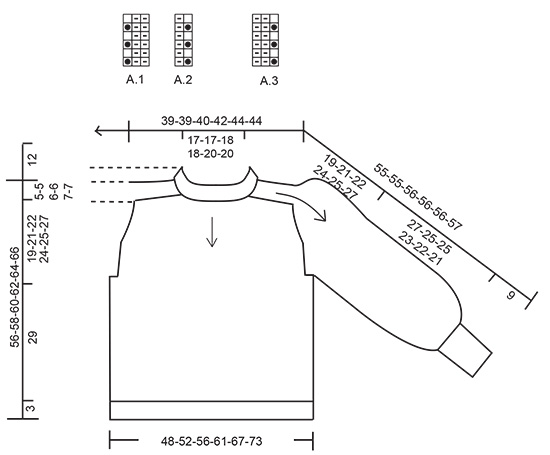
------------------------------------------------------- EXPLANATIONS FOR THE PATTERN: ------------------------------------------------------- RIDGE/GARTER STITCH (worked back and forth): Knit all rows. 1 ridge = knit 2 rows. PATTERN: See diagrams A.1 to A.3. The diagrams show all rows in the pattern from the right side. INCREASE/DECREASE TIP (evenly spaced): To work out how to increase/decrease evenly, count the number of stitches on to be increased/decreased over (e.g. 120 stitches) and divide by the number of increases/decreases to be made (e.g. 18 stitches) = 6.6. In this example, increase by making 1 yarn over after alternately each 6th and 7th stitch (approx.). On the next row work the yarn overs twisted to avoid holes. When decreasing, knit together alternately each 5th and 6th stitch and each 6th and 7th stitch. INCREASE TIP-1: All increases are worked from the right side! Increase 1 stitch by making 1 yarn over. On the next row (wrong side) knit the yarn over twisted to avoid a hole. INCREASE TIP-2: BEFORE MARKER-STITCH: The new stitch twists to the right. Use the left needle to pick up the strand between 2 stitches from the previous round, pick up the back strand and knit in the front loop. AFTER MARKER-STITCH: The new stitch twists to the left. Use the left needle to pick up the strand between 2 stitches from the previous round, pick up the front strand and knit in the back loop. DECREASE TIP (for sleeves): Decrease 1 stitch on either side of the marker thread as follows: Work until there are 3 stitches left before the marker thread, knit 2 together, knit 2 (marker thread sits between these 2 stitches), slip 1 stitch as if to knit, knit 1 and pass the slipped stitch over the knitted stitch (2 stitches decreased). CASTING-OFF TIP: To avoid the cast-off edge being tight you can cast off with a larger size needle. If the edge is still tight, make 1 yarn over after approx. each 4th stitch at the same time as casting off; the yarn overs are cast off as normal stitches. ------------------------------------------------------- START THE PIECE HERE: ------------------------------------------------------- JUMPER – SHORT OVERVIEW OF THE PIECE: The jumper is worked from top down, with 2 strands. The neck is worked in the round with circular needle. The piece is then divided for the front/back pieces and the saddle shoulders. The shoulders are worked separately, back and forth, after which the front and back pieces are worked together again; at the same time stitches are knitted up along the sides of the shoulders. The yoke is continued in the round from mid-back then divided for the body and sleeves. The body is continued in the round. The sleeves are worked in the round with short circular needle/double pointed needles. NECK: Cast on 120-120-132-132-150-150 stitches with circular needle size 5 mm and 2 strands DROPS Kid-Silk. Change to circular needle size 3 mm and work A.1 in the round for 16 cm. Knit 1 round where you decrease 18-18-20-20-22-22 stitches evenly spaced – read INCREASE/DECREASE TIP = 102-102-112-112-128-128 stitches. Now turn the piece so you work in the opposite direction (this means the previous right side will be on the outside when the neck is turned down later). Continue in rib as follows: Work A.3 over the first 18-18-21-21-24-24 stitches, insert a marker here, work A.2 over the next 12-12-14-14-16-16 stitches, work the first stitch in A.2, insert a marker here, work A.1 over the next 36-36-39-39-45-45 stitches, work the first 2 stitches in A.1, insert a marker here, work A.2 over the next 12-12-14-14-16-16 stitches, work the first stitch in A.2, insert a marker here, work A.1 over the next 18-18-18-18-21-21 stitches, work the first 2 stitches in A.1. Continue this pattern for 8 cm (the neck measures 24 cm) – adjust so the next row is an even row in the diagrams. Work the next row as follows: Knit 18-18-21-21-24-24 stitches and decrease 1-0-2-1-3-3 stitches evenly over these stitches (= half back piece), work pattern as before over the next 13-13-15-15-17-17 stitches (= shoulder), knit 38-38-41-41-47-47 stitches and decrease 4-2-3-1-5-5 evenly over these stitches (= front piece), work pattern as before over the next 13-13-15-15-17-17 stitches (= shoulder), knit 20-20-20-20-23-23 and decrease 3-2-1-0-2-2 stitches evenly over these stitches (= half back piece). There are 94-98-106-110-118-118 stitches (34-36-38-40-42-42 stitches on the front/back pieces and 13-13-15-15-17-17 stitches on each shoulder). Cut the strand. Now work the shoulders; leave the other stitches on the needle or place them on a thread. SADDLE SHOULDERS: Starting from the right side, work back and forth over the shoulder-stitches with circular needle size 3 mm and 2 strands DROPS Kid-Silk as follows: Cast on 1 stitch (= edge stitch), work the 13-13-15-15-17-17 stitches in pattern A.2 as before, at the same time as each purl-1 is increased to purl-2 – read INCREASE TIP-1 (= 6-6-7-7-8-8 stitches increased), cast on 1 stitch at the end of the row (= edge stitch) = 21-21-24-24-27-27 stitches. Work 1 row from the wrong side then work the next row from the right side as follows: 1 edge stitch in garter stitch, A.3 until there are 2 stitches left, work the first stitch in A.3 (so the pattern is symmetrical), 1 edge stitch in garter stitch. Continue this pattern back and forth until the piece measures 8-8-9-9-10-10 cm from the purl-increases – adjust so the last row is from the wrong side. Place these stitches on a thread and work the other shoulder in the same way. Now work the front and back pieces and the shoulders onto the same circular needle size 5 mm, at the same time as stitches are knitted up along the sides of the shoulders. Start the round from mid-back: HALF BACK PIECE: Work stocking stitch over the first 17-18-19-20-21-21 stitches, knit up 14-14-14-15-15-15 stitches inside the edge stitch along the side of the shoulder. SHOULDER: Knit 1, * knit 1 in both the front and back loops of the next stitch, make 1 yarn over *, work from *-* a total of 18-18-21-21-24-24 times, knit 1 in both the front and back loops of the next stitch, knit 1 (= 37-37-43-43-49-49 stitches increased and 58-58-67-67-76-76 stitches on the shoulder). FRONT PIECE: Knit up 14-14-14-15-15-15 stitches inside the edge stitch along the other side of the shoulder, knit the next 34-36-38-40-42-42 stitches on the front piece, knit up 14-14-14-15-15-15 stitches inside the edge stitch along the side of the other shoulder. SHOULDER: Knit 1, * knit 1 in both the front and back loops of the next stitch, make 1 yarn over *, work from *-* a total of 18-18-21-21-24-24 times, knit 1 in both the front and back loops of the next stitch, knit 1 (= 37-37-43-43-49-49 stitches increased and 58-58-67-67-76-76 stitches on the shoulder). HALF BACK PIECE: Knit up 14-14-14-15-15-15 stitches inside the edge stitch along the other side of the shoulder, knit the remaining 17-18-19-20-21-21 stitches on the back piece. There are 240-244-266-274-296-296 stitches on the needle. YOKE: Insert a marker thread at the beginning of the round (= mid-back). THE PIECE IS NOW MEASURED FROM HERE! Now insert 4 markers as follows: Marker 1: Work stocking stitch over the first 31-32-33-35-36-36 stitches, insert the marker in the next stitch (= half back piece). Marker 2: Work stocking stitch over the next 56-56-65-65-74-74 stitches, insert the marker in the next stitch (= right sleeve). Marker 3: Work stocking stitch over the next 62-64-66-70-72-72, stitches, insert the marker in the next stitch (= front piece). Marker 4: Work stocking stitch over the next 56-56-65-65-74-74 stitches, insert the marker in the next stitch (= left sleeve). Work stocking stitch over the last 31-32-33-35-36-36 stitches (= half back piece). Allow the 4 markers to follow your work onwards; they are used when increasing. Continue with stocking stitch in the round. AT THE SAME TIME, on the next round the increase for the sleeves and yoke will start. The increase are done at the same time, but in size L, XL, XXL and XXXL the increases continue on the yoke after the increases for the sleeves are finished. Increase as explained below. On the first round increase 4 stitches for the sleeves and 4 stitches for the yoke. Increase 1 stitch on each side of the 4 markers – read INCREASE TIP-2 ( = 8 increased on the round). SLEEVE INCREASES: Increase AFTER markers 1 and 3 and BEFORE markers 2 and 4. Increase like this every 2nd round a total of 7-9-6-9-6-8 times = 72-76-79-85-88-92 stitches on the sleeves (including the marker-stitches on each side) YOKE INCREASES: Increase BEFORE markers 1 and 3 and AFTER markers 2 and 4. Increase like this every 2nd round a total of 7-9-11-12-16-21 times = 76-82-88-94-104-114 stitches on the front and 76-82-88-94-104-114 on the back piece. When all the increases are finished there are 296-316-334-358-384-412 stitches. Continue with stocking stitch until the piece measures 19-21-22-24-25-27 cm from the marker thread after the neck. Now divide for the body and sleeves as follows: Work the first 38-41-44-47-52-57 stitches (= half back piece), place the next 72-76-79-85-88-92 stitches on a thread for the sleeve, cast on 6-6-8-10-10-10 stitches (= in side under sleeve), work the next 76-82-88-94-104-114 stitches (= front piece), place the next 72-76-79-85-88-92 stitches on a thread for the sleeve, cast on 6-6-8-10-10-10 stitches (= in side under sleeve), work the last 38-41-44-47-52-57 stitches (= half back piece). The body and sleeves are finished separately. THE PIECE IS NOW MEASURED FROM HERE. BODY: = 164-176-192-208-228-248 stitches. Continue with stocking stitch in the round for 29 cm. Try the jumper on and work to desired length (3 cm left to finished length). Increase 37-40-42-47-51-55 stitches evenly spaced = 201-216-234-255-279-303 stitches. Change to circular needle size 3 mm. Work A.1 for 3 cm. Cast off with knit over Fisherman’s rib and purl over purl – read CASTING-OFF TIP. The jumper measures approx. 56-58-60-62-64-66 cm from the shoulder down. SLEEVES: Place the 72-76-79-85-88-92 stitches from the thread on the one side of the piece on double pointed needles/short circular needle size 5 mm and knit up 1 stitch in each of the 6-6-8-10-10-10 stitches cast on under the sleeve = 78-82-87-95-98-102 stitches. Insert a marker thread in the middle of the new stitches under the sleeve. Start at the marker thread and work stocking stitch in the round for 4 cm. Now decrease 1 stitch on either side of the marker thread – read DECREASE TIP. The decreases in sizes S and M are finished (= a total of 1-1 time). In sizes L, XL, XXL and XXXL repeat the decrease every 8-2½-2-2 cm 1-3-4-4 more time(s) (= a total of 2-4-5-5 times). When all decreases are worked, there are 76-80-83-87-88-92 stitches on the round. Continue working until the sleeve measures 27-25-25-23-22-21 cm from the division. Try the jumper on and work to desired length (9 cm left to finished length). Knit 1 round where you decrease 34-38-38-42-40-41 stitches evenly spaced = 42-42-45-45-48-51 stitches. Change to double pointed needles size 3 mm and work A.1 for 9 cm. Cast off with knit over Fisherman’s rib and purl over purl – remember CASTING-OFF TIP. The sleeve measures approx. 36-34-34-32-31-30 cm from the division. Work the other sleeve in the same way. |
||||||||||
Diagram explanations |
||||||||||
|
||||||||||
 |
||||||||||
Have you finished this pattern?Tag your pictures with #dropspattern #fallingwatersweater or submit them to the #dropsfan gallery. Do you need help with this pattern?You'll find 33 tutorial videos, a Comments/Questions area and more by visiting the pattern on garnstudio.com. © 1982-2026 DROPS Design A/S. We reserve all rights. This document, including all its sub-sections, has copyrights. Read more about what you can do with our patterns at the bottom of each pattern on our site. |
||||||||||


With over 40 years in knitting and crochet design, DROPS Design offers one of the most extensive collections of free patterns on the internet - translated to 17 languages. As of today we count 324 catalogues and 12290 patterns translated into English (UK/cm).
We work hard to bring you the best knitting and crochet have to offer, inspiration and advice as well as great quality yarns at incredible prices! Would you like to use our patterns for other than personal use? You can read what you are allowed to do in the Copyright text at the bottom of all our patterns. Happy crafting!
Post a comment to pattern DROPS 227-39
We would love to hear what you have to say about this pattern!
If you want to leave a question, please make sure you select the correct category in the form below, to speed up the answering process. Required fields are marked *.