
Popular categories
Looking for a yarn?


Comments / Questions (47)
![]() Shanthi wrote:
Shanthi wrote:
Yea. I did look at the wrong diagram. Sometimes the mind gets blocked while concentrating. 😐. Thank you for guiding me. Enjoy your summer !,
26.07.2022 - 12:37
![]() Shanthi wrote:
Shanthi wrote:
Hi. After casting on 76 stitches, while working the yoke you get 90 stitches. I am getting 94 stitches. What is the mistake I am making ? Can you kindly explain. Awaiting your reply. Thank you.
26.07.2022 - 11:27DROPS Design answered:
Hi Shanthi, you have probably chosen the wrong A.1 diagram. Please follow the diagram A.1 for sizes S-M-L. In this way, you should get 90 stitches. Happy knitting!
26.07.2022 - 12:24
![]() Edyta wrote:
Edyta wrote:
Pierwszy raz próbuję swoich sił z wzorem DROPS. Mam zrobiony ściągacz i 2 rzędy karczku ze schematem A1-na drutach mam 90 oczek-tyle co powinno być. Ale nie jestem pewna czy teraz powinnam zmienić druty na 5,5 i robić dalej wzór ze schematem A2? Czy dalej robić ze schematem A1? Kiedy przejść na schemat A2? 🤔 Opis wzoru czytałam milion razy chyba... 🤷🏻♀️
28.06.2022 - 21:40DROPS Design answered:
Witaj Edyto, teraz zaczynasz przerabiać na drutach nr 5,5 i przerabiać schemat A.2 (Dalej przerabiać na prawo, wykonując schemat A.2 ponad oczkami schematu A.1 (27-27-27-29-29-29 oczek), a oczka przodu i tyłu dżersejem.). W razie jakichś wątpliwości pisz. Pozdrawiamy!
29.06.2022 - 16:00
![]() Martine Houdayer wrote:
Martine Houdayer wrote:
Bonjour, Dans la partie « empiècement augmentations « , j’ai compris comment insérer les 4 nouveaux marqueurs, mais je ne comprends pas pourquoi le 4ème et le 8éme se retrouvent décalés. Du coup , on se retrouve avec des côtés différents le long du raglan et une dissymétrie qui n’est pas jolie . Ai-je bien tout compris ? Merci.
27.04.2022 - 14:54DROPS Design answered:
Bonjour Mme Houdayer, les marqueurs doivent être maintenant au nombre de 8 (au lieu de 4), autrement dit, pour chaque épaule vous avez: 1er/5ème marqueur, 13-14 m de A.2, 2ème/6ème marqueur, 1 m de A.2, 3ème/7ème marqueur, 13-14 m de A.2, 5ème/8ème marqueur. Vous allez ainsi augmenter pour les manches au milieu de A.2 = après le 2ème/6ème marqueur (début de la manche) et avant le 5ème/7ème marqueur (fin de la manche). Bon tricot!
27.04.2022 - 15:36
![]() Karla Ahle wrote:
Karla Ahle wrote:
Bei dem Pulli Easy Twist Modell w-829 verstehe ich die Anleitung nicht ganz. Wenn ich auf Seite drei der Anleitung am Ende der Passe angekommen bin und habe 90 Machen auf der Nadel, wieviele Runden muss ich noch Stricken bevor ich zu Nadelstärke 5,5 Wechsel. Da verstehe ich das Diagramm A1 nicht. Aus wievielten Reihen besteht das? Mfg
03.04.2022 - 13:22DROPS Design answered:
Liebe Frau Ahle, nachdemn Sie auf 90 Maschen zugenommen haben, setzen Sie Markierungen wie erklärt und jetzt stricken Sie weiter SATTELSCHULTER-ZUNAHMEN: mit der Nadel 5,5. Bei der 1. Reihe in A.1 stricken Sie Bündchen wie beschrieben, und gleizeitig machen Sie 3 Umschläge = 3 Zunahmen, so haben Sie 27 Maschen - die Maschen wie bei der 2. Runde in A.1 stricken. Viel Spaß beim stricken!
04.04.2022 - 09:46
![]() Odile Vaessen wrote:
Odile Vaessen wrote:
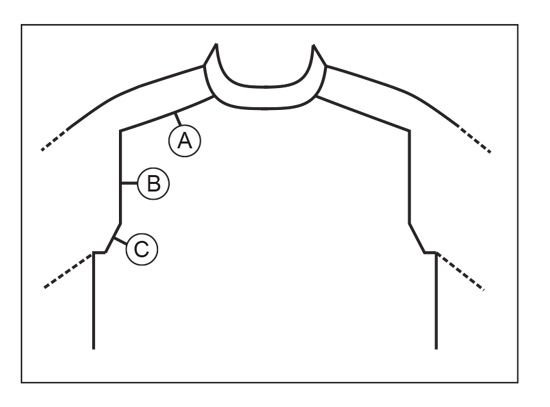
Hallo Op de 2e tekening lijkt het of op het lijf ook gemeerderd wordt bij C, na het rechte stuk van B. In de beschrijving worden alleen 10 steken extra opgezet onder de oksel. Klopt dat, want lijkt me nogal abrupt. Dank u voor het antwoord. Ik vind uw site prachtig en heb al veel modellen gebreid. Vriendelijke groeten
29.03.2022 - 19:02DROPS Design answered:
Dag Odile,
Nee, er wordt daar niet meer extra op het lijf gemeerderd. De tweede tekening geeft dus een vertekend, het zijn de meerderingen bij de mouw die de schuine lijn veroorzaken.
04.04.2022 - 13:44
![]() FRANCE Deprez wrote:
FRANCE Deprez wrote:
Il semble y avoir une erreur dans la phrase suivante : L'ouvrage mesure environ 18-20-23-24-25-27 cm. Tricoter jusqu'à ce que l'ouvrage mesure 18-20-23-24-25-27 cm (il reste environ 3-3-2-3-4-4). Il reste environ quoi ?
13.03.2022 - 16:36DROPS Design answered:
Bonjour Mme Deprez, il manquait "cm", désormais ajouté, merci pour votre retour; la hauteur est identique, mais si vous ne l'avez pas, tricotez jusqu'à la hauteur indiquée pour votre taille; il vous reste alors environ 3-3-2-3-4-4 cm avant la division de l'ouvrage, vous devez encore augmenter tous les tours, et alors l'ouvrage doit mesurer 21-23-25-27-29-31 cm. Merci! Bonne continuation!
14.03.2022 - 11:25
![]() Ewa Chojnowska-Rzepińska wrote:
Ewa Chojnowska-Rzepińska wrote:
Witam Oznaczenia w schematach są jasne ale wychodzi mi zupełnie inny wzór niż na sweterku. Odnosze wrazenie jakby był to inny zupełnie wzór. Pozdrawiam
01.12.2021 - 13:35DROPS Design answered:
Witaj Ewo, czy możesz zrobić zdjęcie i wysłać mi na poland@dropsproject.com? Przyjrzę się i zobaczę o co może chodzić. Pozdrawiam!
01.12.2021 - 13:49
![]() Ewa Chojnowska-Rzepińska wrote:
Ewa Chojnowska-Rzepińska wrote:
Witam Bardzo podoba mi się ten sweterek ale mam problem ze schemat A2, czy można prosić o zamieszczenie filmiku. Dziękuję Pozdrawiam
30.11.2021 - 22:52DROPS Design answered:
Witaj Ewo, poproszę o zamieszczenie filmu, ale to może potrwać. Napisz dokładnie jaki masz problem z tym schematem to postaram się pomóc. W międzyczasie zapoznaj się z kursem Jak odczytywać schematy w robótce na drutach. Czytaj fragment dotyczący robótki przerabianej na okrągło. Pozdrawiamy!
01.12.2021 - 08:48
![]() Nella Poppius wrote:
Nella Poppius wrote:
Hei, tuli tarkennettavaa kohdasta ETU-ja TAKAKAPPALE mikä on on NURJA puoli johon lisätään tasavälein 8 silmukkaa.? yst. nella poppius yst. nella
05.10.2021 - 11:09DROPS Design answered:
Hei, tuohon on tullut virhe. Lisäykset tehdään tietysti työn oikealla puolella, koska puserohan neulotaan suljettuna neuleena. Korjaamme ohjeen.
05.10.2021 - 16:46
|
|||||||||||||||||||||||||||||||
Easy Twist#easytwistsweater |
|||||||||||||||||||||||||||||||
 |
 |
||||||||||||||||||||||||||||||
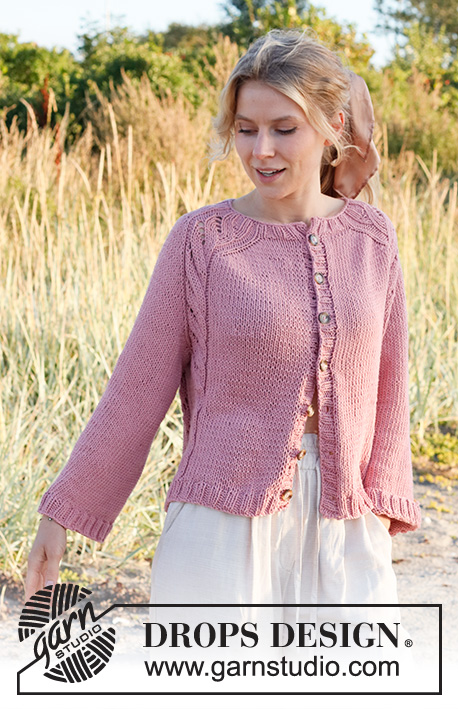
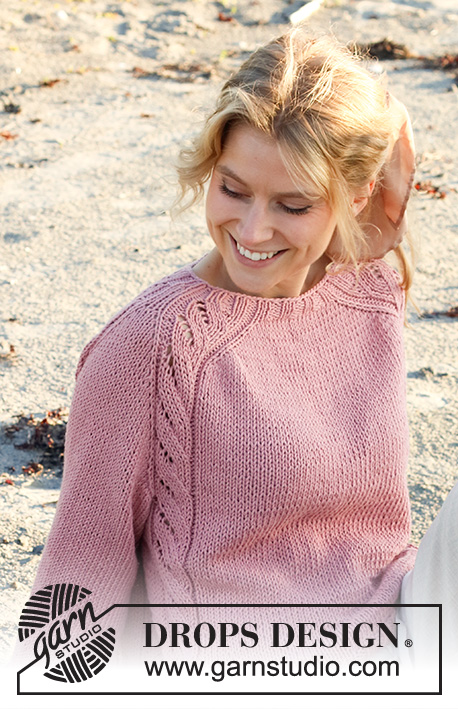
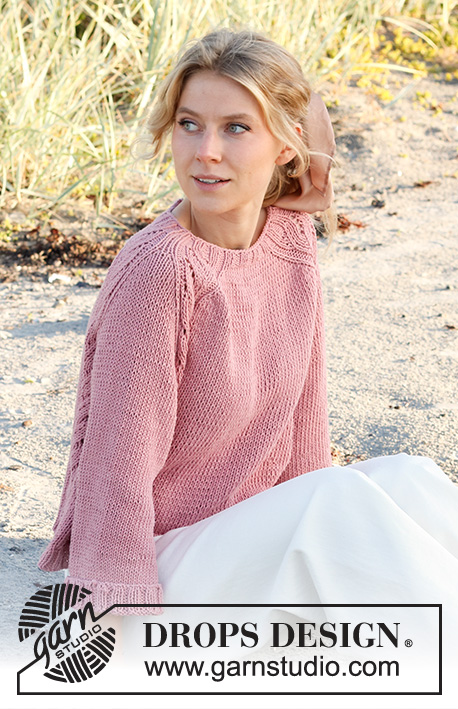
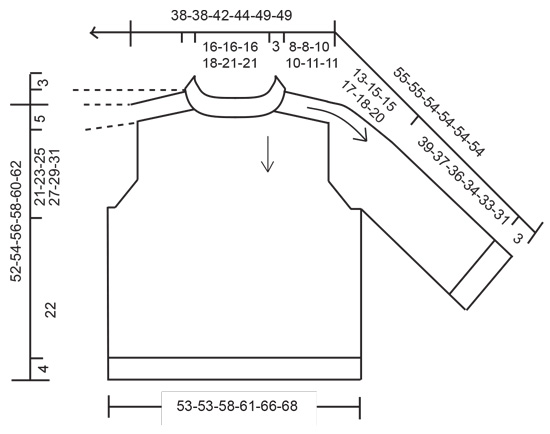
Knitted jumper in DROPS Paris. Piece is knitted top down with saddle shoulders and lace pattern. Size: S - XXXL
DROPS 221-36 |
|||||||||||||||||||||||||||||||
|
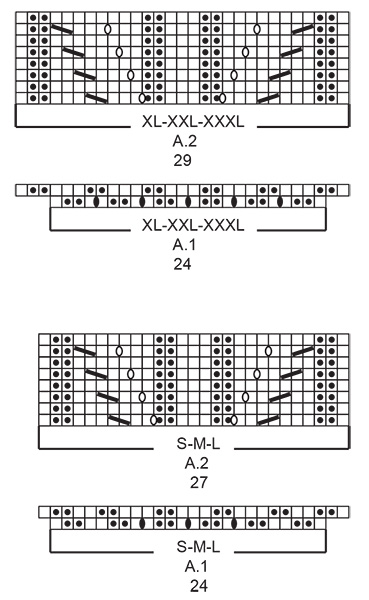
------------------------------------------------------- EXPLANATION FOR THE PATTERN: ------------------------------------------------------- PATTERN: See diagrams A.1 and A.2. Choose diagram for your size. INCREASE TIP-1 (evenly): To calculate how to increase evenly, count the stitches to be increased (e.g. 8 stitches) and divide by stitches of increases to be done (e.g. 2) = 4. In this example increase by making 1 yarn over after every 4th stitch. On next round work yarn overs twisted to avoid holes. INCREASE TIP-2: BEFORE MARKER: The stitch is twisted towards the right. Use left needle to pick up thread between 2 stitches from round below, pick up thread from behind and knit stitch in front loop. AFTER MARKER: The stitch is twisted towards the left. Use left needle to pick up thread between 2 stitches from round below, pick up thread from front and knit stitch in back loop. DECREASE TIP (applies to sleeves in size XL-XXL-XXXL): Decrease 1 stitch on each side of marker as follows: Work until 3 stitches remain before marker, knit 2 together, knit 2 (marker is between these stitches), slip 1 stitch knitwise, knit 1, pass slipped stitch over stitch worked. CAST-OFF TIP: To avoid a tight cast-off edge you may use a larger needle size. If this also is too tight, work a 1 yarn over after approx. every 4th stitch while casting off (cast off yarn overs as regular stitches). ------------------------------------------------------- START THE PIECE HERE: ------------------------------------------------------- JUMPER - SHORT OVERVIEW OF THE PIECE: Work neck edge and yoke in the round on circular needle from mid back, top down. Increase stitches for saddle shoulder, then increase stitches for yoke, and finally increase stitches for sleeves. Now divide yoke for body and sleeves. Body is worked in the round on circular needle, top down. Work sleeves in the round on double pointed needles/short circular needle, top down. NECK EDGE: Cast on 76-76-80-84-88-88 stitches on a short circular needle size 4.5 mm with Paris. Knit 1 round. Then work rib as follows: Knit 1, * purl 2, knit 2 *, repeat from *-* until 3 stitches remain, finish with purl 2 and knit 1. Continue rib like this for 3 cm. YOKE: On next round increase stitches evenly, insert 4 markers in piece. Use markers when increasing for saddle shoulder. Work as follows: 8 stitches in stocking stitch and increase 1-1-1-2-4-4 stitches evenly over these stitches – read INCREASE TIP-1 (= half back piece), insert 1st marker, A.1 over the next 24 stitches (i.e. knit over knit and purl over purl and increase as shown in diagram = shoulder stitches), insert 2nd marker, 12-12-16-20-24-24 stitches in stocking stitch and increase 6-6-2-0-0-0 stitches evenly over these stitches (= front piece), insert 3rd marker, A.1 over the next 24 stitches (i.e. knit over knit and purl over purl and increase as shown in diagram = shoulder stitches), insert 4th marker, 8 stitches in stocking stitch and increase 1-1-1-2-4-4 stitches evenly over these stitches = 90-90-90-98-106-106 stitches. Move markers upwards when working. Switch to circular needle size 5.5 mm. Insert 1 marker after 45-45-45-49-53-53 stitches (= mid front), measure yoke from this marker! SADDLE SHOULDER INCREASE: Read all of the following section before working! Continue to knit piece with A.2 over stitches in A.1 (27-27-27-29-29-29 stitches), and stocking stitch over stitches on front piece and back piece. AT THE SAME TIME on first round increase 4 stitches for saddle shoulder as follows: Increase BEFORE 1st and 3rd marker and increase AFTER 2nd and 4th marker – read INCREASE TIP-2. Now increase only on front piece and back piece, and number of shoulder stitches remains the same. REMEMBER THE KNITTING TENSION! Repeat A.2 vertically. Continue pattern like this, and increase the same way on every round 10-10-12-12-12-12 times (= 130-130-138-146-154-154 stitches). YOKE INCREASE: Now move 2 of the markers and insert 4 new markers without working the stitches as follows: Leave 1st marker, count 13-13-13-14-14-14 stitches of A.2, insert 2nd marker, count 1 stitches of A.2 (= mid on top of shoulder), insert 3rd marker, count 13-13-13-14-14-14 stitches of A.2, insert 4th marker, leave next marker (i.e. before next A.2 = 5th marker), count 13-13-13-14-14-14 stitches of A.2, insert 6th marker, count 1 stitch of A.2, insert 7th marker, count 13-13-13-14-14-14 stitches and insert 8th marker. On next round continue with pattern as before, and increase as follows: Increase 1 stitch before 1st, 3th, 5th and 7th marker and 1 stitch after 2nd, 4th, 6th and 8th marker (= 8 stitches increased in total). On next round increase before 1st and 5th marker and after 4th and 8th marker (= 4 stitches increased in total). Repeat these two rounds, increase alternately 8 and 4 stitches - remember INCREASE TIP-2. Work the increased stitches in stocking stitch, i.e. there are 2 stitches more between lace pattern in every A.2 for every increase from right side. Increase for body on every round, and for sleeve every other round. Increase for body 6-6-8-8-10-10 more times (i.e. increase has been done 16-16-20-20-22-22 times in total from neck edge) and 3-3-4-4-5-5 times in total for sleeve = 166-166-186-194-214-214 stitches. Piece now measures 8-8-10-10-11-11 cm from marker. SLEEVE INCREASE: Continue with stocking stitch and A.2 as before. Continue to increase after 2nd and 6th marker and before 3rd and 7th marker (= 4 stitches increased in total). Increase like this every other round 10-12-13-14-14-16 more times in total (i.e. 13-15-17-18-19-21 increases have been done in total on sleeve) = 206-214-238-250-270-278 stitches. Piece measures approx. 18-20-23-24-25-27 cm. Work until piece measures 18-20-23-24-25-27 cm (approx. 3-3-2-3-4-4 cm remain). Now increase on every round 6-6-4-6-8-8 times in total = 230-238-254-274-302-310 stitches. Piece now measures 21-23-25-27-29-31 cm from marker in the neck. On next round divide piece for body and sleeves as follows: Work 25-25-29-30-34-34 stitches in stocking stitch, pattern as before over the next 12-12-12-13-13-13 stitches (= ½ back piece), slip the next 41-45-45-51-57-61 stitches on a stitch holder for sleeve and cast on 10-10-10-12-12-14 stitches under sleeve, pattern as before over the next 12-12-12-13-13-13 stitches, 50-50-58-60-68-68 stitches in stocking stitch, pattern as before over the next 12-12-12-13-13-13 stitches (= front piece), slip the next 41-45-45-51-57-61 stitches on a stitch holder for sleeve and cast on 10-10-10-12-12-14 stitches under sleeve, pattern as before over the next 12-12-12-13-13-13 stitches, finish with 25-25-29-30-34-34 stitches in stocking stitch (= half back piece). BODY: = 168-168-184-196-212-216 stitches. Continue with stocking stitch and pattern as before. Work stitches under sleeve in stocking stitch When piece measures 22 cm from division (or to desired length, approx. 4 cm remain), increase 8 stitches evenly on next round = 176-176-192-204-220-224 stitches. Switch to circular needle size 4.5 mm and work rib = knit 2/purl 2. Continue like this until rib measures 4 cm. Cast off by knitting - read CAST-OFF TIP. Jumper measures approx. 52-54-56-58-60-62 cm from shoulder. SLEEVES: Slip the 41-45-45-51-57-61 stitches from stitch holder in one side of piece double pointed needles/a short circular needle size 5.5 mm and pick in addition up 1 stitch in each of the 10-10-10-12-12-14 new stitches cast on under sleeve = 51-55-55-63-69-75 stitches. Work in stocking stitch in the round. In size XL-XXL-XXXL decrease stitches as follows: SIZE XL-XXL-XXXL: Insert 1 marker in the middle of the 12-12-14 stitches cast on under sleeve. Decrease stitches on each side of this marker later. When sleeve measures 5 cm from division, decrease 1 stitch on each side of the marker - read DECREASE TIP. Decrease like this every 12-10-5 cm 1-3-5 times in total = 61-63-65 stitches. ALL SIZES: = 51-55-55-61-63-65 stitches. Work in stocking stitch until piece measures 39-37-36-34-33-31 cm (or desired length, approx. 3 cm remain). On next round increase 13-13-13-11-13-11 stitches evenly = 64-68-68-72-76-76 stitches. Switch to double pointed needles/short circular needle size 4.5 mm. Work rib (= knit 2/purl 2) over all stitches. Cast off by knitting when rib measures 3 cm. Work the other sleeve the same way. |
|||||||||||||||||||||||||||||||
Diagram explanations |
|||||||||||||||||||||||||||||||
|
|||||||||||||||||||||||||||||||
 |
|||||||||||||||||||||||||||||||
 |
|||||||||||||||||||||||||||||||
 |
|||||||||||||||||||||||||||||||
Have you finished this pattern?Tag your pictures with #dropspattern #easytwistsweater or submit them to the #dropsfan gallery. Do you need help with this pattern?You'll find 28 tutorial videos, a Comments/Questions area and more by visiting the pattern on garnstudio.com. © 1982-2026 DROPS Design A/S. We reserve all rights. This document, including all its sub-sections, has copyrights. Read more about what you can do with our patterns at the bottom of each pattern on our site. |
|||||||||||||||||||||||||||||||


With over 40 years in knitting and crochet design, DROPS Design offers one of the most extensive collections of free patterns on the internet - translated to 17 languages. As of today we count 325 catalogues and 12298 patterns translated into English (UK/cm).
We work hard to bring you the best knitting and crochet have to offer, inspiration and advice as well as great quality yarns at incredible prices! Would you like to use our patterns for other than personal use? You can read what you are allowed to do in the Copyright text at the bottom of all our patterns. Happy crafting!
Post a comment to pattern DROPS 221-36
We would love to hear what you have to say about this pattern!
If you want to leave a question, please make sure you select the correct category in the form below, to speed up the answering process. Required fields are marked *.