
Popular categories
Looking for a yarn?


Comments / Questions (62)
![]() Samios Zelina wrote:
Samios Zelina wrote:
Bonjour, si je comprends bien on glisse les mailles pour l'encolure devant sur un arrêt de mailles mais on rabat les mailles de l'encolure de dos. Il paraît bizarre.
01.12.2022 - 18:37DROPS Design answered:
Bonjour Mme Samios, tout à fait, on procède très souvent ainsi, l'encolure devant reste ainsi plus souple. Bon tricot!
02.12.2022 - 07:54
![]() Ames wrote:
Ames wrote:
Sorry, I don't think my last question was clear. Thank you so much for your help! I have increased to 102 stitches overall, but I am now looking at continuing the cable pattern from the first x section. However I don't understand how I move from the end of (i.e.) A.1x to the beginning of A.1, as that is going from 8 stitches to 6 stitches in that small section.
24.11.2022 - 16:20DROPS Design answered:
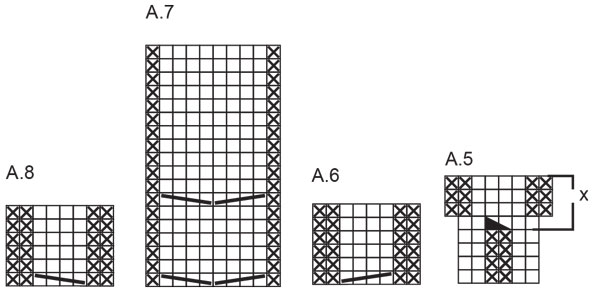
Dear Ames, sorry for having misunderstood - after you have worked the x sections in the diagram, you will work the cables, ie A.6 3 times in width (over A.1,A.2,A.1), then A.7 over A.3 and A.8 3 times in width (over A.4, A.5,A.4). Ie the first diagrams are first worked repeating the first 4 rows for 5 cm, then you work the 4 rows of the x-sections then work the cable patterns A.6, A.7 and A.8. Happy knitting!
25.11.2022 - 08:27
![]() Ames wrote:
Ames wrote:
Hello, I am confused about the cabling increases. After working A.1x etc once vertically, there are now more stitches than before due to the increases (working 2 stitches into 1, etc). Am I correct in then thinking that then starting on A.1 etc and only knitting 19 stitches (for size M) before starting the cabling, it will then be out of joint, as I've now increased the number of stitches in the cabling section? Sorry I'm not sure if this makes sense as a question but I'm really unsure.
24.11.2022 - 14:13DROPS Design answered:
Dear Ames, correct you will have 19 sts in stocking stitch on each side of piece inside the edge stitch - you decrease a total of 2 sts (1 in each section stocking stitch) and increase 2 sts in each diagram (14 increase in total) = 90-2+14=102 sts. Happy knitting!
24.11.2022 - 15:50
![]() Michele Fabbri wrote:
Michele Fabbri wrote:
Davanti: "Ora ci sono 96-102-108-116-124-136 maglie sul ferro." Come è possibile dato che dall'inizio è stato solo detto di fare diminuzioni e nessun aumento?
22.09.2022 - 12:38DROPS Design answered:
Buonasera Michela, dopo aver cambiato la misura dei ferri circolari, si lavora sulle ultime righe dei diagrammi (indicate con X), in cui ci sono degli aumenti. Buon lavoro!
22.09.2022 - 16:25
![]() Shanthi wrote:
Shanthi wrote:
Thank you for explaining so well. It looks so easy now. Happy summer.
26.07.2022 - 12:41
![]() Shanthi wrote:
Shanthi wrote:
Hi. After casting on 82 stitches for the front piece, how many stitches will be there after working the first row ? If more than 82 kindly explain. I’m a beginner at knitting. I find it hard to understand your pattern instructions. Is it possible to give instructions for each row , specially when it comes to increasing and decreasing of stitches. Awaiting your reply. Thank you in advance and have a good day.
26.07.2022 - 11:30DROPS Design answered:
Hi Shanthi, after working the first row you should have the same number on stitches i.e. 82 =1+16+2+6+6+6+8+6+6+6+16+2+1. If you have any questions, please not hesitate to contact us. Happy knitting!
26.07.2022 - 11:47
![]() Shanthi wrote:
Shanthi wrote:
Hi. After casting on 82 stitches for the front piece, how many stitches will be there after working the first row ? If more than 82 kindly explain. I’m a beginner at knitting. I find it hard to understand your pattern instructions. Is it possible to give instructions for each row , specially when it comes to increasing and decreasing of stitches. Awaiting your reply. Thank you in advance and have a good day.
22.07.2022 - 11:30
![]() Michael Harish wrote:
Michael Harish wrote:
Please ignore my comment from yesterday. I had a shower this morning and the water massaged my brain and I finally understood the pattern. :-) No, i dont knit in the shower lol
24.06.2022 - 09:12
![]() Michael Harish wrote:
Michael Harish wrote:
Hi, I am having problems making sense of the pattern for the rib for the front. For xl 1 edge k2 p2 then over 28 stitches k2 a1, a2, a1, a3 (=28) k2 p2 then 28 again finishing withe k2 edge dies not add up to 106 stutches. Please explain, thank you
23.06.2022 - 18:17DROPS Design answered:
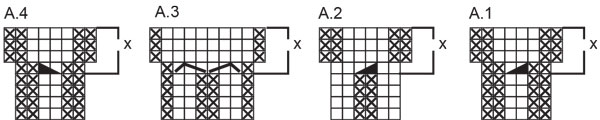
Dear Mr Harish, work as follows: 1 edge stitch in garter stitch, * knit 2, purl 2 *, work from *-* over the next 28 stitches, knit 2, A.1 (= 6 stitches), A.2 (= 6 stitches). A.1, A.3 (= 8 stitches), A.4 (= 6 stitches), A.5 (= 6 stitches), A.4, * knit 2, purl 2 *, work from *-* over the next 28 stitches, finish with knit 2 and 1 edge stitch in garter stitch= 1+28+2+6+6+6+8+6+6+6+28+2+1 =106 stitches. Happy knitting!
24.06.2022 - 09:20
![]() Fabienne Chaplais wrote:
Fabienne Chaplais wrote:
Combien de pelotes faut il pour une taille M pour le Fisher s moin Merci
26.05.2022 - 21:49DROPS Design answered:
Bonjour Mme Chaplais, vous trouverez les quantités requises pour chaque taille dans l'en-tête autrement dit, en taille M, il vous faudra ici 850 g DROPS Alaska/50 g la pelote = 17 pelotes; si vous souhaitez utiliser une alternative, pensez à utiliser notre convertisseur. Bon tricot!
27.05.2022 - 09:05
|
|||||||||||||||||||||||||
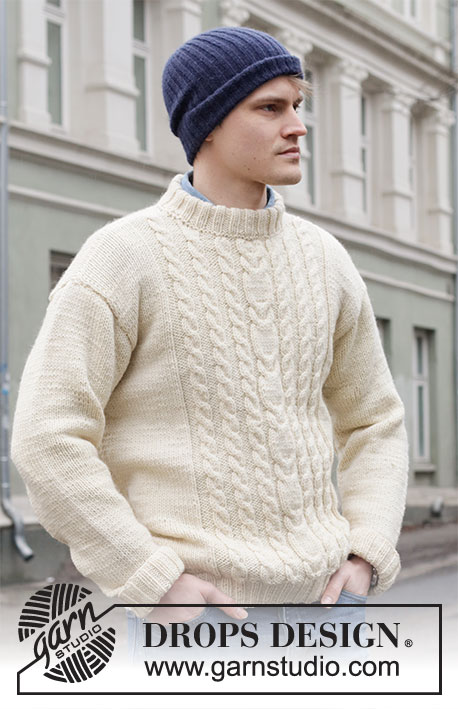
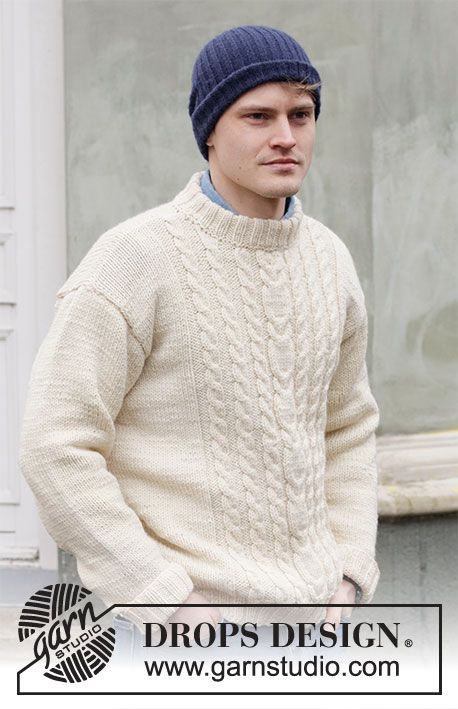
Fisher’s Moon#fishersmoonsweater |
|||||||||||||||||||||||||
 |
 |
||||||||||||||||||||||||
Knitted jumper for men with cables in DROPS Alaska. Size: S - XXXL
DROPS 219-9 |
|||||||||||||||||||||||||
|
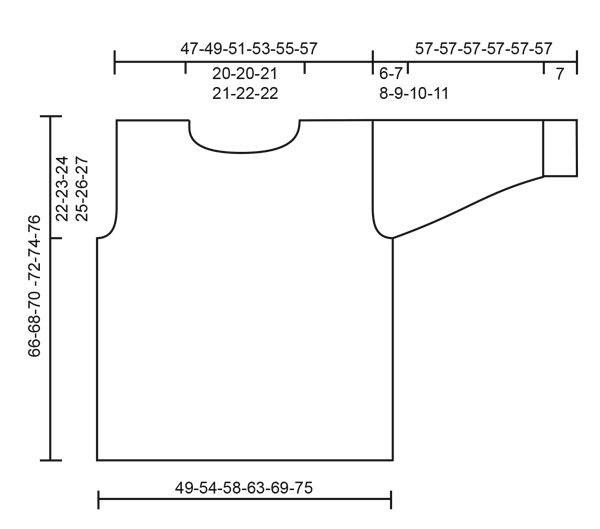
---------------------------------------------------------- EXPLANATION FOR THE PATTERN: ---------------------------------------------------------- GARTER STITCH (back and forth): Knit all rows. 1 ridge vertically = knit 2 rows. PATTERN: See diagrams A.1 to A.8. INCREASE TIP (applies to sleeve): Make 1 yarn over in each side inside 1 edge stitch in garter stitch. On next row work yarn overs twisted to avoid holes. Then work the new stitches in stocking stitch. ----------------------------------------------------- START THE PIECE HERE: ---------------------------------------------------------- JUMPER - SHORT OVERVIEW OF THE GARMENT: Worked back and forth on circular needle in parts and sewn together when finished. Work back piece in stocking stitch and front piece with cables and stocking stitch. Work sleeves back and forth on needle. Work neck edge in the round. BACK PIECE: Cast on 84-88-96-104-112-124 stitches on circular needle size 5 mm with Alaska. Work back and forth as follows – first row is from right side: 1 edge stitch in GARTER STITCH - read explanation above, * purl 2 and knit 2 *, work from *-* until 3 stitches remain, purl 2 and 1 edge stitch in garter stitch. Work rib like this until piece measures 5 cm. Switch to circular needle size 5.5 mm. Work in stocking stitch with 1 stitch in garter stitch in each side. On first row adjust number of stitches to 82-88-94-102-110-122. REMEMBER THE KNITTING TENSION! When piece measures 44-45-46-47-48-49 cm, cast off for armholes in each side. Cast off stitches at beginning of every row in each side: Cast off 4 stitches 0-1-1-1-1-1 time, 3 stitches 1-0-0-0-0-0 times, 2 stitches 0-0-0-1-2-3 times and 1 stitch 0-1-2-3-3-5 times = 76-78-82-84-88-92 stitches. Continue in stocking stitch. When piece measures 64-66-68-70-72-74 cm, cast off the middle 30-30-32-32-34-34 stitches for neck. Then cast off 1 stitch on next row from neck = 22-23-24-25-26-28 stitches for shoulder. Continue until piece measures 66-68-70-72-74-76 cm and cast off. Work the other shoulder the same way. FRONT PIECE: Cast on 82-90-98-106-114-122 stitches on circular needle size 5 mm with Alaska. Work back and forth as follows – first row is from right side: 1 edge stitch in garter stitch, * knit 2, purl 2 *, work from *-* over the next 16-20-24-28-32-36 stitches, knit 2, A.1 (= 6 stitches), A.2 (= 6 stitches), A.1, A.3 (= 8 stitches), A.4 (= 6 stitches), A.5 (= 6 stitches), A.4, * knit 2, purl 2 *, work from *-* over the next 16-20-24-28-32-36 stitches, finish with knit 2 and 1 edge stitch in garter stitch. Continue rib like this (repeat the first 4 rows in A.1 to A.5) until piece measures 5 cm. Switch to circular needle size 5.5 mm. Then work as follows from right side: 1 edge stitch in garter stitch, stocking stitch over the first 16-20-24-28-32-36 stitches, AT THE SAME TIME decrease 0-1-2-2-2-0 stitches evenly, purl 2, A.1x, A.2x. A.1x, A.3x, A.4x, A.5x, A.4x, purl 2, stocking stitch over the next 16-20-24-28-32-36 stitches, AT THE SAME TIME decrease 0-1-2-2-2-0 stitches evenly, 1 edge stitch in garter stitch. There are now 96-102-108-116-124-136 stitches on needle. When A.1x to A.5x have been worked 1 time vertically, continue as follows: 1 edge stitch in garter stitch, 16-19-22-26-30-36 stitches in stocking stitch, purl 2, A.6, A.6, A.6, A.7, A.8, A.8, A.8, purl 2, 16-19-22-26-30-36 stitches in stocking stitch, 1 edge stitch in garter stitch. Continue this pattern. When piece measures 44-45-46-47-48-49 cm, cast off for armhole in each side as on back piece = 90-92-96-98-102-106 stitches. When piece measures 60-62-64-66-68-70 cm, work next row as follows: Work the first 30-31-33-34-36-38 stitches as before, work the next 30 stitches - at the same time decrease 2 stitch evenly over each cable (= decrease 2 stitches over cable in A.6, 4 stitches over cables in A.7, and 2 stitches over cable in A.8, 8 stitches decreased in total), then slip these stitches on a stitch holder for neck (= 22 stitches on stitch holder), work the remaining 30-31-33-34-36-38 stitches as before. Now work each shoulder separately. Continue to cast off for neck at beginning of every row from neck as follows: Cast off 2 stitches 1-1-1-1-2-2 times and 1 stitch 2-2-3-3-2-2 times - NOTE: When working over cables in A.6/A.8, decrease at the same time 2 stitches over every cable = 24-25-26-27-28-30 stitches. Continue until piece measures 65-67-69-71-73-75 cm– decrease 2 stitches over cable in last repetition of A.6/A.8 = 22-23-24-25-26-28 stitches on shoulder. Cast off when piece measures 66-68-70-72-74-76 cm. Work the other shoulder the same way. SLEEVE: Cast on 42-46-46-50-50-50 stitches (including 1 edge stitch in each side) on circular needle size 5 mm with Alaska. Work back and forth as follows – first row is from right side: 1 edge stitch in garter stitch, * knit 2 and purl 2 *, work from *-* until 1 stitch remains, work 1 edge stitch in garter stitch. Work rib like this until piece measures 7 cm. Switch to circular needle size 5.5 mm. Purl 1 row from wrong side while decreasing 0-2-0-4-2-0 stitches evenly = 42-44-46-46-48-50 stitches. Then work in stocking stitch with 1 edge stitch in garter stitch in each side. When piece measures 8-8-8-8-8-10 cm, increase 1 stitch inside 1 edge stitch in each side - read INCREASE TIP. Increase like this every 3½-3½-3-2½-2½-2 cm 12-12-13-15-15-16 times in total = 66-68-72-76-78-82 stitches. When piece measures 51-50-49-48-47-46 cm, cast off 4 stitches in each side. Cast off for sleeve cap at beginning of every row in each side as follows: 2 stitches 2-2-3-3-4-4 times, 1 stitch 0-1-0-1-0-1 time. Then cast off 2 stitches in each side until piece measures 56 cm in all sizes, cast off 3 stitches in each side, then cast off the remaining stitches. Sleeve measures 57 cm in all sizes. Work another sleeve the same way. ASSEMBLY: Sew shoulder seams with grafting/kitchener stitches inside cast-off edge. Sew in sleeve cap. Sew underarm and side seams in one inside 1 edge stitch in garter stitch. NECK EDGE: Work neck edge in the round. Use circular needle size 5 mm and begin from right side at one shoulder seam. Pick up 72 to 84 stitches (including stitches on stitch holder at the front and divisible by 4). Purl 1 round and knit 1 round. Work rib with knit 2 and purl 2 for 9 cm. Cast off stitches with knit over knit and purl over purl. Fold rib at the top of neck down on the inside of garment. Fasten rib to form a folding edge. To avoid a tight neck edge and avoiding the edge to tip outwards, it is important to make the seam elastic. |
|||||||||||||||||||||||||
Diagram explanations |
|||||||||||||||||||||||||
|
|||||||||||||||||||||||||
 |
|||||||||||||||||||||||||
 |
|||||||||||||||||||||||||
 |
|||||||||||||||||||||||||
Have you finished this pattern?Tag your pictures with #dropspattern #fishersmoonsweater or submit them to the #dropsfan gallery. Do you need help with this pattern?You'll find 25 tutorial videos, a Comments/Questions area and more by visiting the pattern on garnstudio.com. © 1982-2026 DROPS Design A/S. We reserve all rights. This document, including all its sub-sections, has copyrights. Read more about what you can do with our patterns at the bottom of each pattern on our site. |
|||||||||||||||||||||||||


With over 40 years in knitting and crochet design, DROPS Design offers one of the most extensive collections of free patterns on the internet - translated to 17 languages. As of today we count 324 catalogues and 12290 patterns translated into English (UK/cm).
We work hard to bring you the best knitting and crochet have to offer, inspiration and advice as well as great quality yarns at incredible prices! Would you like to use our patterns for other than personal use? You can read what you are allowed to do in the Copyright text at the bottom of all our patterns. Happy crafting!
Post a comment to pattern DROPS 219-9
We would love to hear what you have to say about this pattern!
If you want to leave a question, please make sure you select the correct category in the form below, to speed up the answering process. Required fields are marked *.