
Popular categories
Looking for a yarn?


|
|||||||||||||||||||||||||
Fisher’s Moon |
|||||||||||||||||||||||||
 |
 |
||||||||||||||||||||||||
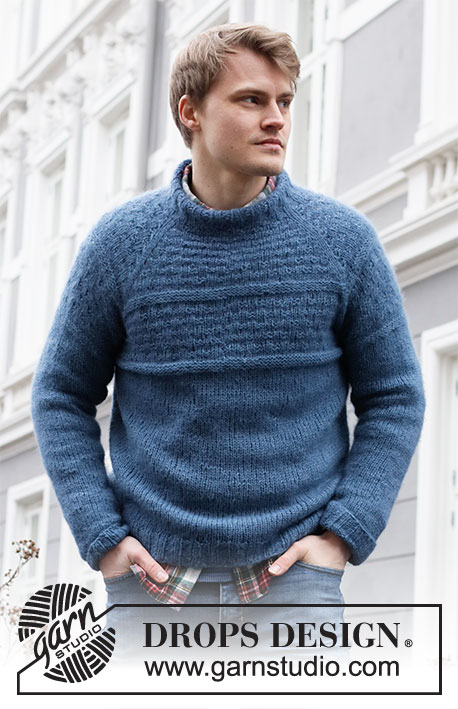
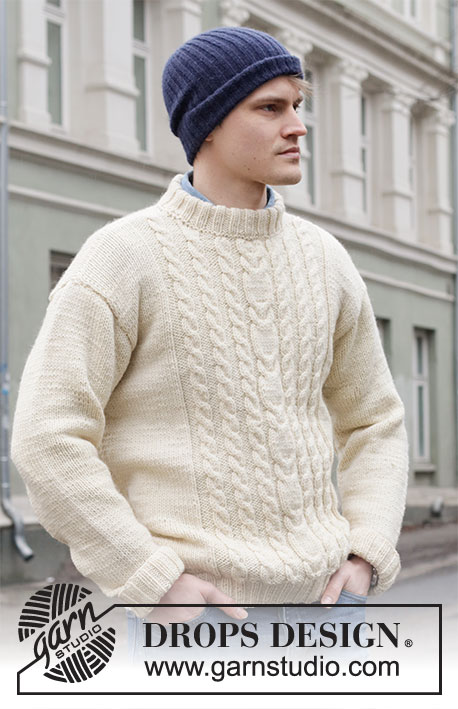
Knitted sweater for men with cables in DROPS Alaska. Size: S - XXXL
DROPS 219-9 |
|||||||||||||||||||||||||
|
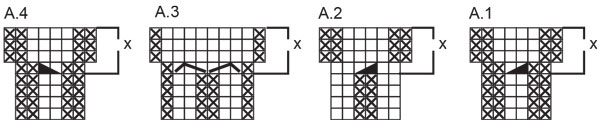
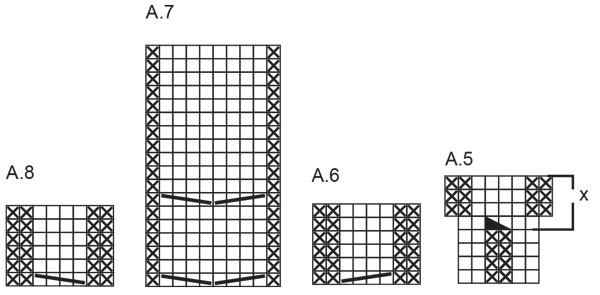
---------------------------------------------------------- EXPLANATION FOR THE PATTERN: ---------------------------------------------------------- GARTER STITCH (back and forth): Knit all rows. 1 ridge vertically = knit 2 rows. PATTERN: See diagrams A.1 to A.8. INCREASE TIP (applies to sleeve): Make 1 yarn over in each side inside 1 edge stitch in garter stitch. On next row work yarn overs twisted to avoid holes. Then work the new stitches in stockinette stitch. ----------------------------------------------------- START THE PIECE HERE: ---------------------------------------------------------- SWEATER - SHORT OVERVIEW OF THE GARMENT: Worked back and forth on circular needle in parts and sewn together when finished. Work back piece in stockinette stitch and front piece with cables and stockinette stitch. Work sleeves back and forth on needle. Work neck edge in the round. BACK PIECE: Cast on 84-88-96-104-112-124 stitches on circular needle size 5 mm = US 8 with Alaska. Work back and forth as follows – first row is from right side: 1 edge stitch in GARTER STITCH - read explanation above, * purl 2 and knit 2 *, work from *-* until 3 stitches remain, purl 2 and 1 edge stitch in garter stitch. Work rib like this until piece measures 5 cm = 2". Switch to circular needle size 5.5 mm = US 9. Work in stockinette stitch with 1 stitch in garter stitch in each side. On first row adjust number of stitches to 82-88-94-102-110-122. REMEMBER THE KNITTING GAUGE! When piece measures 44-45-46-47-48-49 cm = 17¼"-17¾"-18"-18½"-19"-19¼", bind off for armholes in each side. Bind off stitches at beginning of every row in each side: Bind off 4 stitches 0-1-1-1-1-1 time, 3 stitches 1-0-0-0-0-0 times, 2 stitches 0-0- 0-1-2-3 times and 1 stitch 0-1-2-3-3-5 times = 76-78-82-84-88-92 stitches. Continue in stockinette stitch. When piece measures 64-66-68-70-72-74 cm = 25 1/4"-26"-26¾"-27½"-28⅜"-29 1/8", bind off the middle 30-30-32-32-34-34 stitches for neck. Then bind off 1 stitch on next row from neck = 22-23-24-25-26-28 stitches for shoulder. Continue until piece measures 66-68-70-72-74-76 cm = 26"-26 3/4"-27½"-28⅜"-29 1/8"-30" and bind off. Work the other shoulder the same way. FRONT PIECE: Cast on 82-90-98-106-114-122 stitches on circular needle size 5 mm = US 8 with Alaska. Work back and forth as follows – first row is from right side: 1 edge stitch in garter stitch, * knit 2, purl 2 *, work from *-* over the next 16-20-24-28-32-36 stitches, knit 2, A.1 (= 6 stitches), A.2 (= 6 stitches), A.1, A.3 (= 8 stitches), A.4 (= 6 stitches), A.5 (= 6 stitches), A.4, * knit 2, purl 2 *, work from *-* over the next 16-20-24-28-32- 36 stitches, finish with knit 2 and 1 edge stitch in garter stitch. Continue rib like this (repeat the first 4 rows in A.1 to A.5) until piece measures 5 cm = 2". Switch to circular needle size 5.5 mm = US 9. Then work as follows from right side: 1 edge stitch in garter stitch, stockinette stitch over the first 16-20-24-28-32-36 stitches, AT THE SAME TIME decrease 0-1-2-2-2-0 stitches evenly, purl 2, A.1x, A.2x. A.1x, A.3x, A.4x, A.5x, A.4x, purl 2, stockinette stitch over the next 16-20-24-28-32-36 stitches, AT THE SAME TIME decrease 0-1-2-2-2-0 stitches evenly, 1 edge stitch in garter stitch. There are now 96-102-108-116-124-136 stitches on needle. When A.1x to A.5x have been worked 1 time vertically, continue as follows: 1 edge stitch in garter stitch, 16-19-22-26-30-36 stitches in stockinette stitch, purl 2, A.6, A.6, A.6, A.7, A.8, A.8, A.8, purl 2, 16-19-22-26-30-36 stitches in stockinette stitch, 1 edge stitch in garter stitch. Continue this pattern. When piece measures 44-45-46-47-48-49 cm = 17¼"-17¾"-18"-18½"-19"-19¼", bind off for armhole in each side as on back piece = 90-92-96-98-102-106 stitches. When piece measures 60-62-64-66-68-70 cm = 23⅝"-24⅜"-25¼"-26"-26¾"- 27½", work next row as follows: Work the first 30-31-33-34-36-38 stitches as before, work the next 30 stitches - at the same time decrease 2 stitch evenly over each cable (= decrease 2 stitches over cable in A.6, 4 stitches over cables in A.7, and 2 stitches over cable in A.8, 8 stitches decreased in total), then slip these stitches on a stitch holder for neck (= 22 stitches on stitch holder), work the remaining 30-31-33-34-36-38 stitches as before. Now work each shoulder separately. Continue to bind off for neck at beginning of every row from neck as follows: Bind off 2 stitches 1-1-1-1-2-2 times and 1 stitch 2-2-3-3-2-2 times - NOTE: When working over cables in A.6/A.8, decrease at the same time 2 stitches over every cable = 24- 25-26-27-28-30 stitches. Continue until piece measures 65-67-69-71-73-75 cm = 25 1/2"-26⅜"-27⅛"-28"-28¾"-29½" – decrease 2 stitches over cable in last repetition of A.6/A.8 = 22-23-24-25-26-28 stitches on shoulder. Bind off when piece measures 66-68-70-72-74-76 cm = 26"-26¾"-27½"-28⅜"-29 1/8"-30". Work the other shoulder the same way. SLEEVE: Cast on 42-46-46-50-50-50 stitches (including 1 edge stitch in each side) on circular needle size 5 mm = US 8 with Alaska. Work back and forth as follows – first row is from right side: 1 edge stitch in garter stitch, * knit 2 and purl 2 *, work from *-* until 1 stitch remains, work 1 edge stitch in garter stitch. Work rib like this until piece measures 7 cm = 2¾". Switch to circular needle size 5.5 mm = US 9. Purl 1 row from wrong side while decreasing 0-2-0-4-2-0 stitches evenly = 42-44-46-46-48-50 stitches. Then work in stockinette stitch with 1 edge stitch in garter stitch in each side. When piece measures 8-8-8-8-8-10 cm = 3⅛"-3⅛"-3⅛"-3⅛"-3⅛"-4", increase 1 stitch inside 1 edge stitch in each side - read INCREASE TIP. Increase like this every 3½-3½-3-2½-2½-2 cm = 1¼"-1¼"-1⅛"-⅞"-⅞"-¾" 12-12-13- 15-15-16 times in total = 66-68-72-76-78-82 stitches. When piece measures 51-50- 49-48-47-46 cm = 20"-19¾"-19¼"-19"-18½"-18", bind off 4 stitches in each side. Bind off for sleeve cap at beginning of every row in each side as follows: 2 stitches 2- 2-3-3-4-4 times, 1 stitch 0-1-0-1-0-1 time. Then bind off 2 stitches in each side until piece measures 56 cm = 22" in all sizes, bind off 3 stitches in each side, then bind off the remaining stitches. Sleeve measures 57 cm = 22½" in all sizes. Work another sleeve the same way. ASSEMBLY: Sew shoulder seams with grafting/kitchener stitches inside bind-off edge. Sew in sleeve cap. Sew underarm and side seams in one inside 1 edge stitch in garter stitch. NECK EDGE: Work neck edge in the round. Use circular needle size 5 mm = US 8 and begin from right side at one shoulder seam. Pick up 72 to 84 stitches (including stitches on stitch holder at the front and divisible by 4). Purl 1 round and knit 1 round. Work rib with knit 2 and purl 2 for 9 cm = 3½". Bind off stitches with knit over knit and purl over purl. Fold rib at the top of neck down on the inside of garment. Fasten rib to form a folding edge. To avoid a tight neck edge and avoiding the edge to tip outwards, it is important to make the seam elastic. |
|||||||||||||||||||||||||
Diagram explanations |
|||||||||||||||||||||||||
|
|||||||||||||||||||||||||

|
|||||||||||||||||||||||||
|
|||||||||||||||||||||||||
|
|||||||||||||||||||||||||
|
Have you made this or any other of our designs? Tag your pictures in social media with #dropsdesign so we can see them! Do you need help with this pattern?You'll find tutorial videos, a Comments/Questions area and more by visiting the pattern on garnstudio.com. © 1982-2024 DROPS Design A/S. We reserve all rights. This document, including all its sub-sections, has copyrights. Read more about what you can do with our patterns at the bottom of each pattern on our site. |
|||||||||||||||||||||||||


With over 40 years in knitting and crochet design, DROPS Design offers one of the most extensive collections of free patterns on the internet - translated to 17 languages. As of today we count 304 catalogs and 11422 patterns - 11417 of which are translated into English (US/in).
We work hard to bring you the best knitting and crochet have to offer, inspiration and advice as well as great quality yarns at incredible prices! Would you like to use our patterns for other than personal use? You can read what you are allowed to do in the Copyright text at the bottom of all our patterns. Happy crafting!
Comments / Questions (41)
Het is mij niet duidelijk hoe ik het telpatroon moet aflezen. Waar staat de 'x' voor. Ik vind de beschrijving niet duidelijk. Snap er helemaal niets van. Kunt u mij op weg helpen?
18.12.2023 - 20:06DROPS Design answered:
Dag Monique,
Onderaan het patroon staat een link daar veel gestelde vragen. Als je hierop klikt krijg je een lijst waarin een link staat naar Hoe je een telpatroon leest. Hopelijk helpt dat je verder.
20.12.2023 - 19:20Hi! When casting off stitches for armholes, should i continue making the garter stitches for the edges? If so, should I continue doing it after the armholes as well?
07.11.2023 - 18:44DROPS Design answered:
Dear Tiff, stop with the edge stitches in garter stitch when casting off the stitches for armholes. This means the first and last stitch will then be worked in stocking stitch. Happy knitting!
08.11.2023 - 07:58Strikker XL Efter ribben skal der tages der 4 masker ind på første pind. Så går jeg fra 106 m til 102, men der står at man skal have 116. Jeg forstår det ikke. Det er DROPS 219-9
01.11.2023 - 12:12DROPS Design answered:
Hei Birte. Jo, du har 106 masker og når vrangborden måler 5 cm skal du strikke 1 kantmaske i rille, deretter felle 2 masker jevnt fordelt over de neste 28 maskene. Og nå skal du strikke A.1x, A.2x. A.1x, A.3x, A.4x, A.5x, A.4x (og når du strikker disse diagrammene øker du masker), så stikker du 2 vrang og så glattstrikk over de neste 28 maskene samtidig som det felles 2 masker + 1 kantmaske i rille. Kort skrevet: 1 kantmaske + 26 (felt 2) + 2 vrang + 8+8+8+10+8+8+8+2 vrang + 26 (felt 2 m) + 1 kantmaske = 116 masker. mvh DROPS Design
06.11.2023 - 10:38Beim Stricken des Vorderteils soll ich 82 Maschen anschlagen. Nach 5 cm soll bei Größe s keine Masche abgenommen werden. Danach sollen 96 Maschen auf der Nadel sein. Es steht aber nichts von zunehmen. Was soll gemacht werden?
13.08.2023 - 22:26DROPS Design answered:
Liebe Claudia, wenn man die 5. Reihe von den Diagramme strickt, wird man jeweils Maschen zunehmen - siehe 3. + 4. + 5. + 6. Symbol. Viel Spaß beim stricken!
14.08.2023 - 10:40Bonjour j ai essayer de faire la manche a deux reprises elle est trop petite et pas assez grande malgré que j ai respecter tout ce qui as été ecrite rabattre 2 mailles de chaque côté 2 mailles jusqu a ce que l ouvrage mesure 56 cm est ce a tout les rangs que je dois rabattre. Même chose pour rabattre 3 mailles de chaque côté. J ai vraiment besoin des informations svo merci
24.07.2023 - 06:58DROPS Design answered:
Bonjour Dorothée, pour que le haut de la manche ait la bonne longueur, vous devez rabattre 2 mailles de chaque côté jusqu'à ce que la manche mesure 56 cm , cela signifie que vous allez rabattre 2 mailles en début de rang sur l'endroit et 2 mailles en début de rang sur l'envers jusqu'à la hauteur requise (vous devez avoir rabattu le même nombre de mailles de chaque côté). Rabattez ensuite 3 mailles au début des 2 rangs suivants (= de chaque côté = 3 m en début de rang sur l'endroit + 3 m en début de rang sur l'envers) et rabattez les mailles restantes. Bon tricot!
27.07.2023 - 12:08Est-ce possible de tricoter les manches en ronds? Si oui quel modification dois je faire??
16.03.2023 - 23:27DROPS Design answered:
Bonjour Marjolaine, montez simplement 2 mailles en moins (en rond, pas besoin des mailles lisières), et quand la manche mesure 51-50-49-48-47-46 cm, rabattez 2 mailles au milieu sous la manche (1 m de chaque côté de votre marqueur début des tours), et continuez en allers et retours comme indiqué dans les explications. Bon tricot!
17.03.2023 - 08:46Dans l’explication du devant on monte ( pour la taille M) 90 mailles après les schémas en côtes 2x2 il faut DIMINUER 1 maille au début et 1 maille à la fin du rang ….. on obtient 102 mailles !!!? Y a t’il quelque chose qui m’échappe mais on ne peut obtenir 12 mailles de plus en diminuant 2 mailles ! Que dois je faire ?
22.01.2023 - 15:25DROPS Design answered:
Bonjour Mme Davesne, on va diminuer dans les côtes de chaque côté mais aussi augmenter 2 m dans chacun des diagrammes A.1 à A.5 x (cf *3ème, 4ème et 5ème symbole de la légende des diagrammes) - autrement dit vous aviez 90 m, diminuez 2 m et augmentez 2 m x 7 (=A.1x, A.2x. A.1x, A.3x, A.4x, A.5x, A.4x,) = 102 mailles. Bon tricot!
23.01.2023 - 09:53Hej Drop. Jeg forstår ikke forstykkes opskrft. Skal der ikke strikkes rib først og så mønster? Sådan ser det ud på billedet. Men opskriften lyder på at mønster startes fra først pind på forstykke. Jeg forstår heller ikke om mønster skal gentages. Det ser i opskriften ud som om, det kun er een gang. Men det kan jo ikke passe. Kan I gøre det lidt klarere? Og det ville være mere overskueligt, hvis der var afsnit med hvert af de steps. Ville jeg sætte stor pris på. Mange tak. Jette.
03.12.2022 - 12:17Je vous remercie
02.12.2022 - 08:09Bonjour, si je comprends bien on glisse les mailles pour l'encolure devant sur un arrêt de mailles mais on rabat les mailles de l'encolure de dos. Il paraît bizarre.
01.12.2022 - 18:37DROPS Design answered:
Bonjour Mme Samios, tout à fait, on procède très souvent ainsi, l'encolure devant reste ainsi plus souple. Bon tricot!
02.12.2022 - 07:54