
Popular categories
Looking for a yarn?


Comments / Questions (177)
![]() Monica wrote:
Monica wrote:
Hvormange garnnøgler skal der bruges til en vest i str m?
03.01.2021 - 15:02DROPS Design answered:
Hej Monica, i str M skal du bruge 150 g = 3 nøgler. God fornøjelse!
08.01.2021 - 11:17
![]() Ann-Marie Rasch Hansen wrote:
Ann-Marie Rasch Hansen wrote:
Hvad er overvidden til henholdsvis str. S og str. M?
28.12.2020 - 08:38DROPS Design answered:
Hej Ann-Marie, du finder målene i måleskitsen nederst i opskriften. God fornøjelse!
07.01.2021 - 12:02
![]() Hege Aasbø wrote:
Hege Aasbø wrote:
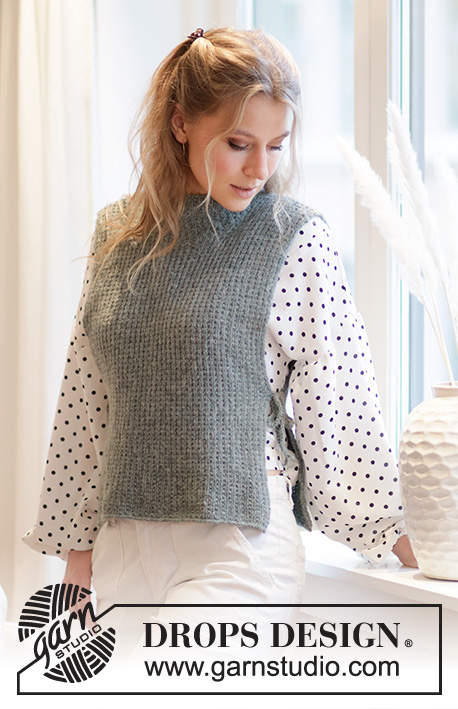
Dere har fire bilder av vesten - men ingen av hvordan den ser ut i siden med stripen i rillestrikk. Syns ofte bildene er lite hjelpsomme for den som skal strikke. Jrg er dessuten usikker på om det kommer til å bli fint med den stripa - ville vært fint å kunne se hvordan det tar seg ut før man setter i gang?
27.12.2020 - 15:02
![]() Charlotte wrote:
Charlotte wrote:
Når lukkes af til ærmer på vesten, skal de 5 kantmaskerne tælles med i aflukningen eller skal de fortsat være 5?kantmasker?
22.12.2020 - 09:54DROPS Design answered:
Hej Charlotte, det er de yderste kantmasker som skal lukkes af til ærmegab i hver side. God fornøjelse!
22.12.2020 - 14:24
![]() Rene wrote:
Rene wrote:
Sorry I confused you I confused my self when I read it lol it's at the neck where it's says pick up 16stitches inside the 1stitch that what I don't understand thank you pattern is 212-44
21.12.2020 - 23:19DROPS Design answered:
Hi Rene, This means that you have 1 edge stitch to the inside of the garment and you pick up stitches on the next row of stitches (to give a neat finish). Happy knitting!
22.12.2020 - 06:52
![]() Reme wrote:
Reme wrote:
Is the one stitch the edge stitch they are saying the garter stitch after that one stitch I start to pick up stitches is that what it mean did a text to you just before this one but I think I might have it right now could you let me know please thank you pattern number 212-44
20.12.2020 - 00:25DROPS Design answered:
Dear Reme, I'm not sure to understand your question properly and sorry in advance. Back piece and front piece are worked with first 5 sts in garter stitch on each side, up to armhole, then after all stitches are cast off for armhole, you work 1 edge stitch in garter stitch on each side - see video. Hope this helps. Happy knitting!
21.12.2020 - 07:52
![]() Lis wrote:
Lis wrote:
Men burde halskant og ærmekant så ikke være den samme strik som forneden og ikke 2 ret 2 vr.
16.12.2020 - 11:36
![]() Lis wrote:
Lis wrote:
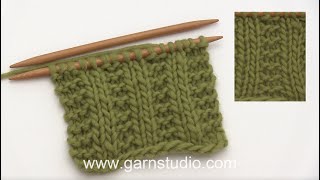
Er ligesom mange andre også i tvivl om kanten forneden - altså start på vesten. Skal det ikke være rib som i halskant og ærmegab ? Kantmaske er klar, men resten ? Fra retsiden alle ret, fra vrangsiden faktisk 2 vr 2 ret ? Det ser underligt ud og bliver snarere en slags halv perlestrikning. Skal det ikke være rib - 2 vr over vr og 2 ret over ret (bortset fra kantmaskerne selvfølgelig).
15.12.2020 - 23:23DROPS Design answered:
Hei Lis. Det er rikitg som det står i oppskriften og det blir som du skriver, en slags perlestrikk (i vrangpartiene). Det blir en meget pent vrangbord, litt anderledes enn en vanlig 2 rett, 2 vrang. Men ønsker du å strikke 2 rett, 2 vrang, kan du fint gjøre det. mvh DROPS design
16.12.2020 - 08:31
![]() Jane wrote:
Jane wrote:
Jeg havde lidt problemer med ribben, men fandt ud af det. Til gengæld er jeg nødt til at sige at størrelserne er helt forkert (jeg har lavet strikkeprøve) min veninde er Max en medio, men jeg er nødt til at strikke xl hvis hun skal passe den. Iøvrigt meget dejligt garn
12.12.2020 - 17:53
![]() Ann-Kristin Andersson wrote:
Ann-Kristin Andersson wrote:
Otydlig och ofullständig beskrivning av kanten längst ner. Begreppen \"Slätstickning\" och \"Rätstickning\" stickat från rätsidan är för mig det samma som räta maskor. Alltså: Från rätsidan stickas alla maskor räta mellan de 5 kantmaskorna. Därefter skriver ni inte HUR man ska sticka från avigsidan. Det tycks mig som att följande borde vara rätt. Från avigsidan mellan kantmaskorna: Sticka 2 aviga, 2 räta, 2 aviga, 2 räta osv. Hälsningar Ann-Kristin
05.12.2020 - 19:51
|
|
Rose Blush#roseblushvest |
|
 |
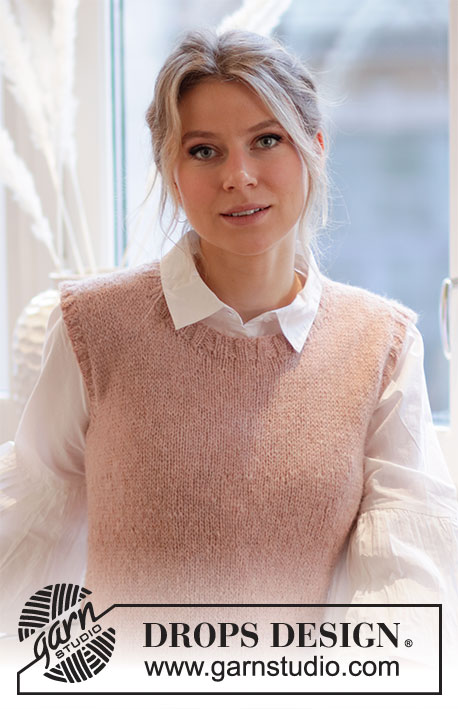 |
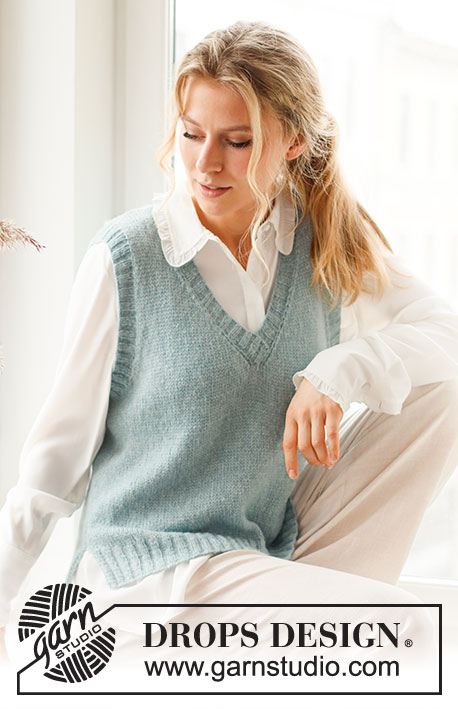
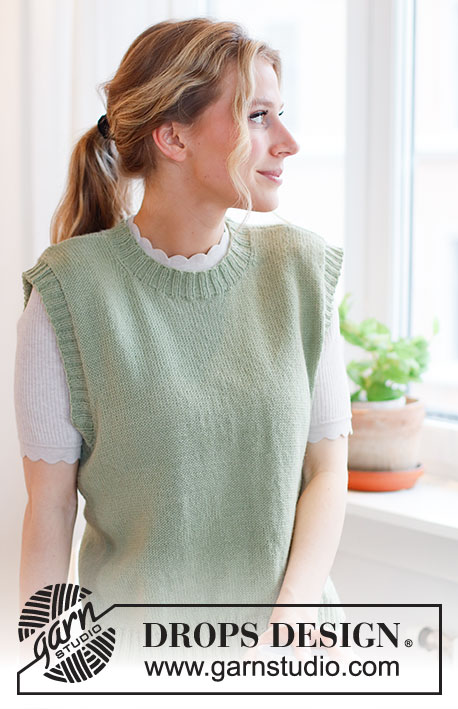
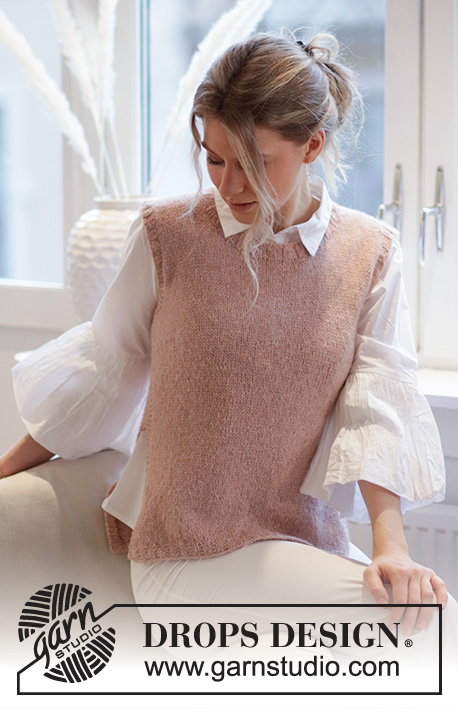
Knitted vest / slipover in DROPS Sky or DROPS Soft Tweed. The piece is worked with ribbed edging and a split in the sides. Sizes S - XXXL.
DROPS 212-44 |
|
|
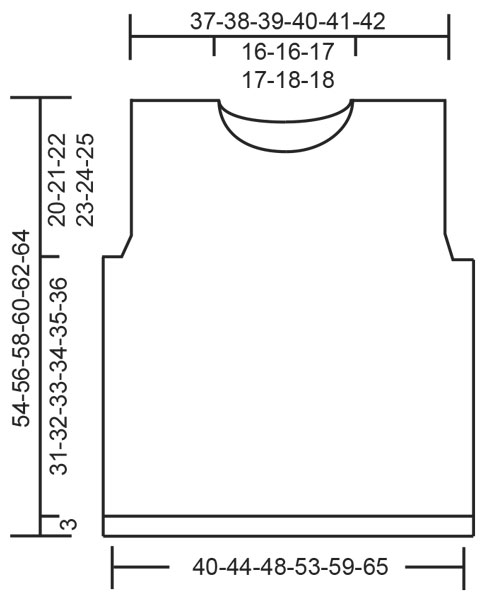
------------------------------------------------------- EXPLANATIONS FOR THE PATTERN: ------------------------------------------------------- RIDGE/GARTER STITCH (worked back and forth): Knit all rows. 1 ridge in height = Knit 2 rows. DECREASE TIP (evenly spaced): To work out how to decrease evenly, count the total number of stitches on needle (e.g. 88 stitches) minus the edge stitches (e.g. 10 stitches) and divide the remaining stitches by number of decreases to be made (e.g. 8) = 9.8. In this example decrease by knitting approx. each 9th and 10th stitch together (do not decrease over the edge stitches). ------------------------------------------------------- START THE PIECE HERE: ------------------------------------------------------- VEST – SHORT OVERVIEW OF THE PIECE: The piece is worked back and forth in sections and sewn together to finish. Stitches are knitted up for the ribbed edges around the armholes and neck. BACK PIECE: Cast on 88-96-104-116-128-144 stitches with circular needle size 3.5 mm and Sky. Purl 1 row (= wrong side). The next row is worked as follows from the right side: 5 edge stitches in GARTER STITCH – read description above, * 2 stitches in stocking stitch , 2 stitches in garter stitch *, work from *-* until there are 7 stitches left, 2 stitches in stocking stitch and finish with 5 edge stitches in garter stitch. Continue like this for 3 cm. Now knit 1 row from the right side, where you decrease 8-8-8-10-10-14 stitches evenly spaced – read DECREASE TIP = 80-88-96-106-118-130 stitches. Purl 1 row from the wrong side. Change to circular needle size 4.5 mm. Work stocking stitch back and forth with 5 edge stitches in garter stitch on each side. REMEMBER THE KNITTING TENSION! When the piece measures 34-35-36-37-38-39 cm, cast off for the armholes at the beginning of each row on each side as follows: Cast off 4-5-6-7-8-9 stitches 1 time, 2 stitches 0-1-2-3-4-6 times and 1 stitch 2-2-2-3-5-5 times = 68-70-72-74-76-78 stitches. Continue back and forth with stocking stitch and 1 edge stitch in garter stitch on each side. When the piece measures 50-52-54-56-58-60 cm, cast off the middle 30-30-32-32-34-34 stitches for the neck and each shoulder is finished separately. Continue by casting off 1 stitch on the next row from the neck = 18-19-19-20-20-21 stitches left on the shoulder. Continue with stocking stitch and 1 edge stitch in garter stitch on each side until the piece measures 20-21-22-23-24-25 cm from where stitches were first cast off for the armhole. Cast off with knit (make sure the cast-off edge is not tight). The piece measures a total of 54-56-58-60-62-64 cm from the shoulder down. Work the other shoulder in the same way. FRONT PIECE: Cast on 88-96-104-116-128-144 stitches with circular needle size 3.5 mm and Sky. Purl 1 row (= wrong side). The next row is worked as follows from the right side: 5 edge stitches in garter stitch – read description above, * 2 stitches in stocking stitch, 2 stitches in garter stitch *, work from *-* until there are 7 stitches left, 2 stitches in stocking stitch and finish with 5 edge stitches in garter stitch. Continue like this for 3 cm. Now knit 1 row from the right side, where you decrease 8-8-8-10-10-14 stitches evenly spaced = 80-88-96-106-118-130 stitches. Purl 1 row from the wrong side. Change to circular needle size 4.5 mm. Work stocking stitch back and forth with 5 edge stitches in garter stitch on each side. REMEMBER THE KNITTING TENSION When the piece measures 34-35-36-37-38-39 cm, cast off for the armholes at the beginning of each row on each side as follows: Cast off 4-5-6-7-8-9 stitches 1 time, 2 stitches 0-1-2-3-4-6 times and 1 stitch 2-2-2-3-5-5 times = 68-70-72-74-76-78 stitches. Continue with stocking stitch and 1 edge stitch in garter stitch on each side until the piece measures 44-46-47-49-50-52 cm, then place the middle 16-16-18-18-18-18 stitches on 1 thread for the neck and each shoulder is finished separately. Continue by casting off on each row from the neck as follows: Cast off 3 stitches 1 time, 2 stitches 2 times and 1 stitch 1-1-1-1-2-2 times = 18-19-19-20-20-21 stitches left on the shoulder. Continue with stocking stitch and 1 edge stitch in garter stitch on each side until the piece measures 20-21-22-23-24-25 cm from where stitches were first cast off for the armhole. Cast off with knit (make sure the cast-off edge is not tight). The piece measures a total of 54-56-58-60-62-64 cm from the shoulder down. Work the other shoulder in the same way. ASSEMBLY: Sew the shoulder seams with grafting stitches inside the cast-off edge. Start under the sleeve and sew the side seam in the outermost loop of the outermost stitch so the seam is flat – leave approx. 18 cm for the split. Repeat on the other side. NECK: Start from the right side at the one shoulder seam and knit up with short circular needle size 3.5 mm approx. 100 to 120 stitches (including the 16-16-18-18-18-18 stitches on the thread) inside the 1 stitch around the whole neck (number of stitches must be divisible by 4). Work rib (= knit 2/ purl 2) in the round for 2½-3 cm. Cast off with knit over knit and purl over purl. EDGE AROUND ARMHOLES: Start from the right side at the side seam under the sleeve and knit up with short circular needle size 3.5 mm approx. 96 to 120 stitches around the armhole (number of stitches must be divisible by 4). Work rib (= knit 2/ purl 2) in the round for 2 cm. Cast off with knit over knit and purl over purl. Work the other edge around armhole in the same way. |
|
 |
|
Have you finished this pattern?Tag your pictures with #dropspattern #roseblushvest or submit them to the #dropsfan gallery. Do you need help with this pattern?You'll find 25 tutorial videos, a Comments/Questions area and more by visiting the pattern on garnstudio.com. © 1982-2026 DROPS Design A/S. We reserve all rights. This document, including all its sub-sections, has copyrights. Read more about what you can do with our patterns at the bottom of each pattern on our site. |
|


With over 40 years in knitting and crochet design, DROPS Design offers one of the most extensive collections of free patterns on the internet - translated to 17 languages. As of today we count 324 catalogues and 12290 patterns translated into English (UK/cm). 12290
We work hard to bring you the best knitting and crochet have to offer, inspiration and advice as well as great quality yarns at incredible prices! Would you like to use our patterns for other than personal use? You can read what you are allowed to do in the Copyright text at the bottom of all our patterns. Happy crafting!
Post a comment to pattern DROPS 212-44
We would love to hear what you have to say about this pattern!
If you want to leave a question, please make sure you select the correct category in the form below, to speed up the answering process. Required fields are marked *.