
Popular categories
Looking for a yarn?


Comments / Questions (21)
![]() Coco wrote:
Coco wrote:
Bonjour concernant l\'empiècement il est indiqué que nous devons faire 10 fois A.2B mais après avoir fait les augmentations de la flèche 1 nous devons donc augmenter le nombre de motifs? Merci beaucoup pour votre réponse.
23.09.2020 - 11:32DROPS Design answered:
Bonjour Coco, effectivement, vous devez continuer le point fantaisie comme avant, mais à chaque fois sur davantage de mailles, autrement dit, vous avez A.1 pour la bordure devant comme avant, 1 fois A.2A, vous répétez A.2B jusqu'à ce qu'il reste 6 ou 7 mailles (selon la taille) et terminez par A.2C (5 ou 6 m selon la taille) et A.1 pour la bordure devant. Bon tricot!
23.09.2020 - 14:26
![]() Maminouchka wrote:
Maminouchka wrote:
Pour rabattre les poignets de manière souple et jolie, utiliser le lien "Rabattre à l'islandaise".
14.09.2020 - 13:21
![]() Thu Anh Phan wrote:
Thu Anh Phan wrote:
Hei ! Skal man regne med halskant når man strikket ferdig i høydenav bærestrykket? Jeg holde på jakker Drops 206-15
23.06.2020 - 00:00DROPS Design answered:
Hei Thu, Bærestykket skal måles fra merket som er rett etter halsen - så halsen er ikke inkludert i målene. God fornøyelse!
24.06.2020 - 07:55
![]() Maria Selvarolo wrote:
Maria Selvarolo wrote:
Buon giorno! Vorrei sapere se è possibile lavorare questa giacca con i ferri dritti, visto che è una giacca aperta. Grazie!
11.05.2020 - 15:38DROPS Design answered:
Buongiorno Maria. Il capo è lavorato dall'alto verso il basso. Soprattutto sullo sprone il numero delle maglie è alto ed è per questo che vengono consigliati i ferri circolari piuttosto che quelli dritti. La lavorazione sui ferri dritti potrebbe risultare non particolarmente comoda, Buon lavoro!
13.05.2020 - 16:41
![]() Johanna wrote:
Johanna wrote:
Graag wil ik weten wat het nut is van steken meerderen onderaan het vest en dan met een dunnere naald verder breien. Is dat niet hetzelfde als gewoon doorgaan ? Alvast bedankt !
01.04.2020 - 21:13DROPS Design answered:
Dag Johanna,
Op deze manier brei je de boord met dezelfde naalddikte, en dus met hetzelfde visuele effect, als op de mouw. Vermoedelijk is dit de reden dat de ontwerper het zo bedacht heeft.
04.04.2020 - 19:04
![]() Mandy wrote:
Mandy wrote:
I tried to download this pattern, but the pattern diagrams, A.1, A.2b, etc, are not showing. No images at all showing
31.01.2020 - 13:40DROPS Design answered:
Dear Mandy, we could successfully print this pattern, tried to first check your printer's settings, then refresch your browser and delete cookies. Hope this helps! Happy knitting!
31.01.2020 - 14:39
![]() Denise wrote:
Denise wrote:
Hi, Is this pattern available in 8ply yarn? Or, is there a similar pattern in 8ply? Thanks Denise
18.11.2019 - 00:29DROPS Design answered:
Dear Denise, you can search a pattern using a yarn group B. Happy knitting!
18.11.2019 - 10:51
![]() Carla wrote:
Carla wrote:
Dit vind ik een heel mooi patroon, wordt het ook vertaald naar het Nederlands?
20.08.2019 - 14:28DROPS Design answered:
Dag Carla,
Het patroon is inmiddels vertaald naar het Nederlands. :) Veel breiplezier!
01.09.2019 - 12:13
![]() Evelyn Wendt wrote:
Evelyn Wendt wrote:
Rigtig flot og lige det jeg mangler. Kan næsten ikke vente med at komme i gang med at strikke den - og denne gang til mig selv.
17.06.2019 - 14:26
![]() Mamidyo wrote:
Mamidyo wrote:
Ce gilet est parfait pour une petite promenade j'apprécie les poches en l'associant avec le pull ne-316 l'ensemble est parfait
07.06.2019 - 19:30
|
|||||||||||||||||||
Frambuesa#frambuesajacket |
|||||||||||||||||||
 |
 |
||||||||||||||||||
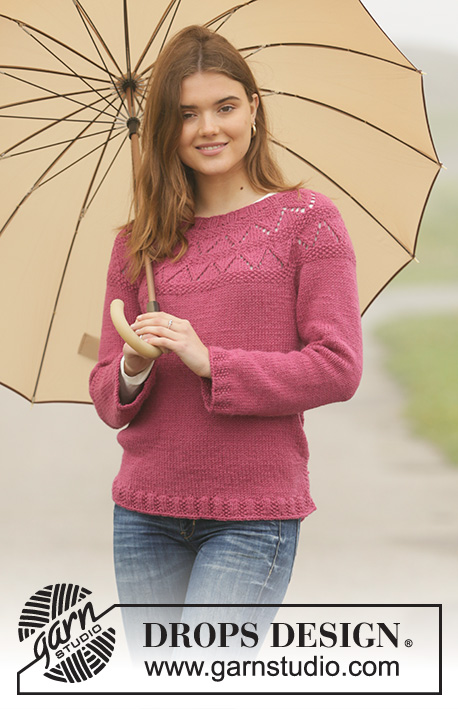
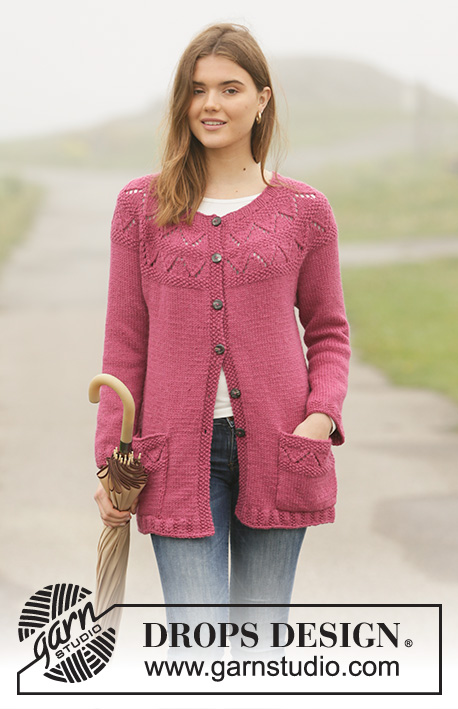
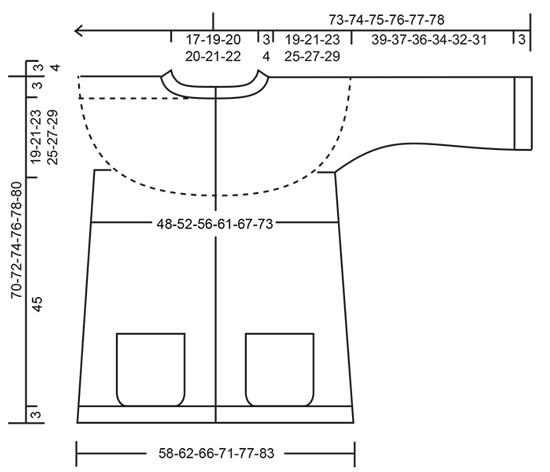
Knitted long jacket in DROPS Nepal. The piece is worked top down with lace pattern and moss stitch on the yoke, with A-shape and pockets. Sizes S - XXXL.
DROPS 206-15 |
|||||||||||||||||||
|
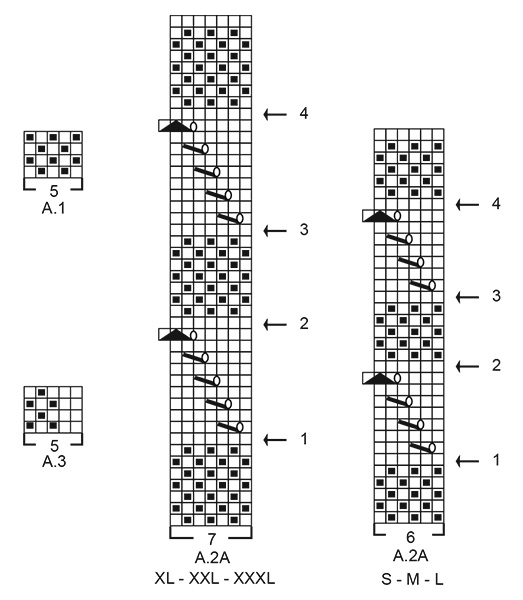
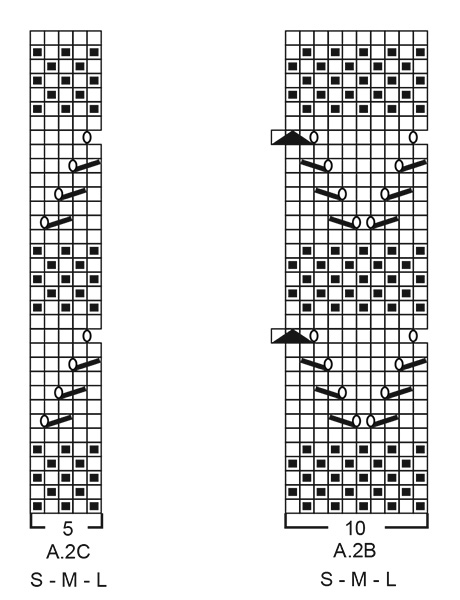
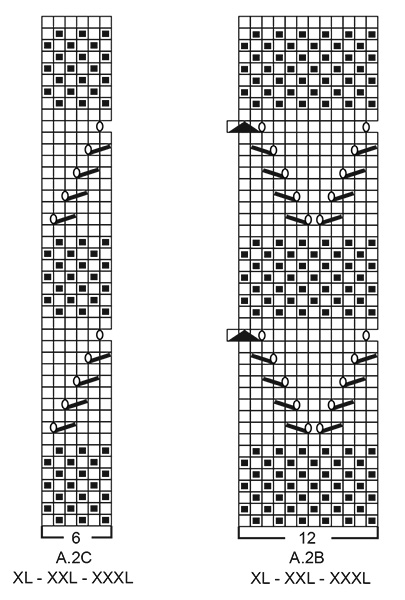
------------------------------------------------------- EXPLANATIONS FOR THE PATTERN: ------------------------------------------------------- RIDGE/GARTER STITCH (worked back and forth): Knit all rows. 1 ridge in height = Knit 2 rows. PATTERN: See diagrams A.1 to A.3. Choose diagram for your size (applies to A.2). The diagrams show all rows in the pattern seen from the right side. INCREASE TIP-1 (evenly spaced): To work out how to increase evenly, count the total number of stitches on the needle (e.g. 84 stitches) minus bands (e.g. 10 stitches) and divide the remaining stitches by the number of increases to be made (e.g. 27) = 2.7. In this example, increase by making 1 yarn over after alternately each 2nd and 3rd stitch. Do not increase on bands. On the next row work the yarn overs twisted to avoid holes. INCREASE TIP-2 (for sides of body and sleeves): Work until there are 2 stitches left before the marker thread, 1 yarn over, knit 4 (marker thread sits between these 4 stitches), 1 yarn over. On the next row/round work the yarn overs twisted to avoid holes. Then work the new stitches in stocking stitch. RAGLAN: When the yoke is finished, work a small raglan before dividing the piece for body and sleeves. All increases are worked from the right side! Increase 1 stitch on each side of the 4 markers in each transition between front/back pieces and sleeves as described below (= 8 stitches increased on the row). Work until 1 stitch remain before first marker, make 1 yarn over, knit 2 (marker is in the middle of these 2 stitches), make 1 yarn over (= 1 stitch increased on each side of marker). On the next row (wrong side) purl the yarn overs twisted to avoid holes. Then work the new stitches in stocking stitch. DECREASE TIP (for mid under sleeves): Start 3 stitches before the marker thread, knit 2 together, knit 2 (marker thread sits between these 2 stitches), slip 1 stitch as if to knit, knit 1 and pass the slipped stitch over the knitted stitch (2 stitches decreased). BUTTONHOLES: Work buttonholes on the right band (when the garment is worn). Work from the right side when there are 3 stitches left on the row as follows: Make 1 yarn over, knit 2 together and knit 1. On the next row knit the yarn over to leave a hole. The first buttonhole is worked when the rib on the neck measures approx. 2 cm. Then work the other 5-5-5-6-6-6 buttonholes with approx. 10-10-10-9-9-9 cm between each one. CASTING-OFF TIP: To avoid the cast-off edge being tight you can cast off with a larger size needle; or make 1 yarn over after approx. each 8th stitch at the same time as casting off (yarn overs cast off as normal stitches). ------------------------------------------------------- START THE PIECE HERE: ------------------------------------------------------- JACKET – SHORT OVERVIEW OF THE PIECE: The neck and yoke are worked back and forth with circular needle from mid front, then the yoke is divided for body and sleeves. The body is continued back and forth with circular needle. The sleeves are worked in the round with double pointed needles/ short circular needle, top down. Finally the pockets are worked separately and then sewn onto the front pieces. NECK: Cast on 84-88-92-92-96-100 stitches (including 5 band stitches on each side towards mid front) with circular needle size 4.5 mm and Nepal. Purl 1 row (= wrong side). The next row is worked as follows from the right side: Work A.1 (= 5 band stitches), * knit 2, purl 2 *, work from *-* until there are 7 stitches left on the row, knit 2 and finish with A.1 (= 5 band stitches). Continue this rib for 3-3-3-4-4-4 cm; remember the BUTTONHOLES on right band – read description above. When the rib is finished, knit 1 row from the right side where you increase 27-33-29-39-47-43 stitches evenly spaced - read INCREASE TIP-1 = 111-121-121-131-143-143 stitches. Insert 1 marker after the 5 band stitches at the beginning of the row; the yoke will be measured from this marker! Purl 1 row from the wrong side (yarn overs purled twisted and band stitches worked in A.1). Now work yoke as described below. YOKE: Change to circular needle size 5.5 mm and work the next row from the right side as follows. Continue A.1 over the 5 band stitches, work A.2A (= 6-6-6-7-7-7 stitches), A.2B until there are 10-10-10-11-11-11 stitches left on the row (= 9-10-10-9-10-10 repeats of 10-10-10-12-12-12 stitches), work A.2C (= 5-5-5-6-6-6 stitches) and finish with A.1 over the 5 band stitches. Continue this pattern. REMEMBER THE KNITTING TENSION! AT THE SAME TIME on each row marked with an arrow in A.2A increase stitches evenly spaced as described below – remember INCREASE TIP-1 (always increase on a row from the wrong side). Arrow-1: Increase 40-40-40-48-48-48 stitches evenly spaced = 151-161-161-179-191-191 stitches. Arrow-2: Increase 40-40-40-48-48-48 stitches evenly spaced = 191-201-201-227-239-239 stitches. Arrow-3: Increase 30-30-30-36-36-36 stitches evenly spaced = 221-231-231-263-275-275 stitches. Arrow-4: Increase 4-6-6-10-2-14 stitches evenly spaced = 225-237-237-273-277-289 stitches. When A.2 has been completed in height the piece measures approx. 16-16-16-20-20-20 cm from the marker on the neck. If the piece is shorter than this, continue working stocking stitch and A.1 over the band stitches to the right length. Then increase to a small raglan as described below. RAGLAN: Insert 4 markers in the piece for the increases to raglan. The markers are inserted without working the stitches; the first marker after the first 39-40-40-46-48-51 stitches (= front piece), 2nd marker inserted after the next 40-44-44-50-48-48 stitches (= sleeve), 3rd marker inserted after the next 67-69-69-81-85-91 stitches (= back piece) and the 4th marker after the next 40-44-44-50-48-48 stitches (= sleeve). There are 39-40-40-46-48-51 stitches left on the front piece after the last marker. Work stocking stitch. AT THE SAME TIME on the next row from the right side increase to RAGLAN on each side of the 4 markers – read description above (= 8 stitches increased). Increase like this every 2nd row (i.e. each row from the right side) a total of 2-4-6-4-6-8 times = 241-269-285-305-325-353 stitches. Continue working without further increases until the piece measures 19-21-23-25-27-29 cm from the marker on the neck. Now divide the piece for body and sleeves as follows: Work 41-44-46-50-54-59 stitches as before (= front piece), place the next 44-52-56-58-60-64 stitches on 1 thread for sleeve and cast on 6-6-8-8-10-10 new stitches on the needle (= in side under sleeve), work the next 71-77-81-89-97-107 stitches as before (= back piece), place the next 44-52-56-58-60-64 stitches on 1 thread for sleeve and cast on 6-6-8-8-10-10 new stitches on the needle (= in side under sleeve) and work the remaining 41-44-46-50-54-59 stitches as before (= front piece). Body and sleeves are finished separately. THE PIECE IS NOW MEASURED FROM HERE! BODY: = 165-177-189-205-225-245 stitches. Insert 1 marker thread 44-47-50-54-59-64 stitches in from each side (= sides of body). There are 77-83-89-97-107-117 stitches between marker threads on the back piece. Allow the threads to follow your work onwards; they will be used when increasing in the sides. Work stocking stitch back and forth and 5 band stitches in A.1 on each side towards mid front – remember the buttonholes on the right band. When the piece measures 5 cm from the division in all sizes increase 1 stitch on each side of both marker threads - read INCREASE TIP-2 (= 4 stitches increased). Increase like this every 5 cm a total of 8 times on each side = 197-209-221-237-257-277 stitches. Continue working until the piece measures 45 cm from the division in all sizes (there is approx. 3 cm to finished length; you can try the jacket on and work to desired length). Purl 1 row from the wrong side (bands worked in A.1) and increase at the same time 40-43-41-45-50-55 stitches evenly spaced on this row = 237-252-262-282-307-332 stitches. This is done to avoid the edge being tight. Change to circular needle size 4.5 mm and work the next row as follows from the right side: 5 band stitches in A.1, work A.3 until there are 7 stitches left on the row, knit 2 and finish with 5 band stitches in A.1. Continue like this until the edge measures 3 cm. Cast off with knit from the right side – read CASTING OFF TIP! The jacket measures approx. 70-72-74-76-78-80 cm from the shoulder down. SLEEVE: Place the 44-52-56-58-60-64 stitches from the thread on the one side of the piece on short circular needle or double pointed needles size 5.5 mm and knit up 1 stitch in each of the 6-6-8-8-10-10 stitches cast on under the sleeve = 50-58-64-66-70-74 stitches. Insert a marker thread in the middle of the 6-6-8-8-10-10 stitches under the sleeve (allow the thread to follow your work onwards; it will be used when decreasing mid under sleeve). Start the round at the marker thread and work stocking stitch in the round. When the sleeve measures 3-2-2--2-3-3 cm from the division decrease 2 stitches mid under sleeve – read DECREASE TIP. Decrease like this every 3-2-1½-1½-1-1 cm a total of 4-7-9-9-10-11 times = 42-44-46-48-50-52 stitches. When the sleeve measures 16-16-16-15-15-15 cm from the division increase 2 stitches mid under sleeve – read INCREASE TIP-2. Increase like this every 6-7-5-6-3-3½ cm a total of 4-3-4-3-5-4 times = 50-50-54-54-60-60 stitches. Continue working until the sleeve measures 39-37-36-34-32-31 cm from the division (there is approx. 3 cm left to finished length; you can try the jacket on and work to desired length). NOTE: Shorter lengths in larger sizes due to wider neck and longer yoke. Knit 1 round where you increase 0-0-1-1-0-0 stitches = 50-50-55-55-60-60 stitches. Change to double pointed needles or short circular needle size 4.5 mm and work A.3 for 3 cm. Cast off with knit – remember CASTING OFF TIP! The sleeve measures approx. 42-40-39-37-35-34 cm from the division. Work the other sleeve in the same way. ASSEMBLY: Sew buttons onto the left band. POCKET: Cast on 33-33-33-39-39-39 stitches with circular needle size 5.5 mm and Nepal. Purl 1 row (= wrong side). The next row is worked as follows from the right side: 1 edge stitch in GARTER STITCH – read description above, work A.2A (= 6-6-6-7-7-7 stitches), A.2B over the next 20-20-20-24-24-24 stitches (= 2 repeats of 10-10-10-12-12-12 stitches), A.2C (= 5-5-5-6-6-6 stitches) and finish with 1 edge stitch in garter stitch. Continue this pattern until the second border of moss stitch has been completed. Then work stocking stitch and 1 edge stitch in garter stitch on each side until the pocket measures 16-17-18-19-20-21 cm. Cast off with knit from the right side. Work the other pocket in the same way. Place 1 pocket on each front piece approx. 8 to 13 cm from the outermost edge of the band mid front and edge-to-edge with the transition between stocking stitch and the edge at the bottom of the jacket – see photo (you can try the jacket on and move the pocket if you wish). Sew the pockets onto the front pieces inside the 1 edge stitch on the pockets. |
|||||||||||||||||||
Diagram explanations |
|||||||||||||||||||
|
|||||||||||||||||||
 |
|||||||||||||||||||
 |
|||||||||||||||||||
 |
|||||||||||||||||||
 |
|||||||||||||||||||
Have you finished this pattern?Tag your pictures with #dropspattern #frambuesajacket or submit them to the #dropsfan gallery. Do you need help with this pattern?You'll find 27 tutorial videos, a Comments/Questions area and more by visiting the pattern on garnstudio.com. © 1982-2026 DROPS Design A/S. We reserve all rights. This document, including all its sub-sections, has copyrights. Read more about what you can do with our patterns at the bottom of each pattern on our site. |
|||||||||||||||||||


With over 40 years in knitting and crochet design, DROPS Design offers one of the most extensive collections of free patterns on the internet - translated to 17 languages. As of today we count 324 catalogues and 12285 patterns translated into English (UK/cm). 12285
We work hard to bring you the best knitting and crochet have to offer, inspiration and advice as well as great quality yarns at incredible prices! Would you like to use our patterns for other than personal use? You can read what you are allowed to do in the Copyright text at the bottom of all our patterns. Happy crafting!
Post a comment to pattern DROPS 206-15
We would love to hear what you have to say about this pattern!
If you want to leave a question, please make sure you select the correct category in the form below, to speed up the answering process. Required fields are marked *.