
Popular categories
Looking for a yarn?


Comments / Questions (8)
![]() Isabel Batista wrote:
Isabel Batista wrote:
As medidas do desenho correspondem a que idade?
11.01.2024 - 13:02DROPS Design answered:
As medidas do esquema correspondem a todos os tamanhos. Algumas medidas são iguais em todos os tamanhos. Bons tricôs!
11.01.2024 - 14:55
![]() Milah wrote:
Milah wrote:
Je ne trouve pas le nombre de maille 195 que vous dites pour l’empiècement alors que j’ai fait toutes les augmentations je la tricote pour 2 ans ’je l’ai refait 2 fois toujours le même problème merci de votre aide
27.10.2023 - 11:02DROPS Design answered:
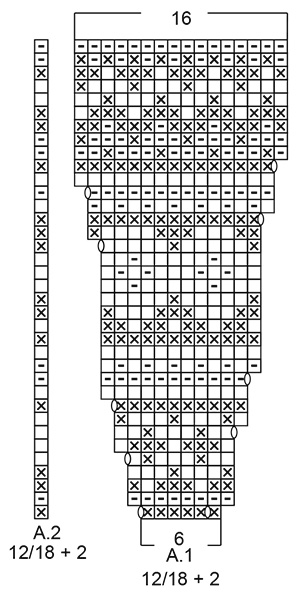
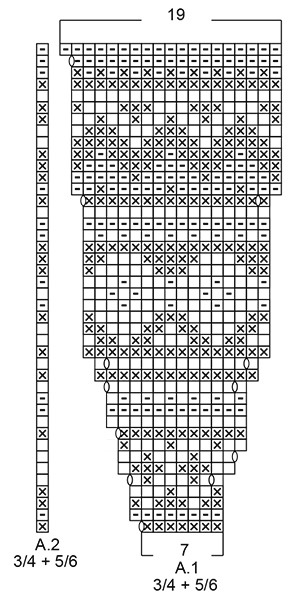
Bonjour Milah, notez que vous devez augmenter 10 mailles dans chaque A.1 pour qu'il y en ait 16 au total quand A.1 est terminé, vous aurez ainsi: 1 m lis, 12 x 16 m, 1 m et 1 m lis soit 195 mailles. Bon tricot!
28.10.2023 - 09:24
![]() Maj-britt Hansson Johnsgård wrote:
Maj-britt Hansson Johnsgård wrote:
Hva menes med 12 raportet a 7 masker
15.02.2020 - 12:15DROPS Design answered:
Hei Maj-Britt, Når du begynner mønster A.1 er det 7 masker i første rad på diagrammet. Disse 7 masker skal repeteres 12 ganger på omgangen (mønster A.1 repeteres 12 ganger). God fornøyelse!
15.02.2020 - 13:51
![]() Åshill wrote:
Åshill wrote:
Hei..kan jeg få kjøpe oppskrifter av dere i papirform??
23.11.2019 - 14:10DROPS Design answered:
Hei Åshill. Vi har sluttet med kataloger, men du kan fint skrive ut alle våre oppskrifter gratis. Trykk på Skriv ut - ikonet og velg Oppskrift og/eller bilder. God Fornøyelse!
25.11.2019 - 10:56
![]() Bianca Zirnig wrote:
Bianca Zirnig wrote:
Nu har jag påbörjat denna. Mönsterstickningen är färdig och det återstår nu bara rött garn. Men jag behövde bara ca ett halv nystan ljus beige nr 8, inte 150g (tre nystan) som det står i beskrivningen för minsta storleken. Det måste vara fel i beskrivningen, för jag har mätt och stickfastheten stämmer.
18.11.2019 - 19:08DROPS Design answered:
Hej Bianca, tack för info, det skall vi titta på :)
03.12.2019 - 15:26
![]() Åse Henriksen wrote:
Åse Henriksen wrote:
Jeg strikker str 2 år og har nok med 50 g i str lys beige. Stemmer garnmengden her?
08.06.2019 - 04:24
![]() Sevinj wrote:
Sevinj wrote:
Hei! Spørsmål ang.montering av stolpene.Det står: Legg høyre stolpe over venstre stolpe og sy fast til dressen der det ble lagt opp 1 maske i hver side. Etter planen blir stolpene mine ganske breie ( 3-4 cm). Redd for at det ikke blir plass for stolpene da. Må jeg legge opp flere masker da? (3-4 på hver side) På forhand takk for svar!
22.01.2019 - 09:14DROPS Design answered:
Hei Sevinj. Om du strikker stolpene lenger enn det som står i oppskriften, bør du også legge til fler masker enn det som står for at de skal bli plass. Du kan nok legge til 2-3 masker i hver side. Vær obs på at dressen kan bli 1-2 cm videre om du gjør det slik. God fornøyelse
29.01.2019 - 13:59
![]() Henna Peura wrote:
Henna Peura wrote:
Hei! Kiitos ihanasta ohjeesta -neulon sitä joululahjaksi siskoni pojalle. Mietin kuitenkin, onko tuon kaarrokkeen värin beigen langan menekki laskettu väärin -itselläni sitä jäi kaksi täyttä kerää. Päävärin riittävyyden kanssa taas olen huolissani, en tosin ole aivan vielä neulonut haalaria loppuun, mutta näyttää siltä että loppuu kesken.
16.12.2018 - 08:21
|
|||||||||||||
Miss Pantsy-Pants#misspantsypants |
|||||||||||||
 |
 |
||||||||||||
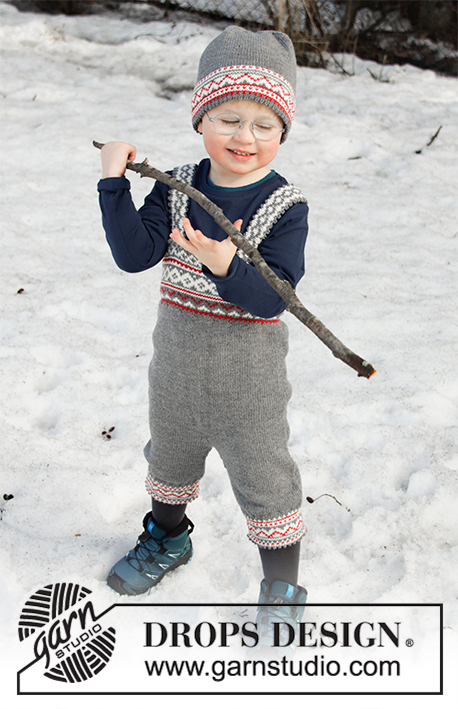
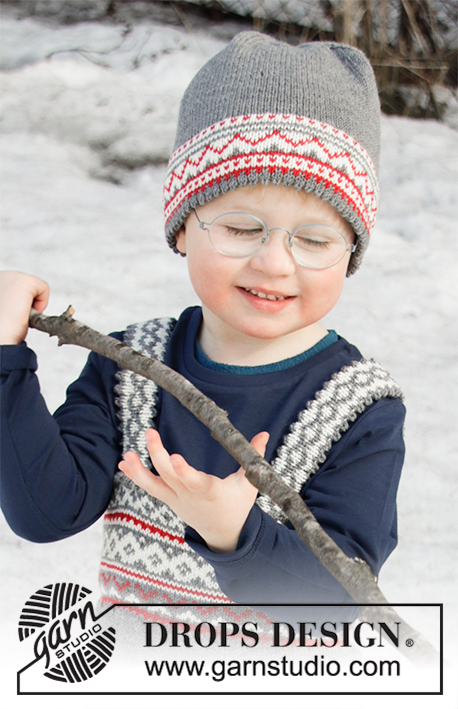
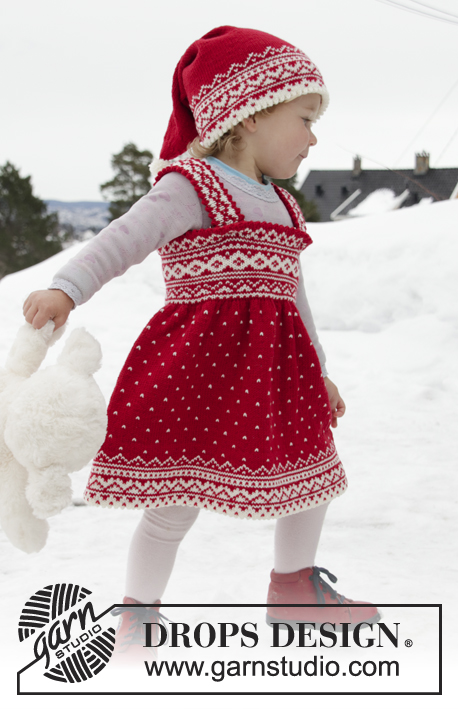
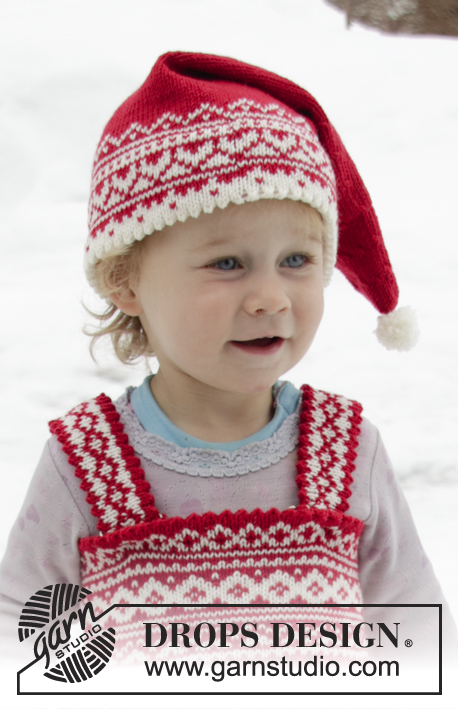
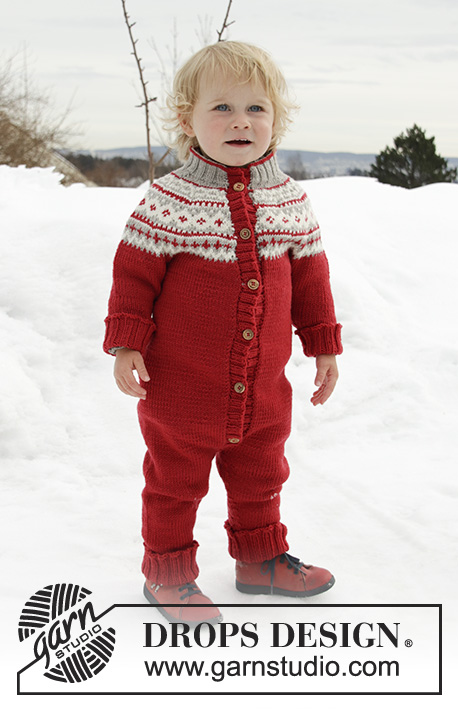
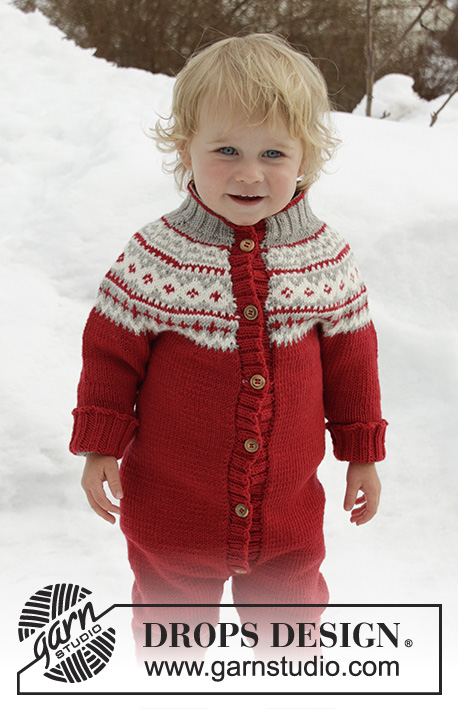
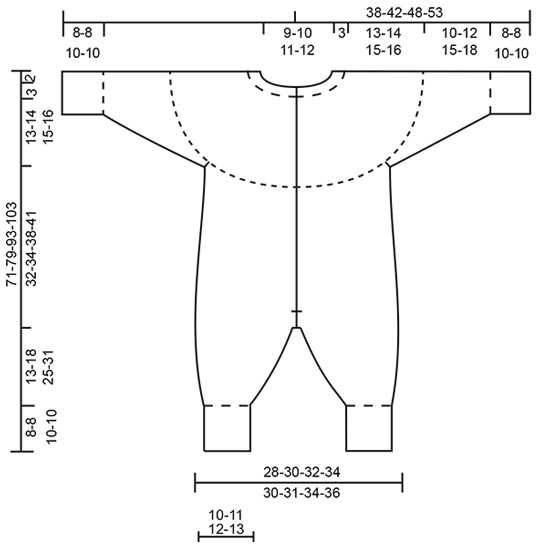
Knitted onesie for children with round yoke in DROPS Merino Extra Fine. The piece is worked top down with Nordic pattern. Sizes 12 months – 6 years.
DROPS Children 32-17 |
|||||||||||||
|
EXPLANATIONS FOR THE PATTERN: ------------------------------------------------------- RIDGE/GARTER STITCH (worked back and forth): 1 ridge = Knit 2 rows. PATTERN: See diagrams A.1 and A.2. Choose diagram for your size. The whole pattern is worked in stocking stitch. DECREASE/INCREASE TIP: To work out when to decrease/increase evenly, count the total number of stitches on the needle (e.g. 76 stitches) and divide by the number of decreases/increases to be made (e.g. 7) = 10.8. In this example, decrease by working together approx. each 10th and 11th stitch, or increase after approx. each 11th stitch by making 1 yarn over (the yarn overs are worked twisted on the next row to avoid holes). INCREASE TIP (for sides of body): Increase 1 stitch on each side of the marker thread as follows: Start 2 stitches before the marker thread, make 1 yarn over, knit 4 (marker thread sits in the middle of these 4 stitches), make 1 yarn over (= 2 stitches increased). On the next row work the yarn overs twisted to avoid holes. DECREASE TIP (for mid under sleeve and inside of leg): Decrease 1 stitch on each side of the marker thread as follows: Start 3 stitches before the marker thread, knit 2 together, knit 2 (marker thread sits between these 2 stitches), slip 1 stitch as if to knit, knit 1 and pass the slipped stitch over the knitted stitch (= 2 stitches decreased). ------------------------------------------------------- START THE PIECE HERE: ------------------------------------------------------- ONESIE - SHORT OVERVIEW OF THE PIECE: The piece is worked back and forth with circular needle from mid front. To make measuring the length of the sleeves and legs easier, the onesie is worked top down. The bands are worked to finish. NECK: Cast on 76-80-84-88 stitches (including 1 edge stitch in each side of the piece) with circular needle size 3 mm and red. Purl 1 row from the wrong side with1 edge stitch in GARTER STITCH – read description above, in each side of the piece. Change to light beige. The next row is worked as follows from the right side: 1 edge stitch in garter stitch, * knit 2, purl 2 *, work from *-* until there are 3 stitches left and finish with knit 2 and 1 edge stitch in garter stitch. Continue this rib for 3 cm, finish after a row from the right side. YOKE: Change to circular needle size 4 mm. The edge stitches are worked in garter stitch to finished length. Purl 1 row from the wrong side with 1 edge stitch in garter stitch in each side and decrease 7-5-4-1 stitches evenly on this row – read DECREASE/INCREASE TIP (purl 2 stitches together = 1 stitch decreased) = 69-75-80-87 stitches. Then work an elevation in back of neck in stocking stitch as follows (to give the garment a better fit): Knit until there are 12-13-14-15 stitches left on row, turn, tighten strand and purl until there are 12-13-14-15 stitches left on other side. Turn, tighten strand and knit until there are 20-22-24-26 stitches left, turn, tighten strand and purl until there are 20-22-24-26 stitches left on other side. Turn, tighten strand and knit until there are 28-31-34-37 stitches left on row, turn, tighten strand and purl until there are 28-31-34-37 stitches left on other side. Turn, tighten strand and knit to end of row, then purl 1 row from the wrong side (edge stitches worked in garter stitch). The next row is worked as follows from the right side: 1 edge stitch in garter stitch, work pattern according to A.1 until there are 2 stitches left on row – NOTE: Choose diagram for your size (= 11-12-11-12 repeats of 6-6-7-7 stitches), work A.2 (= 1 stitch) and finish with 1 edge stitch in garter stitch. Continue this pattern and increase as shown in diagram – REMEMBER THE KNITTING TENSION! When A.1 and A.2 have been completed, there are 179-195-212-231 stitches on the needle. Continue with stocking stitch and 1 edge stitch in garter stitch in each side with red. On the next row from the right side increase 7-7-10-7 stitches evenly on row = 186-202-222-238 stitches. Work until the piece measures approx. 13-14-15-16 cm mid front (measured without the neck). Now divide the piece as follows: Work 25-27-30-32 stitches as before (= front piece), place the next 42-46-50-54 stitches on 1 thread for sleeve (without working them), cast on 6 new stitches on the needle, work 52-56-62-66 stitches (= back piece), place the next 42-46-50-54 stitches on 1 thread for sleeve (without working them), cast on 6 new stitches on the needle and work the remaining 25-27-30-32 stitches as before (= front piece) = 114-122-134-142 stitches. BODY: Insert 1 marker thread 28-30-33-35 stitches in from each side (= 58-62-68-72 stitches between marker threads on back piece). THE PIECE IS NOW MEASURED FROM HERE! Continue back and forth with stocking stitch and 1 edge stitch in garter stitch in each side towards mid front. When the piece measures 10-10-12-12 cm from where body and sleeves were divided, increase 1 stitch on each side of both marker threads – read INCREASE TIP (= 4 stitches increased). Repeat this increase when the piece measures 20-20-24-24 cm from where body and sleeves were divided = 122-130-142-150 stitches. When the piece measures 29-31-35-38 cm from where body and sleeves were divided, stop working the edge stitches in garter stitch mid front. Cast on 1 stitch at the end of the next 2 rows = 124-132-144-152 stitches. Then work stocking stitch in the round over all stitches for approx. 3 cm – the piece now measures 32-34-38-41 cm from the armhole and 45-48-53-57 cm from mid front (measured without neck). Now divide for the legs. LEG: Start mid front, change to double pointed needles size 4 mm and work stocking stitch in the round over the first 62-66-72-76 stitches (the remaining 62-66-72-76 stitches are left on the circular needle). Insert 1 marker thread at the beginning of the round (= inside of leg). On next round, decrease 2 stitches on the inside of the leg – read DECREASE TIP. Decrease like this every round a total of 2-3-3-3 times = 58-60-66-70 stitches. Then decrease on every 4-5-7-9 round a total of 8-7-8-8 times = 42-46-50-54 stitches. When the leg measures 13-18-25-31 cm from the division increase 10 stitches evenly on round = 52-56-60-64 stitches. Change to double pointed needles size 3 mm and work rib in the round (= knit 2 / purl 2) for 8-8-10-10 cm or to desired length. On the next round increase all purl 2 to purl 3 = 65-70-75-80 stitches. Then cast off with knit over knit and purl over purl. Place stitches from the circular needle onto double pointed needles size 4 mm and work the other leg in the same way. The whole piece measures approx. 71-79-93-103 cm, measured from the shoulder down. SLEEVE: Place stitches from the thread on the one side of the piece on double pointed needles size 4 mm and knit up 1 stitch in each of the 6 stitches cast on under the sleeve = 48-52-56-60 stitches. Insert 1 marker thread in the middle of these 6 stitches = mid under sleeve). THE PIECE IS NOW MEASURED FROM HERE! Work stocking stitch in the round with red. When the sleeve measures 2-2-1-1 cm from where the sleeve was divided from the body, decrease 2 stitches mid under sleeve – remember DECREASE TIP. Decrease like this every 3rd-3rd-4th-4th round a total of 7-9-10-12 times = 34-34-36-36 stitches. When the sleeve measures 10-12-15-18 cm from where it was divided from the body, increase 6-6-8-8 stitches evenly on round = 40-40-44-44 stitches. Change to double pointed needles size 3 mm and work rib in the round (= knit 2 / purl 2) for 8-8-10-10 cm or to desired length. On the next round increase all purl 2 to purl 3 = 50-50-55-55 stitches. Then cast off with knit over knit and purl over purl. Work the other sleeve in the same way. LEFT BAND: Knit up approx. 114-148 stitches with circular needle size 3 mm, inside the 1 edge stitch from the right side (the number of stitches should be divisible by 2), start at top of neck. Make sure the band is not tight. Work rib (= knit 2 / purl 2). Make sure the 2 stitches at top of neck are knitted. Work until the band measures approx. 2 cm. Cast off with knit over knit and purl over purl. RIGHT BAND: Work as for left band, but when the band measures 1 cm work 6-6-7-7 buttonholes evenly spaced on band (buttonholes are worked in purl sections seen from the right side). 1 buttonhole = purl 2 together and make 1 yarn over – the first buttonhole is worked approx. 1½-2 cm from the neckline, then work the next 5-5-6-6 buttonholes with approx. 7½-8-7½-8 cm between each one. ASSEMBLY: Lay right band over left band and sew down to the onesie where you cast on 1 stitch in each side, sew with small neat stitches. Sew buttons onto left band. |
|||||||||||||
Diagram explanations |
|||||||||||||
|
|||||||||||||
 |
|||||||||||||
 |
|||||||||||||
 |
|||||||||||||
Have you finished this pattern?Tag your pictures with #dropspattern #misspantsypants or submit them to the #dropsfan gallery. Do you need help with this pattern?You'll find 34 tutorial videos, a Comments/Questions area and more by visiting the pattern on garnstudio.com. © 1982-2026 DROPS Design A/S. We reserve all rights. This document, including all its sub-sections, has copyrights. Read more about what you can do with our patterns at the bottom of each pattern on our site. |
|||||||||||||


With over 40 years in knitting and crochet design, DROPS Design offers one of the most extensive collections of free patterns on the internet - translated to 17 languages. As of today we count 324 catalogues and 12290 patterns translated into English (UK/cm). 12290
We work hard to bring you the best knitting and crochet have to offer, inspiration and advice as well as great quality yarns at incredible prices! Would you like to use our patterns for other than personal use? You can read what you are allowed to do in the Copyright text at the bottom of all our patterns. Happy crafting!
Post a comment to pattern DROPS Children 32-17
We would love to hear what you have to say about this pattern!
If you want to leave a question, please make sure you select the correct category in the form below, to speed up the answering process. Required fields are marked *.