
Popular categories
Looking for a yarn?


Comments / Questions (195)
![]() Mari wrote:
Mari wrote:
Hola buenas noches .Que gráfico he de seguir para hacer el calado de la parte baja del pecho. Gracias
19.08.2021 - 23:16DROPS Design answered:
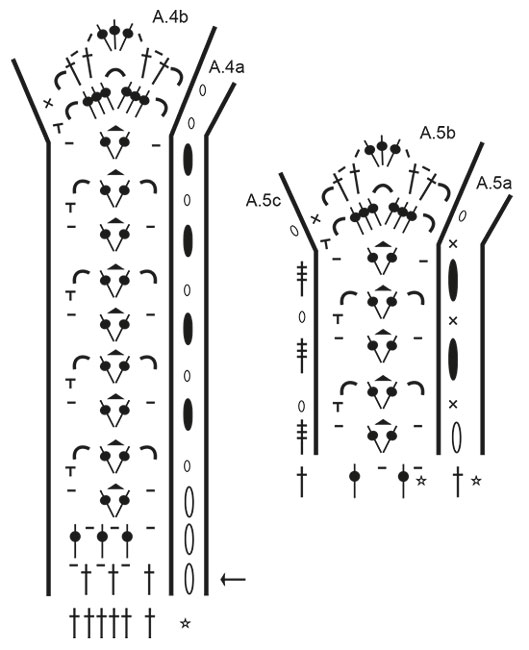
Hola Mari, los gráficos para el volante de abajo (la parte del cuerpo) son A.4a y A.4b.
20.08.2021 - 21:25
![]() Pilar wrote:
Pilar wrote:
Dónde puedo encontrar esta marca de lanas y revistas
27.07.2021 - 11:55DROPS Design answered:
Hola Pilar, AQUI encontrarás una lista de los minoristas DROPS activos en Espana. Todos los patrones son dados a los clientes gratuitamente en la pagina garnstudio.com. Buen trabajo!
27.07.2021 - 14:54
![]() Christine wrote:
Christine wrote:
Bonjour, Je crochète ce modèle en S. Je bloque au niveau du diagramme A4: je ne comprends pas comment réaliser les augmentations en faisant des arceaux supplémentaires. Sachant que j'ai 146 brides à partir desquelles je ne pourrai réaliser que 24 fois A4? ( et non 28 comme demandé?) Cordialement.
15.07.2021 - 16:14DROPS Design answered:
Bonjour Christine, vous devez augmenter au 1er rang de A.4, autrement dit, au lieu de crocheter (1 bride, 1 ml, on saute 1 bride) tout le tour, vous allez crocheter à 11 reprises différentes (cf cette leçon par ex. (1 bride, 1 ml, 1 br dans la m suivante, 1 ml) autrement dit, vous allez ainsi augmenter 11 brides = arceaux. lorsque vous aurez augmenté 11 brides vous aurez 84 fois (1 b, 1 ml) et pourrez ainsi répéter 14 fois A.4 tout le tour (14 x 6 brides par A.4= 84) + A.4a. Bon crochet!
16.07.2021 - 08:20
![]() Cornelia Jernej wrote:
Cornelia Jernej wrote:
Hallo, beim Rückenteil wird ab der ersten Runde 8x beidseitig zugenommen. Das sind noch keine 14 cm Soll ich die restlichen Reihen bis 14 cm ohne Zunahme stricken, oder soll ich die Zunahme auf 14cm verteilen? Grüße Conny
14.07.2021 - 16:14DROPS Design answered:
Liebe Frau Jernej, die Zunahmen werden in jeder Reihe gearbeitet, wenn sie alle fertig sind, dann häkeln Sie ohne Zunahmen bis die Arbeit 14 cm misst. Viel Spaß beim häkeln!
15.07.2021 - 09:26
![]() Jeannine Fournier wrote:
Jeannine Fournier wrote:
Bonjour, j'ai du mal à comprendre vos diagrammes. Je veux faire la taille S. J'aimerais savoir si : En 1a les 5 lignes ne représentent que l'endroit ? Donc quels points pour les rgs de retour ? A moins qu'il n'y ait que 5 lignes au total ? Le triangle qui sépare les 2 Brides ds la même Bride est ce 3ml ? Et le "petit pont" qui suit est ce 2ml ? Merci pour votre réponse.
20.06.2021 - 18:37DROPS Design answered:
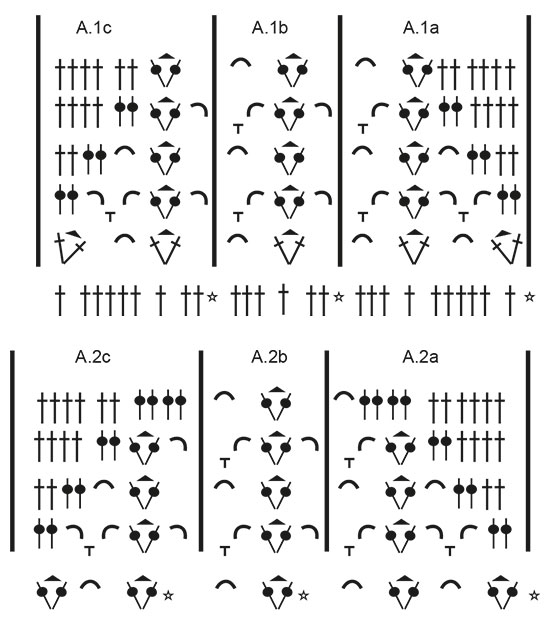
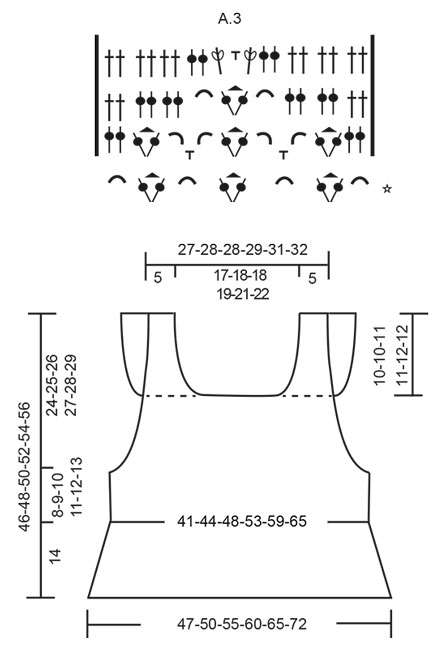
Bonjour Mme Fournier, tous les rangs figurent dans les diagrammes, sur l'endroit lisez de droite à gauche (= A.1a, A.1b, A.1c) et sur l'envers de gauche à droite (A.1c, A.1b, A.1a). Quand ces 5 rangs sont faits, crochetez A.2 de la même façon puis A.3 au-dessus des mailles centrales (pour terminer la pointe ajourée). 1 triangle = 3 ml et le "petit pont" = 2 ml - cf légende. Bon crochet!
21.06.2021 - 08:01
![]() Ladyyauraa wrote:
Ladyyauraa wrote:
Me encuentro que cuando tengo k unir espalda i delantero se hace en redondo los volantes de abajo!!, pero el grafico para hacer el escote con el dibujo es como si estuviera erroneo
18.06.2021 - 01:31
![]() Ursula CHEVALLIER wrote:
Ursula CHEVALLIER wrote:
Merci de votre indication pour la taille 'M' . Pouvez-vous juste confirmer la fin de mon 1ier rg d'augmentation avec le diagr. : l'avant dernière maille de 1c : 1 bride, 3 m en l'air, 2 brides dans la dernière maille , donc la 2ième bride = l'augmentation. Je veux juste être sûr d'avoir bien compris. Merci encore de votre explication.
01.06.2021 - 17:16DROPS Design answered:
Bonjour Mme Chevalier, je vois que j'ai oublié A.1c hier, désolée, voici le détail correct: 1 bride dans la 1ère m + 1 augm, A.1a = 10 brides, A.1b = 5x 6 brides = 30 brides, A.1c = 9 brides, 1 bride dans la dernière m + 1 augm = 1(+1) + 10+30+9 + 1(+1)=51(+2)=53 brides. En M, vous augmentez au 1er rang dans la 1ère m avant A.1a et dans la dernière m après A.1c . Bon crochet!
02.06.2021 - 07:25
![]() Ursula CHEVALLIER wrote:
Ursula CHEVALLIER wrote:
Je rép.ma quest.: en ' M' je démarre sur 51 b. le diagr. 1 a, b, c comme suit: 3m en l'air pour tourner, 1 bride (=augm.)3m en l'air+1b dans la même m et je suis le diagr...j'arrive à la fin de 1c avec 1b+3m en l'air+ 2b (la 2ième = augm.) dans la même B du rg préc. Et que faire avec les 2 B du rg préc. pour finir le rg ??? Après la fin de 1c il me reste 2 B non crochetées, que faire..???
01.06.2021 - 09:47DROPS Design answered:
Bonjour Mme Chevalier, vous avez 51 brides et crochetez: 1 bride dans la première bride (= en augmentant au 1er rang = 2 brides ici), puis A.1a = 10 brides, A.1b = 5 x 6 brides = 30 brides, 1 bride dans la dernière bride (= en augmentant au 1er rang = 2 brides ici), vous avez ainsi bien 51 brides + 2 augmentations: 1(+1) + 10+30+1 (+1)= 51(53) brides, comme au 1er rang (et vous avez augmenté 1 bride de chaque côté = + 2 m par rapport au 1er rang). Est-ce que ceci- peut vous aider?
01.06.2021 - 16:13
![]() Ursula CHEVALLIER wrote:
Ursula CHEVALLIER wrote:
Bonjour, je fait ce modèle en M , donc 53 m en l'air et crocheté 1 rg de brides dessus. J'arrive en 2 ième rg donc avec 51 brides et j'ai crocheté le diagr.A1a ,b , c et j'ai finis avec 1 bride , 3 mailles en air , 1 bride dans la même maille. Après il me reste encore 2 mailles et je dois augmenter 1 maille , comment faire pour cette augmentation à la fin de ce rg...???? Vu qu'il y a 2 mailles qui restent...Merci de v/réponse.
31.05.2021 - 23:05DROPS Design answered:
Bonjour Mme Chevalier, en taille M, vous commencez par une chaînette de 53 mailles en l'air, mais au 1er rang, vous ne devez avoir que 51 brides, c'est probablement l'origine des 2 mailles en l'air en trop que vous avez à la fin du 1er rang. Bon crochet!
01.06.2021 - 08:26
![]() Steffi wrote:
Steffi wrote:
Hallo, nach dem ersten Teil habe ich 73 Maschen in der Reihe. Warum habe ich ab dem Diagrammen dann nur 1+10+30+10 also nur 51 in der nächsten Reihe?? Liebe Grüße an alle Handarbeiter
30.04.2021 - 21:12DROPS Design answered:
Liebe Steffi, Sie müssen gleichzeitig zunehmen und im Muster häkeln, dh, die 1. Reihe wird mit der 1. Muster + mit Zunahmen gehäkelt. Viel Spaß beim häkeln!
03.05.2021 - 07:27
|
|||||||||||||||||||||||||||||||||||||||||||
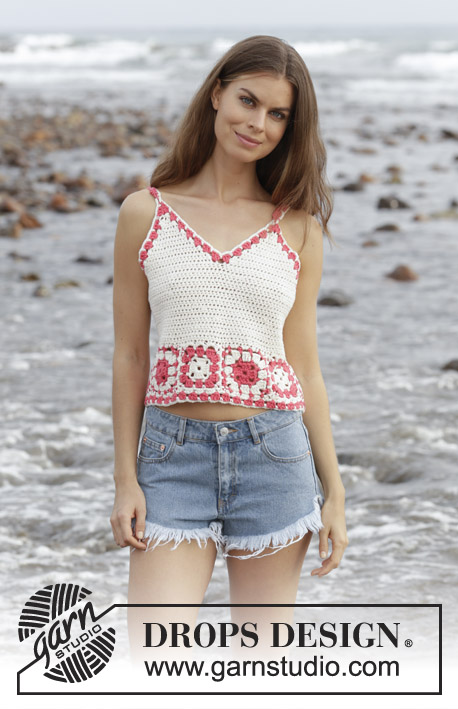
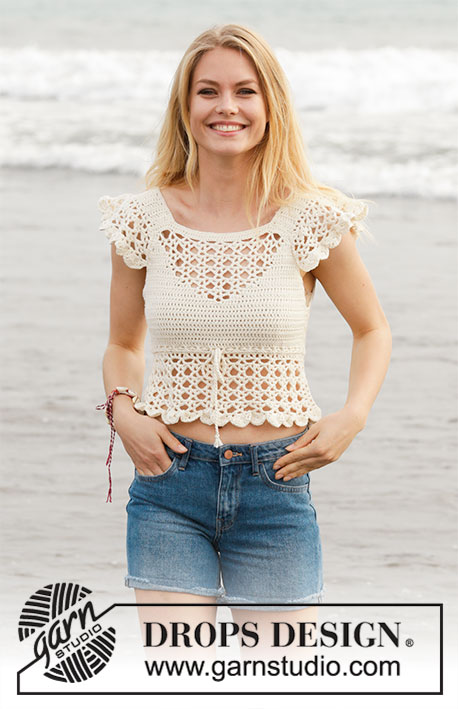
California Dream#californiadreamtop |
|||||||||||||||||||||||||||||||||||||||||||
 |
 |
||||||||||||||||||||||||||||||||||||||||||
Crocheted top with lace pattern and flounce. Size: S - XXXL Piece is crocheted in DROPS Cotton Merino.
DROPS 190-21 |
|||||||||||||||||||||||||||||||||||||||||||
|
INFORMATION FOR PATTERN: PATTERN: See diagrams A.1 to A.5. INCREASE TIP-1: Increase 1 treble crochet by working 2 treble crochets in same stitch. CROCHET TIP-1 (applies to body but not diagram): Replace first treble crochet at beginning of every row with 3 chain stitches. CROCHET TIP-2 (applies to body but not diagram): When working in the round, replace first treble with 3 chain stitches, finish round with 1 slip stitch in 3rd chain stitch at beginning of round. DECREASE TIP: Decrease by working 2 treble crochets together. INCREASE TIP-2 (evenly): To calculate how to increase evenly, use the total number of treble crochets on row (e.g. 146 treble crochets) and divide treble crochets by number of increases to be done (e.g. 22) = 6.6. In this example increase by working 2 treble crochets in same treble crochet alternately approx. every 6th and 7th treble crochet. ---------------------------------------------------------- TOP: Piece is worked back and forth, top down, work front and back piece separately down to armhole, then work in the round over both parts. Then work straps from bottom up and then work flounces back and forth on straps, fasten flounce to front/back piece. FRONT PIECE: Work 51-53-53-55-57-59 chain stitches (including 3 chain stitches to turn with) on hook size 5 mm with Cotton Merino. Switch to hook size 4 mm, turn and work 1 treble crochet in 4th chain stitch from hook (= 2 treble crochets), work 1 treble crochet in each of the next 47-49-49-51-53-55 chain stitches = 49-51-51-53-55-57 treble crochets. On next row begin increase in each side of piece AT THE SAME TIME work pattern as follows: Increase 1 treble crochet in each side of piece (= 2 treble crochets increased) - read INCREASE TIP-1. Increase like this every row 3-5-8-13-14-15 times in total, and then every other row 5-5-3-0-0-0 times in total = 65-71-73-79-83-87 treble crochets on last row. Work next row as follows, begin from right side: Read CROCHET TIP-1 – work 1 treble crochet in each of the first 0-1-1-2-3-4 treble crochets, A.1a over the next 10 treble crochets, repeat A.1b over the next 30 treble crochets (= 5 times in total in width), A.1c over the next 9 treble crochets and 1 treble crochet in each of the last 0-1-1-2-3-4 treble crochets. Continue until A.1 has been work 1 time vertically. REMEMBER THE CROCHET TENSION! Then work as follows, begin from wrong side: Work 1 treble crochet in every treble crochet until 1 treble crochet remains before first chain space, work A.2c, repeat A.2b 3 times in total in width, A.2a and 1 treble crochet in every treble crochet the entire row. Continue until A.2 has been worked vertically. Then work as follows, begin from wrong side: Work 1 treble crochet in every treble crochet until first chain space, work A.3 and 1 treble crochet in every treble crochet the rest of row. Continue until A.3 has been worked vertically. Now work 1 treble crochet in every stitch until piece measures 14-15-15-16-16-17 cm. Fasten off, turn. Put piece aside. BACK PIECE: Work 51-53-53-55-57-59 chain stitches (including 3 chain stitches to turn with) on hook size 5 mm with Cotton Merino. Switch to hook size 4 mm, turn and work 1 treble crochet in 4th chain stitch from hook (= 2 treble crochets), work 1 treble crochet in each of the next 47-49-49-51-53-55 chain stitches = 49-51-51-53-55-57 treble crochets. Then work 1 treble crochet in every treble crochet - AT THE SAME TIME increase 1 treble crochet in each side of piece - remember INCREASE TIP-1. Increase like this every row 8-10-11-13-14-15 times in total = 65-71-73-79-83-87 treble crochets on last row. When piece measures 14-15-15-16-16-17 cm (adjust according to front piece), fasten off, turn. BODY: Now work the two parts together as follows: Work 4-4-7-8-12-15 chain stitches for armhole, 1 treble crochet in each of the 65-71-73-79-83-87 treble crochets from back piece, work 8-8-14-16-24-30 chain stitches for armhole, 1 treble crochet in each of the 65-71-73-79-83-87 treble crochets from front piece, work 4-4-7-8-12-15 chain stitches for armhole and finish with 1 slip stitch in first chain stitch at beginning of round. Then work piece in the round, continue with 1 treble in every treble/chain stitch = 146-158-174-190-214-234 trebles. When working in the round, turn after every round to work alternately from right side and wrong side. This is so that the texture is the same on the entire top - read CROCHET TIP-2. Insert 1 marker thread in each side, in the middle of the 8-8-14-16-24-30 chain stitches. NOW MEASURE THE PIECE FROM HERE! Continue like this until piece measures 8-9-10-11-12-13 cm. Now work in the round according to diagram A.4 while at the same time increasing on first round (round marked with arrow in diagram) as follows: Work A.4b 28-30-33-36-39-43 times in total on round – A.4a shows how rounds begin and end and is worked in addition to A.4b – AT THE SAME TIME increase 11-11-12-13-10-12 chain spaces (= 1 treble crochet + 1 chain stitch) evenly – read INCREASE TIP-2 = 84-90-99-108-117-129 chain spaces (= 1 treble crochet + 1 chain stitch). Continue in the round, i.e. always work pattern from right side. When A.4 is done vertically, fasten off. STRAPS: Now work a strap back and forth in cast-on edge on front piece over the first 8-9-9-9-10-10 treble crochets. Work 1 treble crochet in every treble crochet until strap measures 10-10-11-11-12-12 cm. Fasten off. Work 1 strap over the first 8-9-9-9-10-10 treble crochets in the other side the same way. Work straps the same way on back piece. Sew tog straps on shoulder. FLOUNCE: Work back and forth over every row on strap (= 20-20-22-22-24-24 cm). Begin from wrong side and work 1 treble crochet in first row, * 1 chain stitch, 1 treble crochet around row *, work from *-* along the entire strap – adjust so that there are 26-26-28-28-30-30 chain spaces (= 1 chain stitch + 1 treble crochet) on this row, finish with 1 treble crochet in last row = 1 treble crochet in each side and 26-26-28-28-30-30 chain spaces (= 1 chain stitch + 1 treble crochet). Turn and work as follows from right side: A.5a, A.5b 13-13-14-14-15-15 times in total in width, finish with A.5c. Continue this pattern until A.5 is done vertically, fasten off. Work flounce on the other strap the same way. NECK EDGE: Work 1 double crochet in every treble crochet/2 double crochets along every treble crochet row along the entire neck. SLEEVE EDGE: Work 1 double crochet in every treble crochet/2 double crochets along every treble crochet row along armhole – start right after flounce, work along armhole and to the flounce. Place flounce edge to edge to this sleeve edge (on both front and back piece) and fasten with small, neat stitches. Work the other sleeve edge the same way and fasten flounce. TIE: Cut 3 lengths of 3 metres each with Cotton Merino. Twine the strands tog until they resist, fold them double so that they twine again. Make a knot at each end. Baste the yarn up and down through first row with eyelet holes - start mid front. Tie a bow at the front. |
|||||||||||||||||||||||||||||||||||||||||||
Diagram explanations |
|||||||||||||||||||||||||||||||||||||||||||
|
|||||||||||||||||||||||||||||||||||||||||||
 |
|||||||||||||||||||||||||||||||||||||||||||
 |
|||||||||||||||||||||||||||||||||||||||||||
 |
|||||||||||||||||||||||||||||||||||||||||||
Have you finished this pattern?Tag your pictures with #dropspattern #californiadreamtop or submit them to the #dropsfan gallery. Do you need help with this pattern?You'll find 10 tutorial videos, a Comments/Questions area and more by visiting the pattern on garnstudio.com. © 1982-2026 DROPS Design A/S. We reserve all rights. This document, including all its sub-sections, has copyrights. Read more about what you can do with our patterns at the bottom of each pattern on our site. |
|||||||||||||||||||||||||||||||||||||||||||


With over 40 years in knitting and crochet design, DROPS Design offers one of the most extensive collections of free patterns on the internet - translated to 17 languages. As of today we count 324 catalogues and 12290 patterns translated into English (UK/cm). 12290
We work hard to bring you the best knitting and crochet have to offer, inspiration and advice as well as great quality yarns at incredible prices! Would you like to use our patterns for other than personal use? You can read what you are allowed to do in the Copyright text at the bottom of all our patterns. Happy crafting!
Post a comment to pattern DROPS 190-21
We would love to hear what you have to say about this pattern!
If you want to leave a question, please make sure you select the correct category in the form below, to speed up the answering process. Required fields are marked *.