
Popular categories
Looking for a yarn?


Comments / Questions (195)
![]() Lone wrote:
Lone wrote:
Diagrammerne skal starte med 5 lm. Er det før eller efter udtagning?
23.06.2020 - 08:38DROPS Design answered:
Hej Lone, du vender med de 5 lm for at komme en række op, og så tager du ud ifølge opskriften. God fornøjelse!
25.06.2020 - 09:37
![]() Marina wrote:
Marina wrote:
Perché non date una risposta anche a chi come me ha commentato dicendo che le spiegazioni non sono chiare?
19.06.2020 - 15:53DROPS Design answered:
Buongiorno Marina. Se riscontra difficoltà nell'esecuzione del lavoro, può chiedere aiuto qui, indicando in maniera precisa il punto che non le è chiaro, oppure può contattare il suo rivenditore Drops di fiducia che saprà aiutarla al meglio. Buon lavoro!
19.06.2020 - 18:14
![]() Petra wrote:
Petra wrote:
Hallo, kann mir bitte jemand diese AL genau erklären ? Wann z.B. muss ich welches Muster häkeln ? Und die Muster in Häkelschrift gehören wohin (Vorder- oder Rückenteil, Rumpf, Träger) ? Leider ist die AL schlecht geschrieben / übersetzt und es fehlen die wichtigsten Angaben. Würde mich freuen, wenn mir jemand helfen kann. Vielen Dank
16.06.2020 - 22:00DROPS Design answered:
Liebe Petra, beim Vorderteil häkeln Sie zuerst 1 Reihe Stäbchen dann häkeln im Muster (= A.1) und nehmen beidseitig zu. Muster wird wie beschrieben gehäkelt (starten Sie mit A.1a, wiederholen Sie A.1b und enden Sie mit A.1c) - die Zunahmen gleichzeitig nicht vergessen. Hier lesen Sie mehr über Diagramme. Ihr Laden kann Ihnen gerne weiterhelfen, auch telefonisch oder per E-Mail. Viel Spaß beim häkeln!
17.06.2020 - 08:16
![]() Doreen Gunder wrote:
Doreen Gunder wrote:
Ich denke bin auch recht erfahren, aber diese Anleitung ist kompliziert geschrieben.... Ich raffs nicht...mega mega schade....Ich habs schon bestimmt 20 mal gelesen um zu versuchen es zu verstehen...
15.06.2020 - 22:23DROPS Design answered:
Liebe Frau Gunder, unsere Anleitungen sind möglichst ausführlich Schritt für Schritt geschrieben, darum wirken sie manchmal vielleicht kompliziert. An welcher Stelle verstehen Sie denn etwas nicht? Der erste Häkelschritt ist ab "Vorderteil". Dort ist beschrieben, wie viele Maschen anschlagen werden und nach welchen Diagrammen (A.1, A.2 usw.) Sie häkeln - die Diagramme (Häkelschriften) finden Sie am Ende der Anleitung. Weitere Hilfen finden Sie bei den Videos und Lektionen, die in der Anleitung verlinkt sind. Fragen Sie gerne nach, womit Sie nicht zurechtkommen.
19.06.2020 - 14:11
![]() Marina wrote:
Marina wrote:
Buonasera,mi piace molto questo modello,ma devo dire che la spiegazione è davvero poco chiara e da quanto leggo nei commenti non sono l\'unica ad avere problemi.
15.06.2020 - 17:35
![]() Gun Carne wrote:
Gun Carne wrote:
Försöker virka denna topp undrar, detta mönster säger "Fortsätt till A.1 har virkats 1 gång på höjden" betyder det att A1 a, b, c, virkas 5 varv?
14.06.2020 - 11:35DROPS Design answered:
Hei Gun. Ja, det er riktig. A.1 (a+b+c) består av 5 rader = 1 høyde av A.1. God Fornøyelse!
15.06.2020 - 11:18
![]() Iris Tang wrote:
Iris Tang wrote:
I'm 1.56m if I'm were to use 50g lace cotton thread how many balls do you think I need
14.06.2020 - 08:03DROPS Design answered:
Dear Mrs Tang, you will find all finished measurements in cm for each size in the measurement chart - please remember to check your gauge and keep correct tension - Read more here about tension. Happy crocheting!
15.06.2020 - 09:40
![]() ISABELLE COLANTONIO wrote:
ISABELLE COLANTONIO wrote:
Bonjour, J'esssaye de comprendre ce patron. Pour le devant, j'arrive bien à 73 brides. Et ensuite, je ne comprends plus rien, Faut-il arrêter le fil et redémarrer par l'autre bout? En appliquant les A1a, b et c, cela ne fait que 49 mailles??? Merci d'avance de votre aide, Bonne journée, Isabelle
12.06.2020 - 15:25DROPS Design answered:
Bonjour Mme Colantonio, vous augmentez à 73 brides et en même temps vous crochetez les 49 brides du 1er rang en suivant A.1a, A.1b et A.1c, autrement dit, vous allez augmenter dès le 1er rang des diagrammes. Bon crochet!
15.06.2020 - 07:39
![]() Gun Carne wrote:
Gun Carne wrote:
Symbolen för stolpe i maskan står två stycken som ett V med symbolen för 3 luftmaskor över =det 1 stolpe 3 luftmaskor 1 stolpe i samma maska?
12.06.2020 - 00:59DROPS Design answered:
Hej Gun, ja stolpe om lm-bågen, 3 lm, stolpe om samma lm-båge, osv. Lycka till
12.06.2020 - 10:06
![]() Carmen wrote:
Carmen wrote:
Pueden explicar mejor cómo se une delantero y espalda.? Gracias.
11.06.2020 - 00:20DROPS Design answered:
Hola Carmen. Se empieza en la mitad de la sisa izquierda. Se montan puntos de cadeneta, se trabaja sobre los puntos del delantero, se montan los puntos de cadeneta para la sisa derecha. se trabaja sobre los puntos de la espalda, se montan la otra mitad de los puntos de cadeneta de la sisa izquierda. Ahora unimos la vuelta con un punto enano y comenzamos a trabajar el cuerpo en redondo.
21.11.2020 - 18:59
|
|||||||||||||||||||||||||||||||||||||||||||
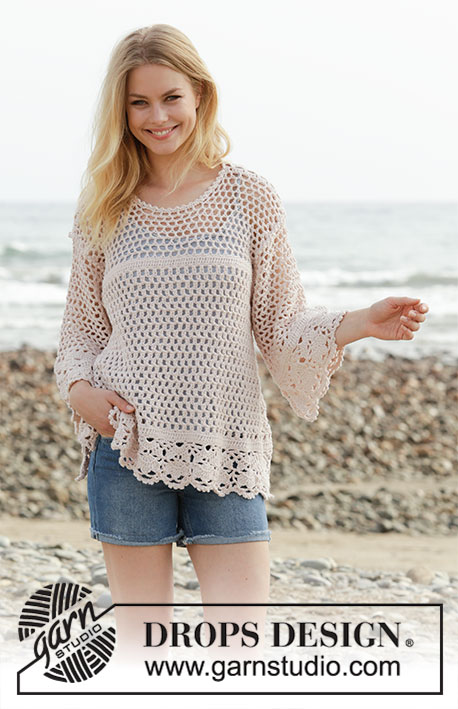
California Dream#californiadreamtop |
|||||||||||||||||||||||||||||||||||||||||||
 |
 |
||||||||||||||||||||||||||||||||||||||||||
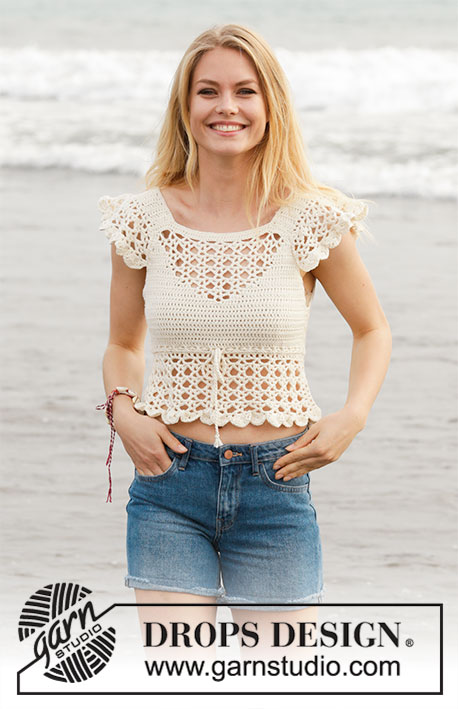
Crocheted top with lace pattern and flounce. Size: S - XXXL Piece is crocheted in DROPS Cotton Merino.
DROPS 190-21 |
|||||||||||||||||||||||||||||||||||||||||||
|
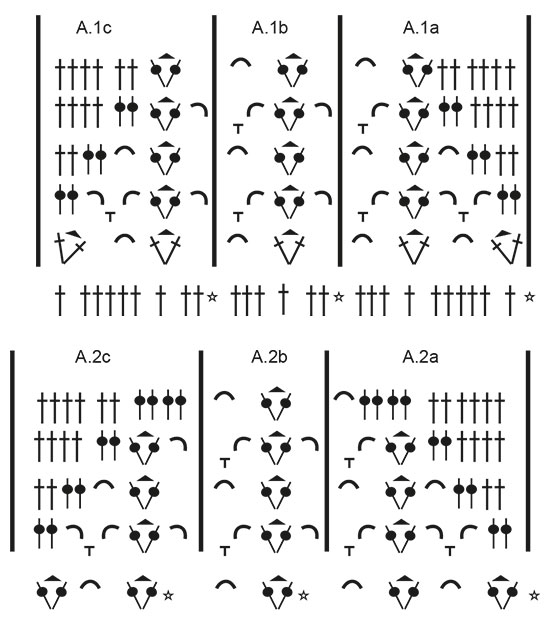
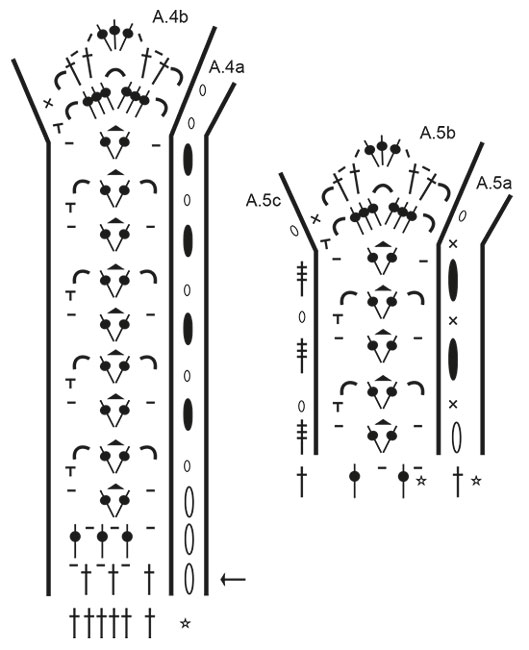
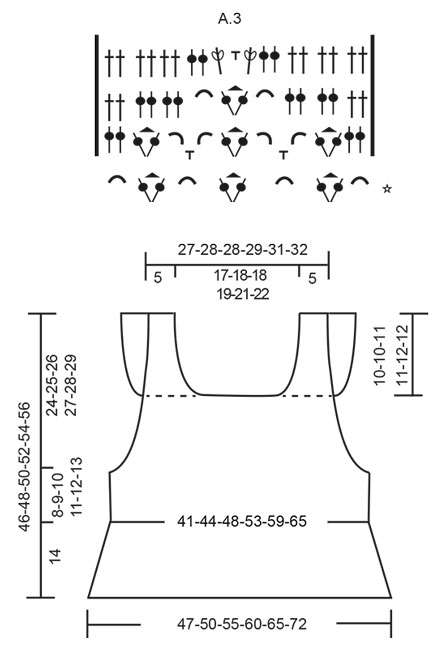
INFORMATION FOR PATTERN: PATTERN: See diagrams A.1 to A.5. INCREASE TIP-1: Increase 1 treble crochet by working 2 treble crochets in same stitch. CROCHET TIP-1 (applies to body but not diagram): Replace first treble crochet at beginning of every row with 3 chain stitches. CROCHET TIP-2 (applies to body but not diagram): When working in the round, replace first treble with 3 chain stitches, finish round with 1 slip stitch in 3rd chain stitch at beginning of round. DECREASE TIP: Decrease by working 2 treble crochets together. INCREASE TIP-2 (evenly): To calculate how to increase evenly, use the total number of treble crochets on row (e.g. 146 treble crochets) and divide treble crochets by number of increases to be done (e.g. 22) = 6.6. In this example increase by working 2 treble crochets in same treble crochet alternately approx. every 6th and 7th treble crochet. ---------------------------------------------------------- TOP: Piece is worked back and forth, top down, work front and back piece separately down to armhole, then work in the round over both parts. Then work straps from bottom up and then work flounces back and forth on straps, fasten flounce to front/back piece. FRONT PIECE: Work 51-53-53-55-57-59 chain stitches (including 3 chain stitches to turn with) on hook size 5 mm with Cotton Merino. Switch to hook size 4 mm, turn and work 1 treble crochet in 4th chain stitch from hook (= 2 treble crochets), work 1 treble crochet in each of the next 47-49-49-51-53-55 chain stitches = 49-51-51-53-55-57 treble crochets. On next row begin increase in each side of piece AT THE SAME TIME work pattern as follows: Increase 1 treble crochet in each side of piece (= 2 treble crochets increased) - read INCREASE TIP-1. Increase like this every row 3-5-8-13-14-15 times in total, and then every other row 5-5-3-0-0-0 times in total = 65-71-73-79-83-87 treble crochets on last row. Work next row as follows, begin from right side: Read CROCHET TIP-1 – work 1 treble crochet in each of the first 0-1-1-2-3-4 treble crochets, A.1a over the next 10 treble crochets, repeat A.1b over the next 30 treble crochets (= 5 times in total in width), A.1c over the next 9 treble crochets and 1 treble crochet in each of the last 0-1-1-2-3-4 treble crochets. Continue until A.1 has been work 1 time vertically. REMEMBER THE CROCHET TENSION! Then work as follows, begin from wrong side: Work 1 treble crochet in every treble crochet until 1 treble crochet remains before first chain space, work A.2c, repeat A.2b 3 times in total in width, A.2a and 1 treble crochet in every treble crochet the entire row. Continue until A.2 has been worked vertically. Then work as follows, begin from wrong side: Work 1 treble crochet in every treble crochet until first chain space, work A.3 and 1 treble crochet in every treble crochet the rest of row. Continue until A.3 has been worked vertically. Now work 1 treble crochet in every stitch until piece measures 14-15-15-16-16-17 cm. Fasten off, turn. Put piece aside. BACK PIECE: Work 51-53-53-55-57-59 chain stitches (including 3 chain stitches to turn with) on hook size 5 mm with Cotton Merino. Switch to hook size 4 mm, turn and work 1 treble crochet in 4th chain stitch from hook (= 2 treble crochets), work 1 treble crochet in each of the next 47-49-49-51-53-55 chain stitches = 49-51-51-53-55-57 treble crochets. Then work 1 treble crochet in every treble crochet - AT THE SAME TIME increase 1 treble crochet in each side of piece - remember INCREASE TIP-1. Increase like this every row 8-10-11-13-14-15 times in total = 65-71-73-79-83-87 treble crochets on last row. When piece measures 14-15-15-16-16-17 cm (adjust according to front piece), fasten off, turn. BODY: Now work the two parts together as follows: Work 4-4-7-8-12-15 chain stitches for armhole, 1 treble crochet in each of the 65-71-73-79-83-87 treble crochets from back piece, work 8-8-14-16-24-30 chain stitches for armhole, 1 treble crochet in each of the 65-71-73-79-83-87 treble crochets from front piece, work 4-4-7-8-12-15 chain stitches for armhole and finish with 1 slip stitch in first chain stitch at beginning of round. Then work piece in the round, continue with 1 treble in every treble/chain stitch = 146-158-174-190-214-234 trebles. When working in the round, turn after every round to work alternately from right side and wrong side. This is so that the texture is the same on the entire top - read CROCHET TIP-2. Insert 1 marker thread in each side, in the middle of the 8-8-14-16-24-30 chain stitches. NOW MEASURE THE PIECE FROM HERE! Continue like this until piece measures 8-9-10-11-12-13 cm. Now work in the round according to diagram A.4 while at the same time increasing on first round (round marked with arrow in diagram) as follows: Work A.4b 28-30-33-36-39-43 times in total on round – A.4a shows how rounds begin and end and is worked in addition to A.4b – AT THE SAME TIME increase 11-11-12-13-10-12 chain spaces (= 1 treble crochet + 1 chain stitch) evenly – read INCREASE TIP-2 = 84-90-99-108-117-129 chain spaces (= 1 treble crochet + 1 chain stitch). Continue in the round, i.e. always work pattern from right side. When A.4 is done vertically, fasten off. STRAPS: Now work a strap back and forth in cast-on edge on front piece over the first 8-9-9-9-10-10 treble crochets. Work 1 treble crochet in every treble crochet until strap measures 10-10-11-11-12-12 cm. Fasten off. Work 1 strap over the first 8-9-9-9-10-10 treble crochets in the other side the same way. Work straps the same way on back piece. Sew tog straps on shoulder. FLOUNCE: Work back and forth over every row on strap (= 20-20-22-22-24-24 cm). Begin from wrong side and work 1 treble crochet in first row, * 1 chain stitch, 1 treble crochet around row *, work from *-* along the entire strap – adjust so that there are 26-26-28-28-30-30 chain spaces (= 1 chain stitch + 1 treble crochet) on this row, finish with 1 treble crochet in last row = 1 treble crochet in each side and 26-26-28-28-30-30 chain spaces (= 1 chain stitch + 1 treble crochet). Turn and work as follows from right side: A.5a, A.5b 13-13-14-14-15-15 times in total in width, finish with A.5c. Continue this pattern until A.5 is done vertically, fasten off. Work flounce on the other strap the same way. NECK EDGE: Work 1 double crochet in every treble crochet/2 double crochets along every treble crochet row along the entire neck. SLEEVE EDGE: Work 1 double crochet in every treble crochet/2 double crochets along every treble crochet row along armhole – start right after flounce, work along armhole and to the flounce. Place flounce edge to edge to this sleeve edge (on both front and back piece) and fasten with small, neat stitches. Work the other sleeve edge the same way and fasten flounce. TIE: Cut 3 lengths of 3 metres each with Cotton Merino. Twine the strands tog until they resist, fold them double so that they twine again. Make a knot at each end. Baste the yarn up and down through first row with eyelet holes - start mid front. Tie a bow at the front. |
|||||||||||||||||||||||||||||||||||||||||||
Diagram explanations |
|||||||||||||||||||||||||||||||||||||||||||
|
|||||||||||||||||||||||||||||||||||||||||||
 |
|||||||||||||||||||||||||||||||||||||||||||
 |
|||||||||||||||||||||||||||||||||||||||||||
 |
|||||||||||||||||||||||||||||||||||||||||||
Have you finished this pattern?Tag your pictures with #dropspattern #californiadreamtop or submit them to the #dropsfan gallery. Do you need help with this pattern?You'll find 10 tutorial videos, a Comments/Questions area and more by visiting the pattern on garnstudio.com. © 1982-2026 DROPS Design A/S. We reserve all rights. This document, including all its sub-sections, has copyrights. Read more about what you can do with our patterns at the bottom of each pattern on our site. |
|||||||||||||||||||||||||||||||||||||||||||


With over 40 years in knitting and crochet design, DROPS Design offers one of the most extensive collections of free patterns on the internet - translated to 17 languages. As of today we count 324 catalogues and 12290 patterns translated into English (UK/cm). 12290
We work hard to bring you the best knitting and crochet have to offer, inspiration and advice as well as great quality yarns at incredible prices! Would you like to use our patterns for other than personal use? You can read what you are allowed to do in the Copyright text at the bottom of all our patterns. Happy crafting!
Post a comment to pattern DROPS 190-21
We would love to hear what you have to say about this pattern!
If you want to leave a question, please make sure you select the correct category in the form below, to speed up the answering process. Required fields are marked *.