
Popular categories
Looking for a yarn?


Comments / Questions (82)
![]() Solveig wrote:
Solveig wrote:
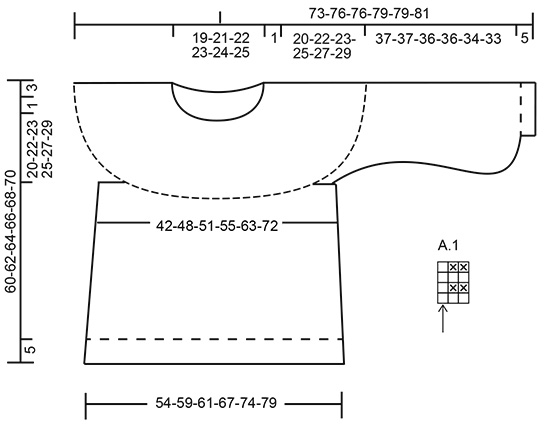
Vedr udtagningstips-1: Der står at man skiftevis tager ud før og efter sidste retmaske i A.1 med et omslag. De nye masker strikkes i den A.1 der er taget ud i. Men hvis sidste maske i en A.1 altid er en retmaske bliver den lige række af retmasker forskubbet hver gang der tages ud EFTER sidste retmaske. Menes der ikke, at det omslag EFTER sidste retmaske skal strikkes i næste A.1, dvs. efter den A.1, som der er taget ud i?
13.06.2018 - 11:41
![]() Vibeke Møller wrote:
Vibeke Møller wrote:
Hvad betyder “rapport” af A1 ? Eren rapport 4 pinde? Mange hilsener en ikke så rutineret strikkeglad, Vibeke.
18.05.2018 - 20:16DROPS Design answered:
Hej Vibeke, 1 rapport består af de 3 masker i diagram A.1. God fornøjelse!
21.05.2018 - 10:02
![]() Karin Jochimsen wrote:
Karin Jochimsen wrote:
Hvor mange meter er der i Brushed Alpaca Silk i en pakke
10.05.2018 - 11:34DROPS Design answered:
Hej Karin, 25g = ca. 140 meter. God fornøjelse!
11.05.2018 - 08:02
![]() Gitte Lindskow wrote:
Gitte Lindskow wrote:
Hej. Jeg kan slet ikke få mønsterdiagram A1 frem?....der er bare et kryds Er det mig der laver noget forkert?
30.04.2018 - 11:17DROPS Design answered:
Hej Gitte, så skal det være der. Tak for info :)
30.04.2018 - 15:56
![]() Sonia wrote:
Sonia wrote:
Nå blir jeg usikker. Slik jeg tenker det, så skulle man øke før og etter den første rettmasken i det opprinnelige diagrammet. Grunnen til det er fordi hvis man øker før og etter den rettmasken som går hele veien oppover, så er man jo over på en 4.rapport, og man skulle jo øke inni hver 3.rapport. Tar jeg feil?
19.04.2018 - 17:15DROPS Design answered:
Hei igjen Sonia. Nå har vi gått gjennom denne oppskriften en gang til, med design avdelingen. Diagrammet er slik det var i utgangspunktet, men vi har nå endret forklaringen under øketips 1, samt lagt til en pil i diagrammet så det er helt tydelig hvilken rettmaske det er snakk om. Det er altså den siste rettmasken i A.1 (som er rett hele veien oppover), det økes før/etter. Beklager forvirringen, og god fornøyelse
20.04.2018 - 15:13
![]() May wrote:
May wrote:
Er diagrammet rett nå? Jeg begynner på denne i dag.
18.04.2018 - 12:42DROPS Design answered:
Hei May. Diagrammet er nå oppdatert og det er den masken ved pilen det økes før/etter. Vi har også oppdatert forklaringen under øketips 1. God fornøyelse
20.04.2018 - 15:15
![]() Sonia wrote:
Sonia wrote:
Hei, Jeg lurer på hvilken rettmaske man viser til når man sier at det skal økes vekselvis i A 1 før og etter rettmasken. Hvilken rettmaske i A 1 er det man viser til?
14.04.2018 - 09:33DROPS Design answered:
Hei Sonia. Vi har nå sjekket oppskriften en gang til, og ser at rettmasken det refereres til er ikke den første masken, men den siste masken i A.1 - den som strikkes rett hele veien oppover. Det økes vekselsvis på hver side av masken for at den skal holde seg på samme sted oppover. Det kan virke som diagrammet har blitt speilvendt og dette skal vi få rettet opp i så fort som mulig. Takk for beskjed og god fornøyelse
17.04.2018 - 10:16
![]() Anne Johansen wrote:
Anne Johansen wrote:
Drops 188-1 Brushed Alpaca Silk. Kan denne strikkes nedenufra og opp ? Strikker først vrangborden og så rettstrikk frem til jeg setter ermene på rundpinnen ? Begynner da mønsteret når du setter på ermene sammen med bolen ? Hvordan skal jeg da rundfelle ? Er halsen lik bak som forran ? Mvh Anne
08.04.2018 - 16:27
![]() Sara wrote:
Sara wrote:
Teen kokoa L ja tuon 126 silmukan jälkeen lisätään 11x14 silmukkaa (=154), jolloin niitä on yhteensä 322 eikä 280, kuten ohjeessa on, kumpi on oikea määrä.
01.04.2018 - 16:41DROPS Design answered:
Hei, silmukkamäärät ovat oikeat, 126 + 154 on 280.
03.04.2018 - 17:11
![]() France wrote:
France wrote:
Bonsoir, Je n'avais pas du tout compris que le motif A1 évoluait en fonction des augmentations. Merci beaucoup pour vos explications.Je vais pouvoir m'y remettre.
12.03.2018 - 22:22
|
||||||||||
Tornade#tornadesweater |
||||||||||
|
|
||||||||||
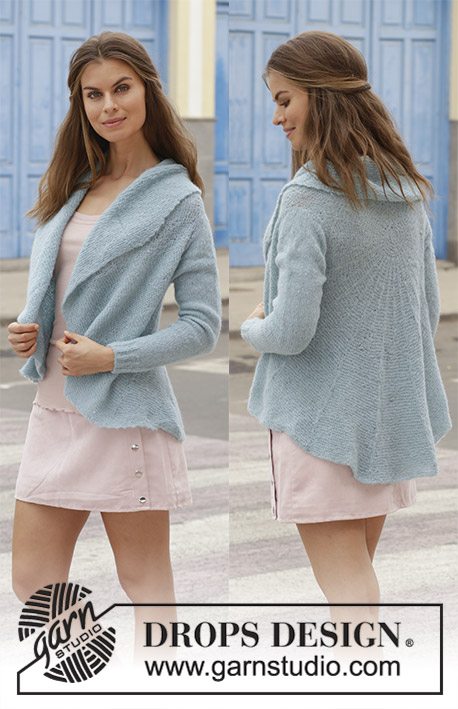
Knitted jumper with garter stitch and round yoke, worked top down. Sizes S - XXXL. The piece is worked in DROPS Brushed Alpaca Silk.
DROPS 188-1 |
||||||||||
|
INFORMATION FOR THE PATTERN: RIDGE/GARTER STITCH (worked in the round): 1 ridge = 2 rounds. Knit 1 round and purl 1 round. PATTERN: See diagram A.1. INCREASE TIP-1 (for round yoke): Increase stitches alternately before and after the last knitted stitch in A.1 – See arrow in diagram. i.e. the first increase is after the last knitted stitch and the second is increased before the last knitted stitch. Increase as follows: Make 1 yarn over between 2 stitches, the yarn over is worked twisted on the next round. Then the increased stitch is worked in garter stitch. In other words for each increased stitch, there will be 1 more stitch in garter stitch in the A.1 you are increasing in. INCREASE TIP-2 (for increases in sides of body and sleeves): Work until there are 2 stitches left before the marker thread, make 1 yarn over, knit 4 stitches (the marker thread sits in the middle of these stitches), make 1 yarn over (= 2 stitches increased). Increase like this at each marker thread. The yarn overs are worked twisted on the next round to avoid holes. DECREASE TIP (for sleeves): Work until there are 3 stitches left before the marker thread, slip 1 stitch as if to knit, knit 1, pass the slipped stitch over the knitted stitch, knit 2 stitches (the marker thread sits in the middle of these stitches), knit the next 2 stitches together (= 2 stitches decreased). ---------------------------------------------------------- JUMPER: The piece is worked in the round, top down. The yoke is worked in the round, then the piece is divided and the sleeves and body are then worked separately in the round. YOKE: Cast on 84-88-94-98-102-104 stitches with circular needle size 4 mm. Work 2 RIDGES – see description above. The round starts mid back. The next round is worked as follows: Knit 16-17-18-19-20-21 stitches and increase 3-4-3-4-3-5 stitches evenly over these stitches (= half back piece), * knit 1, 1 yarn over *, work from *-* over the next 10 stitches (= sleeve = 10 stitches increased), knit 32-34-37-39-41-42 stitches and increase 6-9-6-8-6-10 stitches evenly over these stitches (= front piece), * knit 1, 1 yarn over *, work from *-* over the next 10 stitches (= sleeve = 10 stitches increased), knit 16-17-19-20-21-21 stitches and increase 4-5-3-5-4-5 stitches evenly over these stitches (= half back piece) = 117-126-126-135-135-144 stitches. Change to circular needle size 5 mm. Then work A.1 (= 3 stitches) over all stitches (= 39-42-42-45-45-48 times in width), work the yarn overs twisted to avoid holes. AT THE SAME TIME increase as follows: ROUND YOKE: Increase alternately in every 3rd repeat of A.1 in width every 4th round, i.e. as follows: 1st INCREASE: * Increase 1 stitch – read INCREASE TIP-1, in the first A.1, then work 2 repeats of A.1 in width as before *, work from *-* to end of round = 13-14-14-15-15-16 stitches increased. Work 3 rounds of pattern. REMEMBER THE KNITTING TENSION! 2nd INCREASE: * Work 1 repeat of A.1 as before, increase 1 stitch in the next A.1, work the next repeat of A.1 as before *, work from *-* to end of round = 13-14-14-15-15-16 stitches increased. Work 3 rounds of pattern. 3rd INCREASE: * Work 2 repeats of A.1 as before, increase 1 stitch in the next A.1 *, work from *-* to end of round = 13-14-14-15-15-16 stitches increased. Work 3 rounds of pattern. Repeat 1st to 3rd increase a total of 3-3-3-3-4-4 times (= a total of 9-9-9-9-12-12 increase rounds), then repeat 1st increase, 0-1-1-1-1-1 more time (= a total of 9-10-10-10-13-13 increase rounds), then repeat 2nd increase, 0-0-1-1-0-1 more time (= a total of 9-10-11-11-13-14 increase rounds) = 234-266-280-300-330-368 stitches. Continue with pattern until the piece measures 21-23-24-26-28-30 cm from the cast-on edge. The next round is worked as follows: Knit 31-36-38-42-47-55 stitches (= half the back piece), place the next 54-60-64-66-70-74 stitches on 1 thread (= sleeve), cast on 8-8-10-10-12-12 new stitches on needle, insert 1 marker thread in the middle of these stitches (= in side under sleeve), knit the next 63-73-76-84-95-110 stitches (= front piece), place the next 54-60-64-66-70-74 stitches on 1 thread (= sleeve), cast on 8-8-10-10-12-12 new stitches on needle, insert 1 marker thread in the middle of these stitches (=in side under sleeve), knit 32-37-38-42-48-55 stitches (=half the back piece). Body and sleeves are finished separately. THE PIECE IS NOW MEASURED FROM HERE! BODY: = 142-162-172-188-214-244 stitches. Continue working stocking stitch. When the piece measures 3 cm from where the sleeves were placed on threads, increase 1 stitch on each side of the marker threads (= 4 stitches increased) – read INCREASE TIP-2! Increase like this every 2½-3-3-2½-3-5 cm a total of 10-9-9-10-9-6 times = 182-198-208-228-250-268 stitches. When the piece measures 31-31-32-32-32-32 cm from where the sleeves were placed on threads, work 1 round as before where you increase 2-2-0-0-2-0 stitches evenly on round = 184-200-208-228-252-268 stitches. Change to circular needle size 4 mm. Then work rib (purl 2 / knit 2) for 5 cm. Cast off with knit over knit and purl over purl. Make sure the cast-off edge is not tight; you can cast off with a needle 1 size larger if necessary. The piece measures approx. 36-36-37-37-37-37 cm from where the sleeves and body were separated and a total of 60-62-64-66-68-70 cm from the shoulder. SLEEVE: The piece is worked in the round with double pointed needles/short circular needle. Place the 54-60-64-66-70-74 stitches from the thread on the one side of the piece on double pointed needles size 5 mm and knit up 1 stitch in each of the 8-8-10-10-12-12 stitches cast on under the sleeve, insert 1 marker thread in the middle of these stitches = 62-68-74-76-82-86 stitches. Work stocking stitch. When the piece measures 3 cm from where the sleeve was divided from the body, decrease 1 stitch on each side of the marker thread (= 2 stitches decreased) – read DECREASE TIP! Change to short circular needles when needed. Decrease like this every 3 cm a total of 4-4-5-5-6-6 times = 54-60-64-66-70-74 stitches. Then increase 1 stitch on each side of the marker thread (= 2 stitches increased). Increase like this every 3-3-3-3-2-2 cm a total of 7-6-6-7-7-7 times = 68-72-76-80-84-88 stitches. When the piece measures 37-37-36-36-34-33 cm from where the sleeve was divided from the body, change to double pointed needles size 4 mm and work 1 round where all the stitches are knitted together 2 and 2 = 34-36-38-40-42-44 stitches. Then work rib (= purl 2 / knit 2) AT THE SAME TIME as you increase 2-0-2-0-2-0 stitches evenly on the first round = 36-36-40-40-44-44 stitches. Cast off with knit over knit and purl over purl when piece measures 42-42-41-41-39-38 cm from where the sleeve was divided from the body and a total of 63-65-65-67-67-68 cm from the neck edge. Work the other sleeve in the same way. |
||||||||||
Diagram explanations |
||||||||||
|
||||||||||
 |
||||||||||
Have you finished this pattern?Tag your pictures with #dropspattern #tornadesweater or submit them to the #dropsfan gallery. Do you need help with this pattern?You'll find 26 tutorial videos, a Comments/Questions area and more by visiting the pattern on garnstudio.com. © 1982-2026 DROPS Design A/S. We reserve all rights. This document, including all its sub-sections, has copyrights. Read more about what you can do with our patterns at the bottom of each pattern on our site. |
||||||||||


With over 40 years in knitting and crochet design, DROPS Design offers one of the most extensive collections of free patterns on the internet - translated to 17 languages. As of today we count 324 catalogues and 12290 patterns translated into English (UK/cm). 12290
We work hard to bring you the best knitting and crochet have to offer, inspiration and advice as well as great quality yarns at incredible prices! Would you like to use our patterns for other than personal use? You can read what you are allowed to do in the Copyright text at the bottom of all our patterns. Happy crafting!
Post a comment to pattern DROPS 188-1
We would love to hear what you have to say about this pattern!
If you want to leave a question, please make sure you select the correct category in the form below, to speed up the answering process. Required fields are marked *.