
Popular categories
Looking for a yarn?


Comments / Questions (6)
![]() Gudrun Liedtke wrote:
Gudrun Liedtke wrote:
Hallo,ich verstehe den Anfang nicht.Muss ich bei Gr.XXXL in der ersten Runde 50 + die 6 Maschen stricken und dann den Markierungsfaden oder insgesamt 50 Maschen. Sehr undeutlich beschrieben. Liebe Grüße
06.08.2024 - 14:26DROPS Design answered:
Liebe Frau Liedtke, stricken Sie die ersten 50 M und gleichzeitig nehmen Sie 6 Maschen regelmäßig verteilt (dann sind es 56 M anstatt 50 vor dem 1. Markierungsfaden. Viel Spaß beim Stricken!
06.08.2024 - 15:50
![]() Ruth Savard wrote:
Ruth Savard wrote:
Bonjour, J'aimerais ajouter le motif sur le devant du modèle :Design: Modèle n° li-083 sur les manches. Pouvez-vous me dire à partir de quel maille je peux commencer le motif car je voudrais e qu'il soit centré? Je tricote un chandail de grandeur large. Si j'ai bien lu les explications il y aurait 79 mailles pour la manche. Merci
06.02.2021 - 20:24DROPS Design answered:
Bonjour Mme Savard, nous ne sommes malheureusement pas en mesure de pouvoir adapter chacun de nos modèles à chaque demande, pour toute assistance personnalisée, merci de bien vouloir vous adresser à votre magasin - même par mail ou téléphone. Merci pour votre compréhension. Bon tricot!
08.02.2021 - 08:41
![]() Sandra Stoffels wrote:
Sandra Stoffels wrote:
Ik wil deze trui graag breien in maat S. Ik heb de volgende wol nog liggen: LANG yarns. Merino 120. (Merino fine-superwash). Ik heb proeflapje: 21 st x 28 naalden= 10x 10 cm. Een bol is 50 gram met lengte van ca. 120m. Ik heb 10 bollen. Is dat genoeg voor patroon 181-20?
04.02.2019 - 07:57DROPS Design answered:
Dag Sandra
Voor maat S heb je voor DROPS Lima 10 bollen nodig voor dit patroon. Als de looplengte en de stekenverhouding overeenkomt zou je ook voor een ander garen ongeveer 10 bollen nodig hebben.
08.02.2019 - 17:28
![]() Estelita wrote:
Estelita wrote:
Can I have the English version please
13.06.2018 - 15:16DROPS Design answered:
Dear Mrs Estelita, you can edit the language in all our patterns by clicking on the arrow below the pattern and select English either UK or US in the dropdown menu. Happy knitting!
13.06.2018 - 16:32
![]() Carole wrote:
Carole wrote:
Beautiful, elegant design
30.06.2017 - 18:17
![]() Kody Doisy wrote:
Kody Doisy wrote:
J'adore ce modèle j’espère avoir les explications en top down SVP . Merci
23.06.2017 - 14:19
|
||||||||||||||||
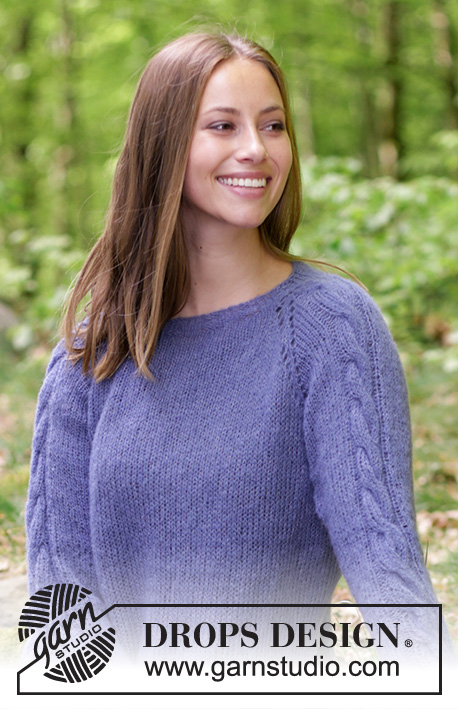
Blue Hour#bluehoursweater |
||||||||||||||||
 |
 |
|||||||||||||||
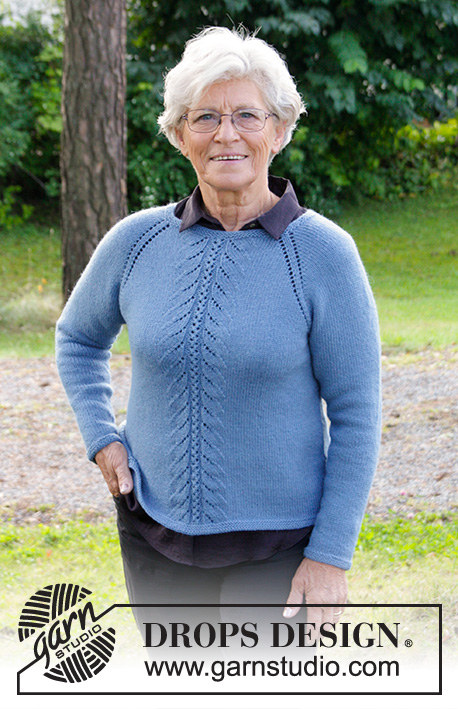
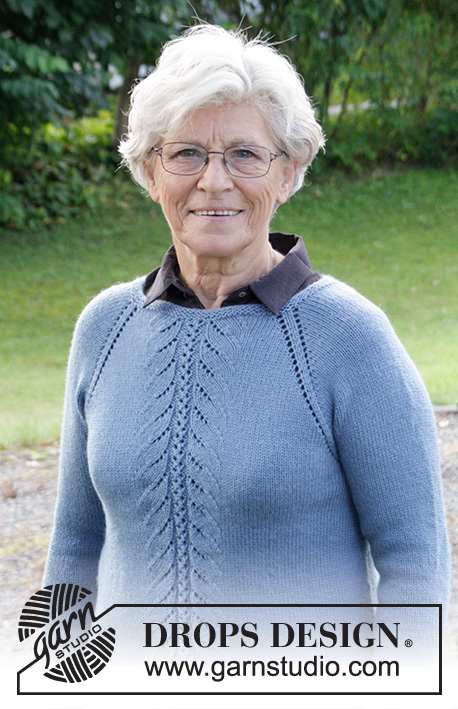
Knitted jumper with raglan and lace pattern, worked top down. Sizes S - XXXL. The piece is worked in DROPS Lima.
DROPS 181-20 |
||||||||||||||||
|
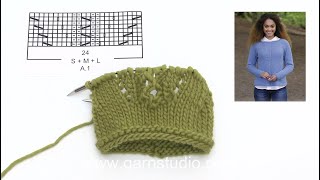
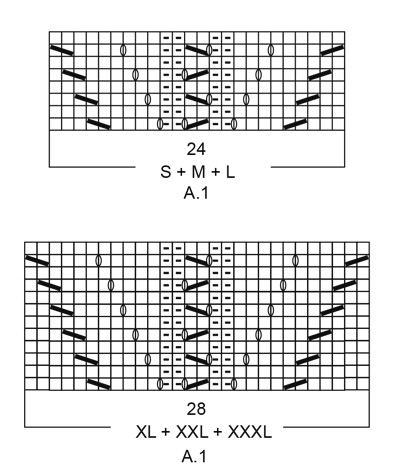
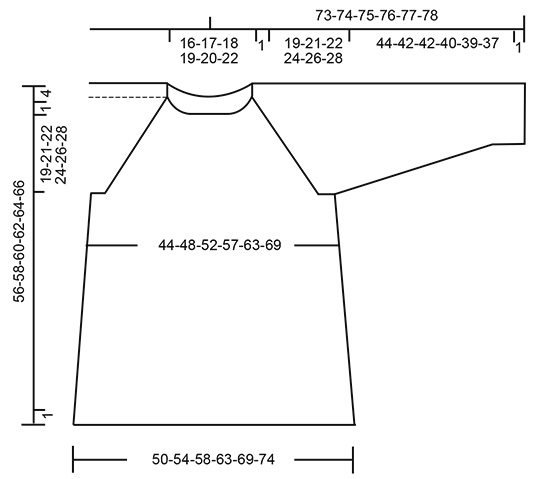
INFORMATION FOR THE PATTERN: RIDGE/GARTER STITCH (worked in the round): 1 ridge = 2 rounds. Knit 1 round and purl 1 round. INCREASE TIP-1 (evenly spaced): To work out how to increase evenly, count the total number of stitches to be increased over (e.g. 45 stitches) and divide by the number of increases to be made (e.g. 3) = 15. In this example, increase after every 15th stitch. Increase 1 stitch by making 1 yarn over, on the next round knit the yarn overs twisted to prevent holes. PATTERN: See diagram A.1. The diagram shows all the rows in the pattern seen from the right side. Choose diagram for your size. RAGLAN: Increase 2 stitches in each transition between body and sleeves every 2nd round as follows: Work until there is 1 stitch left before the marker thread, 1 yarn over, knit 2 stitches (the marker thread sits in the middle of these stitches), 1 yarn over. On the next round knit the yarn overs so that there are holes. INCREASE TIP-2 (for sides of body): Start 2 stitches before the marker thread, make 1 yarn over, knit 4 (the marker thread sits in the middle of these 4 stitches), make 1 yarn over (= 2 stitches increased). On the next round knit the yarn overs twisted to prevent holes. DECREASE TIP (for mid under sleeve): Start 3 stitches before the marker thread, knit 2 together, knit 2 (the marker thread sits in the middle of these two stitches), slip 1 stitch as if to knit, knit 1, pass the slipped stitch over the knitted stitch (= 2 stitches decreased). ---------------------------------------------------------- JUMPER: The piece is worked top down in the round on circular needle. The sleeves are worked in the round with double pointed needles. YOKE: Cast on 90-94-98-104-108-114 stitches with short circular needle size 3.5 mm and Lima. Work 3 RIDGES in the round – see description above. Change to short circular needle size 4 mm. Now work a round where you insert 4 marker threads in the piece and increase stitches as follows: Insert a marker thread at the beginning of the round (= raglan line on back left shoulder): knit 37-39-42-45-47-50 stitches AT THE SAME TIME as you increase 1-1-2-3-5-6 stitches evenly – read INCREASE TIP-1 (evenly spaced), over these stitches, insert a marker thread here, knit 1, * 1 yarn over, knit 1 *, work from *-* 7-7-6-6-6-6 times in total, insert a marker thread here, knit 37-39-42-45-47-50 stitches AT THE SAME TIME as you increase 1-1-2-3-5-6 stitches evenly over these stitches, insert a marker thread here, knit 1, * 1 yarn over, knit 1 *, work from *-* 7-7-6-6-6-6 times in total = 106-110-114-122-130-138 stitches. Knit 1 round (all the yarn overs are knitted twisted to prevent holes). REMEMBER THE KNITTING TENSION! The next round is worked as follows: * Knit 1 stitch, 1 yarn over, knit 6-7-9-9-11-13 stitches, work PATTERN according to diagram A.1 (= 24-24-24-28-28-28 stitches), knit 6-7-9-9-11-13 stitches, 1 yarn over, knit 2 stitches (the marker thread sits in the middle of these stitches), 1 yarn over, knit 13-13-11-11-11-11 stitches, 1 yarn over, knit 1 stitch (the marker thread sits here) *, work from *-* 1 more time. The first increase to raglan is now finished (= 8 stitches increased on the round). Continue the pattern in this way and increase to RAGLAN – see description above, every 2nd round a total of 22-25-27-30-33-36 times (including the first increase) = 282-310-330-362-394-426 stitches. Continue working without increases between body and sleeves (diagram A.1 continues as before) until the piece measures 20-22-23-25-27-29 cm from the cast-on edge and down mid front. The next round is worked as follows: Work the first 82-90-98-108-118-128 stitches (= back piece), place the next 59-65-67-73-79-85 stitches on a thread (= sleeve), cast on 10-10-12-12-14-16 new stitches under the sleeve, work the next 82-90-98-108-118-128 stitches (= front piece), place the next 59-65-67-73-79-85 stitches on a thread (= sleeve), cast on 10-10-12-12-14-16 new stitches under the sleeve. Body and sleeves are now finished separately. Insert a marker thread here. THE PIECE IS NOW MEASURED FROM HERE! BODY: = 184-200-220-240-264-288 stitches. Insert 1 marker thread in each side (i.e. in the middle of the 10-10-12-12-14-16 new stitches cast on under the sleeve in each side). Work stocking stitch in the round and continue A.1 mid front and mid back as before. When the piece measures 4 cm from the separation, increase 2 stitches in each side – read INCREASE TIP-2 (= 4 stitches increased). Increase in this way every 12th-12th-14th-14th-14th-14th round a total of 7-7-6-6-6-6 times = 212-228-244-264-288-312 stitches. Continue with stocking stitch until the piece measures 31-31-32-32-32-32 cm from the separation. Change to circular needle size 3.5 mm. Work 3 ridges. Cast off with knit. To avoid getting a tight cast-off edge you can cast off with a larger needle if necessary. The jumper measures approx. 56-58-60-62-64-66 cm from the shoulder down. SLEEVE: Place the 59-65-67-73-79-85 stitches from the thread in the one side of the piece on double pointed needles size 4 mm and, in addition, knit up 1 stitch in each of the 10-10-12-12-14-16 new stitches cast on under the sleeve = 69-75-79-85-93-101 stitches. Insert 1 marker thread in the middle of the 10-10-12-12-14-16 new stitches knitted up in each side (= mid under the sleeve/sides of the jumper). Work stocking stitch in the round. When the piece measures 4 cm from the separation, decrease 2 stitches mid under the sleeve – read DECREASE TIP. Decrease in this way every 9th-6th-6th-5th-4th-3rd round a total of 11-14-15-17-21-24 times = 47-47-49-51-51-53 stitches. Continue working until the sleeve measures 44-42-42-40-39-37 cm from the separation. Change to double pointed needles size 3.5 mm. Work 3 ridges. Cast off with knit. To avoid getting a tight cast-off edge you can cast off with a larger needle if necessary. Work the other sleeve in the same way |
||||||||||||||||
Diagram explanations |
||||||||||||||||
|
||||||||||||||||
 |
||||||||||||||||
 |
||||||||||||||||
Have you finished this pattern?Tag your pictures with #dropspattern #bluehoursweater or submit them to the #dropsfan gallery. Do you need help with this pattern?You'll find 28 tutorial videos, a Comments/Questions area and more by visiting the pattern on garnstudio.com. © 1982-2026 DROPS Design A/S. We reserve all rights. This document, including all its sub-sections, has copyrights. Read more about what you can do with our patterns at the bottom of each pattern on our site. |
||||||||||||||||


With over 40 years in knitting and crochet design, DROPS Design offers one of the most extensive collections of free patterns on the internet - translated to 17 languages. As of today we count 324 catalogues and 12290 patterns translated into English (UK/cm). 12290
We work hard to bring you the best knitting and crochet have to offer, inspiration and advice as well as great quality yarns at incredible prices! Would you like to use our patterns for other than personal use? You can read what you are allowed to do in the Copyright text at the bottom of all our patterns. Happy crafting!
Post a comment to pattern DROPS 181-20
We would love to hear what you have to say about this pattern!
If you want to leave a question, please make sure you select the correct category in the form below, to speed up the answering process. Required fields are marked *.