
Popular categories
Looking for a yarn?


Comments / Questions (27)
![]() Marianne Holm Jensen wrote:
Marianne Holm Jensen wrote:
Finnes det opplysninger om plaggets mål i de forskjellige størrelsene?
18.03.2017 - 11:52DROPS Design answered:
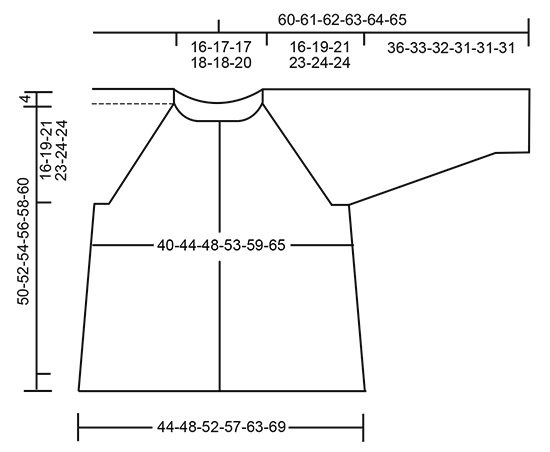
Hej Marianne. Ja, der er en maalskitse nederst paa opskriften. Her staar alle maal i cm per str
20.03.2017 - 13:17Lacko Aranka wrote:
Szép napot kívánok! Azt hiszem a magyar nyelvű verzióban van egy hiba a kardigán kötését leírú részben. Az eredeti szövegben a kezdés 110 szemre van írva, utána 4 sor lustakötés és az utolsó sorban 20szemet kell fogyasztani, ami után 130 szemünk lesz. Szerintem nem fogyasztani, hanem szaporítni kell. Gondolom a fordításba kis hiba csúszott. Aranka
16.03.2017 - 13:01
![]() Anna Riboldi wrote:
Anna Riboldi wrote:
Il modello è bellissimo ( come al solito tutti i vostri)! Grazie della velocissima risposta. Attendo con ansia ulteriori informazioni per poter procedere col lavoro! Anna
31.01.2017 - 16:52
![]() Anna Riboldi wrote:
Anna Riboldi wrote:
Buongiorno, nella spiegazione non trovo né le indicazioni per le asole, né il tipo di bottone che dovrei usare. Potreste cortesemente darmi un suggerimento. Grazie in anticipo. Anna
31.01.2017 - 16:19DROPS Design answered:
Buongiorno Anna, chiederemo un chiarimento alla casa madre in merito alle asole e ai bottoni. Se ci fossero delle correzioni, il modello verrà aggiornato direttamente sul sito. Grazie per la segnalazione. Buon lavoro!
31.01.2017 - 16:37
![]() Michaela Hochfeld wrote:
Michaela Hochfeld wrote:
Wunderschön und so sommerlich! Einfach ein Traum! Kann es kaum erwarten, bis die Anleitung endlich frei geschaltet wird 😩
15.01.2017 - 08:21
![]() Torhild Christensen wrote:
Torhild Christensen wrote:
Nydelig jakke med så fine ermer
22.12.2016 - 21:48
![]() Marcin wrote:
Marcin wrote:
Ładny!
13.12.2016 - 12:04
|
||||||||||||||||||||||||||||
Honey Blossom Cardigan#honeyblossomcardigan |
||||||||||||||||||||||||||||
|
|
||||||||||||||||||||||||||||
Knitted jacket with lace pattern and lace edge, worked top down with ¾ length sleeves in DROPS Merino Extra Fine. Sizes S - XXXL.
DROPS 176-9 |
||||||||||||||||||||||||||||
|
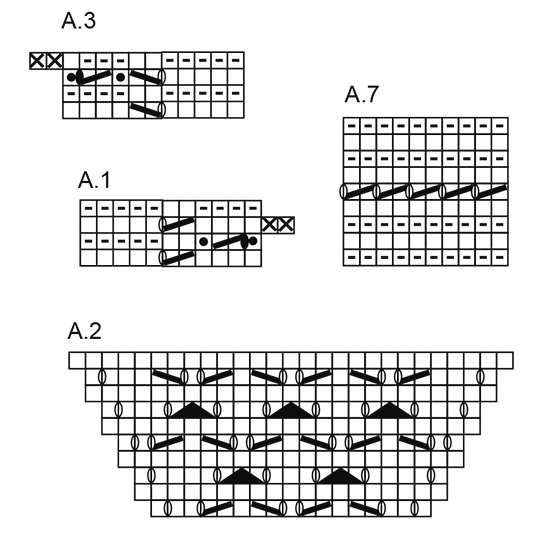
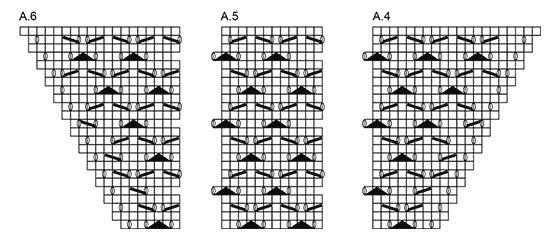
RIDGE/GARTER STITCH (worked back and forth): 1 ridge = Work 2 rows knit. PATTERN: See diagrams A.1 to A.7. The diagrams show all rows in the pattern seen from the right side. A.1 is the left band and A.3 is the right band. RAGLAN: SLEEVE: Increases on the sleeve are part of diagrams A.2, A.4 and A.6. Increase 2 stitches on each sleeve every 2nd row, purl the yarn overs on the next row, there will be holes. BODY: Increase 2 stitches on the back piece and 1 stitch on each front piece as follows: ON EACH ROW: Increase as follows from the right side: Start 2 stitches before A.2: Make 1 yarn over, knit 2, work A.2, knit 2, make 1 yarn over. Repeat before and after the next A.2. Purl the yarn overs on next row, there will be holes. Increase as follows from the wrong side: Start 2 stitches before A.2: Make 1 yarn over, purl 2, work A.2, purl 2, make 1 yarn over. Repeat before and after the next A.2. Knit the yarn overs on next row, there will be holes. ON EVERY 2ND ROW: Increase as follows from the right side: Start 2 stitches before A.2: Make 1 yarn over, knit 2, work A.2, knit 2, make 1 yarn over. Repeat before and after the next A.2. Purl the yarn overs on next row, there will be holes. ON EVERY 4TH ROW: ROW 1 (= from the right side): Start 2 stitches before A.2: Make 1 yarn over, knit 2, work A.2, knit 2, make 1 yarn over. Repeat before and after the next A.2. ROW 2 (= from the wrong side): Purl the yarn overs, there will be holes. ROW 3 (= from the right side): Start 4 stitches before A.2: Knit 2 together, make 1 yarn over, knit 2, work A.2, knit 2, make 1 yarn over, slip 1 stitch as if to knit, knit 1, pass the slipped stitch over the stitch that was knitted – there are no increases, but the row of holes continues as before. Repeat before and after the next A.2. ROW 4 (= from the wrong side): Purl the yarn overs, there will be holes. INCREASE TIP: Start 1 stitch before the marker thread, make 1 yarn over, knit 2 (the marker thread sits between theses stitches), make 1 yarn over. Purl the yarn overs twisted on next row. DECREASE TIP: Start 3 stitches before the marker thread, knit 2 together, knit 2 (the marker thread sits between these 2 stitches), slip 1 stitch as if to knit, knit 1, pass the slip stitch over the stitch that was knitted. The stitches that do not fit the pattern mid under sleeve are worked in stocking stitch. ---------------------------------------------------------- JACKET: The piece is worked back and forth on a circular needle from mid front, top downwards. Cast on 110-114-118-122-126-130 stitches (including 11 band stitches in each side towards mid front) with circular needle size 4 mm and Merino Extra Fine. Work 2 RIDGES – see description above, on the last row of the ridges increase 20 stitches evenly along the row = 130-134-138-142-146-150 stitches. Continue to work as follows – from the right side: Work A.1 (= 11 stitches ), 16-17-18-19-20-21 stitches stocking stitch, 1 yarn over, 1 stitch stocking stitch (= left front piece), A.2 (= 17 stitches) (= left sleeve), 1 stitch stocking stitch, 1 yarn over, 38-40-42-44-46-48 stitches stocking stitch, 1 yarn over, 1 stitch stocking stitch ( = back piece), A.2 (= right sleeve), 1 stitch stocking stitch, 1 yarn over, 16-17-18-19-20-21 stitches stocking stitch, A.3 (= 11 stitches) (= right front piece). The first increase to RAGLAN is now complete. Continue upwards with this division of pattern and stocking stitch. Increase to raglan as described above. On the sleeve increase every 2nd row 22-26-29-31-32-33 times, on the body increase every row 0-0-0-0-0-6 times, then every 2nd row 14-16-17-25-32-30 times, and finally every 4th row 4-5-6-3-0-0 times. NOTE! When A.2 is finished, continue working as follows (across the stitches on the sleeves): A.4 (= 8 stitches), A.5 (= 12 stitches), A.6 (= 7 stitches). When A.4 to A.6 are worked 1 time in height work as follows: A.4, A.5 across the next 36 stitches (= 3 repeats), A.6. Every time A.4, A.5 and A.6 are worked one time in height continue with 2 more repeats of A.5 between A.4 and A.6. Finish A.4, A.5 and A.6 when you have increased in total 22-26-29-31-32-33 times on the sleeves and in total 18-21-23-28-32-36 times on each front piece/back piece. After all the increases, there are 61-69-75-79-81-83 stitches on each sleeve, 76-84-90-102-112-122 stitches on the back piece and 46-50-53-59-64-69 stitches on each front piece= 290-322-346-378-402-426 stitches in total. The next row is worked as follows from the wrong side: Work 46-50-53-59-64-69 stitches (= right front piece), place the next 61-69-75-79-81-83 stitches on a thread (= sleeve), cast on 8-8-10-10-12-14 new stitches, work the next 76-84-90-102-112-122 stitches (= back piece), place the next 61-69-75-79-81-83 stitches on a thread (= sleeve), cast on 8-8-10-10-12-14 new stitches, work the last 46-50-53-59-64-69 stitches (= left front piece). BODY: There are now 184-200-216-240-264-288 stitches on the body. Continue with A.1, stocking stitch and A.3 as before. Insert a marker thread in each side, in the middle of the 8-8-10-10-12-14 new stitches which were cast on. THE PIECE IS NOW MEASURED FROM HERE. When the piece measures 3 cm increase 1 stitch on each side of each marker thread (= 4 stitches increased), increase every 7 cm in total 4 times – READ INCREASE TIP = 200-216-232-256-280-304 stitches. When the piece measures 27-26-26-26-27-29 cm work A.7 with A.1 and A.3 in each side, then cast off. The piece measures approx. 50-52-54-56-58-60 cm from the cast-on edge. SLEEVE: Place the stitches from the thread back on double pointed needles size 4 mm and knit up 1 stitch in each of the 8-8-10-10-12-14 stitches which were cast on under the sleeve = 69-77-85-89-93-97 stitches. Insert 1 marker thread in the middle of the new stitches = mid undersleeve. Continue with A.5, the stitches which do not fit the pattern mid under sleeve are worked in stocking stitch. Continue this pattern. When the piece measures 3-3-3-5-5-5 cm decrease 1 stitch on each side of the marker thread, decrease every 3-2-1½-1½-1-1 cm in total 9-12-15-16-17-18 times – READ DECREASE TIP = 51-53-55-57-59-61 stitches. When the piece measures 33-30-29-28-28-28 cm work A.7 across all the stitches. Cast off when A.7 has been worked 1 time in height, the sleeve measures approx. 36-33-32-31-31-31 cm. Work the other sleeve the same way. Place 6-6-6-7-7-7 buttons evenly distributed on left front band and sew them on. There are no buttonholes, use the holes in the pattern on right front band. |
||||||||||||||||||||||||||||
Diagram explanations |
||||||||||||||||||||||||||||
|
||||||||||||||||||||||||||||
 |
||||||||||||||||||||||||||||
 |
||||||||||||||||||||||||||||
 |
||||||||||||||||||||||||||||
Have you finished this pattern?Tag your pictures with #dropspattern #honeyblossomcardigan or submit them to the #dropsfan gallery. Do you need help with this pattern?You'll find 29 tutorial videos, a Comments/Questions area and more by visiting the pattern on garnstudio.com. © 1982-2026 DROPS Design A/S. We reserve all rights. This document, including all its sub-sections, has copyrights. Read more about what you can do with our patterns at the bottom of each pattern on our site. |
||||||||||||||||||||||||||||


With over 40 years in knitting and crochet design, DROPS Design offers one of the most extensive collections of free patterns on the internet - translated to 17 languages. As of today we count 324 catalogues and 12290 patterns translated into English (UK/cm). 12290
We work hard to bring you the best knitting and crochet have to offer, inspiration and advice as well as great quality yarns at incredible prices! Would you like to use our patterns for other than personal use? You can read what you are allowed to do in the Copyright text at the bottom of all our patterns. Happy crafting!
Post a comment to pattern DROPS 176-9
We would love to hear what you have to say about this pattern!
If you want to leave a question, please make sure you select the correct category in the form below, to speed up the answering process. Required fields are marked *.