
Popular categories
Looking for a yarn?


Comments / Questions (31)
![]() Evaluna wrote:
Evaluna wrote:
Hallo, Ik zie een probleem bij de beschrijving van de afschuining van de schouder in de voorpanden. Ik brei maat XL en moet dus 3 keer 10 st op een hulpdraad zetten en daarna nog 12 keer 5 st. Moet dat niet nog 1 keer 12 st zijn? Die schouder is toch niet zo hoog?
19.03.2018 - 13:17DROPS Design answered:
Hallo Evaluna, Dat was inderdaad een foutje. Het is nu aangepast en bedankt voor het doorgeven!
04.04.2018 - 18:19
![]() Margareta Wiklund wrote:
Margareta Wiklund wrote:
Är på axeln, skall sticka rätt v fr avigan. Här fastnar jag, vid # lägg tråden mellan 2 m o sticka ihop vriden med nästa m på v sticka# vilken tråd? Det blir hål ändå, Tack på förhand
05.12.2017 - 07:45DROPS Design answered:
Du ska ta upp den vågräta tråden mellan två maskor och sticka denna tråd vriden ihop med följande maska. Då ska det inte bli hål i arb.
05.12.2017 - 14:11
![]() Margareta Wiklund wrote:
Margareta Wiklund wrote:
Gör jag det förkortade varvet i sjalkragen endast 1 gång ? Tack på förhand
13.11.2017 - 17:19DROPS Design answered:
Du ska upprepa de förkortade varven tills kragen mäter ca 7-7-7-7-8-8 cm innerst.
13.11.2017 - 17:57
![]() Annelie Dynell wrote:
Annelie Dynell wrote:
Hej har provat nu 5 ggr å varje gång blir allt riktigt utan slingan i mitten som skall korsas ? Den hamnar på avigsidan å allt annat mönster på framsidan ??? Hjälp 😩
23.03.2017 - 10:18DROPS Design answered:
Hej Annelie. Du maa strikke noget forkert, fletten kommer paa retsiden i alle pinde. Desvaerre kan jeg ikke her paa afstand se hvad du gör, men maaske har du mulighed for at besöge en af vores butikker eller en strikkegruppe
27.03.2017 - 13:03
![]() Grethe Skotheim wrote:
Grethe Skotheim wrote:
Hei ! Jeg strikker en barnegenser ,str. 2 år i PUNA-garn. Nederst på bolen er det en rillekant på 2 riller. Den ruller inn ,hva gjør jeg med det når garnet ikke skal strykes? Garnet farger veldig av på fingrene når jeg strikker. Vil dette være en genser som farger av ,eller gir det seg etter en vask? Mvh Grethe
05.03.2017 - 12:04DROPS Design answered:
Hei Grethe. Du kan presse den let naar du har vasket den förste gang, enten ved at du lader den ligge mellem to haandklaeder et par timer - eller du kan presse let med et strygejern (og et viskestykke imellem). Og tit bliver det ogsaa mindre, naar du har strikket laengere og arbejdet faar lidt mere tyngde. Der kan vaere overskudsfarve i garn, men for det meste er det ogsaa vaek efter förste vask. Husk at vaske det efter anvisningerne - og alene, saa det ikke smitter af paa noget andet :)
06.03.2017 - 15:18
![]() Izaskun wrote:
Izaskun wrote:
No termino de entender como se le da forma a los hombros en la espalda. Deslizo los puntos tejidos.Sigo hasta el otro hombro. Deslizo. Son tres veces?
27.02.2017 - 06:40DROPS Design answered:
Hola Izaskun. En lugar de cerrar los puntos del hombro, estamos deslizando a un gancho aux. Lo has entendido correctamente. Deslizamos los puntos correspondientes tres veces a cada lado.
04.03.2017 - 11:57
![]() Fabienne Damas wrote:
Fabienne Damas wrote:
Bonjour, je réalise ce modèle et je suis bloquée au niveau du biais des épaules. Est-il possible d'avoir des précisions. Merci.
15.01.2017 - 15:21DROPS Design answered:
Bonjour Mme Damas, pour le biais des épaules, on fait des rangs raccourcis: on tricote les 8-12 (cf taille) premières maille côté emmanchure, on les glisse en attente, on tricote les mailles restantes du rang, on tourne et on tricote le rang suivant. Répétez ainsi 3 fois au total (= 3 x 8-12 m en attente) et glissez les 10-15 dernières m en attente) - pensez à bien former l'encolure en même temps. On reprendra ces mailles plus tard (cf BORDURE POINT MOUSSE ÉPAULES). Bon tricot!
16.01.2017 - 10:16
![]() Edith wrote:
Edith wrote:
Hallo, ich bin beim Vorderteil am Schalkragen, da steht in jeder 2. Reihe 1 M zunehmen, insgesamt bei Größe xl 4 mal, dann 13 mal in jeder 4. R. Sind für mich 17 M. und keine 18 M die ich zugenommen habe. Oder zählt die 1. Zunahme nicht dazu? Bei insgesamt zählt für mich die 1. Zunahme dazu. LG Edith
13.01.2017 - 07:43DROPS Design answered:
Liebe Edith, die erste Zunahmen am Schalkragen wurde 2 cm ab dem Auffassen gestrickt, dann 1 M x 4 in jeder 2. R + 1 M x 13 in jeder 4. R = 18 Zunahmen. Viel Spaß beim stricken!
13.01.2017 - 08:59
![]() Pavla wrote:
Pavla wrote:
Do you work 1 ridge over shawl collar sts only on every increase row or only one mentioned in pattern ? Thank ou Pavla
13.11.2016 - 21:39DROPS Design answered:
Dear Pavla, the short rows worked over shawl collar when piece measures 2 cm from cable border is only worked one time. Happy knitting!
14.11.2016 - 10:21
![]() Barbara Ernwein wrote:
Barbara Ernwein wrote:
Hallo, ich komme mit dem Rand an der Schulter nicht zurecht. Der wird zusätzlich angestrickt. Was passiert mit dem Rand des hinteren Halsausschnitt? Danke für die Hilfe, ich fange dann Mal mit dem unteren Rumpfteil an. Viele Grüße!
03.11.2016 - 09:56DROPS Design answered:
Liebe Frau Ernwein, Halsausschnitt am Rückenteil entsteht wenn die Arbeit misst 23-29 cm (siehe Größe), dann bearbeiten Sie jede Schulter eine nach der anderen.
03.11.2016 - 11:40
|
|||||||||||||||||||||||||
Millicent#millicentvest |
|||||||||||||||||||||||||
|
|
|||||||||||||||||||||||||
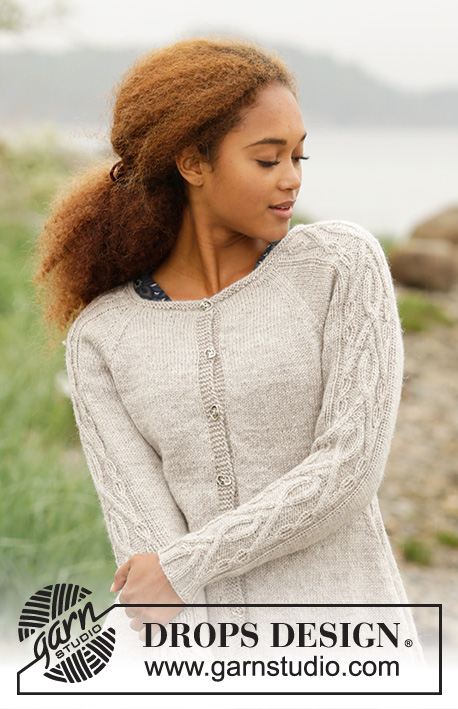
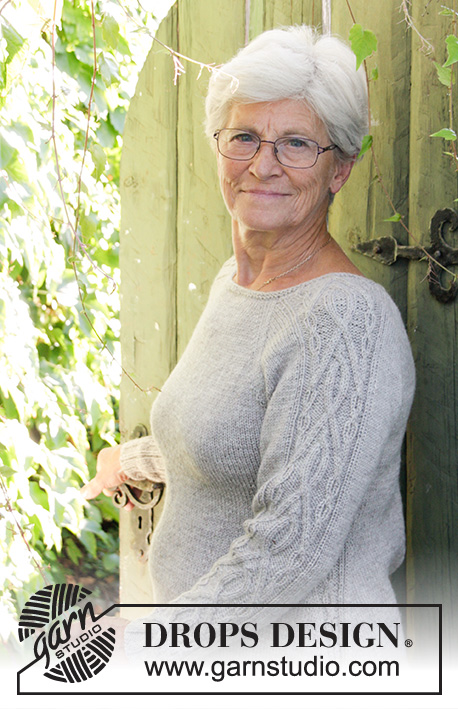
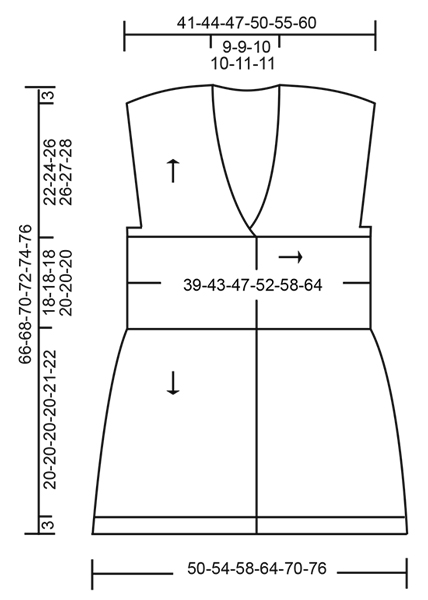
Knitted DROPS vest with cable border in waist and shawl collar in “Puna”. Size: S - XXXL.
DROPS 173-39 |
|||||||||||||||||||||||||
|
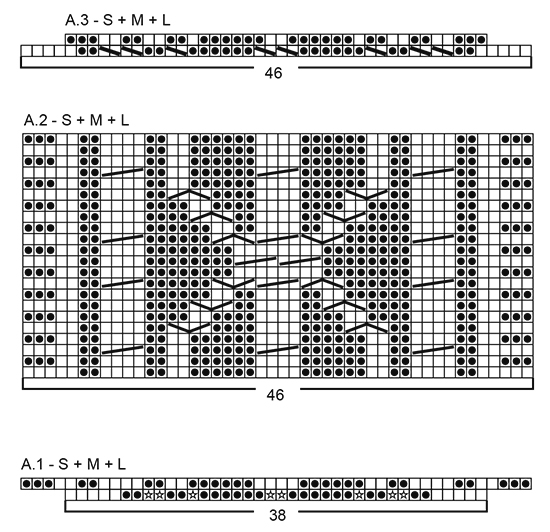
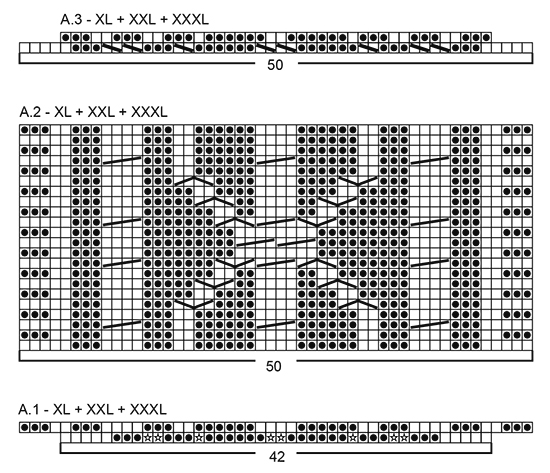
GARTER ST (back and forth): K all rows. 1 ridge = 2 rows K. PATTERN: See diagrams A.1 to A.3 – choose diagram for correct size. The diagrams show all rows in pattern seen from RS. BUTTONHOLES: Dec for 3 buttonholes as follows: K 3, K 2 tog, 1 YO, K 13-15, K 2 tog, 1 YO, K 13-15, 1 YO, K 2 tog and K 3. On next round K the YOs to make holes. INCREASE TIP -1 (applies to even distribution): To calculate how to inc evenly, use the total no of sts on row (e.g. 122 sts), minus bands (e.g. 12 sts) and divide the remaining sts by no of inc to be done (e.g. 54) = 2.04. I.e. in this example inc after approx. every 2nd st and do not inc over bands. NOTE: Inc 1 st by making 1 YO, on next row K YO twisted to avoid holes. INCREASE TIP-2: Inc 1 st by making 1 YO. On next row work YO twisted to avoid holes. INCREASE TIP-3 (applies to sides on bottom part of body): Work until 3 sts remain before marker, make 1 YO, K 6 (marker is in the middle of these 6 sts), make 1 YO. On next row work YOs twisted to avoid holes - work inc sts in stocking st. DECREASE TIP (applies to neckline): Dec inside 6 band sts in garter st + inc sts for shawl collar. All dec are done from RS! Dec as follows after band + collar: Slip 1 st as if to K, K 1, psso. Dec as follows before band + collar: Beg 2 sts before band + collar and K 2 tog. ---------------------------------------------------------- VEST: Beg with cable border as explained below. Pick up sts along one long side of border for yoke and along the other long side of border at the bottom part of body. CABLE BORDER: Worked back and forth on circular needle from mid front. Cast on 38-38-38-42-42-42 sts on circular needle size 3 mm with Puna. Work 6 ridges in GARTER ST - see explanation above (= band). Insert 1 marker, switch to circular needle size 4 mm and work pattern back and forth according to diagram A.1 (choose diagram for correct size). When A.1 has been worked, there are 46-46-46-50-50-50 sts on needle. Now work pattern back and forth according to A.2 – choose diagram for correct size. REMEMBER THE KNITTING TENSION When piece measures approx. 78-86-94-104-116-128 cm from marker (adjust after one whole repetition vertically so that pattern beg and end the same way in each side towards mid front – try the border on and work to desired length – approx. 3 cm remains until full lenght), work pattern back and forth according to diagram A.3. When A.3 has been worked, there are 38-38-38-42-42-42 sts on needle. Switch to circular needle size 3 mm and K 1 row from RS while dec for 3 BUTTONHOLES - see-explanation above. K 1 row from WS, work 5 ridges and cast off with K from RS. UPPER BODY: Pick up sts from RS along one long side on cable border (beg from the side with buttonholes) on circular needle size 4 mm as follows: Pick up 1 st in each of the 6 ridges on band, pick up 1 st in every ridge along edge and finally 1 st in every ridge along band in the other side = approx. 122-132-144-158-174-192 sts. On next row (= WS) K while AT THE SAME TIME inc evenly to 176-192-208-232-256-280 sts - READ INCREASE TIP-1. Insert 2 markers in the piece after 47-51-55-61-67-73 sts in from each side = 82-90-98-110-122-134 sts between markers on back piece - move the markers upwards when working. Now measure piece from where sts were picked up. Work in stocking st with 6 band sts in garter st in each side towards mid front – AT THE SAME TIME work in garter st over 12-14-16-18-20-22 sts in each side on front and back piece (i.e. over 6-7-8-9-10-11 sts on each side of both markers). When 2 ridges have been worked over these sts, work next row as follows from RS: K 45-48-51-56-61-66 sts (= right front piece), cast off the next 4-6-8-10-12-14 sts for armhole (i.e. cast off 2-3-4-5-6-7 sts on each side of marker), K the next 78-84-90-100-110-120 sts (= back piece), cast off the next 4-6-8-10-12-14 sts for armhole and K the remaining 45-48-51-56-61-66 sts (= left front piece). Finish front and back piece separately. BACK PIECE: = 78-84-90-100-110-120 sts. Continue back and forth in stocking st with 4 edge sts in garter st in each side. When piece measures 5-5-5-8-8-8 cm from cable border, inc 1 st inside 4 edge sts in each side - read INCREASE TIP-2 (= 2 sts inc - NOTE: Work inc sts in stocking st). Inc like this every 5-5-5-8-8-8 cm 4-4-4-3-3-3 times in total = 86-92-98-106-116-126 sts. When piece measures 22-24-26-26-27-28 cm, slip sts on a stitch holder for diagonal shoulder at beg of every row in each side as follows: * Work 8-9-9-10-11-12 sts, slip them on stitch holder and work the rest of row *, work from *-* 3 times in total in each side and then slip 10-10-12-12-13-15 sts 1 time in each side on stitch holder the same way. AT THE SAME TIME when piece measures 23-25-27-27-28-29 cm, cast off the middle 14-14-16-18-20-20 sts for neck and finish each shoulder separately. Cast off 2 st on next row from neck. When all sts have been cast off/slipped on stitch holder, piece measures approx. 43-45-47-49-50-51 cm (measured from the top of shoulder incl cable border). RIGHT FRONT PIECE: = 45-48-51-56-61-66 sts. Continue back and forth with 6 band sts in garter st towards mid front, stocking st and 4 edge sts in garter st towards armhole. READ ALL OF THE FOLLOWING SECTION BEFORE CONTINUING! SHAWL COLLAR: When piece measures 2 cm from cable border, inc 1 st on next row from WS inside last st on needle – READ INCREASE TIP-2 (work inc st in garter st). Work 1 ridge back and forth only over the outermost 7 sts towards mid front (i.e. beg from RS, K 7, turn, tighten yarn and K 7). Then work back and forth over all sts again AT THE SAME TIME inc for shawl collar the same way inside outermost band st as follows: Inc 1 st every other row 5-5-4-4-5-5 times in total and then every 4th row 10-10-13-13-14-14 times in total = 16-16-18-18-20-20 sts inc for shawl collar (work the inc sts in garter st). NECK LINE: AT THE SAME TIME when piece measures 3 cm from cable border, dec 1 st for neck line - READ DECREASE TIP. Dec like this every 4th row 3 times in total in all sizes and then every 6th row 6-6-7-8-9-9 times in total. INCREASE AT ARMHOLE: AT THE SAME TIME when piece measures 5-5-5-8-8-8 cm, inc 1 st inside 4 edge sts in the side - read INCREASE TIP-2. Inc like this every 5-5-5-8-8-8 cm 4-4-4-3-3-3 times in total (work the inc sts in stocking st). DIAGONAL SHOULDER: AT THE SAME TIME when piece measures 22-24-26-26-27-28 cm, slip sts on a stitch holder for diagonal shoulder at beg of every row from armhole as follows: * Work 8-9-9-10-11-12 sts, slip them on a stitch holder, work the rest of row, turn piece and work back *, work from *-* 3 times in total and then slip 10-10-12-12-13-15 sts 1 time on stitch holder. After all inc, dec and sts have been slipped on a stitch holder there are 22-22-24-24-26-26 sts on needle for collar and piece measures approx. 43-45-47-49-50-51 cm (measured from the top of shoulder incl cable border). COLLAR: = 22-22-24-24-26-26 sts. Beg from RS and work in garter st back and forth as follows: * Work 1 ridge over all sts, work 1 ridge over only the outermost 14-14-16-16-18-18 sts towards mid front *, work from *-* until collar measures approx. 7-7-7-7-8-8 cm inside on the most narrow part (it will measure approx. 14-14-14-14-16-16 cm at the edge on the widest), cast off. LEFT FRONT PIECE: = 45-48-51-56-61-66 sts. Work as right front piece but reversed. I.e. when first st inc for collar, this is done from RS and when working 1 ridge over only the outermost 7 sts, work first row from WS. When left front piece has been worked, work collar as on right front piece but beg from WS. EDGE IN GARTER ST ON SHOULDER: Slip the 34-37-39-42-46-51 sts from stitch holder on one shoulder on circular needle size 3 mm. K 1 row from WS (to avoid holes in transitions where sts were slipped on stitch holder put strand between 2 sts on needle and K twisted tog with first st on left needle). Then LOOSELY cast off with K from RS - it is important that the cast-off edge is not too tight. Work edge in garter st on the other 3 shoulders the same way. BOTTOM PART OF BODY: Pick up sts from RS along the other long side on cable border (beg from the side without buttonholes) on circular needle size 4 mm as follows: Pick up 1 st in each of the 6 ridges on band, pick up 1 st in every ridge along edge and finally 1 st in every ridge along band in the other side = approx. 122-132-144-158-174-192 sts. On next row (= WS) K while AT THE SAME TIME inc evenly to 176-192-208-232-256-280 sts - READ INCREASE TIP-1. Insert 2 markers in the piece after 47-51-55-61-67-73 sts in from each side = 82-90-98-110-122-134 sts between markers on back piece - move the markers downwards when working. Now measure piece from where sts were picked up on cable border. Work in stocking st with 6 band sts in garter st in each side towards mid front. When piece measures 3-3-3-3-2-2 cm, inc 1 st on each side of both markers – READ INCREASE TIP-3 (= 4 sts inc). Inc like this every 1½ cm (i.e. approx. every 4th row) 12-12-12-12-13-13 times in total in each side = 224-240-256-280-308-332 sts. When piece measures 20-20-20-20-21-22 cm, switch to circular needle size 3 mm. Beg from RS and work 6 ridges back and forth over all sts. Switch back to circular needle size 4 mm and LOOSELY cast off with K from RS. ASSEMBLY: Sew shoulder seams inside cast-off edge with grafting/kitchener stitches. Sew collar tog mid back (seam mid back should be inwards when collar is folded). Sew collar to neckline in the back of neck. Sew the buttons on to the left band. |
|||||||||||||||||||||||||
Diagram explanations |
|||||||||||||||||||||||||
|
|||||||||||||||||||||||||
 |
|||||||||||||||||||||||||
 |
|||||||||||||||||||||||||
 |
|||||||||||||||||||||||||
Have you finished this pattern?Tag your pictures with #dropspattern #millicentvest or submit them to the #dropsfan gallery. Do you need help with this pattern?You'll find 30 tutorial videos, a Comments/Questions area and more by visiting the pattern on garnstudio.com. © 1982-2026 DROPS Design A/S. We reserve all rights. This document, including all its sub-sections, has copyrights. Read more about what you can do with our patterns at the bottom of each pattern on our site. |
|||||||||||||||||||||||||


With over 40 years in knitting and crochet design, DROPS Design offers one of the most extensive collections of free patterns on the internet - translated to 17 languages. As of today we count 324 catalogues and 12290 patterns translated into English (UK/cm). 12290
We work hard to bring you the best knitting and crochet have to offer, inspiration and advice as well as great quality yarns at incredible prices! Would you like to use our patterns for other than personal use? You can read what you are allowed to do in the Copyright text at the bottom of all our patterns. Happy crafting!
Post a comment to pattern DROPS 173-39
We would love to hear what you have to say about this pattern!
If you want to leave a question, please make sure you select the correct category in the form below, to speed up the answering process. Required fields are marked *.