Comments / Questions (29)
![]() Stella Lecis wrote:
Stella Lecis wrote:
Buongiorno, non ho capito come si svolge questo passaggio: Quando il lavoro misura 22-24-26-26-27-28 cm, trasferire le m su un fermamaglie per la diagonale della spalla all’inizio di ogni f a ogni lato come segue: * lavorare 8-9-9-10-11-12 m, trasferirle su un fermamaglie e lavorare il resto del f *, lavorare *-* 3 volte in toale a ogni lato e poi trasferire 10-10-12-12-13-15 m 1 volta a ogni lato su un fermamaglie. Se potete chiarirmelo sareste gentilissimi. Grazie per l'attenzione.
24.01.2025 - 13:48DROPS Design answered:
Buongiorno Stella, in questo punto se devono trasferire delle maglie su un ferro ausiliario o fermamaglie come indicato, su più ferri. Buon lavoro!
25.01.2025 - 10:11
![]() Jules Fairfax wrote:
Jules Fairfax wrote:
Hi, and thanks; I want to use Drops Karisma for this--however-- I see no gauge given. Of course for the vest to fit, I would like to know the gauge. Please, can you help?
03.12.2024 - 03:54DROPS Design answered:
Hi Jules, Puna and Karisma are 2 yarns which belong to yarn group B, are of the same thicknes and can be used for the same pattern. The gauge is 21 stitches in width and 28 rows = 10 x 10 cm. Happy knitting!
03.12.2024 - 06:44
![]() Liz Herring wrote:
Liz Herring wrote:
On back piece after binding off middle stitches for neck and finish shoulder separately. Binding off 2 stitches on next row from neck. When all sts have been binding.... does this mean binding off 2 sts every alternate row until stitches are gone? Not clear instruction here.
05.08.2024 - 11:33DROPS Design answered:
Dear Liz, after casting off teh middle stitches, you cast off another two stitches on each side of the neck to "round off" the neckline a little bit. Afterwards, knit the shoulder stitches until the given measurements. Happy Knitting!
05.08.2024 - 12:51
![]() Tilde wrote:
Tilde wrote:
Hvordan kan det passe, at den nederste del kun skal være 20 cm, inden man strikker de 12 retpinde og slutter af, når man på både billedet og tegningen kan se, at den nederste del er længere end den øverste del? Og den øverste del er ca 26 cm iflg. opskriften og tegningen?
09.04.2023 - 16:07DROPS Design answered:
Hej Tilde, design har bedømt at målene i måleskitsen er mere proportionerlig mht både snoninger i taljen og bærestykke. Du kan jo altid selv justere længden i og med den strikkes oppefra og ned :)
13.04.2023 - 15:18
![]() Sue wrote:
Sue wrote:
CABLE BORDER: When piece measures approx. 78-86-94-104-116-128 cm from marker (adjust after one whole repetition vertically so that pattern beg and end the same way in each side towards mid front – try the border on and work to desired length – approx. 3 cm remains until full lenght), After one repetition adjust! Adjust how? Is there a translation problem or a punctuation error or am I missing something here?
04.01.2023 - 01:19DROPS Design answered:
Dear Sue, you have to adjust the whole length for your size so that the pattern is the same at the beginning and at the end (to let it be symmetrical inside front band stitches) ie work more/less rows but you should finish a whole repeat of the diagram. Happy knitting!
04.01.2023 - 09:22
![]() Annette Deurell wrote:
Annette Deurell wrote:
Jeg forstår ikke placeringen af de tre knaphuller. På billedet er de placeret midt på forkanten. Men det harmonerer ikke med opskriften, hvor der skal strikkes knaphuller lige før forkanten, altså mellem snoningsborten og forkanten.
17.03.2022 - 16:42DROPS Design answered:
Hej Annette, design har taget en beslutning om at det bliver bedre at strikke knaphullerne lige før de sidste retstrikkede masker. Men du laver dem naturligvis hvor det passer dig bedst. God fornøjelse!
22.03.2022 - 13:31
![]() Annette Deurell wrote:
Annette Deurell wrote:
I starten af sjalskraven strikkes vendestrik over de 7 masker på forkanten. Er det eneste vendestrik, eller fortsætter jeg med vendestrik, når der tages ud, altså først 5 gange på hv 2 p og derefter på hv 4 p? Tak fra Annette
17.03.2022 - 13:12DROPS Design answered:
Hej Annette, nej du strikker først vendestrik igen når du kommer ned til KRAVEN. God fornøjelse!
30.03.2022 - 14:02
![]() Anne-Maj wrote:
Anne-Maj wrote:
Hoi hoi, ik ben bij de kraag aangekomen (na rechterbovenlijf) en moet nu doorgaan met ribbelsteek tot het 7 cm op het korte stuk is en 14 cm op de lange kant. Ik begrijp alleen niet wat jullie met korte en lange kant bedoelen. Vanaf waar moet ik het meten? Ik hoor graag antwoord zodat ik verder kan :-) Kan namelijk niet wachten dit vest te dragen deze herfst!!
29.09.2018 - 08:25DROPS Design answered:
Dag Anne-Maj, Omdat je afwisselend ribbels over de hele kraag breit, en over alleen de buitenste steken, zal er a.h.w. een kromming in de kraag komen en is de buitenkant van de kraag (dus aan de kant van het voorpand) langer dan de binnenkant (dus aan de kant van de schouder). Op de korte kant moet hij 7 cm zijn en in de 'buitenbocht' 14 cm.
30.09.2018 - 21:19
![]() Evaluna wrote:
Evaluna wrote:
Hallo, Ik zie een probleem bij de beschrijving van de afschuining van de schouder in de voorpanden. Ik brei maat XL en moet dus 3 keer 10 st op een hulpdraad zetten en daarna nog 12 keer 5 st. Moet dat niet nog 1 keer 12 st zijn? Die schouder is toch niet zo hoog?
19.03.2018 - 13:17DROPS Design answered:
Hallo Evaluna, Dat was inderdaad een foutje. Het is nu aangepast en bedankt voor het doorgeven!
04.04.2018 - 18:19
![]() Margareta Wiklund wrote:
Margareta Wiklund wrote:
Är på axeln, skall sticka rätt v fr avigan. Här fastnar jag, vid # lägg tråden mellan 2 m o sticka ihop vriden med nästa m på v sticka# vilken tråd? Det blir hål ändå, Tack på förhand
05.12.2017 - 07:45DROPS Design answered:
Du ska ta upp den vågräta tråden mellan två maskor och sticka denna tråd vriden ihop med följande maska. Då ska det inte bli hål i arb.
05.12.2017 - 14:11
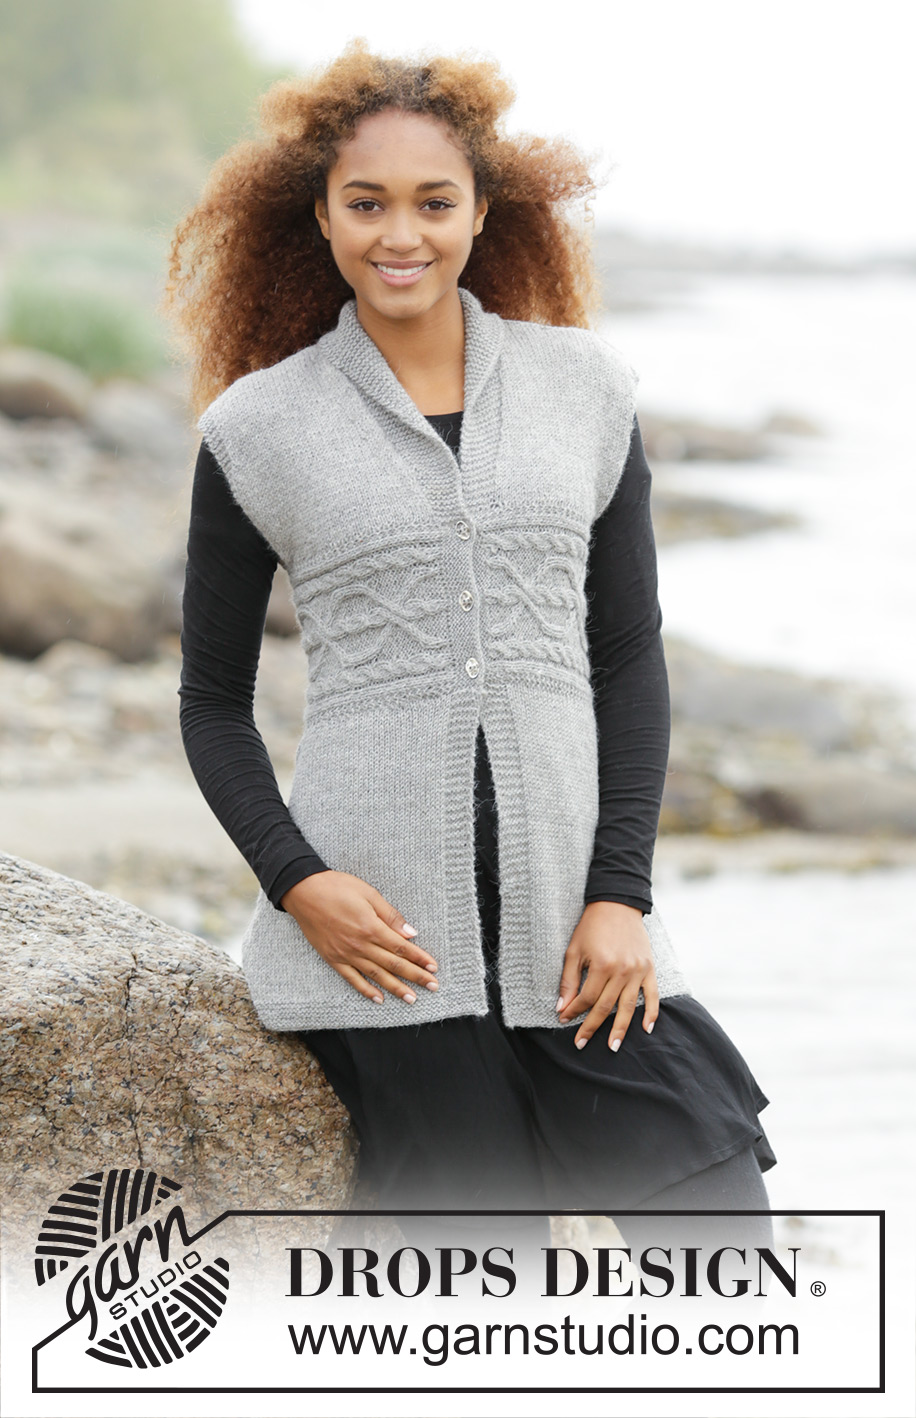
Millicent#millicentvest |
|||||||||||||||||||||||||
|
|
|||||||||||||||||||||||||
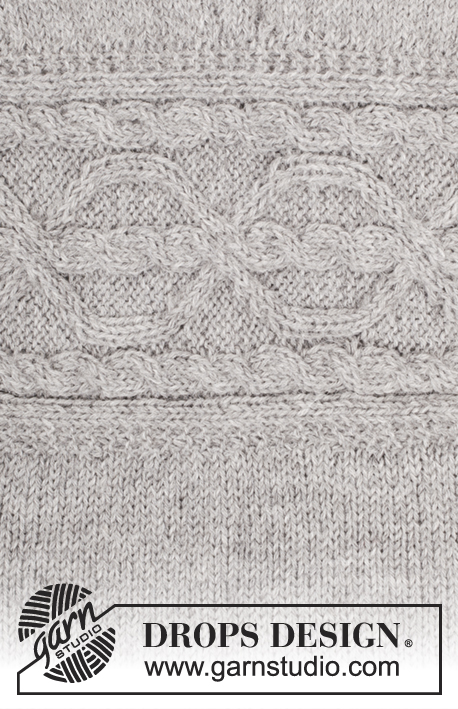
Knitted DROPS vest with cable border in waist and shawl collar in “Puna”. Size: S - XXXL.
DROPS 173-39 |
|||||||||||||||||||||||||
|
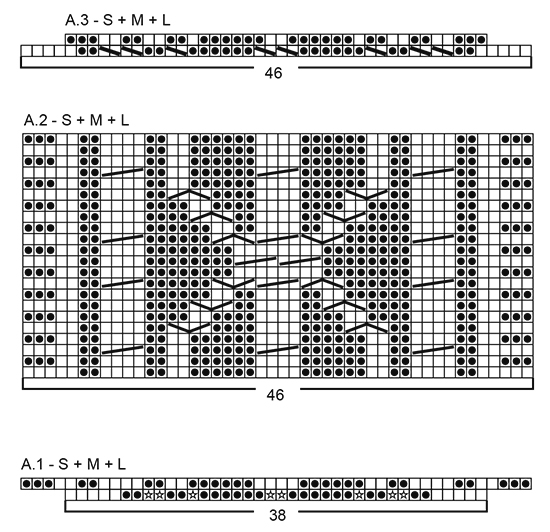
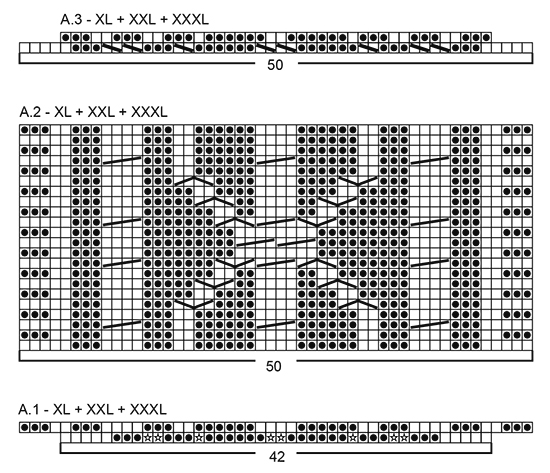
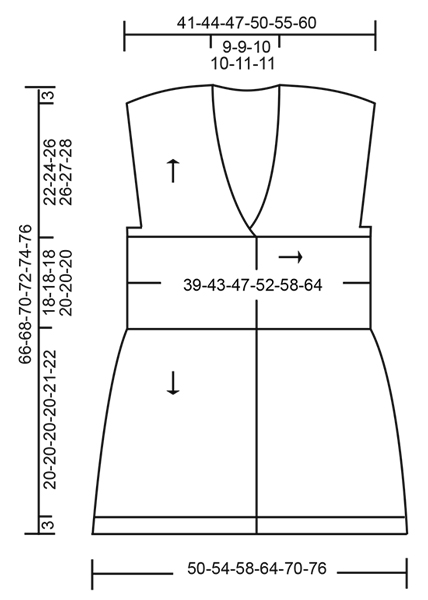
GARTER ST (back and forth): K all rows. 1 ridge = 2 rows K. PATTERN: See diagrams A.1 to A.3 – choose diagram for correct size. The diagrams show all rows in pattern seen from RS. BUTTONHOLES: Dec for 3 buttonholes as follows: K 3, K 2 tog, 1 YO, K 13-15, K 2 tog, 1 YO, K 13-15, 1 YO, K 2 tog and K 3. On next round K the YOs to make holes. INCREASE TIP -1 (applies to even distribution): To calculate how to inc evenly, use the total no of sts on row (e.g. 122 sts), minus bands (e.g. 12 sts) and divide the remaining sts by no of inc to be done (e.g. 54) = 2.04. I.e. in this example inc after approx. every 2nd st and do not inc over bands. NOTE: Inc 1 st by making 1 YO, on next row K YO twisted to avoid holes. INCREASE TIP-2: Inc 1 st by making 1 YO. On next row work YO twisted to avoid holes. INCREASE TIP-3 (applies to sides on bottom part of body): Work until 3 sts remain before marker, make 1 YO, K 6 (marker is in the middle of these 6 sts), make 1 YO. On next row work YOs twisted to avoid holes - work inc sts in stocking st. DECREASE TIP (applies to neckline): Dec inside 6 band sts in garter st + inc sts for shawl collar. All dec are done from RS! Dec as follows after band + collar: Slip 1 st as if to K, K 1, psso. Dec as follows before band + collar: Beg 2 sts before band + collar and K 2 tog. ---------------------------------------------------------- VEST: Beg with cable border as explained below. Pick up sts along one long side of border for yoke and along the other long side of border at the bottom part of body. CABLE BORDER: Worked back and forth on circular needle from mid front. Cast on 38-38-38-42-42-42 sts on circular needle size 3 mm with Puna. Work 6 ridges in GARTER ST - see explanation above (= band). Insert 1 marker, switch to circular needle size 4 mm and work pattern back and forth according to diagram A.1 (choose diagram for correct size). When A.1 has been worked, there are 46-46-46-50-50-50 sts on needle. Now work pattern back and forth according to A.2 – choose diagram for correct size. REMEMBER THE KNITTING TENSION When piece measures approx. 78-86-94-104-116-128 cm from marker (adjust after one whole repetition vertically so that pattern beg and end the same way in each side towards mid front – try the border on and work to desired length – approx. 3 cm remains until full lenght), work pattern back and forth according to diagram A.3. When A.3 has been worked, there are 38-38-38-42-42-42 sts on needle. Switch to circular needle size 3 mm and K 1 row from RS while dec for 3 BUTTONHOLES - see-explanation above. K 1 row from WS, work 5 ridges and cast off with K from RS. UPPER BODY: Pick up sts from RS along one long side on cable border (beg from the side with buttonholes) on circular needle size 4 mm as follows: Pick up 1 st in each of the 6 ridges on band, pick up 1 st in every ridge along edge and finally 1 st in every ridge along band in the other side = approx. 122-132-144-158-174-192 sts. On next row (= WS) K while AT THE SAME TIME inc evenly to 176-192-208-232-256-280 sts - READ INCREASE TIP-1. Insert 2 markers in the piece after 47-51-55-61-67-73 sts in from each side = 82-90-98-110-122-134 sts between markers on back piece - move the markers upwards when working. Now measure piece from where sts were picked up. Work in stocking st with 6 band sts in garter st in each side towards mid front – AT THE SAME TIME work in garter st over 12-14-16-18-20-22 sts in each side on front and back piece (i.e. over 6-7-8-9-10-11 sts on each side of both markers). When 2 ridges have been worked over these sts, work next row as follows from RS: K 45-48-51-56-61-66 sts (= right front piece), cast off the next 4-6-8-10-12-14 sts for armhole (i.e. cast off 2-3-4-5-6-7 sts on each side of marker), K the next 78-84-90-100-110-120 sts (= back piece), cast off the next 4-6-8-10-12-14 sts for armhole and K the remaining 45-48-51-56-61-66 sts (= left front piece). Finish front and back piece separately. BACK PIECE: = 78-84-90-100-110-120 sts. Continue back and forth in stocking st with 4 edge sts in garter st in each side. When piece measures 5-5-5-8-8-8 cm from cable border, inc 1 st inside 4 edge sts in each side - read INCREASE TIP-2 (= 2 sts inc - NOTE: Work inc sts in stocking st). Inc like this every 5-5-5-8-8-8 cm 4-4-4-3-3-3 times in total = 86-92-98-106-116-126 sts. When piece measures 22-24-26-26-27-28 cm, slip sts on a stitch holder for diagonal shoulder at beg of every row in each side as follows: * Work 8-9-9-10-11-12 sts, slip them on stitch holder and work the rest of row *, work from *-* 3 times in total in each side and then slip 10-10-12-12-13-15 sts 1 time in each side on stitch holder the same way. AT THE SAME TIME when piece measures 23-25-27-27-28-29 cm, cast off the middle 14-14-16-18-20-20 sts for neck and finish each shoulder separately. Cast off 2 st on next row from neck. When all sts have been cast off/slipped on stitch holder, piece measures approx. 43-45-47-49-50-51 cm (measured from the top of shoulder incl cable border). RIGHT FRONT PIECE: = 45-48-51-56-61-66 sts. Continue back and forth with 6 band sts in garter st towards mid front, stocking st and 4 edge sts in garter st towards armhole. READ ALL OF THE FOLLOWING SECTION BEFORE CONTINUING! SHAWL COLLAR: When piece measures 2 cm from cable border, inc 1 st on next row from WS inside last st on needle – READ INCREASE TIP-2 (work inc st in garter st). Work 1 ridge back and forth only over the outermost 7 sts towards mid front (i.e. beg from RS, K 7, turn, tighten yarn and K 7). Then work back and forth over all sts again AT THE SAME TIME inc for shawl collar the same way inside outermost band st as follows: Inc 1 st every other row 5-5-4-4-5-5 times in total and then every 4th row 10-10-13-13-14-14 times in total = 16-16-18-18-20-20 sts inc for shawl collar (work the inc sts in garter st). NECK LINE: AT THE SAME TIME when piece measures 3 cm from cable border, dec 1 st for neck line - READ DECREASE TIP. Dec like this every 4th row 3 times in total in all sizes and then every 6th row 6-6-7-8-9-9 times in total. INCREASE AT ARMHOLE: AT THE SAME TIME when piece measures 5-5-5-8-8-8 cm, inc 1 st inside 4 edge sts in the side - read INCREASE TIP-2. Inc like this every 5-5-5-8-8-8 cm 4-4-4-3-3-3 times in total (work the inc sts in stocking st). DIAGONAL SHOULDER: AT THE SAME TIME when piece measures 22-24-26-26-27-28 cm, slip sts on a stitch holder for diagonal shoulder at beg of every row from armhole as follows: * Work 8-9-9-10-11-12 sts, slip them on a stitch holder, work the rest of row, turn piece and work back *, work from *-* 3 times in total and then slip 10-10-12-12-13-15 sts 1 time on stitch holder. After all inc, dec and sts have been slipped on a stitch holder there are 22-22-24-24-26-26 sts on needle for collar and piece measures approx. 43-45-47-49-50-51 cm (measured from the top of shoulder incl cable border). COLLAR: = 22-22-24-24-26-26 sts. Beg from RS and work in garter st back and forth as follows: * Work 1 ridge over all sts, work 1 ridge over only the outermost 14-14-16-16-18-18 sts towards mid front *, work from *-* until collar measures approx. 7-7-7-7-8-8 cm inside on the most narrow part (it will measure approx. 14-14-14-14-16-16 cm at the edge on the widest), cast off. LEFT FRONT PIECE: = 45-48-51-56-61-66 sts. Work as right front piece but reversed. I.e. when first st inc for collar, this is done from RS and when working 1 ridge over only the outermost 7 sts, work first row from WS. When left front piece has been worked, work collar as on right front piece but beg from WS. EDGE IN GARTER ST ON SHOULDER: Slip the 34-37-39-42-46-51 sts from stitch holder on one shoulder on circular needle size 3 mm. K 1 row from WS (to avoid holes in transitions where sts were slipped on stitch holder put strand between 2 sts on needle and K twisted tog with first st on left needle). Then LOOSELY cast off with K from RS - it is important that the cast-off edge is not too tight. Work edge in garter st on the other 3 shoulders the same way. BOTTOM PART OF BODY: Pick up sts from RS along the other long side on cable border (beg from the side without buttonholes) on circular needle size 4 mm as follows: Pick up 1 st in each of the 6 ridges on band, pick up 1 st in every ridge along edge and finally 1 st in every ridge along band in the other side = approx. 122-132-144-158-174-192 sts. On next row (= WS) K while AT THE SAME TIME inc evenly to 176-192-208-232-256-280 sts - READ INCREASE TIP-1. Insert 2 markers in the piece after 47-51-55-61-67-73 sts in from each side = 82-90-98-110-122-134 sts between markers on back piece - move the markers downwards when working. Now measure piece from where sts were picked up on cable border. Work in stocking st with 6 band sts in garter st in each side towards mid front. When piece measures 3-3-3-3-2-2 cm, inc 1 st on each side of both markers – READ INCREASE TIP-3 (= 4 sts inc). Inc like this every 1½ cm (i.e. approx. every 4th row) 12-12-12-12-13-13 times in total in each side = 224-240-256-280-308-332 sts. When piece measures 20-20-20-20-21-22 cm, switch to circular needle size 3 mm. Beg from RS and work 6 ridges back and forth over all sts. Switch back to circular needle size 4 mm and LOOSELY cast off with K from RS. ASSEMBLY: Sew shoulder seams inside cast-off edge with grafting/kitchener stitches. Sew collar tog mid back (seam mid back should be inwards when collar is folded). Sew collar to neckline in the back of neck. Sew the buttons on to the left band. |
|||||||||||||||||||||||||
Diagram explanations |
|||||||||||||||||||||||||
|
|||||||||||||||||||||||||
|
|||||||||||||||||||||||||
|
|||||||||||||||||||||||||
|
|||||||||||||||||||||||||
Have you finished this pattern?Tag your pictures with #dropspattern #millicentvest or submit them to the #dropsfan gallery. Do you need help with this pattern?You'll find 30 tutorial videos, a Comments/Questions area and more by visiting the pattern on garnstudio.com. © 1982-2025 DROPS Design A/S. We reserve all rights. This document, including all its sub-sections, has copyrights. Read more about what you can do with our patterns at the bottom of each pattern on our site. |
|||||||||||||||||||||||||





Post a comment to pattern DROPS 173-39
We would love to hear what you have to say about this pattern!
If you want to leave a question, please make sure you select the correct category in the form below, to speed up the answering process. Required fields are marked *.