
Popular categories
Looking for a yarn?


Comments / Questions (67)
![]() Terese Hall wrote:
Terese Hall wrote:
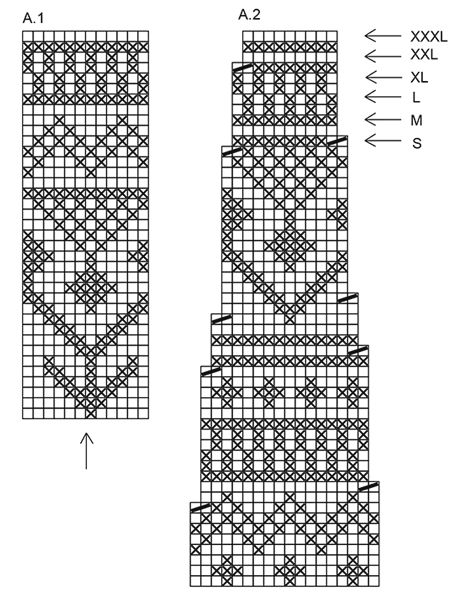
Hej Jag har kommit till mönstret nu och undrar vad pilen i A1 har för funktion? I andra beskrivningar har den betytt att jag skall börja mönstret där. Eller betyder den riktningen som mönstret skall stickas i Mvh Terese
09.03.2017 - 17:55DROPS Design answered:
Hej. Under ÄRM står det "pilen i A.1 = mitt på ärmen" så den visar var mönstret ska placeras på ärmen. Lycka till!
10.03.2017 - 08:47
![]() Marianne Ginnerup wrote:
Marianne Ginnerup wrote:
Hej. Jeg strikker model 173-5 og er nået til "forhøjning bagpå". Og jeg forstår det ikke! Kan ikke få det til at passe. Jeg skal sætte mærke midt foran og midt bagpå. Jeg har 104 m på rundpinden. Men jeg strikker jo så mellem mærkerne for og bag, dvs. jeg også strikker maskerne fra ærmet med. På den måde bliver det jo skævt og bliver kun strikket i den ene side. Hvad gør jeg forkert??? Det er en superflot sweater og jeg glæder mig til den er færdig. Med venlig hilsen Marianne Ginnerup
14.02.2017 - 09:42DROPS Design answered:
Hej Marianne. Du begynder midt bag paa arbejdet (du har 1 maerke midt for og 1 maerke midt bag). Saa strikker du til der er 12 eller 14 m (der er to str med 104 m) för maerket midt for, vender og strikker nu vrang tilbage til du er 12 eller 14 m för maerket midt for paa den anden side. Vend og strik til der er 22 eller 24 m för maerket midt for paa den anden side osv. Du strikker ogsaa maskerne fra aermet med.
14.02.2017 - 16:02
![]() Iris wrote:
Iris wrote:
Merci pour le centrage du motif, c'est compris. Mais "Tricotez ensuite les augmentations en suivant logiquement le diagramme", ces augmentations modifient le diagramme, l'espacement des motifs entre eux. Je fais et je défais, ne sachant comment en fin de A1 je vais me retrouver ? Je n'ai jamais pratiqué les augmentations EN JACQUARD sur aiguilles circulaires. Pouvez-vous encore m'aider SVP ??
15.11.2016 - 16:42DROPS Design answered:
Bonjour Iris, si vous commencez le tour par les 4 dernières m du diagramme (par ex.), l'augm. se fera en suivant la 5ème m à partir de la gauche, la suiv. sera la 6ème m à partir de la gauche et ainsi de suite. Si vous terminez par les 4 premières m du diagramme, l'augm. suiv. se fera en suivant la 5ème m du diagramme à partir de la droite, puis la 6ème m du diagramme et ainsi de suite. Notez dans le diagramme votre première m en début de rang et la dernière et continuez le motif sur ces mailles. Le motif ne tombera pas juste au milieu sous la manche (début des tours) mais il doit rester centré et s'aligner. Bon tricot!
16.11.2016 - 09:03
![]() Iris wrote:
Iris wrote:
Bonjour, me voici arrivée aux manches ! Je ne parviens pas bien à augmenter en jacquard et à prévoir où commencer le motif pour qu'il soit identique des 2 côtés. Un conseil ? Je tricote en taille L et c'est un cadeau de Noël pour ma fille, alors j'aimerais que ce soit réussi. Merci :)
15.11.2016 - 08:54DROPS Design answered:
Bonjour Iris, suivez les conseils indiqués ici pour bien centrer le motif sur la manche. Tricotez ensuite les augmentations en suivant logiquement le diagramme. Bon tricot!
15.11.2016 - 09:23
![]() Ilse Schaffner wrote:
Ilse Schaffner wrote:
How many inches wide are the different sizes for the pattern Black Ice? I looked at the bottom of the pattern but the numbers don't translate from cm to in and the numbers are too high to be inches. It's really confusing.
28.10.2016 - 23:58DROPS Design answered:
Dear Mrs Schaffner, all measurements in chart are in cm, please convert here into inches. Happy knitting!
31.10.2016 - 09:27
![]() Sonja Granvig wrote:
Sonja Granvig wrote:
En helt igennem fantastisk opskrift på en smuk smuk trøje. Har indtil nu strikket 3 af slagsen.
16.10.2016 - 06:32
![]() Ginette wrote:
Ginette wrote:
XXXL represente quelle taille du vetement terminé, merci
14.10.2016 - 21:49DROPS Design answered:
Bonjour Ginette, vous trouverez en bas de page un schéma avec toutes les mesures pour chaque taille. Comparez-les à un pull similaire dont vous aimez la forme pour trouver votre taille - plus d'infos ici. Bon tricot!
17.10.2016 - 08:47
![]() Bente Andresen wrote:
Bente Andresen wrote:
Hej, jeg kan ikke udskrive diagrammet på mønster nr 173-5, hvad gør jeg forkert. hilsen bente andresen
09.09.2016 - 10:40DROPS Design answered:
Hej Bente. Det kan jeg desvaerre ikke hjaelpe med. Jeg kan printe alt uden problemer. Maaske noget i dine indstillinger. Pröv eventuelt igen.
09.09.2016 - 12:57
![]() Zuzana wrote:
Zuzana wrote:
Nádherný.... asi si upletiem.... super
19.07.2016 - 11:36
![]() Douwelina wrote:
Douwelina wrote:
Ik ga hem breien
07.07.2016 - 21:15
|
||||||||||
Black Ice#blackicesweater |
||||||||||
|
|
||||||||||
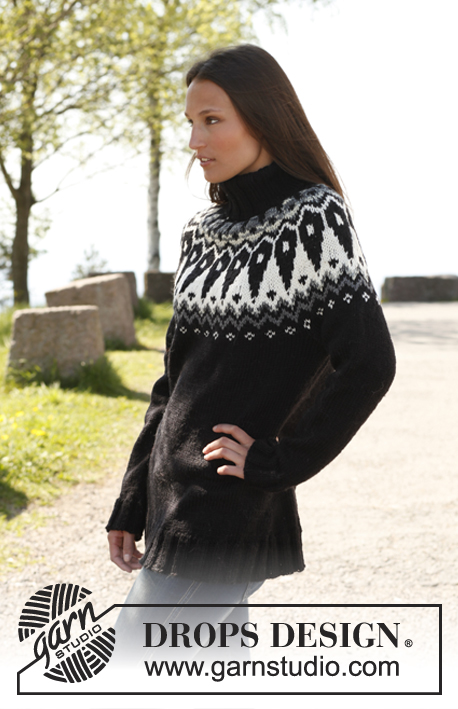
Knitted DROPS jumper with round yoke and Nordic pattern in "Nepal". Size: S - XXXL.
DROPS 173-5 |
||||||||||
|
GARTER ST (back and forth): K all rows. 1 ridge = 2 rows K. GARTER ST (worked in the round): 1 ridge = 2 rounds. * K 1 round and P 1 round *, repeat from *-*. DECREASE TIP: To calculate how often dec should be done, use the total no of sts on row (e.g. 148 sts) and divide by no of dec to be done (e.g. 34) = 4.3. I.e. in this example K approx. every 3rd and 4th st tog. INCREASE TIP (applies to sleeve): Inc on each side of marker as follows: Beg 1 sts before marker and make 1 YO, K 2 sts (marker is in the middle of these 2 sts), make 1 YO (= 2 sts inc). On next round K YOs twisted to avoid holes. PATTERN: See diagrams A.1 to A.2. Work entire pattern in stocking st. KNITTING TIP: To avoid the knitting tension to tighten when working pattern, it is important not to tighten the strands on back side of piece. Switch to a higher needle no when working pattern if the pattern is somewhat tight. ---------------------------------------------------------- BODY: First work back and forth on circular needle in 2 parts, then put piece tog and work in the round on circular needle. BACK PIECE: Cast on 92-100-112-124-132-148 sts on circular needle size 4.5 mm with off white. P 1 row from WS, then work as follows from RS: 3 sts in GARTER ST - see explanation above, K 2, rib (= P 2/K 2) until 3 sts remain, finish with 3 sts in garter st. When rib measures 8 cm, switch to circular needle size 5.5 mm, K 1 row while dec 20-22-28-28-30-34 sts evenly = 72-78-84-96-102-114 sts - READ DECREASE TIP. Continue in stocking st with 3 sts in garter st in each side until piece measures 18 cm. Put piece aside and knit front piece the same way. BODY: Slip the 2 parts tog on to same circular needle size 5,5 then work in the round over all sts = 144-156-168-192-204-228 sts. Continue in stocking st. REMEMBER THE KNITTING TENSION When piece measures 21-22-23-24-25-26 cm, work A.1 over all sts (= 12-13-14-16-17-19 repetitions in width) - READ KNITTING TIP. When 1 round remains in A.1 (piece measures approx. 40-41-42-43-44-45 cm), work next round as follows (= last round in A.1): Cast off 3-3-4-4-5-5 sts for armhole, work 66-72-76-88-92-104 sts (= front piece), cast off 6-6-8-8-10-10 sts for armhole, work 66-72-76-88-92-104 sts (= back piece) and cast off the last 3-3-4-4-5-5 sts for armhole. Put piece aside and knit the sleeves. SLEEVE: Worked in the round on double pointed needles. Switch to a short circular needle when enough sts have been inc. Cast on 52-52-52-56-56-56 sts on double pointed needle size 4.5 mm with off white. K 1 round. Then work rib = K 2/P 2 for 6 cm. K 1 round while dec 12 sts evenly in all sizes = 40-40-40-44-44-44 sts. Insert 1 marker at the beg of round. Switch to double pointed needles size 5.5 mm and work in stocking st with off white. When piece measures 11-11-13-13-10-12 cm, inc 2 sts mid under sleeve - READ INCREASE TIP. Inc like this every 3½-3-2½-2½-2½-2 cm 10-11-12-12-13-15 times in total = 60-62-64-68-70-74 sts. AT THE SAME TIME when piece measures 24-24-23-23-23-22 cm, work A.1, arrow in A.1 shows middle of sleeve, count outwards from arrow and work so that pattern is the same in both sides, work the inc sts in pattern, NOTE: Pattern will not fit one whole repetition. On last round in A.1 (piece measures 43-43-42-42-42-41 cm, NOTE: Shorter measurements in the larger sizes because of wider shoulders), cast off the middle 6-6-8-8-10-10 sts mid under sleeve = 54-56-56-60-60-64 sts remain on needle. Put piece aside and knit another sleeve. YOKE: Slip sleeves on to same circular needle size 5.5 mm as body where armholes were cast off = 240-256-264-296-304-336 sts. Work first round in A.2 AT THE SAME TIME adjust no of sts to 234-252-270-288-306-324. Continue pattern and dec as shown in A.2 (= 13-14-15-16-17-18 repetitions). READ KNITTING TIP! When A.2 has been worked - see arrow for your size, there are 130-140-150-160-153-162 sts on round. K 1 round while at the same time dec 34-44-50-56-49-54 sts evenly = 96-96-100-104-104-108 sts. ELEVATION AT THE BACK: Insert 1 marker mid front. Beg mid back and work an elevation at the back on circular needle size 5.5 mm with off white as follows: K until 10-10-12-12-14-16 sts remain before marker at the front, turn and P until 10-10-12-12-14-16 sts remain before marker in the other side. Turn and K until 20-20-22-22-24-26 sts remain before marker at the front, turn and P until 20-20-22-22-24-26 sts remain before marker in the other side. Turn and K until 30-30-32-32-34-36 sts remain before marker, turn and P until 30-30-32-32-34-36 sts remain before marker in the other side. Turn and K until mid back. Piece measures 66-68-70-73-75-77 cm from bottom edge to shoulder. NECK: = 96-96-100-104-104-108 sts. Work 1 ridge in GARTER ST – see explanation above, switch to a short circular needle size 6 mm, then work rib in the round (K 2/P 2). Continue with rib until piece measures 22-22-22-24-24-24 cm. Cast off sts with K over K and P over P. ASSEMBLY: Sew the openings under the sleeves. |
||||||||||
Diagram explanations |
||||||||||
|
||||||||||
 |
||||||||||
 |
||||||||||
Have you finished this pattern?Tag your pictures with #dropspattern #blackicesweater or submit them to the #dropsfan gallery. Do you need help with this pattern?You'll find 31 tutorial videos, a Comments/Questions area and more by visiting the pattern on garnstudio.com. © 1982-2026 DROPS Design A/S. We reserve all rights. This document, including all its sub-sections, has copyrights. Read more about what you can do with our patterns at the bottom of each pattern on our site. |
||||||||||


With over 40 years in knitting and crochet design, DROPS Design offers one of the most extensive collections of free patterns on the internet - translated to 17 languages. As of today we count 324 catalogues and 12290 patterns translated into English (UK/cm). 12290
We work hard to bring you the best knitting and crochet have to offer, inspiration and advice as well as great quality yarns at incredible prices! Would you like to use our patterns for other than personal use? You can read what you are allowed to do in the Copyright text at the bottom of all our patterns. Happy crafting!
Post a comment to pattern DROPS 173-5
We would love to hear what you have to say about this pattern!
If you want to leave a question, please make sure you select the correct category in the form below, to speed up the answering process. Required fields are marked *.