
Popular categories
Looking for a yarn?


Comments / Questions (33)
![]() Maple wrote:
Maple wrote:
Hi,i'm knitting sliver stag cardigan drops 157-24. I'm knitting large size. Chart A.1 row 5, First,k1edge sts,yo,k1 with grey,then k1 with white, k1 with grey,k1 with white, k3 with grey, k1 with white, k1 with grey, k1 with white, k1 with grey, k1 edge sts ???? Am i do it right ??? I rep row 5, The end i end with yo, k1 with grey, k1 with white.. am i do it right ???..
02.09.2015 - 04:44DROPS Design answered:
Dear Mrs Maple, on row 5, you start with 1 edge st (with grey), then work A.1 = *YO, K2 with grey (= 2 squares after the YO), K1 with white, K1 with grey, K1 with white, K3 with grey, K1 with white, K1 with grey, K1 with white, K1 with grey* (= 13 sts), repeat from *-* and finish with 1 edge st with grey. Happy knitting!
02.09.2015 - 09:59
![]() Maple wrote:
Maple wrote:
Am I do it right , chart A.1 first row, k 1st, yo, k1st, k4st, then k1st, yo,k1st, Rep first row until done knitting the first row. am I do it right???? Please help.....
01.09.2015 - 00:32DROPS Design answered:
Dear Mrs Maple, yes, you will repeat diagram A.1 in width inside 1 edge st in each side. A good idea is to place a marker between each repeat of the diagram to follow more easily the pattern and each repetition. Happy knitting!
01.09.2015 - 10:28
![]() Maple wrote:
Maple wrote:
Hi I am knitting sliver stag cardigan drops 157-24. Diagram A.1chart. Tell me to 1 Yo between 2 STS .First row, I knit 1 st, yo, knit 1st, knit 4 st, then knit 1 st,yo,knit 1 st, then knit 4 st, knit 1 st, yo knit
01.09.2015 - 00:23DROPS Design answered:
Dear Mrs Maple, that's right, on row 1 in A.1 you work: K1, YO, K6, YO, K1 (= 6 sts + 2 YOs = 8 sts). Happy knitting!
01.09.2015 - 10:26
![]() Maple wrote:
Maple wrote:
Hi,I am knitting sliver stag cardigan drops 157-24. I knitting large size. I cast on 106 STS on circular needle size 6 with medium gray and I work 1st row as follow (=RS): 1 edge st in garter st. And then I try to knit A.1. And I don't understand the diagram chart. On the bottom of chart I see number 8 and letter,S/M/L . Where to start and how ??? Please help,I am not sure how to start because chart A.1 have letter S,M and large .
31.08.2015 - 23:44DROPS Design answered:
Dear Mrs Maple, in size L, you follow same diagram as for size S and M (there is another diagram for the 3 larger size). So just repeat A.1 a total of 13 times in width starting and ending with 1 edge st. Start at the bottom corner on the right side and read towards the left from RS and from the left towards the right from WS. Happy knitting!
01.09.2015 - 10:25
![]() Sylvie wrote:
Sylvie wrote:
Bonjour Pourquoi après M1 en taille S, je dois tricoter 2 rangs puis mettre les mailles pour les mailles en attente sur l'envers, alors que je devrais me trouver sur l'endroit de mon travail? Dois-je tricoter 3 rangs ou couper mon fil pour le reprendre sur l'envers? merci de votre réponse
30.06.2015 - 08:21
![]() Marcade wrote:
Marcade wrote:
Pour l'empiecement comment faites vous pour de 106 mailles aller a 314 mailles sans augmentation
24.01.2015 - 11:56DROPS Design answered:
Bonjour Mme Marcade, les augmentations pour l'empiècement se trouvent dans le diagramme A.1 (voir diag. approprié à chaque taille en bas de page), on augmente ainsi avec 1 jeté à chaque symbole "o) dans le diagramme (tricotez le jeté torse à l'end au tour suivant). Bon tricot!
26.01.2015 - 09:37
![]() ML Schnapp wrote:
ML Schnapp wrote:
DROPS 157-24: Reindeer Cardigan The sleeve pattern chart appears to have the stag pattern upside down? Is that intentional?
30.11.2014 - 04:18DROPS Design answered:
Dear Mrs Schnapp, this cardigan is worked from top down, and diagrams are read starting on bottom corner on the right side towards the left (R1) - see also here - that is the reason why the stag will be started top down too (= from antlers). Happy knitting!
01.12.2014 - 13:52Doris Steinmayr wrote:
Was mache ich mit den 2 Maschen bei den Ärmel die beim Muster übrig bleiben
17.11.2014 - 11:54DROPS Design answered:
Die Frage zum Muster am Ärmel ist noch in Bearbeitung.
06.03.2015 - 11:24
![]() Jels Vrijenhoek wrote:
Jels Vrijenhoek wrote:
Het patroon van damesvest 157-24 kan maar gedeeltelijk worden uit gedraaid. Het allerbelangrijkste telpatroon komt niet op papier. Wat moet ik nu doen? Groetjes Jels Vrijenhoek
01.11.2014 - 20:09DROPS Design answered:
Hoi Jels. Ik kan je helaas niet helpen. Ik kon dit patroon zonder problemen printen, dus ik denk dat het aan je printer/instellingen kan liggen.
03.11.2014 - 17:03
![]() DUVAL Marie wrote:
DUVAL Marie wrote:
Taille: S - M - L - XL - XXL - XXXL à quelle taille européenne correspond ces lettres svp ? merci
09.09.2014 - 20:49DROPS Design answered:
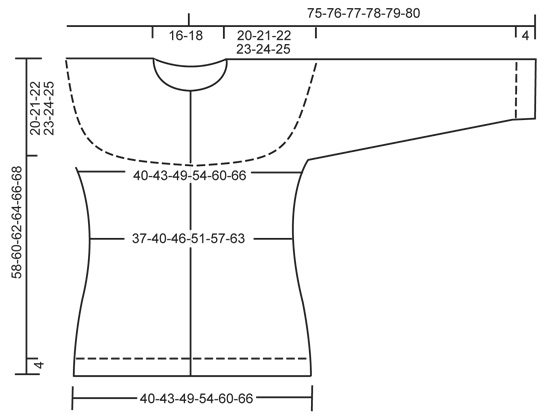
Bonjour Mme Duval, vous trouverez en bas de page un schéma avec toutes les mesures pour chaque taille. Ces mesures sont prises à plat, d'un côté à l'autre. Comparez-les à celles d'un vêtement analogue dont vous aimez la forme pour trouver la taille qui convient. Bon tricot!
10.09.2014 - 09:37
|
||||||||||
Silver Stag Cardigan#silverstagcardigan |
||||||||||
|
|
||||||||||
Knitted DROPS Christmas jacket with round yoke, reindeer pattern, worked top down in ”Karisma”. Size: S - XXXL.
DROPS 157-24 |
||||||||||
|
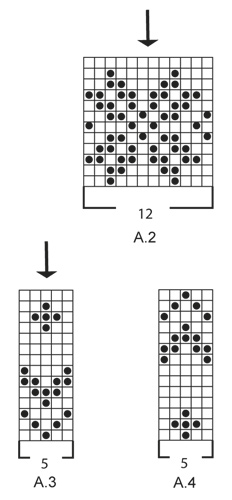
GARTER ST (back and forth on needle): K all rows. 1 ridge = 2 rows K. PATTERN: See diagrams A.1 to A.4. The diagrams show all rows in pattern seen from RS. Work entire pattern in stocking st. DECREASE TIP (applies to sides and sleeves): Dec before marker and 1 st K as follows: K 2 tog. Dec after marker and 1 st K as follows: Slip 1 st as if to K, K 1, psso. INCREASE TIP (applies to sides): All inc are done from RS. Inc 4 sts in total on row. Work until 1 st remains before marker, 1 YO, 2 sts in stocking st, 1 YO = 2 sts inc. On next row P YO twisted (i.e. work in the back loop of YO instead of front) to avoid holes. ---------------------------------------------------------- JACKET: Work back and forth, top down on circular needle. Work sleeves in the round on double pointed needles. YOKE: Cast on 90-98-106-122-130-138 sts on circular needle size 4 mm with medium grey. Work 1st row as follows (= RS): 1 edge st in GARTER ST - see explanation above - A.1 until 1 st remains, 1 edge st in garter st. REMEMBER THE KNITTING TENSION! When A.1 has been worked 1 time vertically, there are 266-290-314-362-386-410 sts on needle. Continue with 3-5-9-5-7-11 rows in stocking st (with 1 edge st in garter st in each side) with medium grey. Work next row from WS as follows: Work the first 38-41-47-53-59-65 sts (incl 1 edge st in garter st), slip the next 58-64-64-76-76-76 sts on a stitch holder (= sleeve), cast on 10 new sts under sleeve, insert a marker in the middle of these 10 sts, work the next 74-80-92-104-116-128 sts, slip the next 58-64-64-76-76-76 sts on a stitch holder (= sleeve), cast on 10 new sts under sleeve, insert a marker in the middle of these 10 sts, work the remaining 38-41-47-53-59-65 sts. BODY: There are now 170-182-206-230-254-278 sts for body. Now work as follows: 1 edge st in garter st, A.2 (= 12 sts) until 1 st remains, 1 edge st in garter st. Continue like this until A.2 has been worked 1 time vertically. Now work piece in stocking st with medium grey. On next row from RS dec 1 st on each side of each marker in the sides - SEE DECREASE TIP. Repeat dec every 2 cm 2 more times = 158-170-194-218-242-266 sts. When piece measures 12-13-14-15-16-17 cm from marker under sleeves, inc 1 st on each side of marker in each side of piece – see INCREASE TIP. Repeat inc every 2 cm 2 more times = 170-182-206-230-254-278 sts. When piece measures 56-58-60-62-64-66 cm, switch to circular needle size 3 mm and inc 22-26-26-30-30-34 sts evenly = 192-208-232-260-284-312 sts. Continue to work rib from RS as follows: 1 edge st in garter st, * K 2, P 2 *, repeat from *-* until 3 sts remain, K 2, 1 edge st in garter st. When rib measures 4 cm, cast off K over K and P over P. SLEEVES: Slip sts from stitch holder back on double pointed needles size 4 mm. There are now 58-64-64-76-76-76 sts for sleeve. Work 1 row in stocking st. Then cast on 10 sts under sleeve = 68-74-74-86-86-86 sts. Insert a marker in the middle of these new sts. Then work the sleeve in the round. Now work A.2. NOTE: Adjust so that the 2 middle sts in diagram (see arrow) are the 2 middle sts on sleeve. When A.2 has been worked, continue with A.3. NOTE: Adjust so that the middle st in diagram (see arrow) is one of the 2 middle sts on sleeve. AT THE SAME TIME on 1st round in A.3 beg dec under sleeve - READ DECREASE TIP. Repeat dec every 3-2½-2½-2½-2½-2½ cm 9-12-12-12-12-12 more times = 48-48-48-60-60-60 sts. When sleeve measures 38 cm, work A.4. NOTE: Adjust so that the middle st in diagram (see arrow) is one of the 2 middle sts on sleeve. When A.4 has been worked vertically, switch to double pointed needles size 3 mm and inc 4-8-8-0-4-4 sts evenly = 52-56-56-60-64-64 sts. Then work rib (= K 2/P 2) for 3 cm. Cast off with K over K and P over P. LEFT BAND: Work band back and forth on circular needle size 3 mm. Pick up approx. 144 to 168 sts (divisible by 4) inside 1 edge st along left band with medium grey. Work rib as follows from WS: 1 st in garter st, * P 2, K 2 *, repeat from *-*, finish with P 2 and 1 st in garter st. Rib beg and ends with K 2 and 1 st in garter st from RS. Work until rib measures 3 cm. Cast off with K over K and P over P. RIGHT BAND: Work as left but after 1 cm, dec for 7 buttonholes evenly (dec for buttonholes in P sections seen from RS). 1 BUTTONHOLE = P 2 tog and make 1 YO – top buttonhole should be approx. 6-7 cm from the top (there should also be 1 buttonhole on neck edge), and bottom approx. 5-6 cm from bottom edge. NECK EDGE: Pick up 96-100-104-108-112-116 sts over bands and cast-on edge on circular needle size 3 mm with medium grey. Work rib as follows: 1 edge st in garter st, * P 2, K 2 *, repeat from *-* until 3 sts remain, P 2, 1 edge st in garter st. When neck edge measures 1 cm, dec for 1 buttonhole over the other holes on right band by K 2 tog and making 1 YO. Continue like this until rib measures 3 cm. Cast off with K over K and P over P. ASSEMBLY: Sew the holes under the sleeves. Sew the buttons on to left band. |
||||||||||
Diagram explanations |
||||||||||
|
||||||||||
 |
||||||||||
 |
||||||||||
 |
||||||||||
Have you finished this pattern?Tag your pictures with #dropspattern #silverstagcardigan or submit them to the #dropsfan gallery. Do you need help with this pattern?You'll find 29 tutorial videos, a Comments/Questions area and more by visiting the pattern on garnstudio.com. © 1982-2026 DROPS Design A/S. We reserve all rights. This document, including all its sub-sections, has copyrights. Read more about what you can do with our patterns at the bottom of each pattern on our site. |
||||||||||


With over 40 years in knitting and crochet design, DROPS Design offers one of the most extensive collections of free patterns on the internet - translated to 17 languages. As of today we count 324 catalogues and 12290 patterns translated into English (UK/cm). 12290
We work hard to bring you the best knitting and crochet have to offer, inspiration and advice as well as great quality yarns at incredible prices! Would you like to use our patterns for other than personal use? You can read what you are allowed to do in the Copyright text at the bottom of all our patterns. Happy crafting!
Post a comment to pattern DROPS 157-24
We would love to hear what you have to say about this pattern!
If you want to leave a question, please make sure you select the correct category in the form below, to speed up the answering process. Required fields are marked *.