
Popular categories
Looking for a yarn?


Comments / Questions (32)
![]() DROPS DesignNL wrote:
DROPS DesignNL wrote:
Rita: ik zie nu dat je het over het aantal St. Tussen het ajour, maar je moet ook 5 St. Tussen breien. ( bij Herhaling van m3b), maar het patroon klopt.
22.05.2012 - 18:39
![]() Rita wrote:
Rita wrote:
En toch is de teltekening fout,mijn buurvrouw heeft het ook eens geprobeerd,na 2 samen breien,1 omslag,1 r.,1 omslag en 1 afn. en 1 breien en de afgenomene erover moet je 4 steken breien in plaats van 5 anders komt de tekening niet uit.Dat er geen steken minder op staan dat weet ik ook wel.
22.05.2012 - 15:24DROPS Design answered:
2 st samen, 1 omslag, 1 r, 1 omslag, 1 r afnemen, 1 r, overhalen maakt bij mij wel 5 st...
22.05.2012 - 16:43
![]() Rita wrote:
Rita wrote:
Mevrouw,bij de teltekening m 3 staat een fout in de derde rij,in plaat van 5 steken tussen de minderingen zijn het er maar 4 ,dan komt de tekening juist anders klopt het niet. groetjes Rita
21.05.2012 - 14:08DROPS Design answered:
Ik heb het patroon doorgenomen en kan geen fout vinden? Bij het breien van M.3 komen er geen minderingen? Het aantal st na het breien van de nld 3 moet gelijk blijven. Er zijn 6 r st tussen elk "ajourmotief". U moet ook ervoor zorgen dat de ajourmotieven netjes boven elkaar komen te liggen.
22.05.2012 - 14:34
![]() Drops Design wrote:
Drops Design wrote:
Lilla, you work what's called short rows to shape the collar. After working the 13 sts, you turn work and knit back. We also have a video for that in our video library.
22.04.2010 - 00:36
![]() Lillan wrote:
Lillan wrote:
Having problems with the last part of the collar: 2 rows garter over all 18, 2 rows garter over the first 13. What do I do with the 5 left over. Doesn't look right. Thanks a lot.
21.04.2010 - 21:27
![]() DROPS Design wrote:
DROPS Design wrote:
Lillian, M2A starts by K2 tog and end with yo, K1. M2B starts with yo, K3 and ends with yo, K1. M2C starts with yo, K3 and ends with Slip 1 st as if to knit, K1, psso. The yo and 2 sts tog in A and C keeps the number of sts the same.
24.02.2010 - 20:16
![]() Lillan wrote:
Lillan wrote:
In sleeve pattern in M2A it looks like we decrease by one stich each side of pattern, therefore reducing total count by 2 stiches. Is this correct? Thanks for your prompt reply. LB
24.02.2010 - 20:02
![]() Drops Design wrote:
Drops Design wrote:
Jo men ærmerne skal passe. Du er nødt til at måle hele vejen rundt langs med kanten af hele ærmekuppelen, så stemmer det. God fornøjelse!
02.03.2009 - 11:55
![]() Dorthe Andersen wrote:
Dorthe Andersen wrote:
Hej. Jeg er lige blevet færdig med at strikke denne trøje men jeg kan ikke få ærmerne til at passe. I opskriften ser det ud til at ærmet er ca 12 cm. kortere i ærmelukningen. hvad gør jeg? venlig hilsen Dorthe.
02.03.2009 - 10:14
![]() DROPS Design NL wrote:
DROPS Design NL wrote:
Hoi. De vertaling van de teltekening staat onderaan het patroon. Kijk onder "VERKLARING SYMBOLEN". De vertalingen staan in dezelfde volgorde als op de schematekening. Succes! Tine
16.09.2008 - 11:03
|
|||||||||||||||||||
DROPS 94-25 |
|||||||||||||||||||
|
|
|||||||||||||||||||
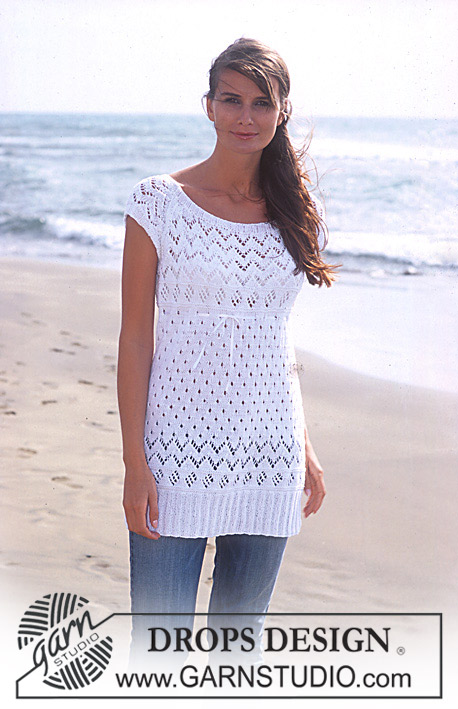
DROPS Long cardigan with lace pattern knitted in Muskat.
DROPS 94-25 |
|||||||||||||||||||
|
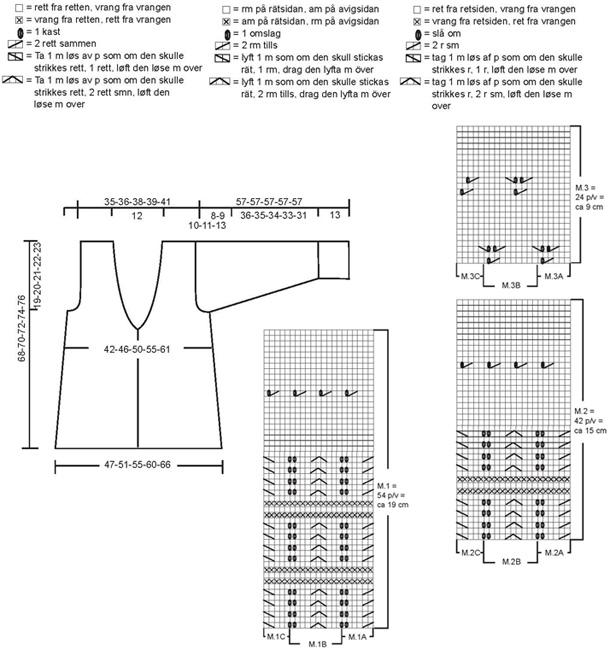
Knitting Gauge: 21 sts x 28 rows on needles size 4 mm stocking sts = 10 x 10 cm. Pattern: See diagrams M.1 to M.3 Diagrams are seen from the right side. NB: Make sure the patterns are in line vertically as shown in diagrams. Knit sts not fitting into pattern after dec for armhole, neck and sleeve cap in stocking sts. Back piece: Please read all of the section before you begin! Cast on 101-109-117-127-141 sts (inclusive of 1 seam st each side – all seam sts are knitted in garter sts throughout) on needles size 4 in Muskat and knit 2 rows of garter sts, continue in stocking sts. When the piece measures 10 cm continue from the right side as follows: 1 seam st, 9-8-7-7-9 sts of stocking sts, M.1A (= 6 sts), M.1B over the next 70-80-90-100-110 sts, M.1C (=5 sts), 9-8-7-7-9 sts of stocking sts and 1 seam st. NB: purl all sts on rows purled from the right side. After 1 vertical repeat of M.1, continue with 1 vercital repeat of M.2, and now knit M.3 until finished measurements. At the same time when the piece measures 12 cm dec 1 st each side on every 7-7-7-8-8 cm a total of 5 times = 91-99-107-117-131 sts. When the piece measures 49-50-51-52-53 cm bind off for armhole on each side on every other row: 4 sts 1 times, 3 sts 0-1-1-1-2 times, 2 sts 1-1-2-4-5 times and and 1 st 3 times = 73-75-79-81-85 sts. When the piece measures 66-68-70-72-74 cm bind off the centre 21 sts for neck and continue to bind off on each neckline on every other row: 1 st 2 times = 24-25-27-28-30 left on each shoulder. When the piece measures 68-70-72-74-76 cm bind off remaining sts (adjust to at least 2 rows of stocking sts after finishing the lace pattern). Left front: Please read all of the section before continuing. Cast on 56-60-64-69-76 sts (inclusive of 1 seam st at the side and 5 edge sts mid front, all knitted in garter sts throughout) on needles size 4 mm in Muskat and knit 2 rows garter sts with the 2 mid front sts knitted in double thread (use an extra ball and let the thread follow the piece as you go along). Continue in stocking sts (remember garter sts at side and mid front and double thread mid front). At the same time when the piece measures 10 cm, knit next row as follows from the right side: 1 seam st, 14-8-12-7-14 sts stocking sts, M.1A (= 6 sts), M.1B over the next 20-30-30-40-40 sts, M.1C (= 5 sts), 5 sts stocking sts and 5 edge sts at the centre front as before. Continue the pattern as described for back piece – remember to purl all sts on rows purled from the right side. Decreasing at side: At the same time when the piece measures 12 cm dec at side as done for the back piece = 51-55-59-64-71 sts. Collar: Please read all of the section before continuing. At the same time when the piece measures 46-47-48-49-50 cm inc number of sts knitted in garter st for collar mid front. Knit 1 extra st in garter sts on every 4th row a total of 13 times (i.e. do not inc sts but knit 1 st previously knitted in stocking sts in garter sts) = 18 sts of garter sts mid front. At the same time knit 1 more st with double thread on every 4th row a total of 3 times = 5 sts knitted in double thread mid front. Armhole: At the same time when the piece measures 49-50-51-52-53 cm bind off for armhole as on the back piece = 42-43-45-46-48 sts. When the piece measures 68-70-72-74-76 cm – adjust to the back piece – bind off the outermost 24-25-27-28-30 sts for the shoulder = 18 sts left on row for the collar. Collar: Continue knitting the collar and sew it to the back piece during assembly. Knit as follows: *2 rows of garter sts over all sts, 2 rows of garter sts over only the 13 sts towards mid front (remember to knit the 5 outermost sts with double thread)*, repeat from *-* until the collar measures 6 cm on the inside (it will measure approx 12 cm on the outer side). Put the sts on a thread. Right front: Cast on and knit as left front but reversed. I addition make buttonholes on front edge, 1 buttonhole = bind off the 3rd and 4th st on front edge and cast on 2 new sts over the bound off sts on next row. Bind off for buttonholes when the piece measures: Size S: 24, 31 and 38 cm Size M: 25, 32 and 39 cm. Size L: 26, 33 and 40 cm Size XL: 27, 34 and 41 cm Size XXL: 28, 35 and 42 cm Sleeve: Cast on 57-57-57-67-67 sts (inclusive of 1 seam st each side) on needles size 4 mm in Muskat and knit 2 rows of garter sts, at the same time dec 4 sts evenly on the 1st row = 53-53-53-63-63 sts. Continue in stocking sts. When the piece measures 6 cm knit the next row from the right side as follows: 1 seam st, M.2A (= 6 sts), M.2B over the next 40-40-40-50-50 sts, M.2C (= 5 sts) and 1 edge st. Knit 1 vertical repeat of M.2 and then knit M.3 until finished measurements– remember the pattern should be in line as shown in the pattern diagram. At the same time when the piece measures 13 cm inc. 1 st each side on every 3.5-3-2-2.5-2 cm a total of 10-12-15-12-15 times = 73-77-83-87-93 sts – new sts are knitted in stocking sts until they fit into the pattern. When the piece measures 49-48-47-46-44 cm bind off for sleeve cap each side on every other row: 3 sts 1 time, 2 sts 3 times and 1 st 3-5-6-8-10 times. Continue to bind off 2 sts each side until the piece measures 56 cm. Then bind off each side 3 sts 1 time. Bind off remaining sts when the piece measures approx 57 cm. Knit the other sleeve. Assembly: Sew shoulders seams. Sew the collar together mid back (sew sts together from threads). Sew the collar to the back piece with the seam at the right side. Sew in the sleeves inside the seam sts. Sew the sides and the sleeves together inside the seam sts. Sew in the buttons. |
|||||||||||||||||||
Diagram explanations |
|||||||||||||||||||
|
|||||||||||||||||||
 |
|||||||||||||||||||
Have you finished this pattern?Tag your pictures with #dropspattern or submit them to the #dropsfan gallery. Do you need help with this pattern?You'll find 24 tutorial videos, a Comments/Questions area and more by visiting the pattern on garnstudio.com. © 1982-2026 DROPS Design A/S. We reserve all rights. This document, including all its sub-sections, has copyrights. Read more about what you can do with our patterns at the bottom of each pattern on our site. |
|||||||||||||||||||


With over 40 years in knitting and crochet design, DROPS Design offers one of the most extensive collections of free patterns on the internet - translated to 17 languages. As of today we count 325 catalogues and 12298 patterns translated into English (UK/cm). 12298
We work hard to bring you the best knitting and crochet have to offer, inspiration and advice as well as great quality yarns at incredible prices! Would you like to use our patterns for other than personal use? You can read what you are allowed to do in the Copyright text at the bottom of all our patterns. Happy crafting!
Post a comment to pattern DROPS 94-25
We would love to hear what you have to say about this pattern!
If you want to leave a question, please make sure you select the correct category in the form below, to speed up the answering process. Required fields are marked *.