
Popular categories
Looking for a yarn?


Comments / Questions (49)
![]() Fina wrote:
Fina wrote:
Por un problema en mis manos no puedo tejer con aguja circular como se podría convertir este patrón para dos agujas? Gracias
13.01.2026 - 10:38DROPS Design answered:
Hola Fina, puedes leer esta lección para transformar este patrón. Pero el raglán tendría que trabajarse en circular, mientras que el delantero y la espalda se pueden trabajar con agujas rectas. El raglán solo podría trabajarse con agujas rectas si trabajas de abajo arriba la labor, con una abertura en una de las líneas de raglán en la espalda, pero el número de puntos para trabajar en el raglán sería muy elevado para las agujas rectas.
23.02.2026 - 01:27
![]() Cate wrote:
Cate wrote:
Hello. I love this pattern. I'm at the bottom bavk (ribbing) and don't understand something on row 1. It says "... on the wrong side... work 1 garter stitch, stocking stitch..." Is a wrong side garter stitch a purl and the stocking stitch a knit?? Or the other way around?
13.12.2025 - 02:14DROPS Design answered:
Hi Cate, Garter stitch is knitted from both the right and wrong side, stocking stitch is knitted from the right side and purled from the wrong side. So from the wrong side you knit the garter stitch and purl the stocking stitches. Regards, Drops Team.
15.12.2025 - 07:43
![]() Elisa wrote:
Elisa wrote:
Sono riuscita a proseguire nel lavoro,sono a 3 cm dopo aver diviso il corpo dalle maniche :) ma ho ancora un dubbio: quando dovrò fare gli ultimi 6 cm con i ferri 3,x separare il lavoro devo lavorare con i ferri dritti? ( Sto lavorando con i circolari) Grazie
17.10.2025 - 16:39DROPS Design answered:
Buonasera Elisa, dopo aver diviso le parti si prosegue in piano in ferri di andata e ritorno. Può utilizzare sia i ferri dritti che quelli circolari. Buon lavoro!
17.10.2025 - 23:37
![]() Elisa wrote:
Elisa wrote:
Ho letto la vostra risposta,sí lo so che ai margini di A2 ci sono due maglie a rov e che i gettati vanno fatti prima e dopo queste maglie a rov ma ho provato a lavorare i gettati come indicato e quello prima di A2 non viene =a quello dopo A2 (viene perfetto) ho anche provato a lavorarli entrambi a drt ritorto ,vengono meglio ma non = ,quello prima di A2 viene sempre + molle di quello dopo A2,Se prima e dopo A2 facessi una sola maglia a rov e i gettati prima e dopo il rov potrebbe venir?
12.10.2025 - 13:05
![]() Elisa wrote:
Elisa wrote:
Ho letto le risposte fornite riguardo ai gettati ma io sto lavorando in circolare,per me il rovescio non esiste. Ho fatto molti tentativi,ho provato a lavorare il gettato prima di A1 facendo un aumento intercalare,poi preso a rov e lavorato a dritto e invece il gettato dopo A2 normalmente a dritto ritorto ma non veniva bene così ho provato a lavorare entrambi con aumento intercalare e poi a dr ritorto e viene meglio ma non bene. Il gettato dopo A2 è perfetto, l' altro ancora un po' mollo :(
11.10.2025 - 23:41DROPS Design answered:
Buongiorno Elisa, gli aumenti per il raglan si lavorano prima del diagramma A.2 e le prime maglie dei due ferri di A.2 sono lavorate a rovescio. Buon lavoro!
12.10.2025 - 09:35
![]() Daniela wrote:
Daniela wrote:
Ho provato a lavorare i gettati come indicato ma quelli prima di A2 seppur io li passo sul ferro destro,poi li metto ritorti sul ferro sinistro per poi lavorarli a dritto con il ferro di destra,non vengono bene come quelli dopo A2( perfetti) ma mi viene un buchino più grande e come una riga in diagonale che copre il buco sotto.Ho provato anche a fare un aumento intercalare prima di A2 (poi lavorato come indicato nel pattern),viene un po' meglio ma il problema resta cosa fare?
10.10.2025 - 23:56DROPS Design answered:
Buonasera Elisa, provi a vedere se questo videole può essere di aiuto per lavorare i gettati prima di una maglia a rovescio. Buon lavoro!
11.10.2025 - 19:36
![]() Elisa wrote:
Elisa wrote:
Mi dica se ho capito bene: dal primo giro di aumenti subito dopo aver finito il collo a coste,si lavora il giro dopo con i gettati ritorti ,poi si ripetono gli 8 aumenti,nel giro dopo si fanno ritorti,si continua così fino a 16 volte in cui si è aumentato e poi si alternano 4 e 8 au ogni tot ferri giusto? Posso lavorare i gettati con aumenti intercalari ?iniziando da una maglia prima del marker (prima di A3) e una maglia dopo il marker ( dopo A3)?
10.10.2025 - 01:10DROPS Design answered:
Buonasera Elisa, si, gli aumenti sono corretti. Buon lavoro!
11.10.2025 - 19:34
![]() Elisa wrote:
Elisa wrote:
Non riesco a fare i gettati prima di A2,li ho fatti come indicato eppure vengono buchi non capisco perché. Non è che essendo nel punto in cui la maglia successiva va lavorata a rov ci sono delle modifiche? Prendo il gettato ritorto e lo lavoro a dritto poi 2 rov poi A2 ma viene con i buchi,invece i gettati dopo A2 mi vengono bene,precisi come devo fare? Attento risposta
09.10.2025 - 23:20DROPS Design answered:
Buonasera Elisa, provi a vedere se questo video la può aiutare a lavorare i gettati prima della maglia rovescio. Buon lavoro!
11.10.2025 - 19:32
![]() Elisa wrote:
Elisa wrote:
Ho ancora un dubbio sugli aumenti: c'è scritto che si devono fare gli aumenti prima sul davanti e sul dietro (+4) e poi dopo tot ferri altri 4 aumenti nelle linee raglan delle maniche (+4) ho capito bene? Poi non mi è chiaro come alternare gli aumenti, dopo aver fatto il 1 giro di au (+8 tutti insieme nei raglan),il ferro dopo è con i gettati ritorti senza su e ok,quello dopo si devono ripetere gli au nel davanti e nel dietro (+4) e nel ferro dopo ancora si fanno gli altri 4 nelle maniche?
09.10.2025 - 02:10DROPS Design answered:
Buonasera Elisa, deve continuare con gli aumenti indicati fino al numero di maglie riportato nel modello, poi continuare con gli aumenti diversificati tra corpo e maniche. Buon lavoro!
09.10.2025 - 23:49
![]() Daniela wrote:
Daniela wrote:
Non mi è chiaro il diagramma A1,se lo seguo a me viene una lavorazione a grana di riso su quelle 11 maglie,ho provato e mi vengono 4 sezioni di 11 maglie a grana di riso intervallate dal resto delle maglie tutte a 2 a 2 ma così non credo abbia senso. Dopo aver avviato le maglie,dovrei iniziare il ferro sul dritto del lavoro giusto? Può dirmi come dovrebbero essere lavorate sul dritto le 11 maglie di A1? Io ho fatto 2 rov,3d,1r,3dr,2rov ma credo di aver sbagliato, attendo risposta
07.10.2025 - 21:41DROPS Design answered:
Buonasera Daniela, il modello è lavorato in tondo, per cui non c'è diritto e rovescio del lavoro. Il primo giro è: 2 maglie rovescio, 3 maglie diritto, 1 maglia rovescio, 3 maglie diritto, 2 maglie rovescio. Buon lavoro!
09.10.2025 - 23:46
|
||||||||||||||||
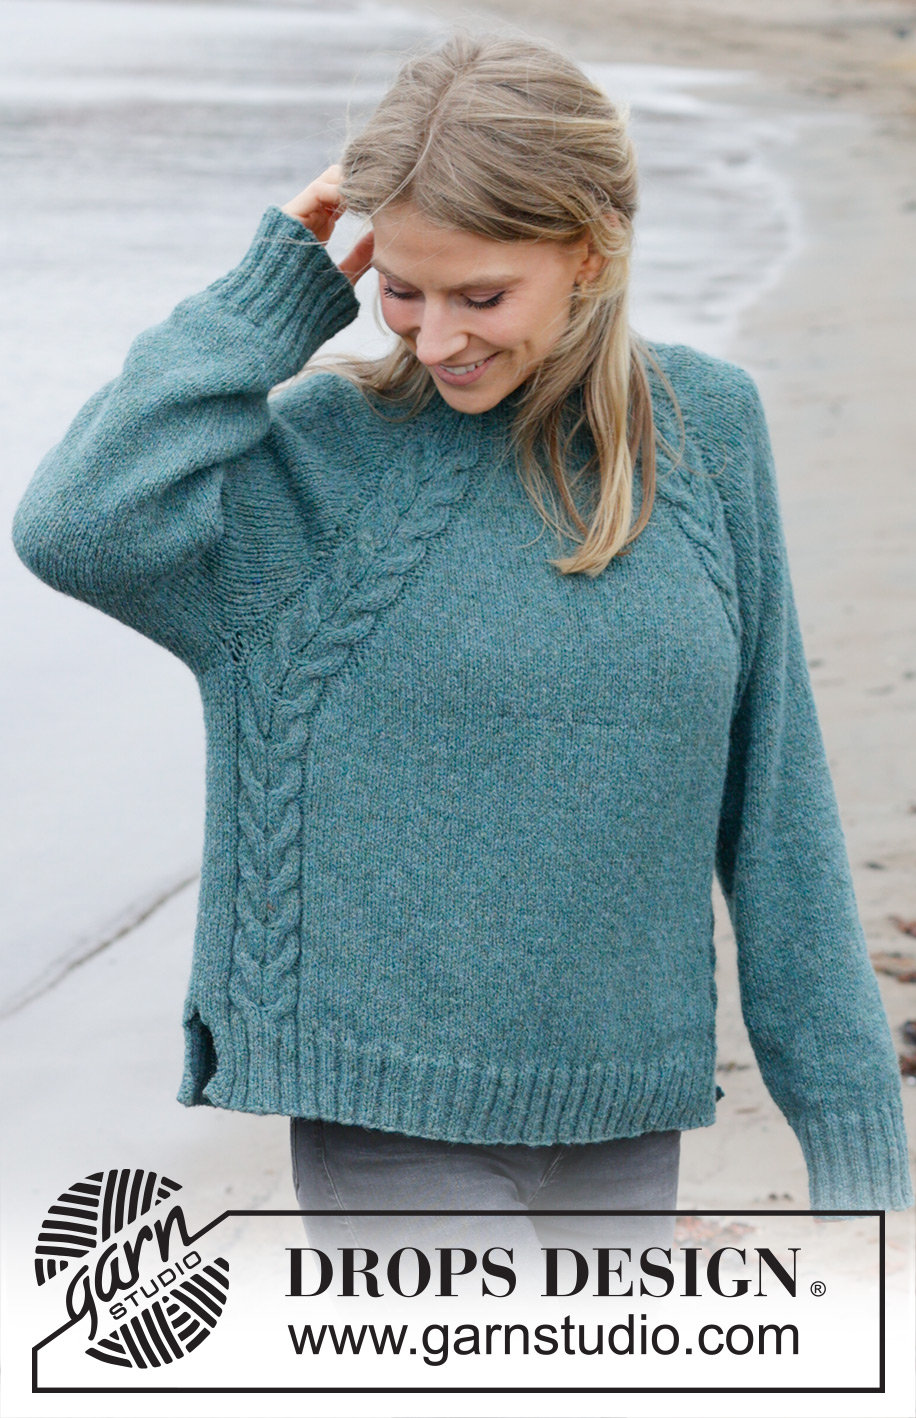
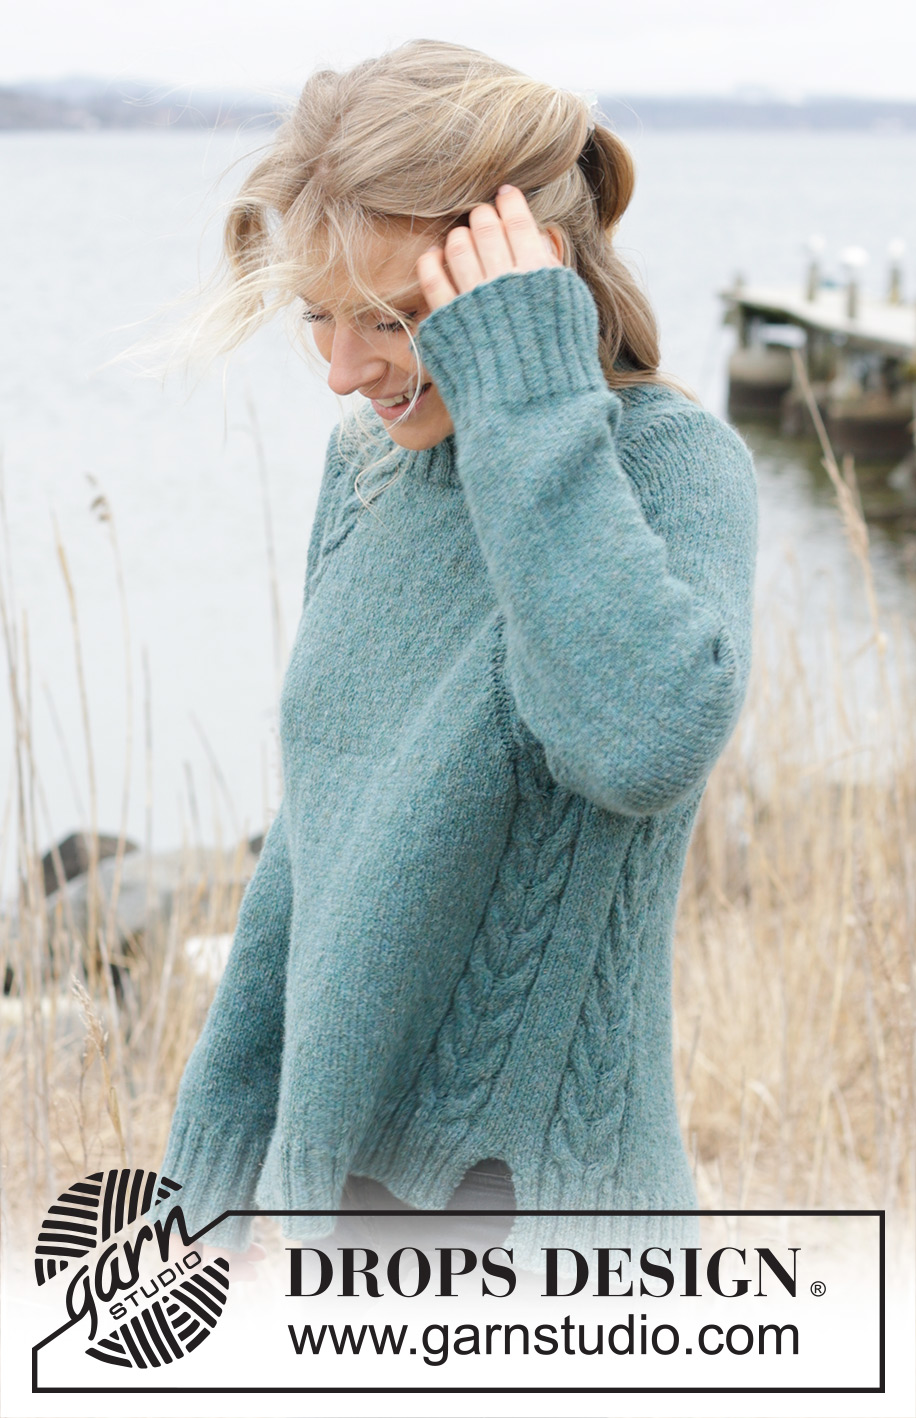
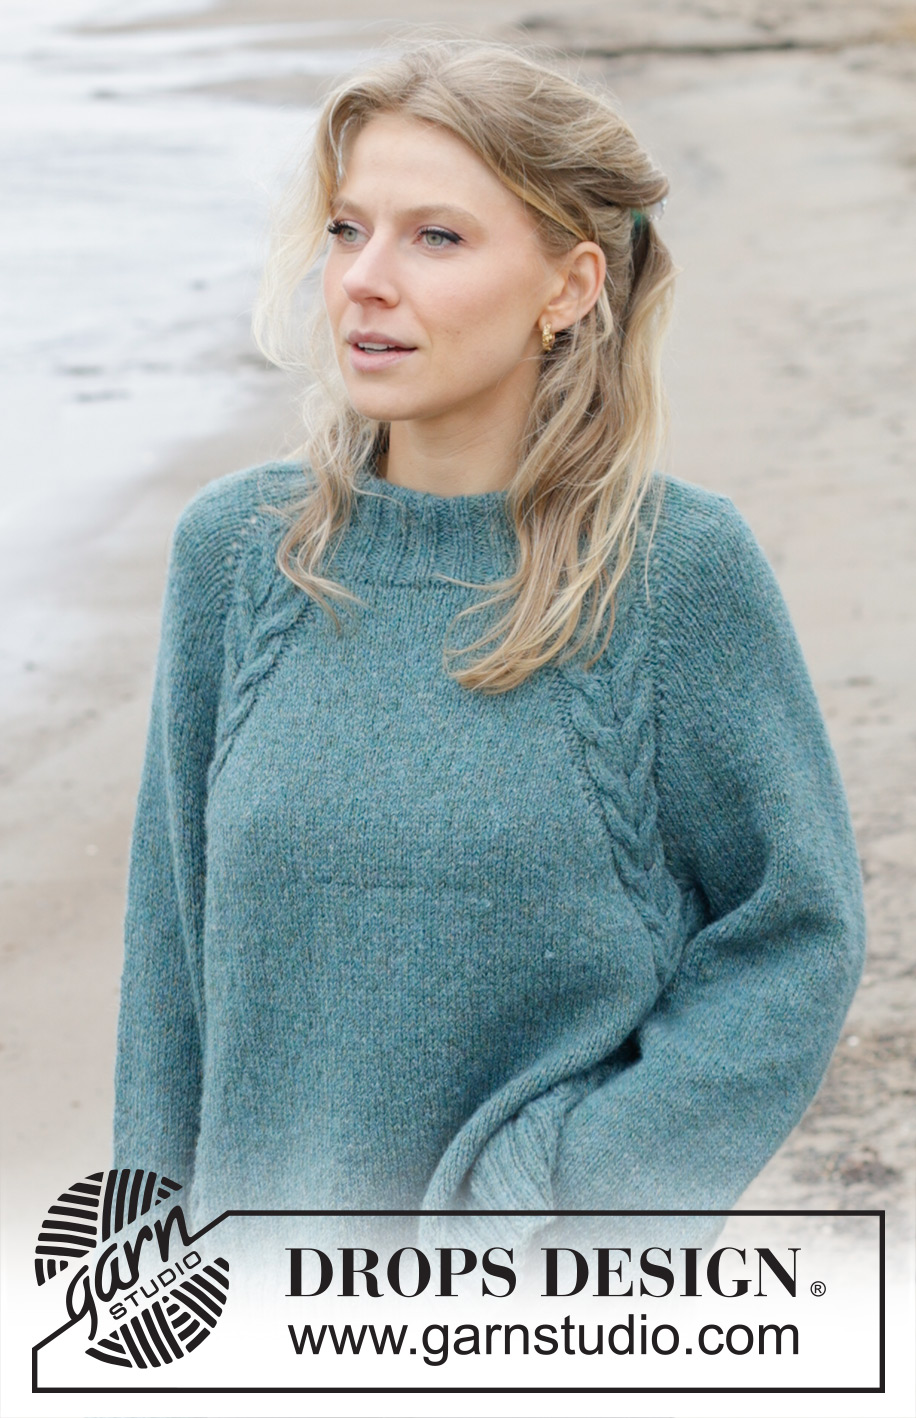
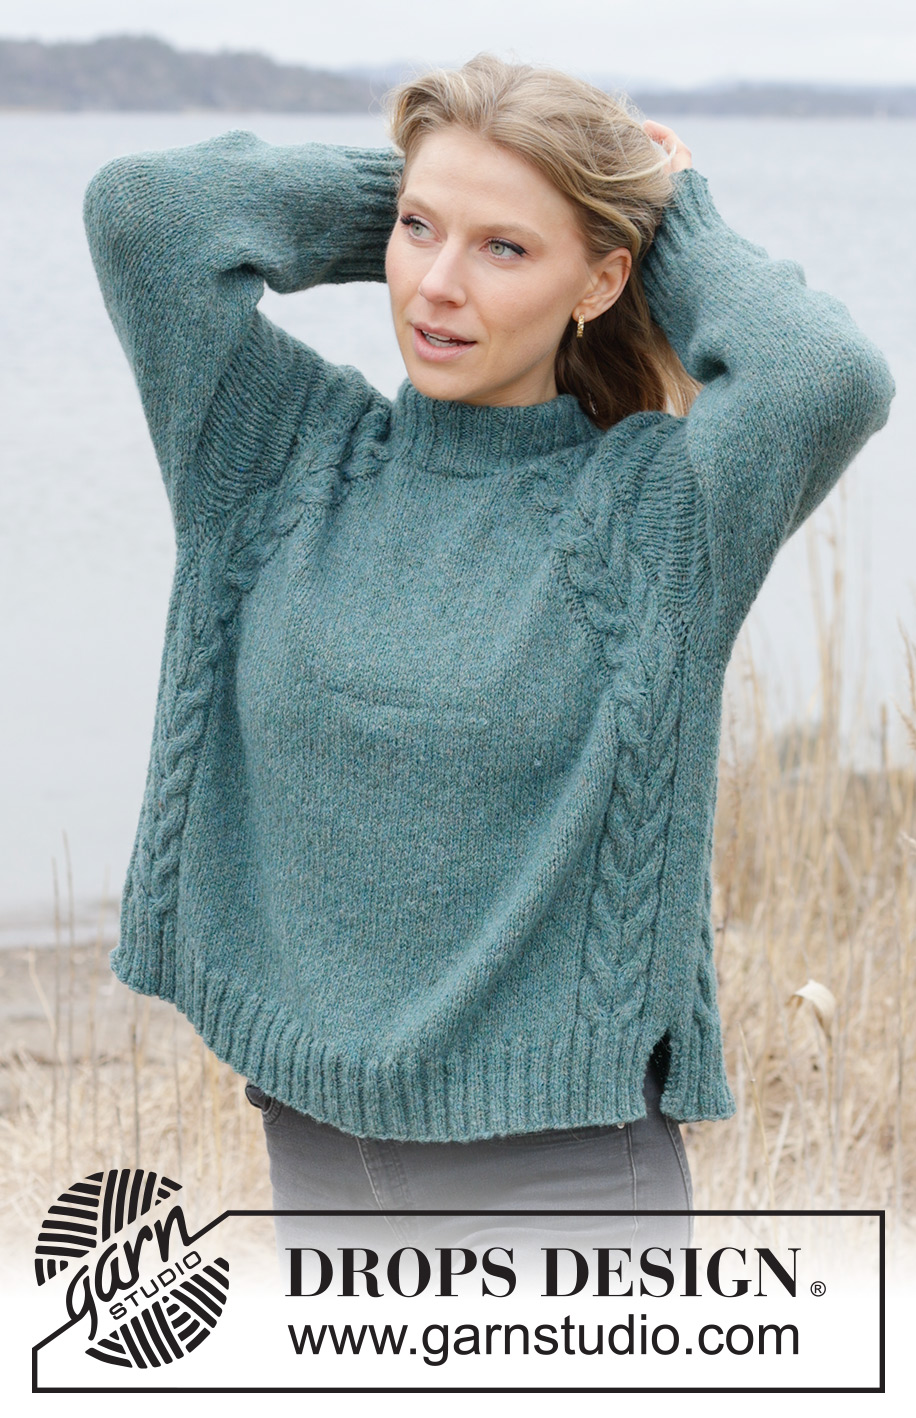
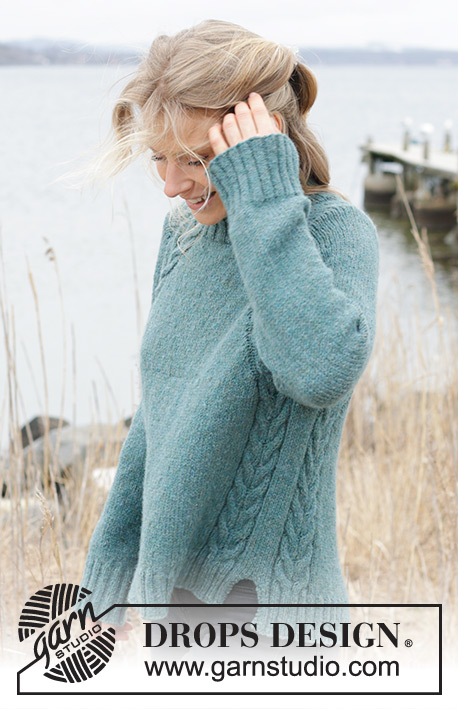
Emerald Lake Sweater#emeraldlakesweater |
||||||||||||||||
 |
 |
|||||||||||||||
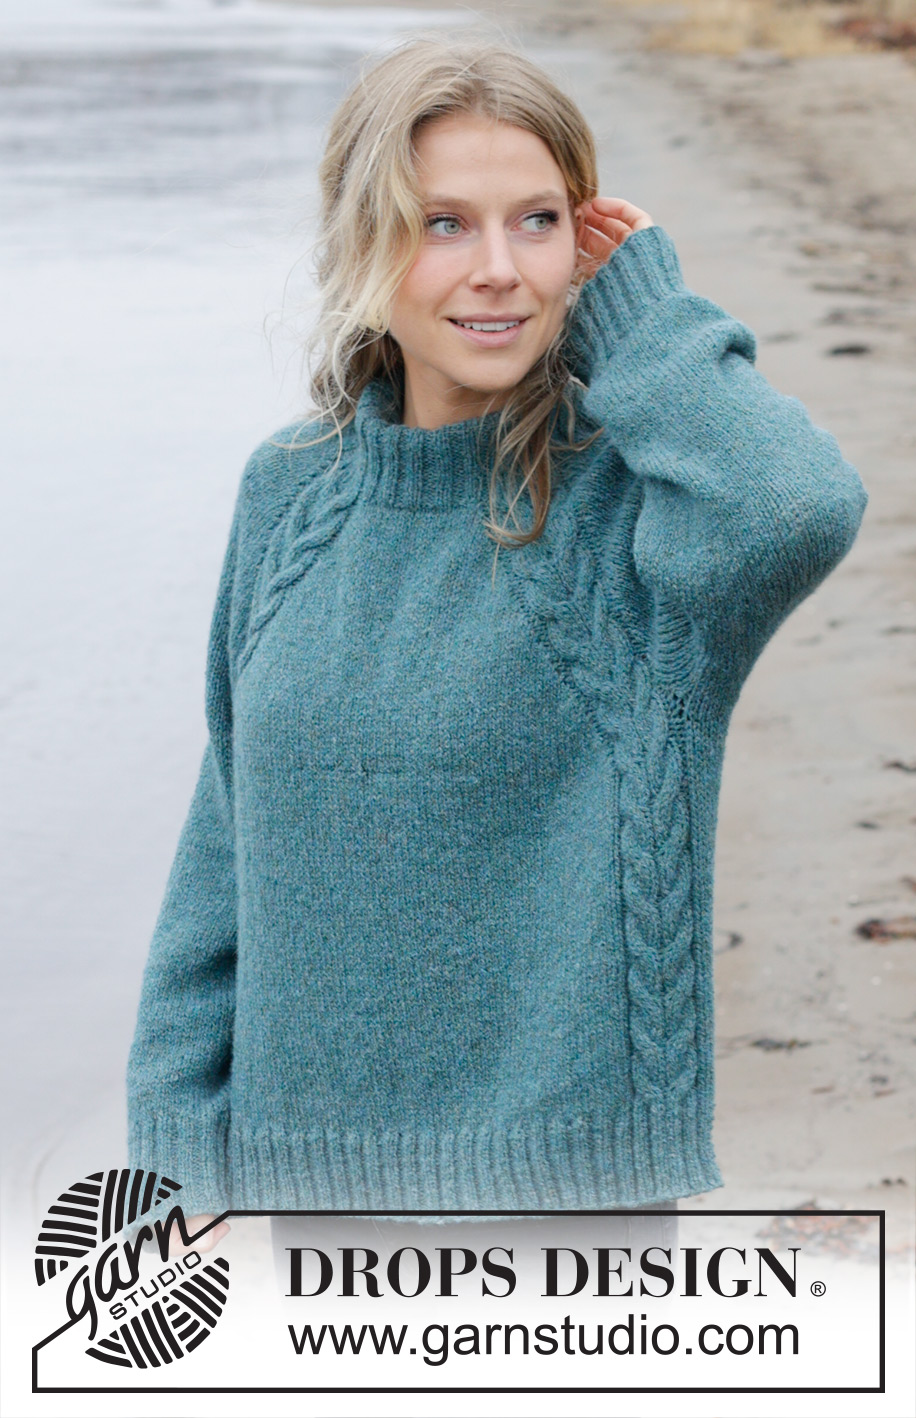
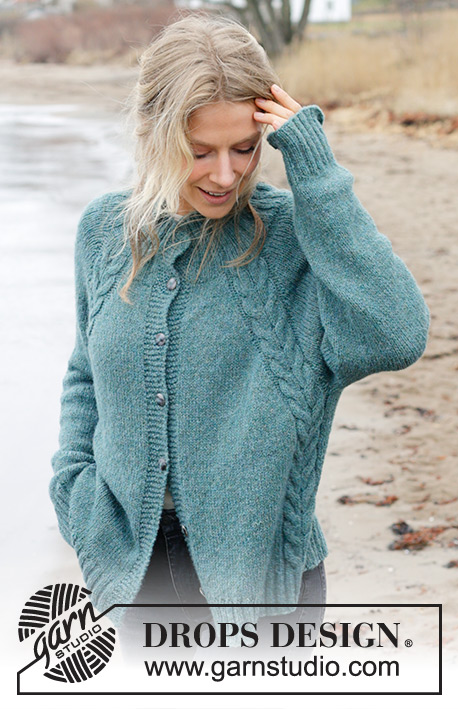
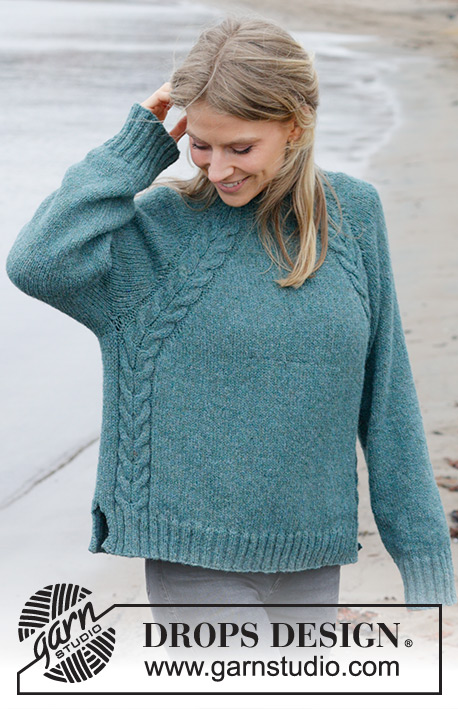
Knitted jumper in DROPS Sky. The piece is worked top down with high neck, raglan, cables and split in sides. Sizes XS - XXL.
DROPS 244-12 |
||||||||||||||||
|
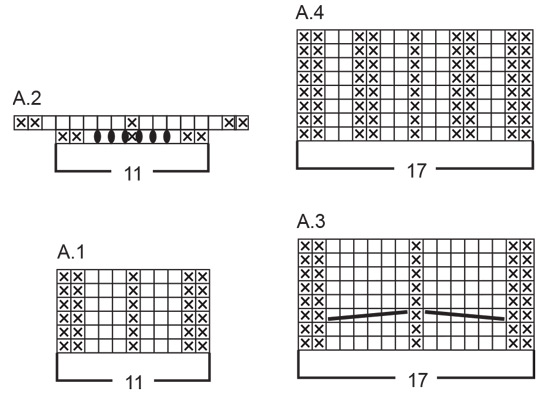
------------------------------------------------------- EXPLANATIONS FOR THE PATTERN: ------------------------------------------------------- GARTER STITCH (worked back and forth): Knit all rows. 1 ridge = knit 2 rows. PATTERN: See diagrams A.1 to A.4. RAGLAN: Increase 1 stitch after/before A.2/A.3. Increase 1 stitch by making 1 yarn over. The yarn overs are then worked as follows on the next round: AFTER A.2/A.3: Knit the yarn over twisted - no hole. BEFORE A.2/A.3: Slip the yarn over knit-wise, insert the left needle and place it back on the left needle twisted, knit the yarn over - no hole. INCREASE TIP: Increase 1 stitch by making 1 yarn over, which is worked twisted on the next row/round to avoid a hole. DECREASE TIP (for sleeves): Decrease 1 stitch on each side of the marker-thread as follows: Work until there are 3 stitches left before the marker-thread, knit 2 together, knit 2 (marker-thread sits between these 2 stitches), slip 1 stitch knit-wise, knit 1 and pass the slipped stitch over the knitted stitch. ------------------------------------------------------- START THE PIECE HERE: ------------------------------------------------------- JUMPER – SHORT OVERVIEW OF THE PIECE: The neck and yoke are worked in the round with circular needle, from the back right shoulder, top down. The yoke is divided for body and sleeves and the body is continued in the round with circular needle as far as the split in each side. Then the front and back pieces are finished back and forth with circular needle, separately. The sleeves are worked in the round with short circular needle/double pointed needles. HIGH NECK: Cast on 116-116-116-124-124-124 stitches with circular needle size 4.5 mm and DROPS Sky. Change to circular needle size 3 mm and work the first round as follows: * knit 2, purl 2 *, work from *-* 4 more times, knit 2, work A.1, * knit 2, purl 2 *, work from *-* 2-2-2-3-3-3 more times, knit 2, A.1, * knit 2, purl 2 *, work from *-* 4 more times, knit 2, work A.1, * knit 2, purl 2 *, work from *-* 2-2-2-3-3-3 more times, knit 2, work A.1. Continue this rib in the round for 10-10-10-11-11-11 cm. YOKE: Change to circular needle size 4.5 mm. Insert 1 marker on the round, which the yoke will be measured from. Work the next round as follows: Increase 1 stitch for RAGLAN – read description above, knit 22 and decrease 2 stitches evenly spaced over these stitches (sleeve), increase 1 stitch for raglan, work A.2 over A.1, increase 1 stitch for raglan, knit 14-14-14-18-18-18 and decrease 2-0-0-2-0-0 stitches evenly spaced (front piece), increase 1 stitch for raglan, work A.2 over A.1, increase 1 stitch for raglan, knit 22 and decrease 2 stitches evenly spaced (sleeve), increase 1 stitch for raglan, work A.2 over A.1, increase 1 stitch for raglan, knit 14-14-14-18-18-18 and decrease 2-0-0-2-0-0 stitches evenly spaced (back piece), increase 1 stitch for raglan, work A.2 over A.1. You have increased 8 stitches for raglan and there are 140-144-144-148-152-152 stitches on the needle. On the next round work stocking stitch (without increasing for raglan) and the last round in A.2 in each transition between the body and sleeves – remember to work the yarn overs as described above. Continue with stocking stitch but now with A.3 over each A.2 in each transition between the body and sleeves. A.3 is repeated in height. REMEMBER THE KNITTING TENSION! In addition, continue to increase for RAGLAN every 2nd round a total of 9-13-16-16-14-10 times (including the increases on the first round after the rib) = 204-240-264-268-256-224 stitches. Continue to increase for raglan every 2nd round but every 2nd increase is only on the front and back pieces, i.e., increase on the front and back pieces every 2nd round and on the sleeves every 4th round (alternately 4 and 8 increased stitches). Increase like this 18-16-16-16-20-28 times on the front and back pieces, 9-8-8-8-10-14 times on the sleeves. The sleeve increases are now finished. In sizes XS, S and M the increases for the front and back pieces are also finished. In sizes L, XL and XXL, increase on the front and back pieces 1 more time. ALL SIZES: There are 312-336-360-368-380-396 stitches and the piece measures approx. 21-22-25-25-27-30 cm from the marker after the neck. Divide for the body and sleeves on the next round as follows: Place the first 56-62-68-68-68-68 stitches on a thread for the sleeve, cast on 8-10-12-16-20-24 stitches (in side under sleeve), work the next 100-106-112-116-122-130 stitches as before (A.3 + 66-72-78-82-88-96 stocking stitches + A.3 = front piece), place the next 56-62-68-68-68-68 stitches on a thread for the sleeve, cast on 8-10-12-16-20-24 stitches in side under sleeve) and work the last 100-106-112-116-122-130 stitches (A.3 + 66-72-78-82-88-96 stocking stitches + A.3 = back piece). The body and sleeves are finished separately. The piece is now measured from here! BODY: = 216-232-248-264-284-308 stitches. Insert 1 marker thread in each side, in the middle of the 8-10-12-16-20-24 stitches cast on under each sleeve. Allow the threads to follow your work onwards – they are used when working the split in each side. Continue in the round with stocking stitch and A.3 (the 8-10-12-16-20-24 cast-on stitches under each sleeve are worked in stocking stitch). When the body measures 22-23-22-24-24-23 cm from the division, and you have either worked 2 or 4 rounds after a cable round in A.3, divide the piece at both marker-threads and finish each piece separately. BACK PIECE: = 108-116-124-132-142-154 stitches. Work 1 row from the wrong side and increase – read INCREASE TIP as follows: Work 1 garter stitch, stocking stitch over the next 3-4-5-7-9-11 stitches and increase 0-3-2-4-2-4 stitches evenly over these stitches, work A.4 over A.3, stocking stitch over the next 66-72-78-82-88-96 stitches and increase 8-10-12-12-14-14 stitches evenly over these stitches, work A.4 over A.3, stocking stitch over the next 3-4-5-7-9-11 stitches and increase 0-3-2-4-2-4 stitches evenly over these stitches, 1 garter stitch = 116-132-140-152-160-176 stitches. Change to circular needle size 3 mm and work as follows from the right side: SIZE XS: 2 garter stitches, knit 2, work A.4, * knit 2, purl 2 *, work from *-* a total of 18 times, knit 2, work A.4, knit 2 and 2 garter stitches. Continue this rib back and forth for 6 cm. Cast off a little loosely. The jumper measures approx. 54 cm from the shoulder. SIZES S, M, L, XL and XXL: 2 garter stitches, * knit 2, purl 2 *, work from *-* a total of 1-1-2-2-3 times, knit 2, work A.4, * knit 2, purl 2 *, work from *-* a total of 20-22-23-25-27 times, knit 2, work A.4, * knit 2, purl 2 *, work from *-* a total of 1-1-2-2-3 times, knit 2 and 2 garter stitches. Continue this rib back and forth for 6 cm. Cast off a little loosely. The jumper measures approx. 54-56-58-60-62-64 cm from the shoulder. FRONT PIECE: Work in the same way as the back piece. SLEEVES: Place the 56-62-68-68-68-68 stitches from the thread on the one side of the piece on short circular needle/double pointed needles size 4.5 mm and knit up 1 stitch in each of the new stitches cast on under the sleeve = 64-72-80-84-88-92 stitches. Insert a marker-thread in the middle of the new stitches under the sleeve. Start at the marker-thread and work stocking stitch in the round. When the sleeve measures 4-4-3-3-2-2 cm, decrease 1 stitch on each side of the marker-thread – read DECREASE TIP. Decrease like this every 8½-4½-3-2½-2½-2 cm a total of 4-7-10-11-12-13 times = 56-58-60-62-64-66 stitches. Continue working until the sleeve measures 35-35-33-33-32-30 cm from the division. Knit 1 round and increase 12-14-16-18-16-18 stitches evenly spaced – remember INCREASE TIP = 68-72-76-80-80-84 stitches. Change to double pointed needles size 3 mm and work rib (knit 2, purl 2) for 8 cm. Cast off a little loosely. The sleeve measures approx. 43-43-41-41-40-38 cm from the division. Work the other sleeve in the same way. ASSEMBLY: If you want a double neck, fold the neck to the inside and fasten with a couple of stitches in each raglan-line. |
||||||||||||||||
Diagram explanations |
||||||||||||||||
|
||||||||||||||||
 |
||||||||||||||||
 |
||||||||||||||||
Have you finished this pattern?Tag your pictures with #dropspattern #emeraldlakesweater or submit them to the #dropsfan gallery. Do you need help with this pattern?You'll find 32 tutorial videos, a Comments/Questions area and more by visiting the pattern on garnstudio.com. © 1982-2026 DROPS Design A/S. We reserve all rights. This document, including all its sub-sections, has copyrights. Read more about what you can do with our patterns at the bottom of each pattern on our site. |
||||||||||||||||


With over 40 years in knitting and crochet design, DROPS Design offers one of the most extensive collections of free patterns on the internet - translated to 17 languages. As of today we count 324 catalogues and 12290 patterns translated into English (UK/cm). 12290
We work hard to bring you the best knitting and crochet have to offer, inspiration and advice as well as great quality yarns at incredible prices! Would you like to use our patterns for other than personal use? You can read what you are allowed to do in the Copyright text at the bottom of all our patterns. Happy crafting!
Post a comment to pattern DROPS 244-12
We would love to hear what you have to say about this pattern!
If you want to leave a question, please make sure you select the correct category in the form below, to speed up the answering process. Required fields are marked *.