
Popular categories
Looking for a yarn?


Comments / Questions (100)
![]() Anne-Lise Hansen wrote:
Anne-Lise Hansen wrote:
Kan ikke få maske tallet til at passe Strikker str L 74 m - 10 m= 64 m Tager ud 10 × 8 m = 80 m 64 m+ 80 m= 144 m Der står at jeg skal have 160 m Har jeg lavet noget galt
17.02.2026 - 11:11DROPS Design answered:
Hei Anne-Lise. Du har 74 masker. Når du starter består A.2 / A.3 av 2 masker, men når disse diagrammene er strikket 1 gang i høyden består A.2/A.3 av 8 masker og man har da 88 masker på pinnen. Deretter skal A.2a / A.3b strikkes 9 ganger til (totalt 10 ganger) og det økes med 2 masker hver gang A.2 / A.3 strikkes = 8 økte masker x 9 ganger = 72 masker + de 88 maskene man hadde etter å ha strikket A.2 / A.3 1. gang i høyden = 160 masker. mvh DROPS Design
23.02.2026 - 15:04
![]() Katja Vandsted wrote:
Katja Vandsted wrote:
Kan du fortælle mig hvorfor det ser ud som om A2 udtagninger gå den forkerte vej . Jeg kan sende billede hvis behov.
14.12.2025 - 18:39DROPS Design answered:
Hei Katja. Til denne vesten er det laget flere hjelpevideoer. Ta en titt på disse og sammenlign med plagget du strikker og se hva som blir feil hos deg. Evnt kan du ta med deg plagget til en butikk som selger DROPS garn og få en forklaring når du viser frem plagget (dessverre ingen mulighet å sende / legge til bilde under Spørsmål). mvh DROPS Design
15.12.2025 - 13:52
![]() Marit wrote:
Marit wrote:
Rareste mønster jeg har vært borti...krøkkete å forstå.🤔
11.11.2025 - 21:13
![]() Rhoda wrote:
Rhoda wrote:
Hallo, According to the instructions , the pattern states to ``repeat A.2a and A.3a vertically, i.e. continue increases every 6th round, work the increased stitches in English rib.`` I don't understand by every 6th round, how? Elaborate please
01.10.2025 - 21:05DROPS Design answered:
Hi Rhoda. Take a look at the tutorial videos for this vest, perhaps you will understand it better. mvh DROPS Design
13.10.2025 - 14:48
![]() Birthe Dannerfjord wrote:
Birthe Dannerfjord wrote:
Jeg vil gerne bestille lysegrå garn 250 gram til denne vest: Drops 217-13 Har lidt svært ved at få det rigtige garn. ønsker hjælp Mvh Birthe Dannerfjord
25.06.2025 - 18:49DROPS Design answered:
Hej Birthe, du klikker bare på Bestil-knappen inde på selve opskriften, så kommer du ind til Yarnliving som tager sig af din bestilling :)
26.06.2025 - 14:54
![]() Birthe Roed wrote:
Birthe Roed wrote:
Kan jeg købe garnet her
18.06.2025 - 21:09DROPS Design answered:
Hei Birthe. Du kan klikke på Bestill på ønsket garn/farge på vår nettsiden, men blir omdirigert til en buttikk som selger våre kvaliteter. Det vil da stå fra hvilken butikke du kjøper i fra. Eller du kan klikke på Fin en butik! og velg den butikken du selv ønsker. mvh DROPS Design
23.06.2025 - 10:39
![]() Cecilie Bak wrote:
Cecilie Bak wrote:
Hej, Jeg strikker en str xl, og der står at jeg skal strikke A1a x 8, A2a, A1a x 14, A3a, A1a x 14, A2a, A1a x 14, A3a, A1a x 8. Der jeg er forvirret over, er det antal gange jeg skal lave A1a mellem A2a og A3a, for hver gang jeg har lavet A2a og A3a i højden, er der jo kommet flere masker på pinden så den ovenstående strikkesekvens nu ikke længere går op. Skal man øge antallet af gange man strikker A1a før, mellem og efter A2a og A3a? Og med hvor meget?
10.05.2025 - 00:58DROPS Design answered:
Hej Cecilie, jo det er de samme 2 masker du strikker hele vejen, og da du altid tager 2 masker ud, så vil det også altid gå op med de 2 masker du har i A.1a :) Har du set alle de videoer vi har til just denne model. De viser nøjagtig hvordan du tager ud og hvordan du strikker de nye masker :)
20.05.2025 - 13:47
![]() Heather A Watson wrote:
Heather A Watson wrote:
Struggling to understand pattern as I know this stitch as fisherman's rib and achieve by knitting one stitch below on every knit stitch on every row. I cannot understand exactly how to achieve the increases in yoke using what I find a simpler way to achieve same resulting pattern. As I find following charts more difficult than written instructions is it possible to have this lovely garment pattern done in writing?
10.02.2025 - 13:28DROPS Design answered:
Dear Heather, we don't make custom patterns, our patterns are made of the written instructions and, sometimes, charts, which often help visualize the pattern better. The charts follow the English rib, which is almost the same visually as fisherman's rib but is worked slightly different (as seen in this video). You can read more on these two types of brioche patterns in this lesson. Happy knitting!
17.02.2025 - 00:07
![]() Ella wrote:
Ella wrote:
Waar maak ik een rekenfout? Als ik 12x a2+a3 in de hoogte gedaan heb, heb ik 12x8 = 96 steken gemeerderd. Als ik daar 68 waar je mee begint bij op tel kom ik op 164 steken. Volgens het patroon zouden het er 180 moeten zijn.
02.02.2025 - 12:03DROPS Design answered:
Dag Ella,
Je hebt ook al 16 steken gemeerderd in totaal door het eerste deel van A.2 en A.3 te breien, hiermee kom je in totaal precies op 180 steken.
05.02.2025 - 20:16
![]() Ella wrote:
Ella wrote:
Ik ben bezig deze te maken in maat xxl. Nu heb ik bijna de hals klaar met 68 steken volgens beschrijving. Wanneer ik alle steken voor de het starten met de pas optel kom ik echter op 70 uit (8+2+14+2+16+2+14+2+8). Waar komen die 2extra steken vandaan? Hoe kan ik ze er extra tussen krijgen?
22.01.2025 - 17:34DROPS Design answered:
Dag Ella,
Het zijn er echt 68, ik heb het twee keer nageteld. Ook als je de getallen in jouw post optelt kom je op 68.
22.01.2025 - 21:36
|
||||||||||||||||||||||||||||
Easy Over#easyovervest |
||||||||||||||||||||||||||||
 |
 |
|||||||||||||||||||||||||||
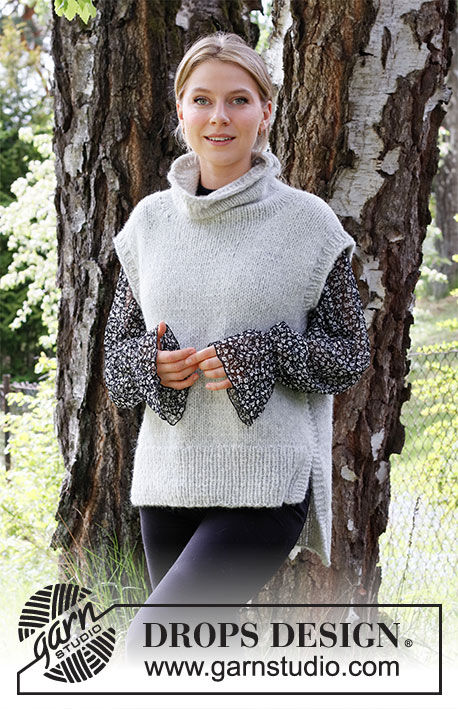
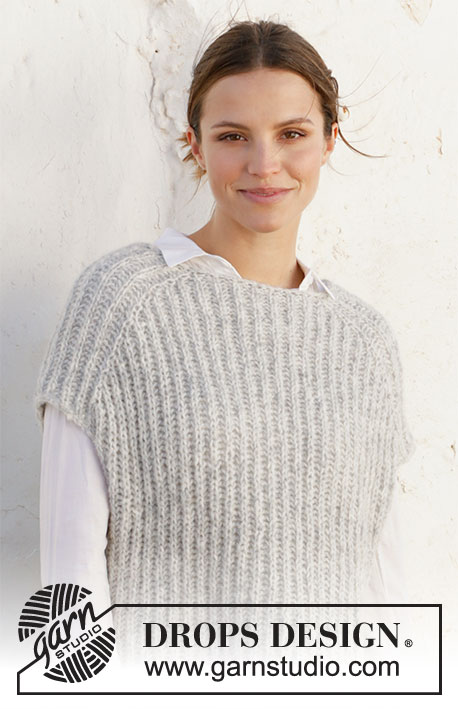
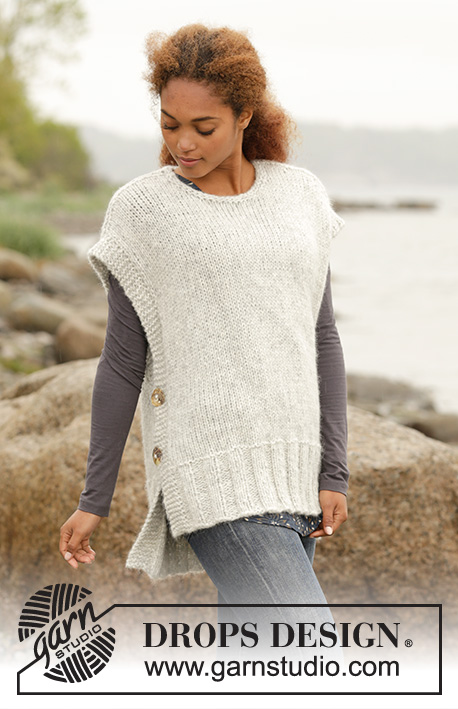
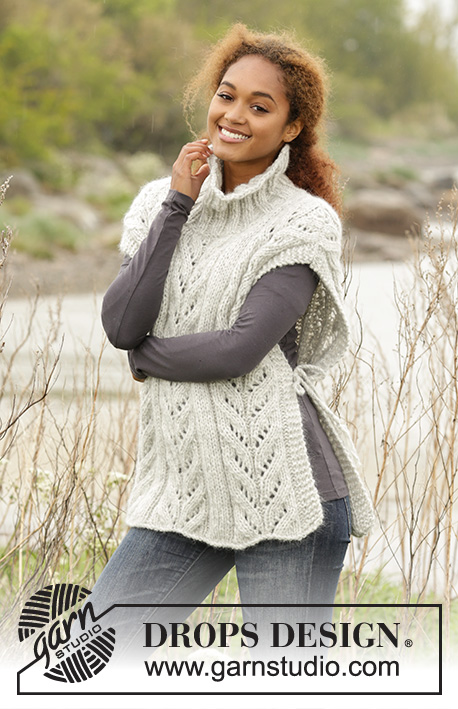
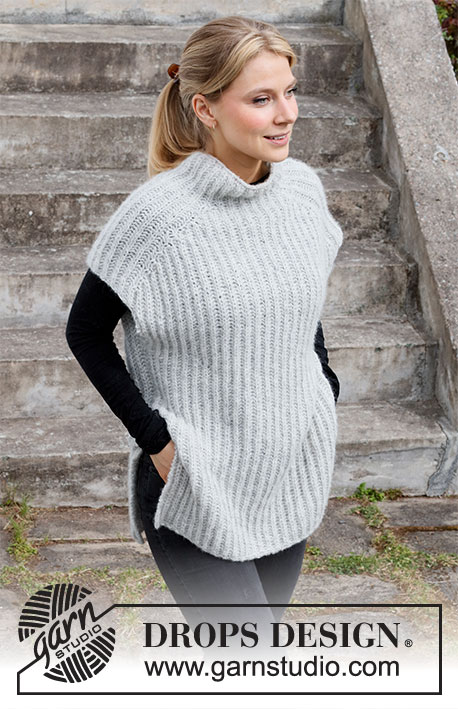
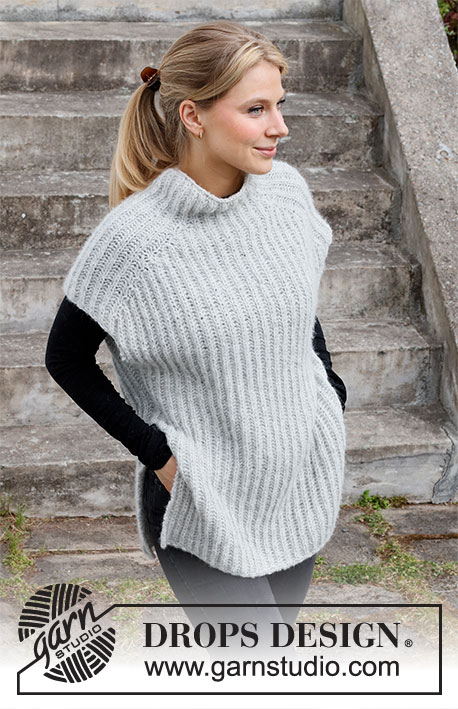
Knitted vest with English rib in DROPS Air. Worked top down. Size: XS - XXL
DROPS 217-13 |
||||||||||||||||||||||||||||
|
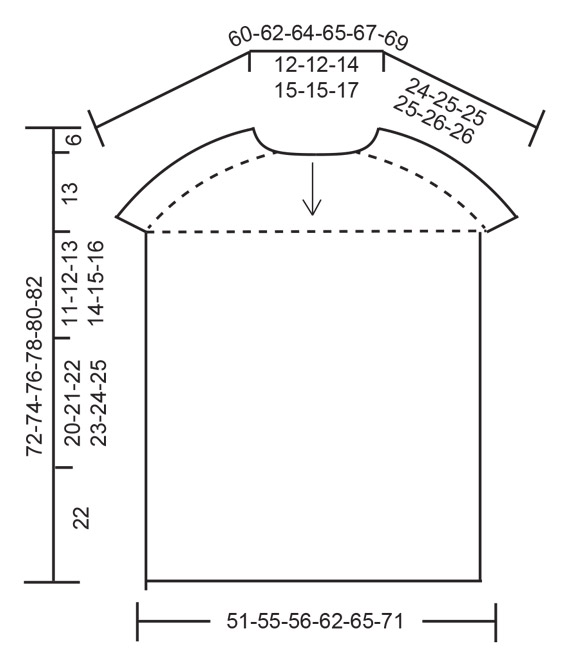
------------------------------------------------------- EXPLANATION FOR THE PATTERN: ------------------------------------------------------- GARTER STITCH (back and forth): Knit all rows. 1 ridge vertically = knit 2 rows. PATTERN: See diagrams A.1 to A.4 (worked in English rib). DECREASE TIP (evenly): To calculate how to decrease evenly, use the total number of stitches on round (e.g. 62 stitches) and divide stitches by number of decreases to be done (e.g. 10) = 6.2. In this example decrease by purling approx. every 5th and 6th stitch together. ------------------------------------------------------- START THE PIECE HERE: ------------------------------------------------------- VEST - SHORT OVERVIEW OF THE PIECE: Work neck edge and yoke in the round on circular needle from mid back, top down. Increase stitches for shoulder on yoke before dividing the piece, and work front and back piece separately until finished measurements. NECK EDGE: Cast on 66-66-70-74-74-78 stitches on circular needle size 6 mm = US 10 with Air. Purl 1 round and decrease 10 stitches evenly – read DECREASE TIP = 56-56-60-64-64-68 stitches. Switch to circular needle size 7 mm = US 10,75. Work A.1 over all stitches. Continue until piece measures 9 cm = 3½". YOKE: Work pattern as follows: Work A.1 (= 2 stitches) over the first 6-6-6-8-8-8 stitches (= half back piece), A.2 (= 2 stitches), A.1 over 14 stitches, A.3 (= 2 stitches) (= shoulder), A.1 over 10-10-12-14-14-16 stitches (= front piece), A.2 over 2 stitches, A.1 over 14 stitches, A.3 over 2 stitches (= shoulder), and A.1 over the last 4-4-6-6-6-8 stitches (= half back piece). REMEMBER THE KNITTING GAUGE! When A.1 has been worked 1 time vertically, repeat A.1a vertically. When 2 and A.3 have been worked 1 time vertically, repeat A.2a and A.3a vertically, i.e. continue increases every 6th round, work the increased stitches in English rib. When A.2 and A.3a have been worked 8-9-9-10-11-12 times vertically in total, there are 136-144-148-160-168-180 stitches on needle. Work A.1a over all stitches until piece measures 24-25-25-25-26-26 cm = 9½"-9¾"-9¾"-9¾"-10¼"-10¼" on the longest (i.e. measured along the shoulder), adjust so that next round is a purl round. Now divide piece into front and back piece and bind off shoulder stitches as follows: Work 26-28-28-32-34-36 stitches in English rib, 1 stitch in GARTER STITCH – read explanation above (= half back piece), bind off the next 15 stitches (bind off yarn overs as separate stitches), 1 stitch in garter stitch, work 51-55-57-63-67-73 stitches in English rib, 1 stitch in garter stitch (= front piece), bind off the next 15 stitches (bind off yarn overs as separate stitches), 1 stitch in garter stitch and work English rib over the last 25-27-29-31-33-37 stitches (= half back piece). Cut the yarn. Let the stitches on front piece sit on needle. BACK PIECE: = 53-57-59-65-69-75 stitches. Work as follows from right side: Work 1 stitch in garter stitch, A.4 (= 2 stitches) until 1 stitch remains (i.e. English rib begins and ends with 1 purl English rib stitch), and finish with 1 stitch in garter stitch. Continue pattern back and forth. When piece measures 11-12-13-14-15-16 cm = 4⅜"-4¾"-5⅛"-5½"-6"-6¼" from division, insert 1 marker in each side, use this for side seam later. When piece measures 66-68-70-72-74-76 cm = 26"-26⅜"-27½"-29⅛"-29⅛"-30" from the neck, bind off by knitting, bind off yarn overs as separate stitches (this is done to avoid a tight bind-off edge). FRONT PIECE: Work the 53-57-59-65-69-75 stitches on front piece as on back piece. ASSEMBLY: Begin at the marker in the side and sew back and front piece together from marker and approx. 20-21-22-23-24-25 cm = 8"-8¼"-8¾"-9"-9½"-9¾" downwards. Bottom 22 cm = 8¾" = vent. |
||||||||||||||||||||||||||||
Diagram explanations |
||||||||||||||||||||||||||||
|
||||||||||||||||||||||||||||
 |
||||||||||||||||||||||||||||
 |
||||||||||||||||||||||||||||
Have you finished this pattern?Tag your pictures with #dropspattern #easyovervest or submit them to the #dropsfan gallery. Do you need help with this pattern?You'll find 17 tutorial videos, a Comments/Questions area and more by visiting the pattern on garnstudio.com. © 1982-2026 DROPS Design A/S. We reserve all rights. This document, including all its sub-sections, has copyrights. Read more about what you can do with our patterns at the bottom of each pattern on our site. |
||||||||||||||||||||||||||||


With over 40 years in knitting and crochet design, DROPS Design offers one of the most extensive collections of free patterns on the internet - translated to 17 languages. As of today we count 324 catalogs and 12290 patterns - 12280 of which are translated into English (US/in).
We work hard to bring you the best knitting and crochet have to offer, inspiration and advice as well as great quality yarns at incredible prices! Would you like to use our patterns for other than personal use? You can read what you are allowed to do in the Copyright text at the bottom of all our patterns. Happy crafting!
Post a comment to pattern DROPS 217-13
We would love to hear what you have to say about this pattern!
If you want to leave a question, please make sure you select the correct category in the form below, to speed up the answering process. Required fields are marked *.