
Popular categories
Looking for a yarn?


Comments / Questions (12)
![]() Sabine wrote:
Sabine wrote:
Für z.B. einen Waschhandschuh kann dieses Muster problemlos in RUNDEN gestrickt werden, indem man die Rückreihen (2. und 4. Reihe) mit linken Maschen strickt - dabei ist auch die Schlinge, die um die Masche liegt, viel leichter zu erkennen und auf die linke Nadel zu nehmen. Ein Muster, das leicht von der Hand geht!
19.09.2025 - 12:49
![]() Sabine wrote:
Sabine wrote:
Sie können oben unter dem Produktnamen "VIDEOS" anklicken, dort sehen Sie, wie das Waffelmuster zu stricken ist.
19.09.2025 - 09:38
![]() Anne wrote:
Anne wrote:
Jeg fatter ikke diagrammet - i hvilket hjørne starter man?
11.09.2025 - 12:24
![]() Sabine wrote:
Sabine wrote:
Diese Aussage ich nicht richtig, oder? "Bei einer Länge von ca. 22 cm – daran angepasst, dass die 2. Reihe von A.1 gestrickt wurde - die nächste Reihe (= Rück-Reihe) ..." Denn die 2. Reihe ist doch die Rückreihe, es ist doch somit nach der 1. Reihe (oder auch nach der 3. Reihe) zum Abschluss des Musters eine Reihe links zu stricken, oder? Dank vorab!
28.03.2025 - 19:03DROPS Design answered:
Liebe Sabine, diese Reihe ist eine Rückreihe, dh wie alle andere Rück-Reihe stricken, bei der nächsten Hin-Reihe 9 Maschen regelmäßig verteilt stricken und dann 3 Reihen rechts stricken. Viel Spaß beim Stricken!
31.03.2025 - 07:41
![]() Elisabeth Skjørvold Jæger wrote:
Elisabeth Skjørvold Jæger wrote:
Når skal man avslutte mønsteret før riller og økning? Er det etter 2. pinne i mønsteret eller etter A1? Mistenker det skulle vært etter 2.pinne og på retten. Fikk en kant med rettmaske istedenfor riller. Ser rart ut.
24.02.2025 - 14:14DROPS Design answered:
Hej Elisabeth, når du har strikket den sidste pind fra vrangen ifølge opskriften, strikker du 1 pind fra retsiden hvor du øker 9 masker, efter det strikker du 3 pinde ret, så du får ialt 2 riller :)
05.03.2025 - 14:16
![]() Elisabeth Skjørvold Jæger wrote:
Elisabeth Skjørvold Jæger wrote:
Jeg har nå strikket denne kluten og jeg tror det er en feil i mønsteret. Det er veldig kronglete skrevet om hvordan man skal avslutte. Er det etter 2. pinne i mønsteret eller etter A1? Mistenker det skulle vært etter 2.pinne og på retten. Fikk en kant med rettmaske istedenfor riller. Ser rart ut.
23.02.2025 - 00:46DROPS Design answered:
Hei Elisabeth, Du skal felle løst av med rett, etter 3 pinner rett (+ 1 pinne rett hvor du øker 9 masker) = 2 riller. God fornøyelse!
24.02.2025 - 07:02
![]() Gunvor wrote:
Gunvor wrote:
Mønsteret funker ikke, jeg skjønner ikke forklaringen
30.01.2025 - 22:09
![]() Chris Bassett wrote:
Chris Bassett wrote:
Thank you Mrs Roberts, I wasn't at all sure either, and having watch the video I would not have got it right.
14.11.2024 - 19:42
![]() Sharon Roberts wrote:
Sharon Roberts wrote:
I dont understand "knit 1 in stitch from previous row then drop the stitch from the left needle " or " lift the loop which lies around the stitch and knit it together with the stitch on the needle". Please tell me what these stitches are called . Ie( K1B) knit one below.
15.05.2024 - 02:01DROPS Design answered:
Dear Mrs Roberts, in this video we show how to work such a pattern like diagram A.1, note that the diagram in this pattern are the rows 2 to 5 in the video. Happy knitting!
15.05.2024 - 07:42
![]() Barbara wrote:
Barbara wrote:
Wenn ich diesen clean&Colourful spüllappen mit weniger Maschen stricken möchte nehm ich dann auch nach den Rippen 9Maschen verteilt auf und am Schluss wieder ab? Oder wären es dann weniger? Mir ist der Lappen zu gross in Originalgarn und Anschlag🙈 oder wieso macht man diese Zu und Abnahmen?
04.02.2021 - 18:46DROPS Design answered:
Liebe Barbara, es wird zuerst abgenommen dann man braucht weniger Maschen im Muster als für die Krausrippe, am besten stricken Sie eine Maschenprobe und messen Sie wieviele Maschen Sie brauchen, dann können Sie kalkulieren wieviele Sie anschlagen sollen und dann abnehmen sollen. Ihr DROPS Laden wird Ihnen gerne damit helfen - auch telefonisch oder per E-Mail. Viel Spaß beim stricken!
05.02.2021 - 08:06
|
|||||||||||||
Clean & Colourful#dropscleanandcolourful |
|||||||||||||
 |
 |
||||||||||||
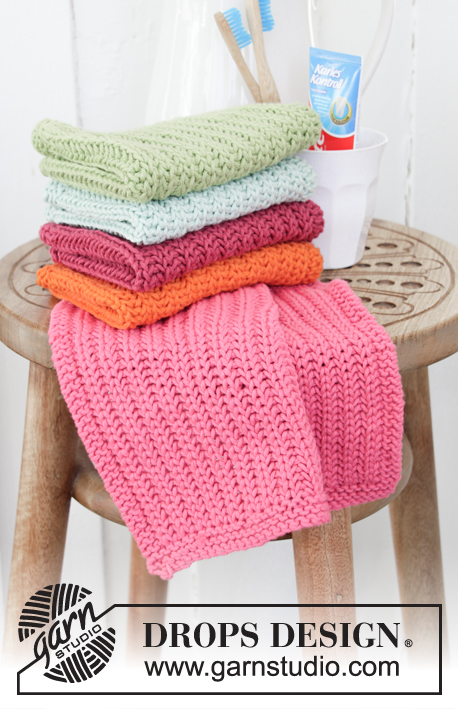
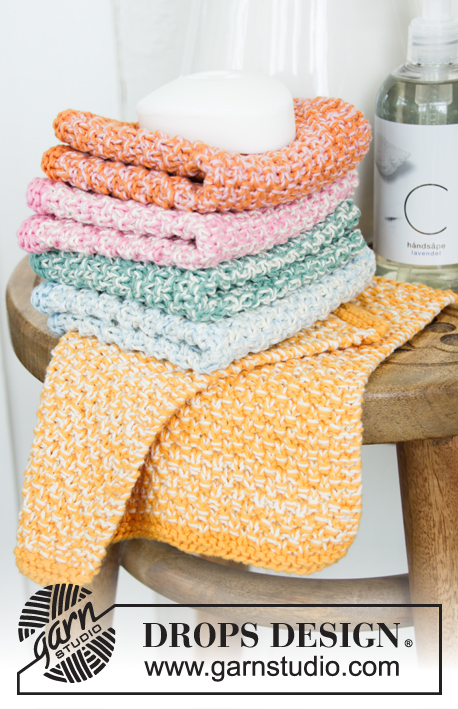
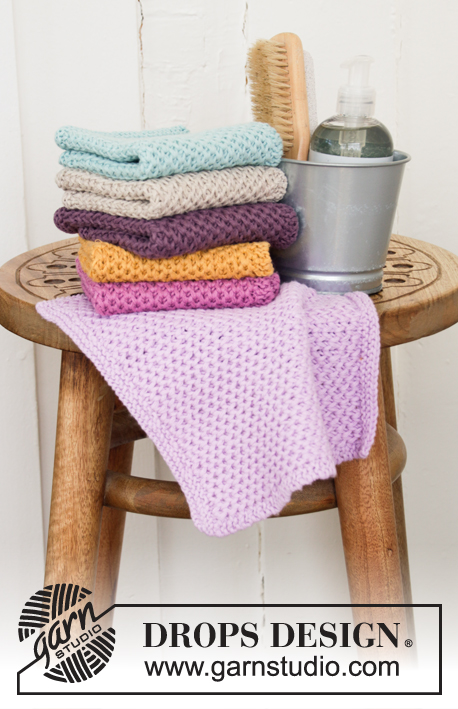
Knitted cloths in DROPS Cotton Light. The piece is worked with waffle pattern.
DROPS 198-36 |
|||||||||||||
|
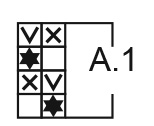
------------------------------------------------------- EXPLANATIONS FOR THE PATTERN: ------------------------------------------------------- DECREASE/INCREASE TIP (evenly spaced): To work out how to decrease/increase evenly, count the total number of stitches on needle (e.g. 53 stitches) and divide these stitches by number of decreases/increases to be made (e.g. 9) = 5.9. In this example, decrease by working each 5th and 6th stitch together. When increasing, make 1 yarn over after each 6th stitch. On the next row work the yarn overs twisted to avoid holes RIDGE/GARTER STITCH (worked back and forth): Knit all rows. 1 ridge in height = Knit 2 rows. PATTERN: See diagram A.1. First row = right side. ------------------------------------------------------- START THE PIECE HERE: ------------------------------------------------------- CLOTHS – SHORT OVERVIEW OF THE PIECE: The piece is worked back and forth. You work a total of 6 cloths; 1 cloth in each color. CLOTH: Cast on 53 stitches with needle size 3 mm = US 2,5 and Cotton Light. Work 1 RIDGE – read description above, then knit 1 row where you decrease 9 stitches evenly spaced – read DECREASE/INCREASE TIP = 44 stitches. Knit 1 row from the wrong side. Then work waffle pattern as follows – from the right side: Work 2 stitches in garter stitch, repeat A.1 until there are 2 stitches left on row (= 20 repeats of 2 stitches) and finish with 2 stitches in garter stitch. Repeat A.1 upwards – REMEMBER THE KNITTING GAUGE! When the piece measures approx. 22 cm = 8¾" – adjust to after a row 2 in A.1, work the next row as follows (= wrong side): 2 stitches in garter stitch, * purl 1, lift the loop which lies around the stitch and purl it together with the stitch on the needle *, work from *-* until there are 2 stitches left on row and finish with 2 stitches in garter stitch. Then knit 1 row where you increase 9 stitches evenly spaced = 53 stitches. Knit 3 rows and loosely bind off. |
|||||||||||||
Diagram explanations |
|||||||||||||
|
|||||||||||||
 |
|||||||||||||
Have you finished this pattern?Tag your pictures with #dropspattern #dropscleanandcolourful or submit them to the #dropsfan gallery. Do you need help with this pattern?You'll find 13 tutorial videos, a Comments/Questions area and more by visiting the pattern on garnstudio.com. © 1982-2026 DROPS Design A/S. We reserve all rights. This document, including all its sub-sections, has copyrights. Read more about what you can do with our patterns at the bottom of each pattern on our site. |
|||||||||||||


With over 40 years in knitting and crochet design, DROPS Design offers one of the most extensive collections of free patterns on the internet - translated to 17 languages. As of today we count 324 catalogs and 12290 patterns - 12280 of which are translated into English (US/in).
We work hard to bring you the best knitting and crochet have to offer, inspiration and advice as well as great quality yarns at incredible prices! Would you like to use our patterns for other than personal use? You can read what you are allowed to do in the Copyright text at the bottom of all our patterns. Happy crafting!
Post a comment to pattern DROPS 198-36
We would love to hear what you have to say about this pattern!
If you want to leave a question, please make sure you select the correct category in the form below, to speed up the answering process. Required fields are marked *.