
Popular categories
Looking for a yarn?


Comments / Questions (20)
![]() Sonia Gomez wrote:
Sonia Gomez wrote:
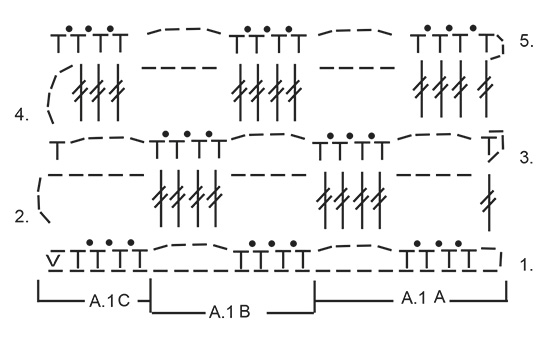
Hola. No entiendo en diagrama. Los signos que están encima de los puntos bajos, que significan 3 cadenetas, serian la segunda vuelta. Por lo tanto como enlazo con la siguiente vuelta, la que en el esquema lleva el numero \"2\"? Porque como yo lo entiendo empezaría al otro lado de la labor.
06.06.2018 - 12:53
![]() Ulla Rørstrøm wrote:
Ulla Rørstrøm wrote:
Hækling af stk to, start 😕
06.05.2018 - 22:21
![]() Sarah wrote:
Sarah wrote:
Jeg fik ikke rigtig det svar jeg ønskede, synes jeg. Jeg ved godt den første linje er luftmaskerækken, men hvis I ser under hvad de forskellige tegn betyder, så er det udelukkede luft og kædemasker. Jeg læser det som, at jeg skal starte med en luftmaske, fortsætte med en luftmaske, endnu en lm, 3 lm, 1 lm og 3 lm. Der er intet der binder det sammen. Kig i jeres diagramforklaring.
30.04.2018 - 12:31DROPS Design answered:
Hej Sara, undskyld, jeg forstod ikke at det var symbolteksterne der var fejl i. Nu er de rettet. Tak for info :)
04.05.2018 - 12:27
![]() Sarah wrote:
Sarah wrote:
Jeg er ikke super god til at læse diagrammer, men jeg regner mig heller ikke for rigtig dårlig. Men her forstår jeg slet ikke noget, jeg kan godt læse mig frem til jeg skal slå 64 masker op plus to vende masker, lave en fastmaske i 4. luftmaske fra nålen, men så skal jeg følge diagram A.1 A det er 100% luftmasker, jeg forstår simpelthen ikke hvordan der kan lade sig gøre?
16.04.2018 - 13:41DROPS Design answered:
Hei Sarah Den omgangen med luftmasker helt i bunnen av diagrammet er den luftmaskeraden du heklet til å begynne med. Den er der for å indikere hvilke masker du skal hekle staver/fastmasker osv i. Altså første rad av A.1.a begynner med en fastmaske i 4 luftmnasken fra nålen, 3 lm, 1 fm i neste lm, 3 lm, 1 fm i neste lm osv. God fornøyelse
25.04.2018 - 13:58Maria wrote:
Can I work this model with a group C yarn Instead of A+A+A?
16.03.2018 - 18:26DROPS Design answered:
Dear Maria, Yes you can, but please make sure you do a gauge swatch, then wahs and block it and do the necessary adjustments (about needle size and/or stitch counts) accordinly. Happy Knitting!
17.03.2018 - 12:00
![]() Jackie wrote:
Jackie wrote:
Want to make this for sure.
30.01.2018 - 00:58
![]() Irene wrote:
Irene wrote:
Love it!
21.01.2018 - 12:03
![]() Agata wrote:
Agata wrote:
Ciekawy wzór, super poncho, czy schemat pojawi się na stronie?
20.01.2018 - 10:43
![]() Pia wrote:
Pia wrote:
Så fin!
14.01.2018 - 09:48
![]() Victoria wrote:
Victoria wrote:
Mit Sicherheit auch für Anfänger gut ausführbar.
13.12.2017 - 20:38
|
||||||||||||||||
Netty#nettyponcho |
||||||||||||||||
 |
 |
|||||||||||||||
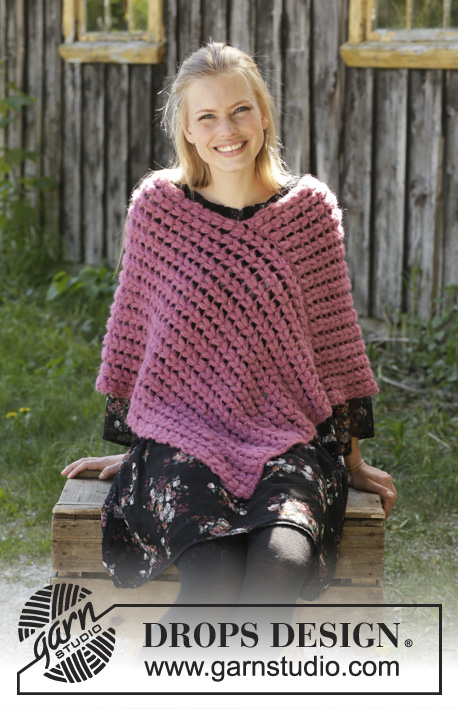
Crocheted poncho with lace pattern. Sizes S - XXXL. The piece is worked in DROPS Nord and DROPS Kid-Silk.
DROPS 188-23 |
||||||||||||||||
|
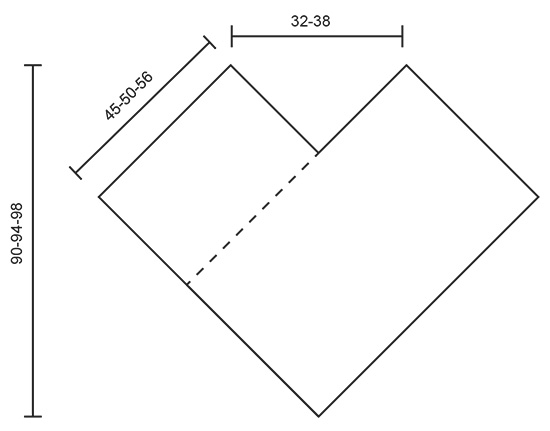
INFORMATION FOR THE PATTERN: PATTERN: See diagram A.1. Work as follows: Work A.1A, then repeat A.1B until there are 5 stitches remain, finish with A.1C over the last 5 stitches. --------------------------------------------------------- PONCHO: The poncho is worked as a scarf and sewn together to finish. So that the pattern on the poncho faces the same way when the poncho is worn, you work first from the middle and out towards the one side. Then you work in the row of chain stitches, from the middle and out towards the other side. REMEMBER THE CROCHET GAUGE! Work 64-72-80 LOOSE chain stitches (including 2 chain stitches to turn) with hook size 5 mm / H/8 and 1 strand Nord and 2 strands Kid-Silk (= 3 strands). Work as follows: A.1A (start with first single crochet in the 4th chain stitch from the hook), work A.1B 6-7-8 times, finish with A.1C. Continue A.1 upwards and repeat rows 2-5. When the piece measures approx. 70-75-80 cm / 27½"-29½"-31½" finish the piece – adjust so that you stop after row 5 in the pattern. Cut the strands. Then work in the opposite direction from the chain-stitch row – start in right corner and work as follows: ROW 1: 1 single crochet in the first chain stitch, 1 chain stitch, 1 single crochet in the next 4 chain stitches, * 4 chain stitches, skip 4 chain stitches, 1 single crochet in the next 4 chain stitches *, repeat from *-* a total of 7-8-9 times and finish with 1 chain stitch and 1 single crochet in the last stitch, turn piece. NEXT ROW: 3 chain stitches, skip the first single crochet, 1 single crochet in the next single crochet, * 3 chain stitches, 1 single crochet in the next stitch *, repeat from *-* a total of 2 times, 1 single crochet in the last single crochet, * 4 chain stitches, skip the chain-space with 4 chain stitches, 1 single crochet in the next single crochet, 3 chain stitches, 1 single crochet in the next single crochet, 3 chain stitches, 1 single crochet in the next single crochet, 3 chain stitches, 1 single crochet in the next single crochet *, repeat from *-* a total of 7-8-9 times and finish with 1 chain stitch and 1 slip stitch in the last stitch, turn the piece. Then repeat rows 2-5 as before. Continue like this until the piece measures 25-25-24 cm / 9¾"-9¾"-9½". Insert 1 marker in the side of the piece; it is here that the short side from part 1 will be sewn together with this side. When the piece measures the same on each side of the middle, finish the piece. The piece measures a total of approx. 140-150-160 cm / 55"-59"-63". ASSEMBLY: Sew the short side from the first part to the long side on the second part, from the marker in the side and down – see sketch (broken line = seam). The opposite long-side forms a tip mid front. CROCHET EDGE: Work a finishing edge around the neck and the bottom edge of the poncho with hook size 5 mm / H/8 and 1 strand Nord and 2 strands Kid-Silk as follows – start in the seam in the front of the poncho: ROUND 1: 1 single crochet in first stitch, 1 chain stitch, skip 1 stitch, * 4 single crochets around the next treble crochet/4-chain-space, 4 chain stitches, skip 4 chain stitches /1 treble crochet*, repeat from *-* and finish with 1 slip stitch in the first single crochet. ROUND 2: 3 chain stitches, skip the first single crochet, * 1 single crochet in the next single crochet, 3 chain stitches, 1 single crochet in the next single crochet, 3 chain stitches, 1 single crochet in the next single crochet, 3 chain stitches, 1 single crochet in the next single crochet, 4 chain stitches, skip 4 chain stitches *, repeat from *-* and finish with 1 slip stitch in the first chain stitch on the round. |
||||||||||||||||
Diagram explanations |
||||||||||||||||
|
||||||||||||||||
 |
||||||||||||||||
 |
||||||||||||||||
Have you finished this pattern?Tag your pictures with #dropspattern #nettyponcho or submit them to the #dropsfan gallery. Do you need help with this pattern?You'll find 4 tutorial videos, a Comments/Questions area and more by visiting the pattern on garnstudio.com. © 1982-2026 DROPS Design A/S. We reserve all rights. This document, including all its sub-sections, has copyrights. Read more about what you can do with our patterns at the bottom of each pattern on our site. |
||||||||||||||||


With over 40 years in knitting and crochet design, DROPS Design offers one of the most extensive collections of free patterns on the internet - translated to 17 languages. As of today we count 325 catalogs and 12298 patterns - 12288 of which are translated into English (US/in).
We work hard to bring you the best knitting and crochet have to offer, inspiration and advice as well as great quality yarns at incredible prices! Would you like to use our patterns for other than personal use? You can read what you are allowed to do in the Copyright text at the bottom of all our patterns. Happy crafting!
Post a comment to pattern DROPS 188-23
We would love to hear what you have to say about this pattern!
If you want to leave a question, please make sure you select the correct category in the form below, to speed up the answering process. Required fields are marked *.