
Popular categories
Looking for a yarn?


Comments / Questions (49)
![]() Virginia wrote:
Virginia wrote:
Buongiorno! Non riesco a capire come dovrei lavorare i giri con A4 e A5, potrei avere una descrizione dettagliata, per favore? Non mi tornano i gruppi di maglie alte doppie finali!! Sono meno di quelli che dovrebbero essere! Grazie in anticipo per l'aiuto! Buona giornata
09.04.2019 - 15:22DROPS Design answered:
Buongiorno Virginia. Purtroppo in questa sede non riusciamo a dettagliare le spiegazioni. Verifichi di aver aumentato i 7 archi di cat quando lavora la prima riga di A3 e di contare nei gruppi di m.a doppie anche quelle verso il collo. Per un aiuto più personalizzato , può contattare il suo rivenditore Drops di fiducia, mandando anche una fotografia del suo lavoro . Buon lavoro!
09.04.2019 - 21:43
![]() Stine wrote:
Stine wrote:
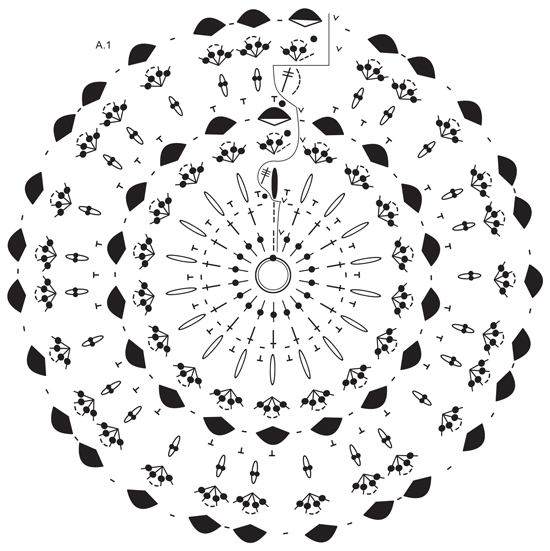
Hvor er diagram A1? Jeg skjønner ikke begynnelsen på oppskriften
30.03.2019 - 20:52DROPS Design answered:
Hej Stine, Du starter i midten af cirklen som er A.1 og følger diagrammet mod solen række for række. God fornøjelse!
05.04.2019 - 15:24
![]() MARITA PATRICIA wrote:
MARITA PATRICIA wrote:
La hice y me quedó hermosa!!
17.09.2018 - 08:50
![]() Elly wrote:
Elly wrote:
In het overzicht mis ik telpatroon A1. Ook in het printoverzicht. Hoop dat u mij snel kunt helpen; wil graag beginnen.
09.09.2018 - 18:35DROPS Design answered:
Dag Elly, A.1 staat helemaal bovenaan bij de telpatronen. Het is het cirkelvormige telpatroon.
12.09.2018 - 14:28
![]() Jessica wrote:
Jessica wrote:
Das hab ich ja eigentlich so gemacht. Fange ich bei der zweiten Runde Luftmaschenbögen in der letzten Doppelstäbchen Gruppe an wie üblich? Es wäre wirklich super wenn es ein Video für diesen Teil geben würde. Es sind nur insgesamt 6 Reihen zu machen, 2 mal Zunahmen und ich hänge seit Tagen an dieser Stelle fest
10.07.2018 - 15:51DROPS Design answered:
Liebe Jessica, die Doppelstäbchen Gruppe starten Sie am Anfang der Reihe wie im A.5 (= Rückreihe), dann wie zuvor im A.3 und dann wie im A.4 enden. 3. Reihe wird wie im A.4 angefangen und wie im A.5 enden. Viel Spaß beim häkeln!
11.07.2018 - 07:34
![]() Jessica wrote:
Jessica wrote:
So ich habe nochmal aufgeribbelt. Ich habe bei den 67 Stäbchen Gruppen 7 Luftmaschenbögen zugenommen wie beschrieben. Dann komme ich auf 74 Luftmaschenbögen. Da man nach A4 und A5 häkelt, Maschen überspringt damit der Übergang ja schöner aussieht, werden die Maschen ja weniger. Oder muss man wie vorher schonmal bei den Ärmelanfängen Doppelstäbchen zunehmen? Ich bin gerade wirklich überfordert.
10.07.2018 - 14:57DROPS Design answered:
Liebe Jessica, wenn Sie über die unteren 67 Stb-Gruppen häkeln, müssen Sie von Anfang an mit A.4/A.5 am Anfang/Ende jeder Reihe häkeln, es sind dann weniger Gruppen um die Zunahmen zu häkeln aber trotzdem 7 Lm-Bögen regelmäßig verteilt über die unteren Maschen/Stb-Gruppen häkeln. Viel Spaß beim häkeln!
10.07.2018 - 15:46
![]() Jessica wrote:
Jessica wrote:
Ich hab das genauso gemacht. Habe 7 Luftmaschenbögen zugenommen. Habe so angefangen und geendet wie beschrieben. Gleichzeitig mir die Bilder im Forum angeguckt. Ich hatte noch nie so Probleme beim häkeln. Dann muss ich nochmal schauen und vielleicht aufribbeln
10.07.2018 - 10:03
![]() Jessica wrote:
Jessica wrote:
Ich komme nur auf 117 Stäbchen Gruppen anstatt 122 die ich haben müsste nachdem das ovale gehäkelt wurde. Was mache ich falsch? Ich habe mir die Bilder angesehen die im Forum zur Verfügung stehen aber es wird ja nur die ersten 3 Reihen angezeigt. Ich weiß also nicht ob ich beim zweiten mal mit den Luftmaschenbögen richtig anfangen habe. Die Anleitung ist teilweise leider nicht so verständlich
09.07.2018 - 22:25DROPS Design answered:
Liebe Jessica, für die ovale Form häkeln Sie über die unteren 67 DStb-Gruppen (mit A.4 und A.5 anfangen/enden und A.3 inzwischen wiederholen); die 3 Reihe von A.3 wiederholen Sie 2 x gleichzeitig 7 Lm-Bögen bei jedem 1. Reihe zunehmen = es sind dann 81 DStb-Gruppen + die oberen 41 DStb-Gruppen = 122 DStb-Gruppen insgesamt. Wahscheinlich haben Sie irgendwie alle Zunahmen nicht gehäkelt. Viel Spaß beim häkeln!
10.07.2018 - 08:36
![]() Jessica Thum wrote:
Jessica Thum wrote:
Und wenn ich markiert habe für die ovale Form, zähle ich dann beide Seiten jeweils die Maschen weg oder das ich auf die insgesamte Summe komme? Denn es ist ja eine ungerade Zahl. Ich muss unten die 67 behäkeln und die 45 von Mitte bis Nacken nicht. Steh irgendwie auf dem Schlauch
05.07.2018 - 10:05DROPS Design answered:
Liebe Frau Thum, ja genau, Sie sollen 67 Stb-Gruppen unten und 45 Stb-Gruppen oben haben, und dann nur auf den unteren 67 Stb-Gruppe häkeln. Sollte es nicht genau die Mitte sein, ist auch schon ok und wird dann mit der Kante nicht bemerkt. Viel Spaß beim häkeln!
05.07.2018 - 13:19
![]() Jessica Thum wrote:
Jessica Thum wrote:
Danke. Und wie mache ich dann die 6 Reihen? Ich verstehe die Diagramme dazu nicht. Ich verstehe es so das ich mit 2 mal 6 Luftmaschen anfange und ende. Und bei Reihe 2 und 3 bzw 5 und 6 ich Luftmaschenbogen überspringen muss
05.07.2018 - 08:47DROPS Design answered:
Liebe Frau Thum, am Anfang der Reihe häkeln Sie A.4, dann A.3 wie früher wiederholen und mit A.5 enden (= A.4 und A.5 werden den ovalen Form geben). Von der Rückseite häkeln Sie zuerst A.5 dann A.3 und mit A.4 enden. Viel Spaß beim häkeln!
05.07.2018 - 10:04
|
||||||||||||||||||||||||||||||||||||||||||||||
Isla Bonita#islabonitajacket |
||||||||||||||||||||||||||||||||||||||||||||||
 |
 |
|||||||||||||||||||||||||||||||||||||||||||||
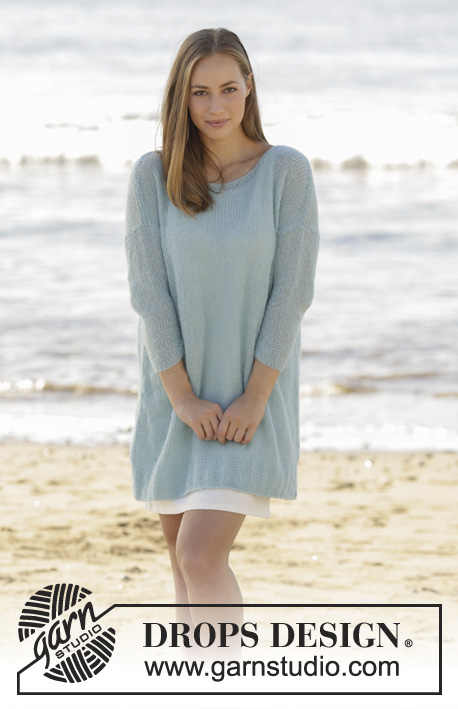
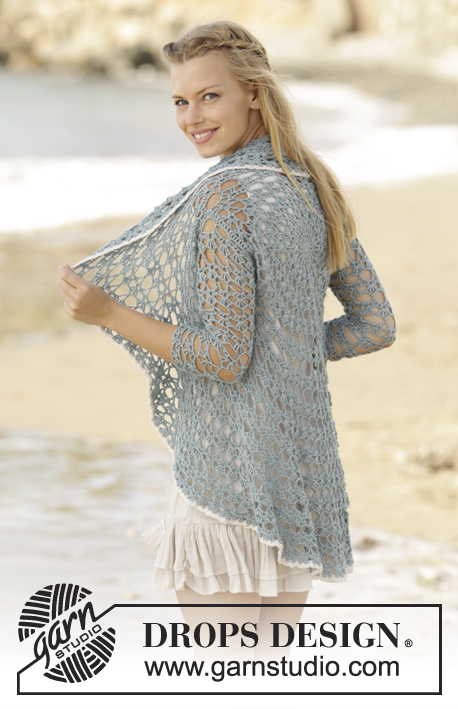
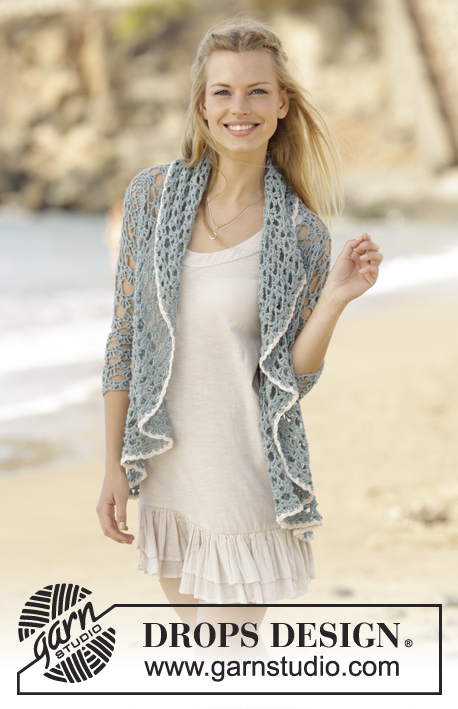
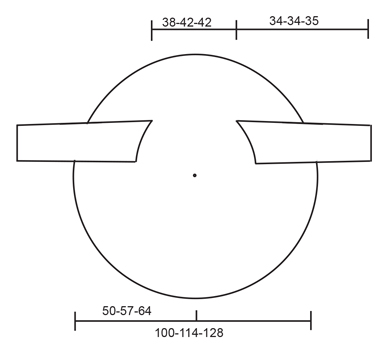
Crochet circle jacket in DROPS BabyMerino. Sizes S - XXXL.
DROPS 177-18 |
||||||||||||||||||||||||||||||||||||||||||||||
|
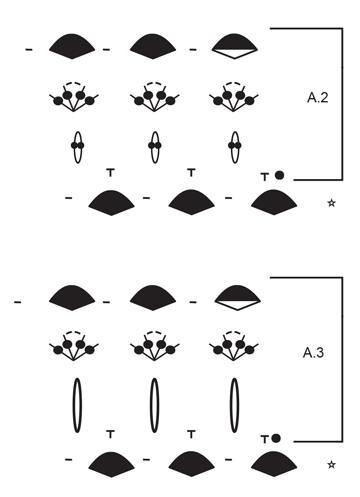
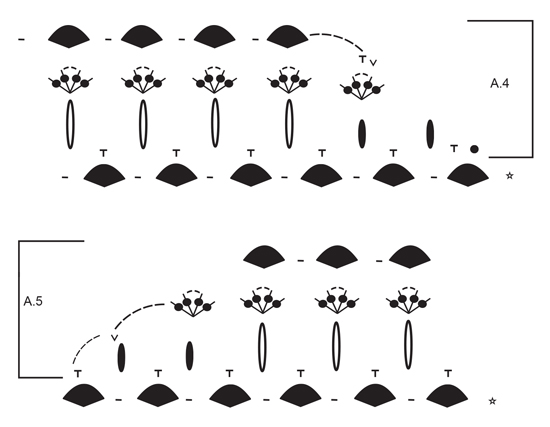
PATTERN: See diagrams A.1 to A.5. CROCHET INFO: The first single crochet at the beginning of the round is replaced by 1 chain stitch, the round is finished with 1 slip stitch in the 1st chain stitch at the beginning of the round. The first double crochet at the beginning of the round is replaced by 3 chain stitches, the round is finished with 1 slip stitch in the 3rd chain stitch at the beginning of the round. The first treble crochet at the beginning of the round is replaced by 4 chain stitches, the round is finished with 1 slip stitch in the 4th chain stitch at the beginning of the round. ---------------------------------------------------------- CIRCLE JACKET: Work 4 chain stitches with hook size 3.5 mm/E/4 and light sea green and form them to a ring with 1 slip stitch in the first chain stitch. Continue working according to diagram A.1. READ CROCHET INFO! REMEMBER THE CROCHET GAUGE! When A.1 has been completed, the circle measures approx. 26 cm / 10¼" in diameter and there are 27 treble crochet groups on the round. Work according to A.2, on the first round in A.2 increase 9 chain-spaces evenly along the round, increase in the same way as on round 6 in A.1, i.e. increase 1 chain-space as follows: work 1 single crochet around the chain-space in the middle of the treble crochet group, 9 chain stitches, 1 single crochet around the chain stitch between the treble crochet groups, 9 chain stitches, 1 single crochet around the chain-space in the middle of the next treble crochet group = 36 chain-spaces. Complete A.2 1 time in height. Sizes L/XL-XXL/XXXL: When A.2 has been completed 1 time in height, continue working according to A.3, increase in the same way as in A.2 – work 1 double crochet group more between each increase, every time you increase = 45-45 treble crochet groups. ALL SIZES: = 36-45-45 treble crochet groups. The next round is worked in the same way as round 1 in A.3, AT THE SAME TIME work the armholes as follows: 1 single crochet around the chain-space in the middle of the treble crochet group, work 33-36-39 loose chain stitches, skip 6-7-8 treble crochet groups, 1 single crochet around the chain-space in the middle of the next treble crochet group (you have now worked one armhole), * 12 chain stitches, 1 single crochet around the chain-space in the middle of the next treble crochet group *, repeat from *-* in total 14-20-18 times, work 33-36-39 loose chain stitches, skip 6-7-8 treble crochet groups, 1 single crochet around the chain-space in the middle of the next treble crochet group (you have now worked one more armhole), * 12 chain stitches, 1 single crochet around the chain-space in the middle of the next treble crochet group *, repeat from *-* to the end of the round, but finish with 1 slip stitch in the first single crochet at the beginning of the round (instead of 1 single crochet around the next chain-space). The next round is worked in the same way as round 2 in A.3 as follows: work in the same way as before with 2 double crochet + 2 chain stitches + 2 double crochet around each chain-space, around each chain-space for the armhole work 7-8-9 double crochet groups, AT THE SAME TIME increase 9 double crochet groups evenly along the round, increase 1 double crochet group by working 2 double crochet + 2 chain stitches + 2 double crochet + 2 double crochet + 2 chain stitches + 2 double crochet around 1 chain-space = 45-54-54 double crochet groups. ROUND 3: Work 2 treble crochet + 2 chain stitches + 2 treble crochet around the chain-space in the middle of each double crochet group and 1 chain stitch between each treble crochet group = 45-54-54 treble crochet groups with 1 chain stitch between each. Continue to work according to A.3, AT THE SAME TIME increase 9 chain-spaces evenly along the round each time you work round 1 as follows: ROUND 1: Work slip stitches to the middle of the first chain-space (in the middle of a treble crochet group), 1 single crochet, * 12 chain stitches, 1 single crochet around the next chain-space in the middle of a treble crochet group *, repeat from *-* the whole round AT THE SAME TIME as you increase 9 chain-spaces evenly along the round = 54-63-63 chain-spaces (finish the round with 6 chain stitches and 1 double treble crochet in the first single crochet at the beginning of the round). ROUND 2: Work 2 double crochet + 2 chain stitches + 2 double crochet around each chain-space the complete round = 54-63-63 double crochet groups. ROUND 3: Work 2 treble crochet + 2 chain stitches + 2 treble crochet around each chain-space in the middle of the double crochet group and 1 chain stitch between each treble crochet group the whole round = 54-63-63 treble crochet groups with 1 chain stitch between each. Repeat 1st-3rd round 5-5-6 times more, AT THE SAME TIME increase 9 chain-spaces every time you work round 1 = 99-108-117 treble crochet groups. So that the jacket is given an oval shape, continue by working back and forth over only the bottom 62-67-72 treble crochet groups, do not work over the middle 37-41-45 treble crochet groups at the top of the neck. Start from the right side and repeat rows 1-3 in A.3 as before a total of 2 times (i.e. the back piece gets 6 more rows in height), to get a neat transition every time you turn the piece, work as shown in A.4 and A.5, AT THE SAME TIME increase 7 chain-spaces every time you work row 1 (= a total of 113-122-131 treble crochet groups on the round including the treble crochet groups towards the neck). To finish, work 2 rounds with chain-spaces around the whole jacket (from the right side) as follows – work with powder: ROUND 1: * 4 chain stitches, 1 single crochet around the chain-space in the middle of one treble crochet group, 4 chain stitches, 1 single crochet around next chain-space (between 2 treble crochet groups *, repeat from *-* the whole round. ROUND 2: *4 chain stitches, 1 single crochet in single crochet *, repeat from *-*- the complete round and finish with 1 single crochet in the last single crochet. Cut and fasten the strand. SLEEVES: Crochet up 66-72-78 double crochet around the armhole (approx. 5 double crochet in each treble crochet group and approx. 33-36-39 double crochet around the chain-space – start mid under the sleeve). The next round is worked as follows: * 1 double crochet in the first/ next double crochet, 1 chain stitch, skip 1 double crochet *, repeat from *-* the whole round = 33-36-39 double crochet + 33-36-39 chain stitches. Continue working as follows: ROUND 1: * 6 chain stitches, skip 5 double crochet/chain stitches, 1 single crochet in the next double crochet/chain stitch *, repeat from *-* the whole round = 11-12-13 chain-spaces. ROUND 2: Work 2 double crochet + 2 chain stitches + 2 double crochet around each chain-space the whole round = 11-12-13 double crochet groups. ROUND 3: Work 2 treble crochet + 2 chain stitches + 2 treble crochet around each chain-space in the middle of the double crochet group and 1 chain stitch between each treble crochet group the whole round = 11-12-13 treble crochet groups with 1 chain stitch between each. ROUND 4: * 12 chain stitches, 1 single crochet around the chain-space in the middle of the treble crochet group *, repeat from *-* the whole round = 11-12-13 chain-spaces, but decrease at the same time 1 chain-space on the round mid under the sleeve as follows: 1 single crochet around the chain-space in the middle of the next-to-last treble crochet group on the round, 6 chain stitches, 1 double crochet around the chain-space in the middle of the treble crochet group to be skipped, 6 chain stitches, 1 single crochet around the chain-space in the middle of the next treble crochet group = 10-11-12 treble crochet groups. Repeat rounds 2-4 and decrease at the same time 1 chain-space every 3rd round so that for each repeat in height there will be 1 treble crochet group/chain-space less on the round. When there are 6-7-8 treble crochet groups/chain-spaces on the round, continue working without decreases until the sleeve measures 34-34-35 cm / 13½"-13½"-13¾", or to desired length, try the jacket on as you go. Cut and fasten the strand and repeat on the other sleeve. |
||||||||||||||||||||||||||||||||||||||||||||||
Diagram explanations |
||||||||||||||||||||||||||||||||||||||||||||||
|
||||||||||||||||||||||||||||||||||||||||||||||
 |
||||||||||||||||||||||||||||||||||||||||||||||
 |
||||||||||||||||||||||||||||||||||||||||||||||
 |
||||||||||||||||||||||||||||||||||||||||||||||
 |
||||||||||||||||||||||||||||||||||||||||||||||
Have you finished this pattern?Tag your pictures with #dropspattern #islabonitajacket or submit them to the #dropsfan gallery. Do you need help with this pattern?You'll find 6 tutorial videos, a Comments/Questions area and more by visiting the pattern on garnstudio.com. © 1982-2026 DROPS Design A/S. We reserve all rights. This document, including all its sub-sections, has copyrights. Read more about what you can do with our patterns at the bottom of each pattern on our site. |
||||||||||||||||||||||||||||||||||||||||||||||


With over 40 years in knitting and crochet design, DROPS Design offers one of the most extensive collections of free patterns on the internet - translated to 17 languages. As of today we count 324 catalogs and 12290 patterns - 12280 of which are translated into English (US/in).
We work hard to bring you the best knitting and crochet have to offer, inspiration and advice as well as great quality yarns at incredible prices! Would you like to use our patterns for other than personal use? You can read what you are allowed to do in the Copyright text at the bottom of all our patterns. Happy crafting!
Post a comment to pattern DROPS 177-18
We would love to hear what you have to say about this pattern!
If you want to leave a question, please make sure you select the correct category in the form below, to speed up the answering process. Required fields are marked *.