
Popular categories
Looking for a yarn?


Comments / Questions (86)
![]() Moon wrote:
Moon wrote:
Hoe haak ik het telpatroon
15.04.2026 - 22:14DROPS Design answered:
Dag Moon,
Bij de veel gestelde vragen (FAQ link bovenaan bij het patroon) vind je antwoord op hoe je haakt volgens een telpatroon.
03.05.2026 - 18:14
![]() Hilde wrote:
Hilde wrote:
Jeg har heklet 2 omg. og skal begynne å øke til raglan - kommer denne økningen i tillegg til «øk slik på forstk og bakst»?
16.02.2026 - 21:45DROPS Design answered:
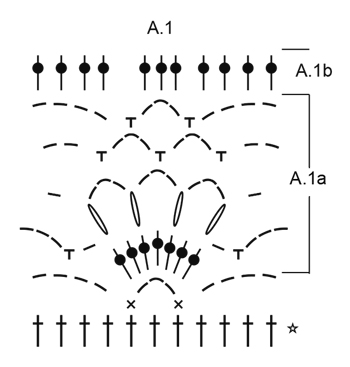
Hei Hilde, Raglanøkningene er forskjellige på for- og bakstykket og på ermene. Så "øke slik ......" er en videre forklaring på hvordan man øke til raglan på disse stykkene. Du enten øker 2 staver på hver side av A.1 eller 1 stav på hver side av A.1, på for- og bakstykkene og på ermene, som forklart i denne delen av teksten. Hilsen Drops Team..
17.02.2026 - 06:43
![]() Maria wrote:
Maria wrote:
Tack för finna mönster. Jag har en fråga. Är A1a 4 varv?
17.12.2025 - 14:05DROPS Design answered:
Hei Maria. Ja, det stemmer, 4 varv. mvh DROPS Design
22.12.2025 - 10:55
![]() Karin wrote:
Karin wrote:
Hej, en fråga efter följande förklaring... När A.1 har virkats 1 gång på höjden, repeteras A.1a över A.1. Efter alla ökningarna är det 80-88-98-108-122-136 st på framst och bakst, Frågan är, ska jag upprepa bara A1a flera gånger, inte A1b? Tack för bra och fina mönster 😊
16.12.2025 - 15:28DROPS Design answered:
Hei Karin. A.1a repeteres i høyden. A.1b hekles kun på ermkanten. mvh DROPS Design
22.12.2025 - 10:44
![]() Maria wrote:
Maria wrote:
Hej, förstår inte hur jag ska tolka detta: ÖKA SÅ HÄR PÅ FRAMST OCH BAKST: Öka 2 st på varje v totalt 3-4-7-9-13-16 ggr, sedan 1 st på varje v totalt 12-12-10-9-6-5 ggr. Jag tolkar det som att jag ska virka 4 varv med 2st ökning (på båda sidor av raglan) och 12 varv med 1 st ökning (på båda sidor av raglan). Men då avslutas dessa varv mitt i tredje varvet av 1a, med rätt antal maskor. Virkar storlek M. Vad har jag inte förstått?
13.12.2025 - 22:37DROPS Design answered:
Hei Maria. Da kan du hekle siste omgang av A.1a uten økning. Deretter hekler du omgangen som begynner med: Nästa v virkas så här: Virka 1 st i var och en av de första 40-44-49-54-61-68 st, virka 8 lm (= under ärmen), sätt 1 markör... mvh DROPS Design
15.12.2025 - 11:46
![]() Annie wrote:
Annie wrote:
Hi, I have similar problem as the question before but also, do I increase both for raglan and the other instructions for arms and front and back, or is it two explanations for the same thing? 🤔
08.12.2025 - 12:21DROPS Design answered:
Dear Annie, you increase at the same time for front/back pieces and for sleeves but not at the same rythm, check out for your size, so you might have to increase 2 sts for front/back pieces but only 1 for sleeves, or 2 for each piece. Happy crocheting!
08.12.2025 - 16:16
![]() Mary wrote:
Mary wrote:
Hello, I struggle understand how to increase 2 stitches before and after raglan as well as increase 1 stich before and after raglan. It says 1A on both instructions.
08.12.2025 - 09:43DROPS Design answered:
Dear Mary, depending on your size you will increase first 2 sts on front/back piece 3 to 16 times (see size) on every round then only 1 stitch 12 - 5 times on every round; and at the same time, increase on sleeves 2 sts 0 to 4 times on every round then 15-17times 1 st on every round, see under YOKE. Happy crocheting!
08.12.2025 - 16:08
![]() Monica wrote:
Monica wrote:
Hej. Jag har virkat klart toppen och märker nu att de tre luftmaskorna som ska utgöra den första stolpen på varje nytt varv, har "flyttat" sig ett steg åt vänster. Det blir som en rand som går snett nedåt vänster och den syns tydligt på baksidan och är inte snyggt. Varför har det blivit så? Hur kan jag rätta till det?
05.10.2025 - 21:06
![]() Monica wrote:
Monica wrote:
Hej. Jag har virkat klart toppen och märker nu att de tre luftmaskorna som ska utgöra den första stolpen på varje nytt varv, har "flyttat" sig ett steg åt vänster med början troligen från det att ökningarna skulle göras fram till slutet. Det syns tydligt på baksidan och är inte snyggt. Varför har det blivit så? Hur kan jag rätta till det?
18.09.2025 - 20:19DROPS Design answered:
Hei Monica. Mulig du har "hoppet" over 1 maske på begynnelsen av hver omgang, slik at det har forskjøvet seg og det har blitt en skrå linje. mvh DROPS Design
06.10.2025 - 09:49
![]() Anette wrote:
Anette wrote:
Hallo liebes Drops-Team, Ich soll nach Anleitung an den MARKIERERN zunehmen, es ist nicht beschrieben, wo sie zu setzen sind? LG Anette
12.09.2025 - 12:33DROPS Design answered:
Liebe Anette, das Setzen der Markierer wird über dem Abschnitt, der über RUMPFTEIL steht, genannt. Viel Spaß beim Weiterhäkeln!
16.09.2025 - 10:06
|
||||||||||||||||||||||
Warm Apricot |
||||||||||||||||||||||
|
|
||||||||||||||||||||||
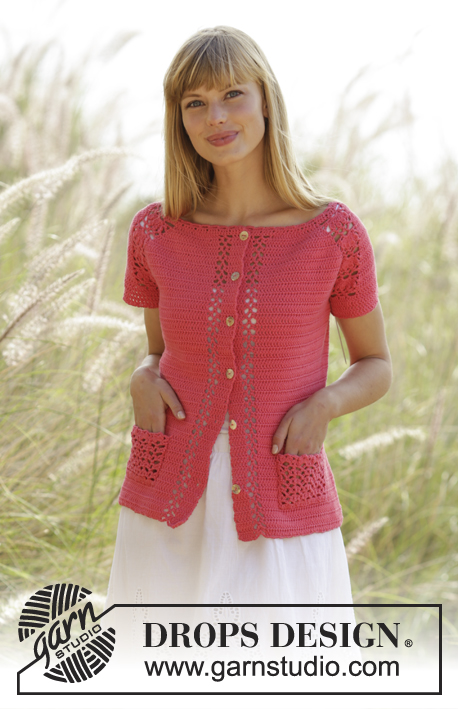
Crochet DROPS top with lace pattern and raglan in ”Safran”. The piece is worked top down. Size: S - XXXL.
DROPS Extra 0-1287 |
||||||||||||||||||||||
|
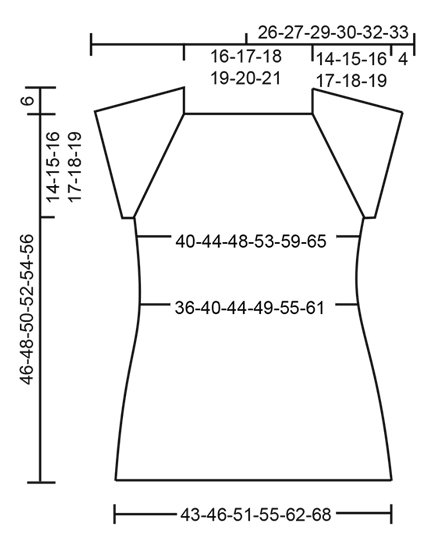
PATTERN: See diagrams A.1. CROCHET INFO: Replace first dc at on every dc round with ch 3, finish the round with 1 sl st in 3rd ch from beg of round. On every sc round, replace first sc with 1 ch and finish round with 1 sl st in 1st ch from beg of round. INCREASE TIP-1: Inc 1 dc by working 2 dc in same dc. INCREASE TIP-2 (applies to sides of body): Work until 3 dc remain before marker thread, work 2 dc in next dc (= 1 dc inc), work 1 dc in each of the next 4 dc (marker thread is in the middle of these sts), work 2 dc in next dc (= 1 dc inc). RAGLAN: Inc for raglan on each side of A.1. Inc 2 sts BEFORE A.1 as follows: Work until 2 dc remain before A.1, work 2 dc in each of the next 2 dc (= 2 dc inc). Inc 2 sts AFTER A.1 as follows: Work 2 dc in each of the first 2 dc after A.1 (= 2 dc inc). Inc 1 sts BEFORE A.1 as follows: Work until 1 dc remains before A.1, work 2 dc in next dc (= 1 dc inc). Inc 1 sts AFTER A.1 as follows: Work 2 dc in first dc after A.1 (= 1 dc inc). The inc on body and sleeves are uneven as explained in pattern. DECREASE TIP: Work until 4 dc remain before marker thread, work the next 2 dc tog as follows: Work 1 dc in next dc but wait with last pull through (= 2 sts on hook), work 1 dc in next dc, but on last pull through pull yarn through all sts on hook - 1 dc have been dec, work 1 dc in each of the next 4 dc (marker thread is between these sts), work the next 2 dc tog (= 1 dc dec). ---------------------------------------------------------- YOKE: The piece is worked top down. Work 160-165-170-175-180-185 ch on hook size 3.5 mm = US E/4 with Safran and join in the round with 1 sl st in the first ch. Read CROCHET INFO and crochet next round as follows: 1 dc in each of the first/next 4 ch, skip next ch*, crochet from *-* all the round = 128-132-136-140- 144-148 dc. Then work next round as follows: Work 1 dc in each of the first 18-19-20-21-22-23 dc AT THE SAME TIME inc 4-5-5-6-7-8 dc evenly – READ INCREASE TIP-1 – (= half back piece), A.1 over the next 11 dc, 2 dc in next dc, 1 dc in each of the next 4 dc, 2 dc in next dc, A.1 over the next 11 dc (= sleeve), 1 dc in each of the next 36-38-40-42-44-46 dc AT THE SAME TIME inc 8-10-10-12-14-16 dc evenly (= front piece), A.1 over the next 11 dc, 2 dc in next dc, 1 dc in each of the next 4 dc, 2 dc in next dc, A.1 over the next 11 dc (= sleeve), 1 dc in each of the last 18-19-20-21-22-23 dc AT THE SAME TIME inc 4-5-5-6-7-8 dc evenly. On front and back piece there are now 44-48-50-54-58-62 dc and on sleeve there are A.1, 8 dc and A.1. On next round inc for RAGLAN – see explanation above! INC AS FOLLOWS ON FRONT AND BACK PIECE: Inc 2 dc every round 3-4-7-9-13-16 times in total, then 1 dc every round 12-12-10-9-6-5 times in total. INC AS FOLLOWS ON SLEEVES: Inc 2 dc every round 0-0-1-3-4-4 times in total, then 1 dc every round 15-16-16-15-15-17 times in total. REMEMBER THE CROCHET GAUGE! When A.1 have been worked 1 time vertically, repeat A.1a over A.1. After all inc there are 80-88-98-108-122-136 dc on front piece and back piece, on sleeve there are A.1, 38-40-44-50-54-58 dc and A.1. Piece measures approx. 14-15-16-17-18-19 cm / 5½"-6"-6¼"-6¾"-7"-7½". Work next round as follows: Work 1 dc in each of the first 40-44-49-54-61-68 dc, work 8 ch (= under sleeve), insert 1 marker thread in the middle between the new ch, skip: A.1a, 38-40-44-50-54-58 dc and A.1a (= sleeve), work 1 dc in each of the next 80-88-98-108-122-136 dc, 8 ch (= under sleeve), insert 1 marker thread in the middle of the new sts, skip: A.1a and 38-40-44-50-54-58 dc and A.1a (= sleeve), work 1 dc in each of the next 40-44-49-54-61-68 dc = 160-176-196-216-244-272 dc and 16 ch. Insert 1 marker in piece, NOW MEASURE PIECE FROM HERE. Move marker threads when working, leave the marker in piece. BODY: Work 1 dc in every dc, 1 dc in every ch. There are 88-96-106-116-130-144 dc between marker threads on back piece and front piece. When piece measures 3 cm / 1" (measured from marker), dec 1 st on each side of each marker thread in the side (= 4 sts dec) - READ DECREASE TIP! Repeat dec every 4-4-3½-4½-4½-4½ cm / 1½"-1½"-1¼"-1¾"-1¾"-1¾" 3-3-4-3-3-4 more times = 160-176-192-216-244-268 dc in total. When piece measures 17-18-19-20-21-22 cm / 6¾"-7"-7½"-8"-8¼"-8¾" (measured from marker), inc 1 st on each side of each marker thread (= 4 dc inc) – see INCREASE TIP-2. Repeat inc every 1½ cm / ½" 6-6-7-6-6-7 more times = 188-204-224-244-272-300 dc. Continue with 1 dc in every dc until piece measures 32-33-34-35-36-37 cm / 12½"-13½"-13⅜"-13¾"-14¼"-14½" (measured from marker). Piece measures approx. 46-48-50-52-54-56 cm / 18"-19"-19¾"-20½"-21¼"-22" in total from neck edge. Work 1 edge around the top as follows: Work * 1 sc in first/next dc, ch 4, skip approx. 1 cm / ⅜" *, repeat from *-* around the entire top. Fasten off. SLEEVE EDGE: Sleeve is worked in the round, top down. Beg by working mid under sleeve as follows: Work 1 sc in 5th ch of the 8 ch worked in armhole on body. Work 3 ch (= 1 dc). Then work with 1 dc in each of the next ch 3, A.1a as before, 1 dc in each of the next 38-40-44-50-54-58 dc, A.1a as before, 1 dc in each of the last 4 ch under sleeve, finish with 1 sl st in 3rd ch at beg of round. Work 1 dc in every dc and A.1a until 1 whole repetition of A.1a has been worked. Then work 1 dc in every dc, work A.1b over A.1a = 68-70-74-80-84-88 dc. On next round work 1 dc in every dc AT THE SAME TIME dec 12 dc evenly = 56-58-62-68-72-76 dc. Work 1 dc in every dc until sleeve edge measures approx. 4 cm / 1½". Work * 1 sc in first/next dc, ch 4, skip approx. 1 cm / ⅜" *, repeat from *-* around the entire sleeve. Fasten off. Work a sleeve edge around the other sleeve. NECK EDGE: Beg mid back. Work ch 1, * 1 sc in first/next dc, ch 4, skip approx. 1 cm / ⅜" *, repeat from *-* around the entire neck, finish with 1 sl st in first ch, make sure to avoid a tight neck edge. |
||||||||||||||||||||||
Diagram explanations |
||||||||||||||||||||||
|
||||||||||||||||||||||
 |
||||||||||||||||||||||
 |
||||||||||||||||||||||
Have you finished this pattern?Tag your pictures with #dropspattern or submit them to the #dropsfan gallery. Do you need help with this pattern?You'll find 13 tutorial videos, a Comments/Questions area and more by visiting the pattern on garnstudio.com. © 1982-2026 DROPS Design A/S. We reserve all rights. This document, including all its sub-sections, has copyrights. Read more about what you can do with our patterns at the bottom of each pattern on our site. |
||||||||||||||||||||||


With over 40 years in knitting and crochet design, DROPS Design offers one of the most extensive collections of free patterns on the internet - translated to 17 languages. As of today we count 324 catalogs and 12290 patterns - 12280 of which are translated into English (US/in).
We work hard to bring you the best knitting and crochet have to offer, inspiration and advice as well as great quality yarns at incredible prices! Would you like to use our patterns for other than personal use? You can read what you are allowed to do in the Copyright text at the bottom of all our patterns. Happy crafting!
Post a comment to pattern DROPS Extra 0-1287
We would love to hear what you have to say about this pattern!
If you want to leave a question, please make sure you select the correct category in the form below, to speed up the answering process. Required fields are marked *.